When you click on links to various merchants on this site and make a purchase, this can result in this site earning a commission. Affiliate programs and affiliations include, but are not limited to, the eBay Partner Network.
I went with Clifford Performance's 16ga. steel headers, for less than that new HD exhaust. They are split with two 2.5" collectors which can blend into one 3" exhaust.. I regret not wrapping them with heat shield fiberglass cloth, but that is another project for next time I have them off...
BTW.. that is a purdy motor..
With many of the pre efi engines an oil leak is diagnosed as being due to a bad rear main seal.
But actually, the problem may be the multi-piece pan gasket of the early engines. To bypass this issue, it is easy to convert your pan so that it can use the efi era one piece pan gasket.
Simply grind off the raised tabs at each bolt hole. Clean the pan of any metal filings/grindings, and install the one piece.
*Also, to prevent the bolts from localizing the torque when tightened, at the junkyard remove the long metal inserts that border the pan. The bolts are then inserted through these efi era slats, and into their holes. The slats distribute the pressure, much like the slats used on valve covers.
Way good tip amigo, and I am going to look for the long slat style 'washer' for my old '68 300 IL 6. Even after a fresh engine rebuild, and very careful cleaning & gasket prep, my engine started weeping a bit in short order. Because my truck is a 4x4, I am not sure if I can pull the pan, with the engine in the truck..?? I will put up with the weeping if engine pulling is required, until the next time I have to pull it .. hopefully some years from now..
Fishnut: You don't need to pull the engine. Just get two 1" thick pieces of wood, undo the motor mount nuts, jack up the engine and shove those blocks between the frame and mount, then let your jack down. That gives me enough to pull my pan, but it's messy work.
I like to use 3m weatherstrip adhesive and adhere the gasket to the pan, and let it dry well. Then I put it on. That's the trick! The one piece is much better.
Also, during the efi years the Lords at Ford put a one piece rail on either side of the pan. If you find a set of those they help.
Thanks F250, and congratulations on living in a small Mexican fishing village. We do too, and absolutely love it . La Ribera, is about 6 0 miles NE from Cabo san Lucas. Just far enough to keep the crazy tourist throng at arm's length. We are on the Sea of Cortez, not the Pacific, which is warmer, and calmer most of the time.. Most years, we spend 2, four month stays, or a little more, depending upon other factors in our schedules. Being retired makes us flexible.
I will try the wood block idea. My '68 4x4 has the Dana 44 HD front axle, with the 12 bolt, closed knuckle hubs. it also has the Np 435 four speed, so I am trying to picture it in my mind, and am thinking that I may have to pull the center console cover, to get 2" or so of clearance. We are in FW Texas at the moment, but will be home in Baja soon. I will sort it out then..
This weekend I pulled the old crankshaft timing gear with a tool rented from the local auto parts store, but they didn't have an installation tool. After pulling the old gear, I was searching my limited supplies in my garage for something that might give me the reach to "push" the new gear in place. This is what I came up with:
I used the crankshaft damper bolt and washer, camshaft cover plate (though not really necessary), the old timing gear, and a few sockets of the same length. I think you can imagine the process from the photo (below) -- tightening the bolt pressed on the old gear, which pressed on the sockets, which pressed on the cam plate, which pressed the new gear in place. Worked like a charm!
And, in case you were wondering - yes, I am replacing the cam gear as well with a matching tooth ratio :-)
There's an article on my blog with a lot of general info about beefing up the 300. Parts numbers, etc., and the tech info is mostly in the back of the article. It first appeared in True Blue Trucks magazine.
I've been re-reading the tips section and saw this post. Interested, I went in search and could not find the 300 article, although many interesting stories real and fictional about the Caribbean and Denmark. Could you please point to the exact blog post; yr, date, etc? I concentrated on 2014 back (date of FTE post).
This weekend I pulled the old crankshaft timing gear with a tool rented from the local auto parts store, but they didn't have an installation tool. After pulling the old gear, I was searching my limited supplies in my garage for something that might give me the reach to "push" the new gear in place. This is what I came up with:
I used the crankshaft damper bolt and washer, camshaft cover plate (though not really necessary), the old timing gear, and a few sockets of the same length. I think you can imagine the process from the photo (below) -- tightening the bolt pressed on the old gear, which pressed on the sockets, which pressed on the cam plate, which pressed the new gear in place. Worked like a charm!
And, in case you were wondering - yes, I am replacing the cam gear as well with a matching tooth ratio :-)
You just did the #1 NO NO! You never use the crank bolt to press the gears or balancer on to the crank.
You were lucky you did not hurt the threads in the crank or the bolt threads and end up with a large paper weight.
Originally Posted by 1986F150six
That is certainly thinking "outside the box"!
Sometimes out side the box is not the way to do it.
See the above answer.
Dave ----
I totally understand. I have a lot of experience with related topics, having worked in a machine shop for many years. This has given me a better "feel" for avoiding thread damage (I've had my fair share).
I would not have attempted if:
1. The cam bolt / crank threads were course instead of fine
2. I did not have adequate thread engagement at the start, or
3. If I had felt "too much" resistance at any point while tightening.
I was very slow and steady, kept my hand as close to the center of the 1/2" drive ratchet as possible (shortest moment arm), and applied minimum rotating pressure. If I had, at any point, felt binding or significant resistance, I would have immediately stopped and found a better way (going to the auto parts and renting a tool, for example). I absolutely did not want a paper weight!!!
In retrospect, these points are important and should've been included in my original post. And I guess I should state that this is not the best or proper way to do it. But in a pinch, and with care, it worked without problem for me. I am lucky that it worked as well as it did and that I didn't have to stop and run to the auto parts to rent/buy a tool.
Adam, That's pretty much how I have been installing mine for forever - using the crank threads. [How else could it be done if the gear was being changed with the engine still in the vehicle? Remove and disassemble the engine???] I do have a few spacers of different heights so I can start with enough thread engagement to prevent crank damage and then switch to a thicker spacer as the gear is pressed further on the crank.
I was installing my pistons and was looking for something to protect the crankshaft journals from scoring / damage by the connecting rod bolts. I was first looking at cutting pieces of old vacuum hose (since I plan to replace it anyway), but found that the spark plug boots were 'pre-cut' and ready to use. Worked well One note: despite what the picture shows, I found it worked even better - and was easier to remove - when I only put on the spark plug boots on the lowest 1/3 of the connecting rod bolts.
Nothing earth-shattering here, but maybe it helps someone. FYI - I have a new set of spark plug wires which I will use, but I wouldn't see an issue with re-using these boots if someone had to. Sets might vary, but I didn't damage or destroy anything on my old set when I pulled them off the wires.
Last edited by 81F(ranken)100; Aug 27, 2018 at 10:02 AM.
Reason: English should be my first language......
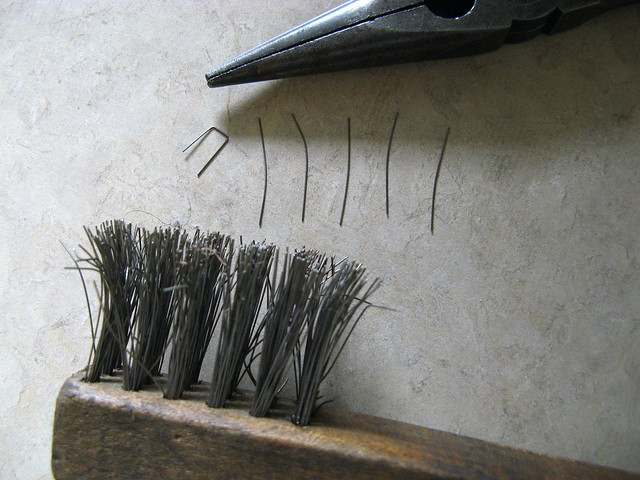
I want to share a tip I discovered. Probably out of a long ago Sunday-nite-stores-closed need to fix plug wires. Ninety nine percent of the defective plug wires I've fixed had failed at the terminal juncture. Especially true with supression core wires. I came up with this method to fix them.
Use a strand of a wire brush. Break it off with needle nose pliers.
bend it into a "U" shape with one leg about 3/8" long and one leg about 1/4" long with the middle section about 1/8".
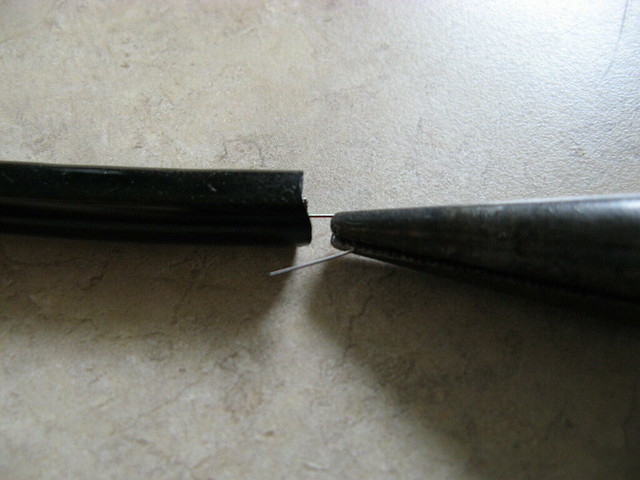
Carefully insert the long end into the conductor core until the U bottoms out .
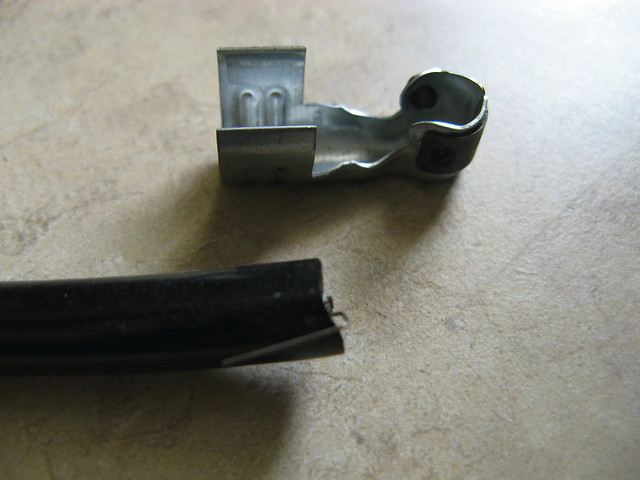
Crimp the terminal end over the shorter end.
That wire will never fail at the terminal end again.
This Hennessey Takes the Expedition Tremor's Off-Roading Capability to the Next Level
Slideshow: The VelociRaptor Expedition gains a lift, upgraded suspension, Brembo brakes, and trail-ready equipment while retaining the stock 440-horsepower EcoBoost V6.
Rezvani's Latest Post-Apocalyptic Monster Is a Ford F-150 Raptor Underneath
Slideshow: Called the Fortress, the 850-horsepower pickup combines Raptor underpinnings with military-inspired features, survival equipment, and a starting price of $285,000.


 One note: despite what the picture shows, I found it worked even better - and was easier to remove - when I only put on the spark plug boots on the lowest 1/3 of the connecting rod bolts.