


Yet another 'what carb' - Motorcraft/Holley

Thread Starter
|
Junior User
Joined: Oct 2005
Posts: 61
Likes: 0
From: Arvada, CO
Yet another 'what carb' - Motorcraft/Holley
I've read thru all the "what carb do I have" questions and hesitate to post another, but here goes -
1983 E-350 460, "Manufactured by Holley for Motorcraft"
tag says:
MOTORCRAFT
E3TE RC
B 3D29
stamped on the air horn:
E3TE-9510-RC
LIST-50003
1193
the other burning question is - how are all these questions answered? Is there some batman decoder ring for the part number cross-reference somewhere?
Best sources for a rebuild kit? This is a Class C RV, currently driven from about 5500' to 10,000' elevation, but I'm talking with a potential buyer who lives at sea level. Thoughts? Leave it jetted as-is or ?
Thanks!
Greg
Thread Starter
|
Junior User
Joined: Oct 2005
Posts: 61
Likes: 0
From: Arvada, CO
I just called Holley - the tech support guy told me "that number doesn't cross directly to a Holley carb model number, but the rebuilt kit is Holley 3-1364".
A few parts houses don't recognize that number, but one told me it's been superceded by 3-1363.
Prices range from $30 at Advance Auto to $60 at CarQuest to $71 at NAPA. Seems pretty odd to have that big a spread for (hopefully) the same kit. Also seems very high to me for a carb rebuild kit, too, but I haven't done a carb in 30 years so maybe that's the going price?
Edit - further research says this is the Holley 4180C carb - wonder why the Holley tech guy couldn't find that?
MSEE
Joined: Apr 2004
Posts: 10,386
Likes: 35
From: Austin, TX

Advance, Carquest and Napa will probably try to sell you their house brand kit instead of a Holley kit, which would explain the price differences. Napa, although usually quite expensive, has the best kits in my opinion. The best option of course would be to try and get an actual Holley kit, however you want to go about that.
Thread Starter
|
Junior User
Joined: Oct 2005
Posts: 61
Likes: 0
From: Arvada, CO
Thanks - Advance Auto is listed as the nearest Holley distributor from the Holley website - I'll have to call and confirm this is the genuine Holley Renew kit ...
Now that I'm using Holley 4180C in the search, I'm finding a number of hits from the big names; Jegs, Summit etc ... all around mid-$50
Edit - well either Holley (or most likely me) transposed the kit number - the correct kit is 3-1346 (not 1364) and found one locally - whoohooo! Now, here's hoping for a miraculous recovery when rebuilt - and no bonehead "doh" moments!
Thread Starter
|
Junior User
Joined: Oct 2005
Posts: 61
Likes: 0
From: Arvada, CO
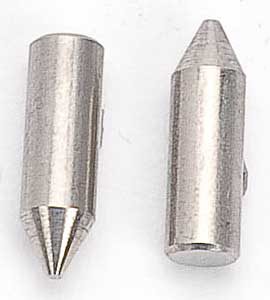
Thanks - quick question - hopefully quick answer - the parts diagram 199R10060 (which I can't find on the holley site) shows #79 Needle - Pump Disc. check (under the screw and nozzle in the body under the choke plate). Mine is gone, and doesn't appear to be in the repair kit, unless it's one of the check *****? Is it a ball or needle?
shown here it says checkball http://www.autozone.com/az/cds/en_us...rInfoPages.htm if you scroll down to the 4180-C diagram and click on it to expand the diagram.
shown here it says checkball http://www.autozone.com/az/cds/en_us...rInfoPages.htm if you scroll down to the 4180-C diagram and click on it to expand the diagram.
Thread Starter
|
Junior User
Joined: Oct 2005
Posts: 61
Likes: 0
From: Arvada, CO
Edit - found the answer to the needle vs check ball ... down at the Reassembly instructions, it says to replace the needle (missing on mine) with the included ball.
Trending Topics
MSEE
Joined: Apr 2004
Posts: 10,386
Likes: 35
From: Austin, TX
There should be a needle as seen in the picture below. This is to keep air from sucking back into the accelerator pump when it refills itself. Some carbs do use a check ball, but they also include a small weight that sits on top of the check valve to actually push it down. EDIT: just saw your follow-up after I already posted.
FTE Stories
Ford Trucks for Ford Truck Enthusiasts

3 Best / 3 Worst Parts of Modern Ford Ownership
Brett Foote
10 Amazing Upgrades That Solve Common Ford Truck Owner Headaches
Pouria Savadkouei
Every 2026 Ford Engine Explained
Brett Foote
10 Ugly Ford Trucks That We Still Kinda Love
Joe Kucinski
10 Things Every Truck Owner NEEDS (2026 Edition)
Michael S. Palmer
Rezvani's Latest Post-Apocalyptic Monster Is a Ford F-150 Raptor Underneath
Verdad Gallardo
Top 10 Most Expensive Ford Trucks Ever Sold on Bring a Trailer
Joe Kucinski
2027 Ford Super Duty Buyer's Guide (Every Model, Engine, & Package)
Brett Foote
Top 10 Ford Truck Tragedies
Joe Kucinski
Thread Starter
|
Junior User
Joined: Oct 2005
Posts: 61
Likes: 0
From: Arvada, CO
The carb is assembled and installed (dang van engine compartments - I have a permanent dent in my chest shaped like the hood latch). Dropped one carb retaining nut and spend an hour looking for it - finally went on trolling with a magnet and pulled it out of a dark corner of the intake manifold (on top, not "in" thank goodness!!!)
Have to cut and reflare the gas line where it goes into the carb - somewhere along the line it got a pretty good kink in it - can't find my flare tool so knocking off until tomorrow.
Setting the float level on the back float looks like it's gonna be REAL fun...
Have to cut and reflare the gas line where it goes into the carb - somewhere along the line it got a pretty good kink in it - can't find my flare tool so knocking off until tomorrow.
Setting the float level on the back float looks like it's gonna be REAL fun...
Thread Starter
|
Junior User
Joined: Oct 2005
Posts: 61
Likes: 0
From: Arvada, CO
In over my head
Well, got the carb bolted down and jury-rigged a fuel line temporarily. I got it to start, barely but it's leaking badly, perhaps thru or near the accelerator pump. The pump diaphram in the rebuild kit has a black side and a greenish side. I installed it with the greenish rubberized side up, against the carb body. Perhaps it's upside down? Also looks like it has a drip on the fuel tube to the back bowl. The rebuild kit's o-rings looked too small. It included a couple of rubber plug-like "seals" I guess that the fit into the bowl inlets, and the fuel tube fit into these seals, but they wouldn't seat deep enough into the fuel bowls to fully assemble them, so I used the o-rings.
Also, I suspect I don't have the electric automatic choke reinstalled and adjusted correctly. When I pulled it apart, I forgot to turn it to release spring tension and count the turns, so I put it back on in where I remembered the connection was clocked. It feels like there's too much tension on the choke and it's full on and pretty solid.
Also, I suspect I don't have the electric automatic choke reinstalled and adjusted correctly. When I pulled it apart, I forgot to turn it to release spring tension and count the turns, so I put it back on in where I remembered the connection was clocked. It feels like there's too much tension on the choke and it's full on and pretty solid.
MSEE
Joined: Apr 2004
Posts: 10,386
Likes: 35
From: Austin, TX
You'll have to go through and make sure all the seals are good and tight; unfortunately Holleys are known for leaking because of the separate fuel bowl and throttle body design. How much did you turn the choke? You mentioned counting the number of turns - you're only supposed to rotate it maybe 30 degrees at most in either direction from straight up. Usually, just enough tension to keep it closed when it's cold, but loose enough that you can easily open it with your finger, is enough. If you're making the choke cap go in full circles, it's never going to open. Maybe I am misunderstanding you.
Thread Starter
|
Junior User
Joined: Oct 2005
Posts: 61
Likes: 0
From: Arvada, CO
sorry, didn't mean "full turns" on the choke (but perhaps I did go a full turn?) ... but I lined the mark on the choke body up 3 marks back from the index mark on the body, per instructions.
I'm sure I'll have the chance to correct that, as I am pretty sure I'm going to have to remove and dis/re-assemble to get the leaks to stop.
Also, there was one additional blue gasket (2 blue ones included) that looked like it should go between the body and rear bowl/metering assembly, but not called out in the diagram. Using the cutouts as an indicator, it was no where on the diagram, but just guessing, it looked like it should go against the head of the power valve? There was already a black gasket that matched the diagram to put in place there.
Wish I could find the parts diagram that came with the rebuild kit somewhere online to link into here ...
Thread Starter
|
Junior User
Joined: Oct 2005
Posts: 61
Likes: 0
From: Arvada, CO
double checked the choke - it was set per the instructions; 3 lines back from the center mark. I rolled it forward to one line before the center mark, where it was just barely holding the choke plate on (90* temps). Attempted a start and she runs without pouring gas all over the manifold... I don't think the choke adjustment would fix that - I wonder if the front bowl float was stuck last night and sitting overnight freed it up?
Idles too slow to stay running and, of course, I didn't drill out the tamper-proof plugs from the idle adjustment screws when I had it on the bench ... dang it.
Idles too slow to stay running and, of course, I didn't drill out the tamper-proof plugs from the idle adjustment screws when I had it on the bench ... dang it.

Thread
Thread Starter
Forum
Replies
Last Post
jc78
Small Block V8 (221, 260, 289, 5.0/302, 5.8/351W)
4
May 26, 2001 06:38 AM