When you click on links to various merchants on this site and make a purchase, this can result in this site earning a commission. Affiliate programs and affiliations include, but are not limited to, the eBay Partner Network.
Thanks for the reps guys, just trying to pass the help on like yall have!
Originally Posted by Sous
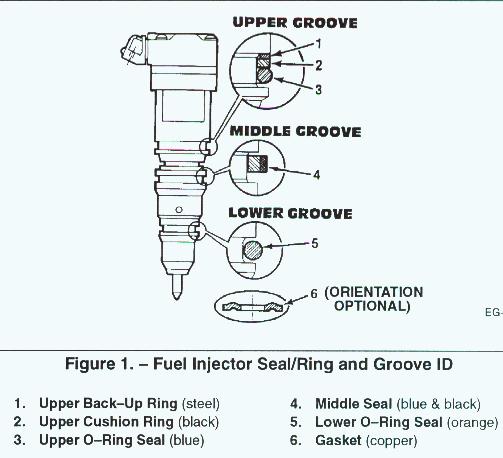
Copper washer ridge up toward the injector or down toward the engine?
I did mine ridge toward injector when I shimmed them, but it isn't set in stone that it has to be. When I get to work tonight I can look at the ones I got from FFD to see how they put them on.
Here is a diagram I stole from Roland awhile back about the o-rings and such:
I did mine ridge toward injector when I shimmed them, but it isn't set in stone that it has to be.
I did mine this way as well. When I bought mine I asked about the orientation and they said it doesn't matter. Mine came fully assembled (o-rings and all) since I bought new injectors but they recommended I replace the copper rings since they were used when they bench tested the injectors.
Okay, here is a picture of the 406 Injectors Tool Kit.
The piece on the left goes into the vice and there is a dowel pin that holds the injector in place:
It worked very well.
The part on the right is a fixture that will take a 1/2" drive ratchet/torque wrench to remove the upper body from the nozzle portion.
In the center of the bag are the Poppet/Armature screw tool, dowel pin and some torx nuts for the solenoid and spacer bolts.
In the rebuild kit were two packages of shims with 8 each of .001" and .002"
A piece of metal .002" thick that is supposed to pass as a feeler gauge.
Alliant O-rings for he internals
Italian O-rings for the externals and copper crush washers
New Poppet/Armature Screws and a torx bit to fit
New Stop Springs
New Poppet Springs
New check *****
I went ahead and rebuilt the #1 injector so as to get a feel and sense for things. The body and o-rings are coated with motor oil.
I took pictures of disassembly but will only post them if someone is interested in seeing them.
Using compressed air to gently remove the intensifier piston worked fantastic. Soaked the metal parts in Chemtool Carb cleaner and then sprayed the passages and internals with spray can carb cleaner.
Used a wire wheel to clean up the body and cap making sure to get the o-ring groove perfectly clean.
Does anyone have the correct torque specs for the injector body, bolts and screws?
The ones I found seem high for the solenoid screws at 8 ft lbs.
The center bolt for the armature plate is only...12 in-lbs, I think. "Just as you feel it starting to want to tighten is the correct torque" is how I remember being told earlier this week.
I can say I am pretty certain the center bolt's head won't take much torque without stripping.
How does that tool remove the top of the injector? Is there a recess or something that fits together?
I could see the part that was under the armature plate, but it didn't move- maybe because my poppet valve is stuck? What happened when you removed the armature plate and screw? Did the center piece come out, or is that what you used the tool for?
Sorry for all the questions, trying to learn something. Thanks!
Hats off to you being able to do this! I'm of the belief there's just something things I'm willing to pay someone else to do. Not because I can't do them but because I would hate to make that one little mistake and have to chase my tail finding the mistake and fixing it. Everyone has a right to earn a living.
The center bolt for the armature plate is only...12 in-lbs, I think. "Just as you feel it starting to want to tighten is the correct torque" is how I remember being told earlier this week.
I can say I am pretty certain the center bolt's head won't take much torque without stripping.
How does that tool remove the top of the injector? Is there a recess or something that fits together?
I could see the part that was under the armature plate, but it didn't move- maybe because my poppet valve is stuck? What happened when you removed the armature plate and screw? Did the center piece come out, or is that what you used the tool for?
Sorry for all the questions, trying to learn something. Thanks!
The top portion screws into the bottom. You can see the threads in this picture and the o-ring that seals the connection.
Jim, you are a brave man. While looking at your pictures just now, I had a thought. Even if you have a couple of injectors that don't work right and you cannot nail down the problem. You could potentially just send the problem injectors off to be professionally checked out, which would still save you a ton of cash and instill pride because you gave it your best shot.
Good lord man, big thumbs up on your endeavor. After seeing pics on this thread, my little injector shim kit just got pushed back a few rows on the shelf... Wonder if Pete's following. His shim kit collecting dust too, lol
Rezvani's Latest Post-Apocalyptic Monster Is a Ford F-150 Raptor Underneath
Slideshow: Called the Fortress, the 850-horsepower pickup combines Raptor underpinnings with military-inspired features, survival equipment, and a starting price of $285,000.


 I'm of the belief there's just something things I'm willing to pay someone else to do. Not because I can't do them but because I would hate to make that one little mistake and have to chase my tail finding the mistake and fixing it. Everyone has a right to earn a living.


 v
v 


