
99 F550 trailer wiring question
#1
 04-04-2014, 10:06 AM

Join Date: Dec 2011
Posts: 172
Likes: 0
Received 0 Likes
on
0 Posts
99 F550 trailer wiring question
Hey guys, I own a small moving company and am looking to use my 16ft box f550 to also tow my new enclosed trailer. Although the truck does have a hitch, there is no wiring at the back of the truck, whether or not there used to be I am unsure. I was wondering if any of you have a color code for the wiring loom that comes to the rear of the truck past the fuel tank? I also need to wire a license plate light and backup alarm. Any thoughts/suggestions are greatly appreciated! Thanks!
#2
04-09-2014, 07:42 AM
Join Date: Dec 2011
Posts: 172
Likes: 0
Received 0 Likes
on
0 Posts
#3
04-09-2014, 02:26 PM

7 wire blunt cut harness in back of an F-550:
- Brown with white stripe: TAIL Running Lamps (also where you can tap for your license plate light)
- White solid: GROUND
- Orange solid: HOT in Run (For charging trailer battery. Can also be used to charge trailer breakaway brake battery)
- Yellow solid: LEFT Turn Signal, and STOP light left side for trailer.
- Green solid: RIGHT Turn Signal, and STOP light right side for trailer.
- Blue solid: TRAILER BRAKE power feed. (output from electric trailer brake controller)
- Black with light green stripe: REVERSE lamps
- You may or may not have an 8th wire... possibly a Light Green with a (I forgot what color) Stripe. This would be the CHMSL (Center High Mounted Stop Lamp). I'd have to verify first, but I won't now because you don't need it for purposes of what you are trying to do.
Of the 7 trailer related wires, 4 are functional without you having to do anything. They are the typical flat four trailer wire circuits.
White - Ground
Yellow - Left/Stop
Green - Right/Stop
Brown (with white stripe on the Ford) - Running lamps.
To get the remaining 3 wires to work, you have to do a few things up in front of the truck:
1. Install two relays in the mini relay box under the hood. The mini relay box is inbetween the master brake cylinder and the main underhood fuse panel.
- Part Numbers to Relays: FOAB-14B192-A (Both relays use the same part number.)
- The relay slot closest to the firewall in the mini relay box enables the Trailer Tow battery charge circuit to work (Orange solid wire in back of truck).
- The relay slot closes to the front grill in the mini relay box enables the Trailer Tow Reverse Lamp circuit to work (Black with Light Green stripe).
2. Install two 30 amp fuses in the main fuse panel (aka Power Distribution Block, aka PDB) under the hood.
- Part Numbers to Fuses: E97B-14A094-A (Both fuses use the same part number.)
- Install one fuse at Location #16 in the PDB to enable the battery charge relay you installed above to work.
- Install the other fuse at Location #28 in the PDB to enable the electric TRAILER BRAKE CONTROLLER, discussed below, to work.
3. Install a jumper wire harness under the dashboard to enable an electric trailer brake controller to energize and modulate the BLUE wire in the back of the truck
- Part Number to Jumper Harness: F81Z-14A348-A (typically a brown connector housing with 5 wires attached. Aftermarket units only have 4 wires attached)
- Remove the interior fuse panel access cover under the steering wheel (four quarter turn screws)
- Locate the 6 way GREY connector that the Brown jumper harness will fit into.
4. Install Trailer Brake Controller (aftermarket)
Wire Color Codes for TBC ciricuits:
White - Ground
Dark Blue - Trailer Brake Output feed to Bluer blunt cut wire in back of truck
Red - Trailer Brake Control Input Power
Light Green - Service Brake Apply input signal to TBC
Brown - Optional panel instrumentation lamp power to TBC, if TBC has an interior illumination circuit.
Ok that should about cover it.
#4
04-09-2014, 03:55 PM
Join Date: Dec 2011
Posts: 172
Likes: 0
Received 0 Likes
on
0 Posts

#5
04-09-2014, 04:44 PM
Glad to be of help!
The "information highway" is so cluttered with commercial interests and items for sale getting targeted hit priority over actual information, it is almost impossible to find an answer to an informational question quickly online anymore. When someone posts very specific information to a question I have, I am so thankful to find it, I try to reciprocate it forward whenever I can.
Here is a pic of how I converted the blunt cut wire ends in my 550 into a terminal junction splice box that allows those circuits to feed multiple types of trailer connectors and other rear wiring clearance lights as well as supplemental reverse lights.
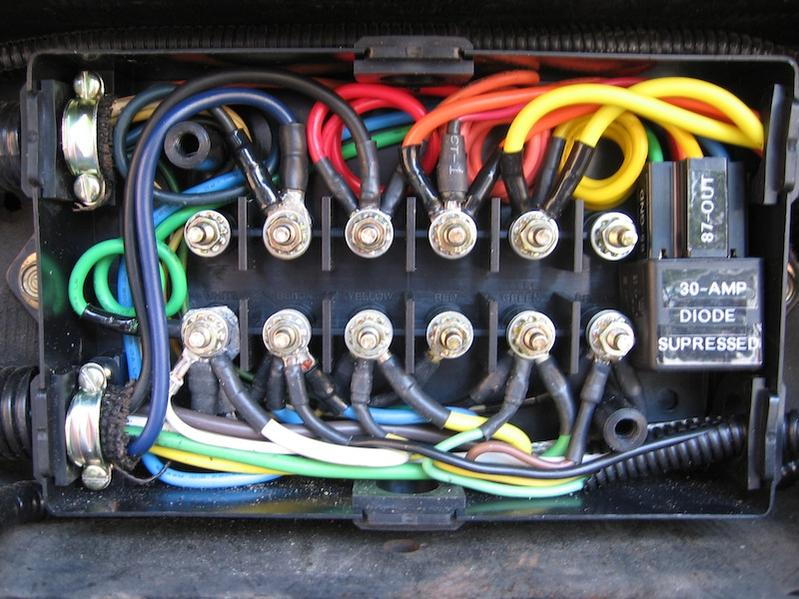
This box has a sealed gasket when closed, and is mounted on the last cross member to the rear of the aft axle fuel tank. The center section of that cross member is shaped almost as if it was intended to accommodate this exact box. There are single row and double row post terminal boxes like this one. I bought mine 13 or more years ago, so I no longer remember the brand. It has 6 gasketed wire harness ports, and 12 terminal posts. I wanted to be able to run 6 back up lights (side facing, rear facing, and angle facing), as well as an in bed harness for a gooseneck, so having a junction box for all splices made the most sense to me.
For just one trailer plug, you can butt splice each circuit directly. You'll notice however, that I added a diode supressed relay for the reverse lamps. I also have a back up alarm, and tailgate mounted switches to turn the reverse lamps on and off while hooking up a trailer at night. It takes me a while fiddling with the spring bars , snap up bracket pins, etc, so the extra light is nice.
The "information highway" is so cluttered with commercial interests and items for sale getting targeted hit priority over actual information, it is almost impossible to find an answer to an informational question quickly online anymore. When someone posts very specific information to a question I have, I am so thankful to find it, I try to reciprocate it forward whenever I can.
Here is a pic of how I converted the blunt cut wire ends in my 550 into a terminal junction splice box that allows those circuits to feed multiple types of trailer connectors and other rear wiring clearance lights as well as supplemental reverse lights.
This box has a sealed gasket when closed, and is mounted on the last cross member to the rear of the aft axle fuel tank. The center section of that cross member is shaped almost as if it was intended to accommodate this exact box. There are single row and double row post terminal boxes like this one. I bought mine 13 or more years ago, so I no longer remember the brand. It has 6 gasketed wire harness ports, and 12 terminal posts. I wanted to be able to run 6 back up lights (side facing, rear facing, and angle facing), as well as an in bed harness for a gooseneck, so having a junction box for all splices made the most sense to me.
For just one trailer plug, you can butt splice each circuit directly. You'll notice however, that I added a diode supressed relay for the reverse lamps. I also have a back up alarm, and tailgate mounted switches to turn the reverse lamps on and off while hooking up a trailer at night. It takes me a while fiddling with the spring bars , snap up bracket pins, etc, so the extra light is nice.
#6
04-11-2014, 09:06 AM
Join Date: Dec 2011
Posts: 172
Likes: 0
Received 0 Likes
on
0 Posts
#7
04-15-2014, 04:12 PM
Yes, a mini relay holder from an F-250 / 350 would work, as would one from an Excursion. These lighter vehicles sometimes have TWO mini relay holders. On both your 2001 and your 1999 trucks, you should be able to see the metal tabs that these mini relay boxes click into that surround your underhood main electrical center/fuse panel.
Your 2001 might already have one of these metal tabs occupied with a mini relay holder, with the other tab (oriented perpendicularly) unoccupied. It appears that your 1999 has both metal tabs open and unoccupied.
The metal tabs are only there for trucks built from 1998 to mid 2001 (model years early 1999 through 2001). For model year 2002 and beyond, Ford changed the electrical system entirely, so you would need to limit your bone yard search to model year 2001 or older.
Yet, obtaining the mini relay box is only a small part of the equation to resolving your new discovery that you don't have one at all. The bigger part of this problem to solve would be the wiring from the mini relay box to the main underhood fuse panel. To my knowledge, the relay box is not "plug and play" at an easy to add and available connection point. As far as I can tell, the wiring harness to the mini relay box is integrated into the body wiring harness of the main fuse panel.
Fortunately, you have another similar vehicle you can make comparisons with, if you decide to retrofit your 99 550. You will not need to locate "550" specific electrical parts, as the items we are talking about are common to all the Super Duties and Excursions built prior to model year 2002.
That isn't to say that 2002 and beyond trucks don't use a similar, if not the same relay box. It is just to say that if they do, it is definitely not mounted in exactly the same way as before. I don't remember the specifics that I knew at one time, but the summary of my recollection is that the underhood main fuse panel was changed/removed/reworked signficantly for 2002. So if the 2002 used the same relay box part number, either for trailering, or for rear air conditioning in the Excursion, or for any other purpose, I don't know where it would be located, nor would I know if a later version has the same base and retention cleats that would click into the 99-01 mounting tabs. Therefore, the safest bet is to look for trucks from 99-01.
Also, none of the foregoing is required if you just need stop, tail, turn, and license plate running lamps to tow a light trailer without trailer brakes. But for a tandem axle cargo trailer greater than 5,000 lbs GVWR, I can see where you would want to have trailer brakes, despite the larger service brakes on the 550, if for no other reason than liability, let alone safety and common sense.
While I haven't been down this particular road without the factory prep relay receptacle in place already (I just had to add the relays themselves), I'm sure that someone else has been there done that, and has discussed their solution online at some point over the last decade. I hope you are able to find a workable solution to getting a trailer brake control operational.. and when you do, please follow up with what worked for you, to help the next guy.
Trending Topics
#8
04-21-2014, 02:16 AM
Y2KW57, where did you get the junction box you used? I did a very similar thing with my truck as I equipped it with both 6 & 7 pin trailer plugs using a Signal Stat box, but it only had 7 studs in it. I need 8. Also, I still had water creep in through the wire entry points and corrode the terminals over time and am currently revamping the system. Have you experienced this?
#9
04-21-2014, 01:34 PM
A longtime friend of mine in the automotive parts industry sourced it for me 15 years ago. He has since retired, and was probably too old to remember back then, much less today, where sourced it from.
From time to time, I have seen the same plastic box design, albeit with fewer studs, in various supply catalogs. If I were to have to order a new one today, I'd be starting from scratch, as you are. I'd probably start my search with the heavy truck parts supply catalogs.
Fortunately, I haven't had a need to replace my box, and corrosion hasn't been an issue. I did take a few precautions to help prevent this however, as follows:
1. All harnesses leading into and out of the junction box drain down and away from their ports of entry. I learned this from GM. It is hard to tell from my close up pic of the wiring above, and I don't have any other pic available, but the harness ports I used are to the left and right of the junction box, and beyond the frame of the picture, these harness angle downward, even if just a little bit. All harness have a low point that is lower than the entry point to the junction box, so that water will drip off the harness before entering and filling the box.
2. All wiring connection terminals are pre tinned BARE connectors without any built in insulation. Notice you don't see any of the typical blue or red or yellow plastic insulators crimped around the terminal lugs.
3. All wiring leads were hand fluxed and pre-tinned also.
4. All connections were flow filled with solder after being bare crimped.
5. All connections were insulated with heat shrink (instead of the smooshed plastic pre insulated crap) using Raychem dual layer self sealing waterproof 4:1 ratio heat shrink that not only allows for greater conformance between the difference in crimp connector diameter and wire insulation diameter... it also oozes an inner layer of sealant on the leading and trailing edges of the heat shrink tube, wrapping around the wire jacket diameter circumferentially with a thermoset glue that prevents moisture from entering into the connection zone.
6. No regular zinc plated washers were used. All hardware, including the dual star lockwahers, contact spreading flat washers, and nuts (later changed to nylon insert lock nuts after this picture was taken), were either nickel plated brass or stainless steel.
7. An antioxidant (similar to NoAlOx) was used after the connections were finalized.
Naturally, all of this took a great deal of time and tedium to execute for every single wire connector. But I only wanted to do this once. Which leads to the last protective measure...
8. The box is buried in a dry area underneath the truck (attacted inside the center of the last crossmember) and has a stainless steel splash guard and water deflector covering it. The box is not only inaccessible to the elements... it isn't easily accessible to me either, without taking stuff apart. Something would have to break to motivate me to disassemble the rear splash shield... so in answer to your last question... No, I haven't experienced any corrosion problems with this installation yet.
#10
04-21-2014, 01:44 PM
You and I have the same work ethic. I got 13 years out of my original install and it's still functional but it will be a problem before long. I'm doing a refurb of the frame and wiring to get some more years out of it. I'll have to hunt for that box, I've been looking on line for about a week now at various options (there aren't many) but haven't seen that one. Thanks.
#11
06-19-2016, 02:25 AM

Senior User
Join Date: Nov 2014
Location: San Francisco
Posts: 111
Likes: 0
Received 0 Likes
on
0 Posts
Thank you for posting, this helped me out a lot with trying to figure out how to wire a 1999 F350 (wires are the same color). I spent hours searching for this on Google, should have came here first.

Thread
Thread Starter
Forum
Replies
Last Post
truckmonger1
Other; Brakes, Electrical, Hitches, Weight Distribution & CDL Discussion
7
07-17-2005 03:52 PM