

Keyless Entry/Remote Rear Window Write-up!

Thread Starter
|
Fleet Mechanic

Joined: Dec 2006
Posts: 1,925
Likes: 10
From: Phoenix, AZ
Keyless Entry/Remote Rear Window Write-up!
I decided to make a semi-decent write up on this because I am extremely pleased with the results and would like others to be able to do this easily if they so choose.
Caution! Before starting make sure you are comfortable working with wiring (splicing, tapping, soldering etc.). If you mess up any wires in the walk-through it could prevent your vehicle from starting or blow fuses/etc. and become a mess! Make sure you know what wire is what and the connections made are done so properly and adequately protected.
I will not go into how to heatshrink wires/making proper connections/ or soldering. If you feel super uncomfortable and want to know more, just send me a message or you can probably find tons of good info on the series of tubes (internet).
This walk-through is based on the Bulldog Keyless entry system that can be purchased at Oreilly's /Autozone. Its a pretty inexpensive system so that's why I went with it.
Tool list:
-Wire splicer
-Pliers
-Screwdriver
-phillips head bit
-flathead bit
-torx bit (Sorry don't know exact size (t-40 i think)
-Multimeter
-Exacto Blade or sharp knife
-Flashlight
Needed Supplies:
-Electrical Tape
-Shrinkwrap
-Lighter
-Two extra 5 prong relays
-Extra wiring 18-14 gauge (Several feet to be safe)
-9 Wire connectors (18-14 gauge)
-Wire taps (5)
Highly Recommended Extras:
-Soldering Gun
-Extra Solder
-Variation of extra wiring (18-14 gauge)
Section 1: Diagrams
Section 2: Getting Started
Section 3: Initial Wiring
Section 4: Starter Immobilizer (optional)
Section 5: Parking Light Confirmation (optional)
Section 6: Door Lock wiring
Section 7: Rear Window Wiring (manditory (okay maybe not (or is it?)))
Section 8: Clean-up
Section 1: Diagrams
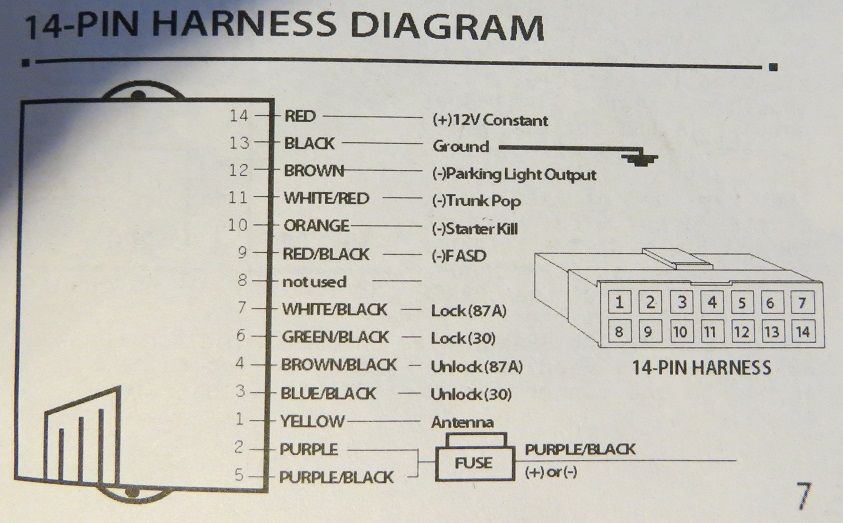
Here is the module wiring diagram for what the wire colors of the harness go to:
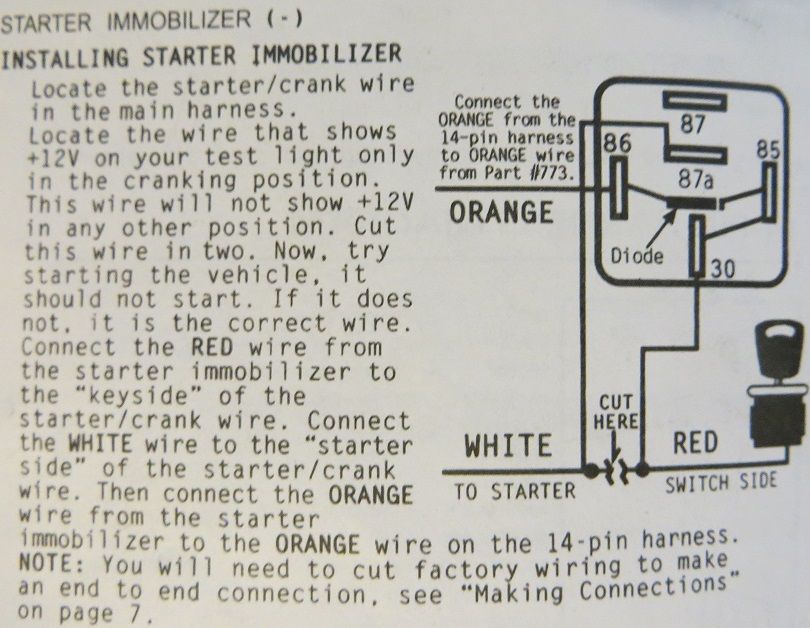
Starter Immobilizer instruction with included 5 prong relay and connector:
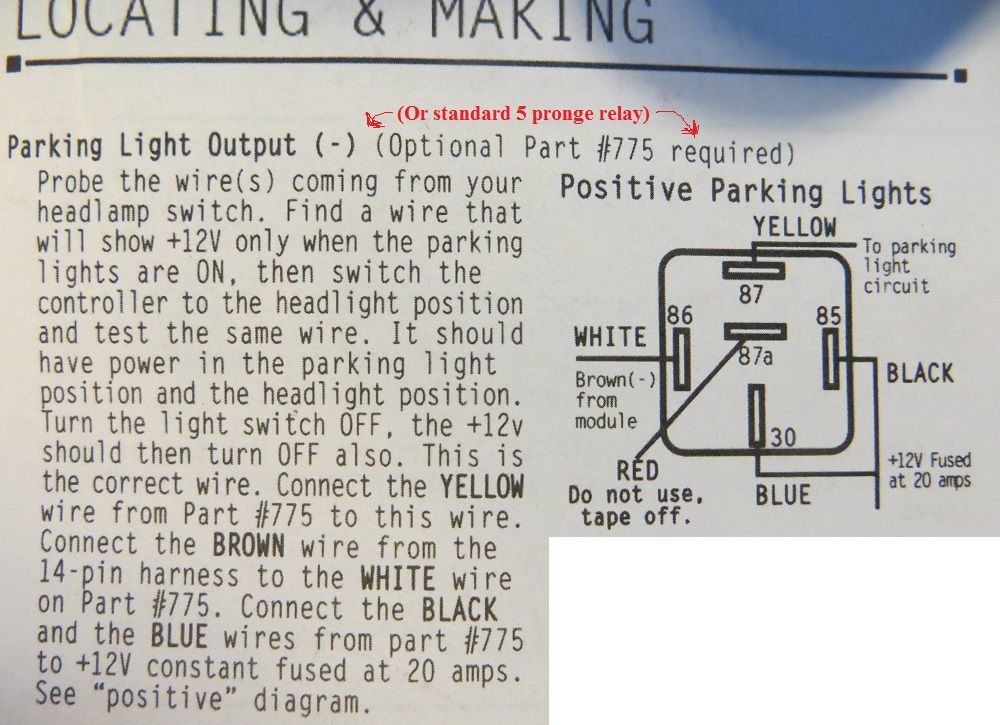
Parking light wiring confirmation instructions:
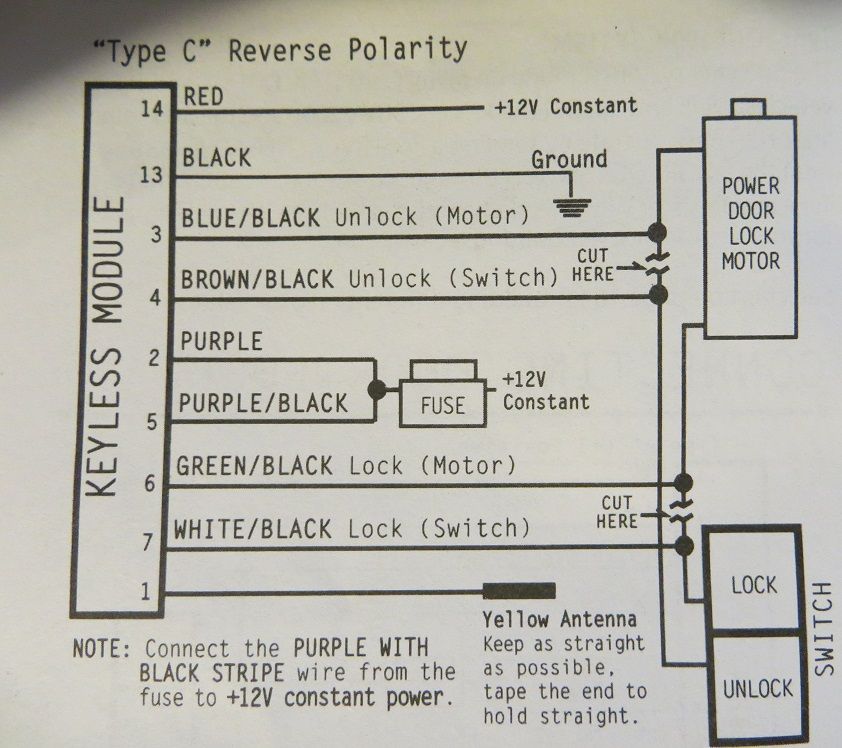
Door lock wiring instructions (For "Type C" vehicles which most Fords are)
Section 2: Getting Started
Before you begin ripping all your wiring apart, you will need to take off some panels to gain easier access to all the wiring. Depending on what you are planning to install will determine how much you have to take off. Some people decide not to install the starter immobilizer or parking light confirmation, which can save some time but not really that much. I explain how to proceed as if you were installing everything.
The panels you will need to take off to get access include:
-Drivers kick panel
-Instrument Cluster Bezel
-Drivers door panel (not 100% necessary but recommended)
To take off the kick panel, you will need to unscrew one screw from the black floor molding tab so you can get the bottom of the kick panel out from underneath it. The kick panel is held in by two of the door panel type clips and it should just pry off. I always pull mine off, but you can use a screwdriver/pliers or better yet door panel removal tool to get it off. Like I said I always have luck just ripping it off.
To take off the Cluster Bezel, you will need to take off both trim pieces to the right and left of the steering wheel. They are in place by clips so they will pry off with a flathead screwdriver. Once they are off, you can see there are torx screws hidden beneath them. After unscrewing the torx screws, you need to take off the headlight switch. To do this, turn the lights fully on. There is a metal clip on the back side of the **** that secures it to the bar. Use a small flathead screwdriver and pry the clip forward and the **** will come off. TURN THE LIGHTS BACK OFF so you don't drain your battery. Once this is off, the cluster will be able to be pried off. The rear window switch wiring will need to be unplugged from the bezel (it's a pain to pull out you may need to use a screwdriver and pry it off).
I won't go over taking off the door panels since I didn't need to do it, but there are plenty off good write ups on how to do that. It only has a few screws and lots of those plastic fastener things.
Section 3: Initial Wiring
You will want to know the general idea of where you want the module before you get to involved in wiring. I shoved mine behind some of the firewall backing near some other wiring stuff but there are plenty of places to hide it up in the dash if not a lot of aftermarket stuff is up there already.
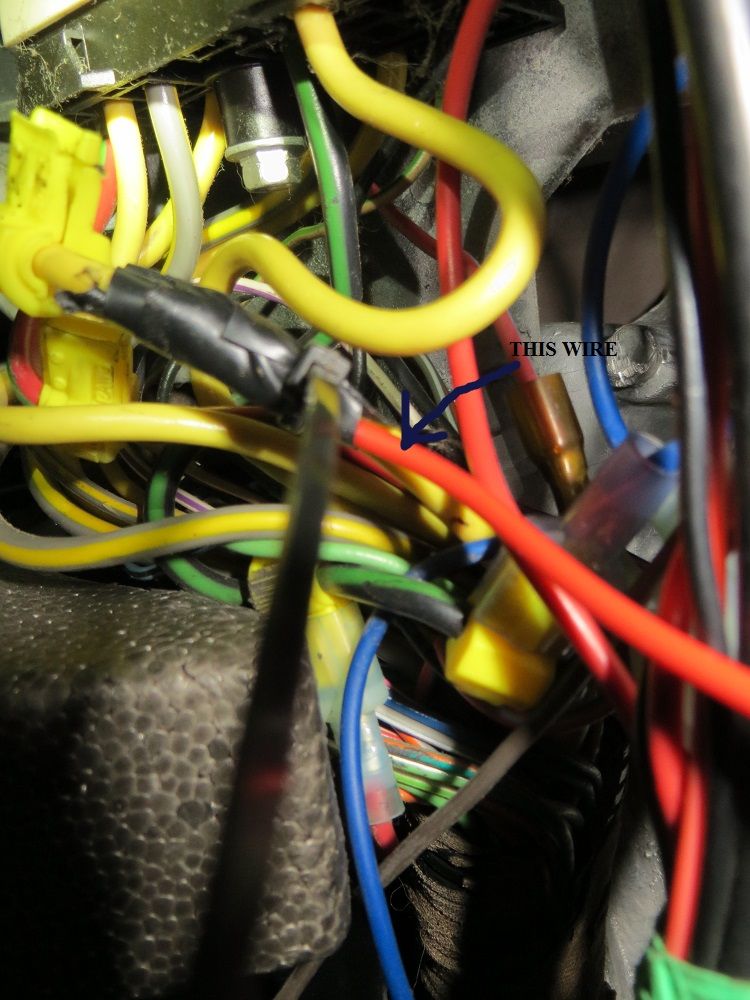
First, you want to find the 12v constant wire to plug the red wire from the module harness into. There are several of these wires up in the dash underneath the steering wheel. All the big yellows ones should be constant 12v and you can tap into any of them. Use your multimeter to verify that they are always hot though just in case!
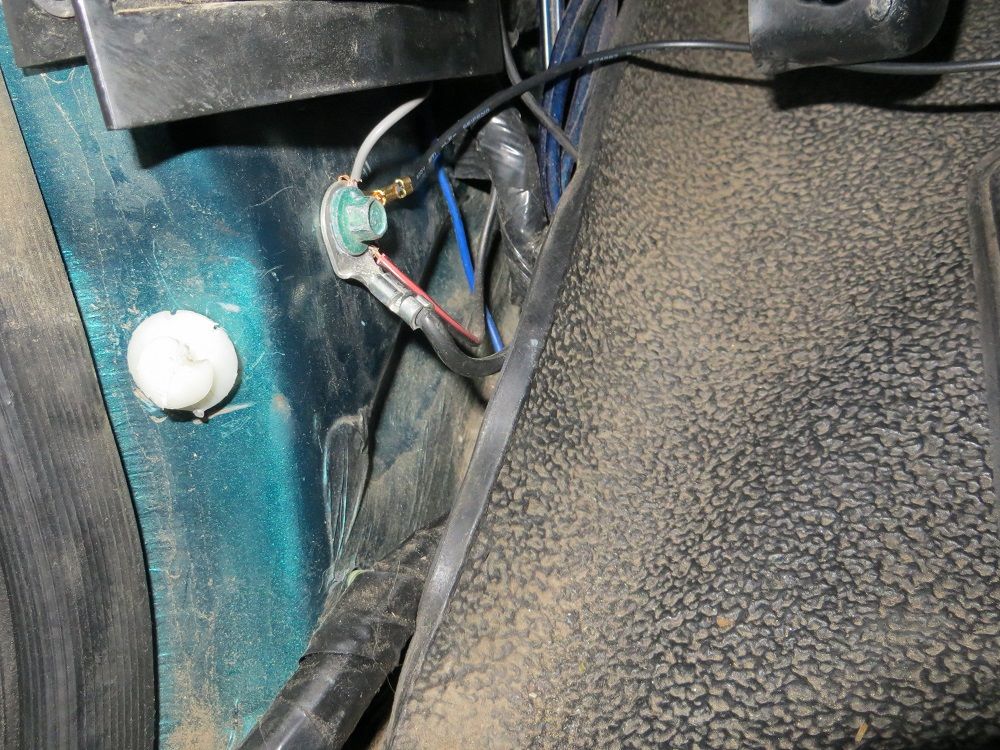
Next, connect your ground wire to the ground spot underneath the parking brake release:
You're now ready to move onto bigger and better things!
Section 4: Starter Immobilizer
If you choose to install this, find a good place where you will have your relay mounted. I mounted mine up underneath the dash where there was some bolt on the left hand side up above the parking brake pedal assembly. I unfortunately didn't take a picture where but you can mount it anywhere you please!
The diagram in Section 1 explains exactly how to hook this up so I won't go too into detail. I will provide pictures of what I had though.
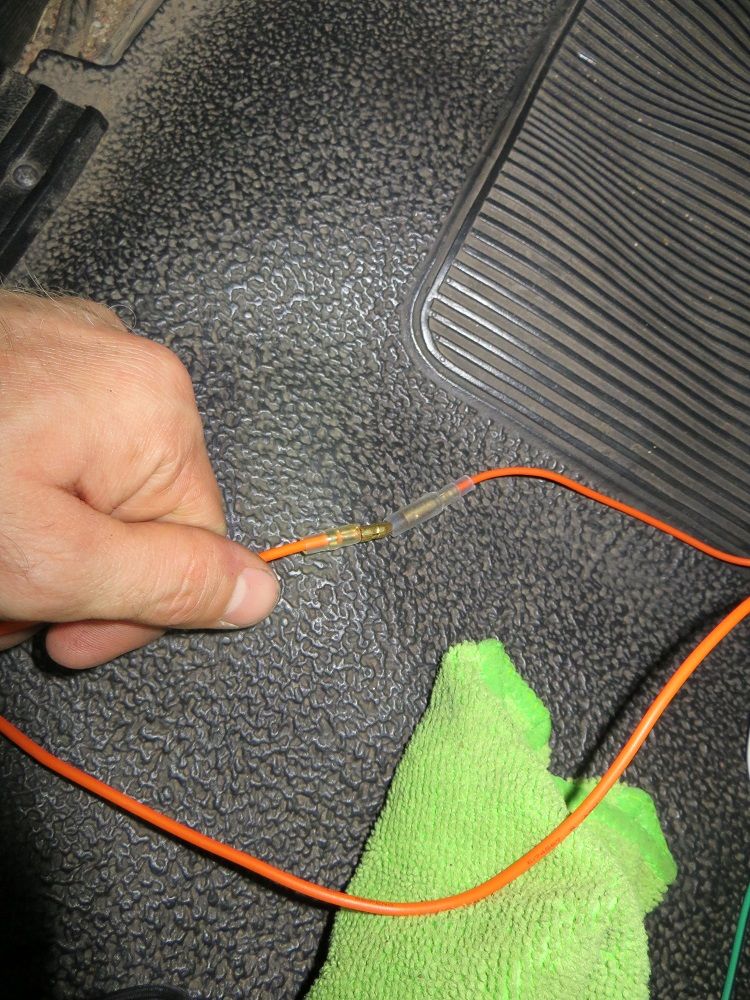
The red wire from the bulldog relay kit is connected to the key side of the starter wire:
White wire from the bulldog relay kit is connected to starter side of the wire:
Next, connect orange wires from relay to harness!!
Section 5: Parking Light Confirmation
Same thing as last section, you'll need to find a spot for the relay if you choose to install this. Also, you will need to use one of the extra relays you bought here and make connections from the extra wiring you have to the relay. You will only use 4 of the 5 prongs on this relay. I also won't go too much into detail because the diagram in section 1 also explains the installation process.
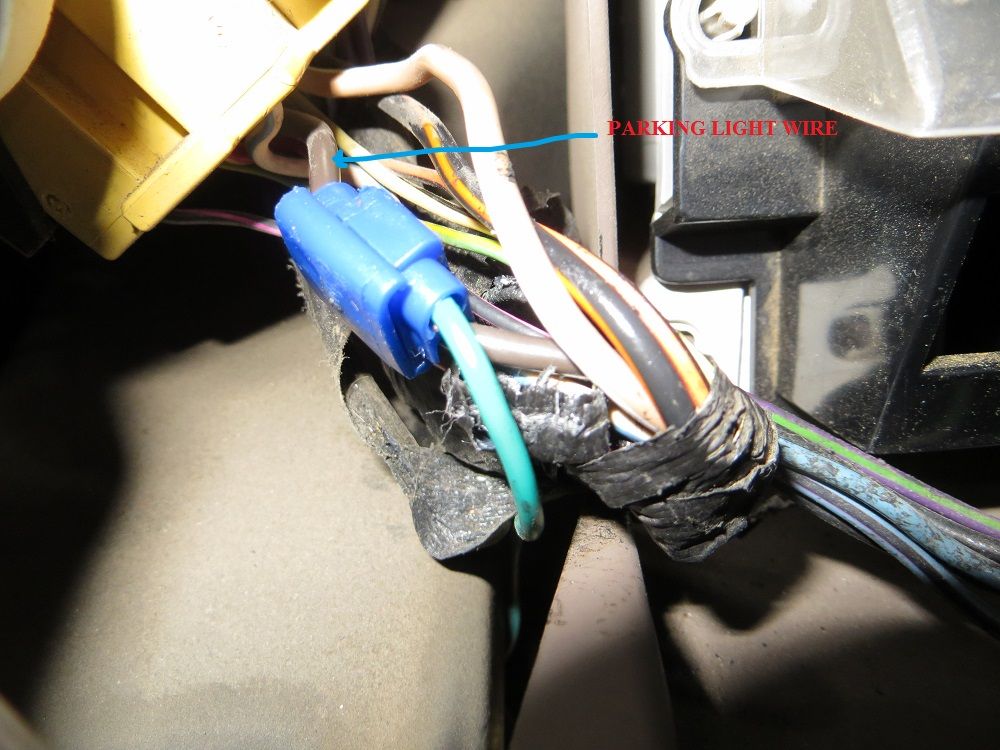
This is why you took off the instrument cluster bezel. You need to access the brown wire which controls your parking lights. The brown wire will show 12v on your multimeter with the both the lights on and the parking lights on. It will show no voltage with the lights off.
Here is my relay mounted up under my dash:
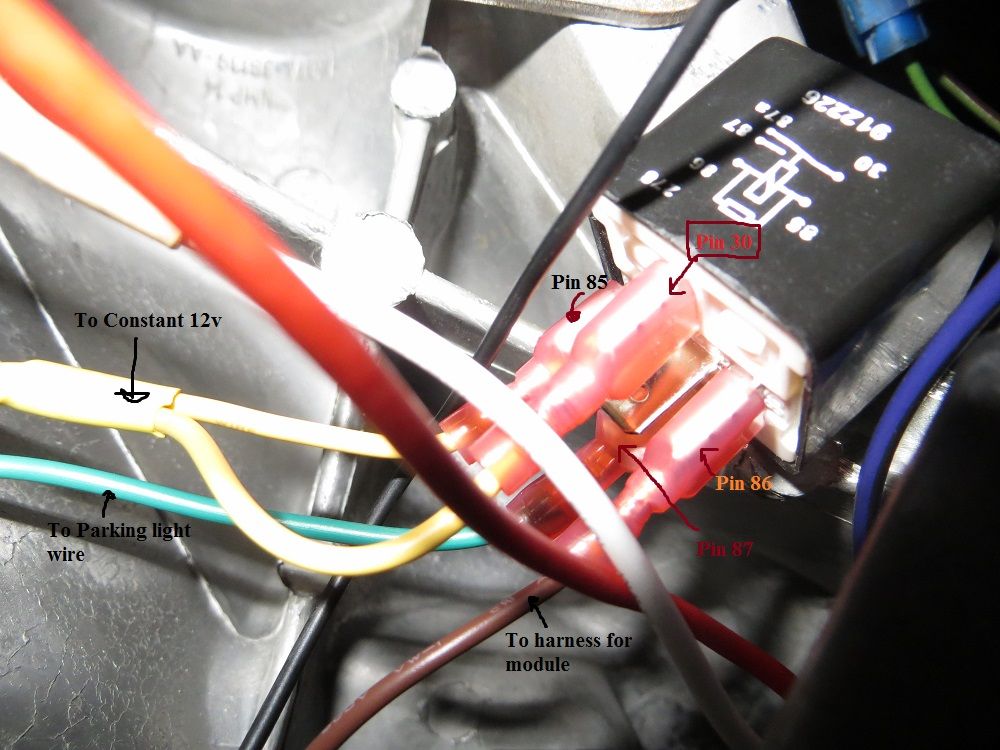
The brown wire on pin 86 of the relay is one from the wiring harness of the module. The other wires are extra wires I bought and cut to length.
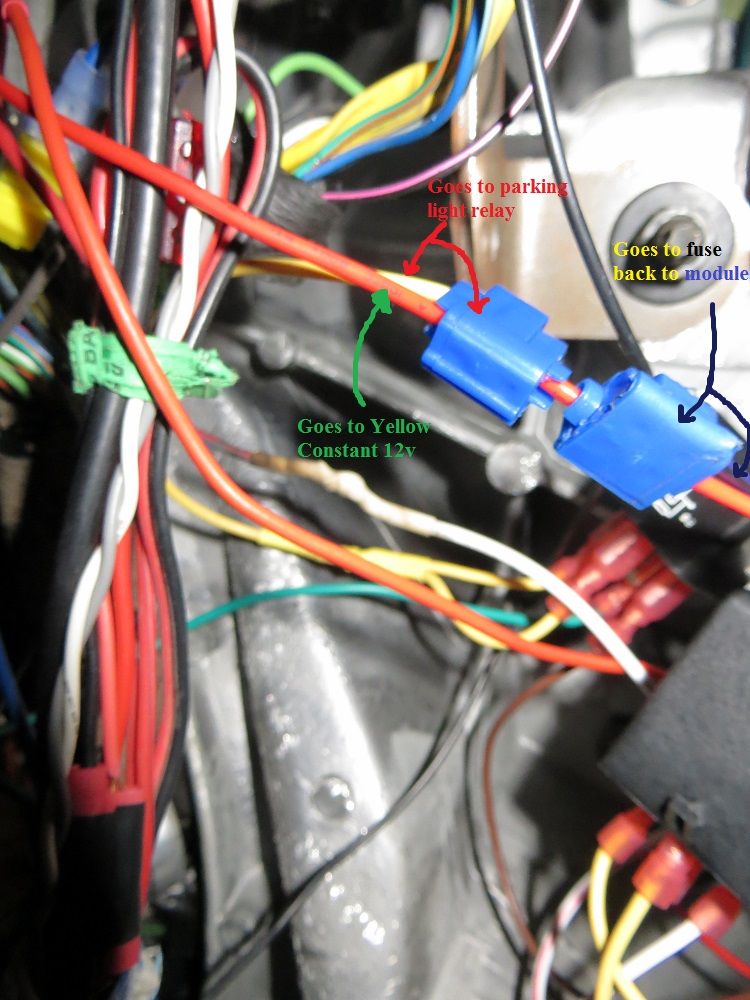
Here is a picture of the connections from the relay to the power wire:
Section 6: Door Lock Wiring
I was a little lucky in this section. My truck used to have manual windows and locks, but I converted them to auto by going to a junk yard and getting wiring/panels etc and buying new motors. I was at an advantage here because I routed my power lock wiring up against my firewall underneath the dash, when the stock wiring is up inside the dash and quite inaccessible. I have read that people have taken off their door panel to be able to access their door lock wiring easier to install keyless enty kits. The idea of what I did for what you have to do is identical, but you may have to do a little searching for your wires if you did not take off the door panel.
Like the last section. The diagram in section 1 explains the wiring quite well so refer to that for a complete list of what to do.
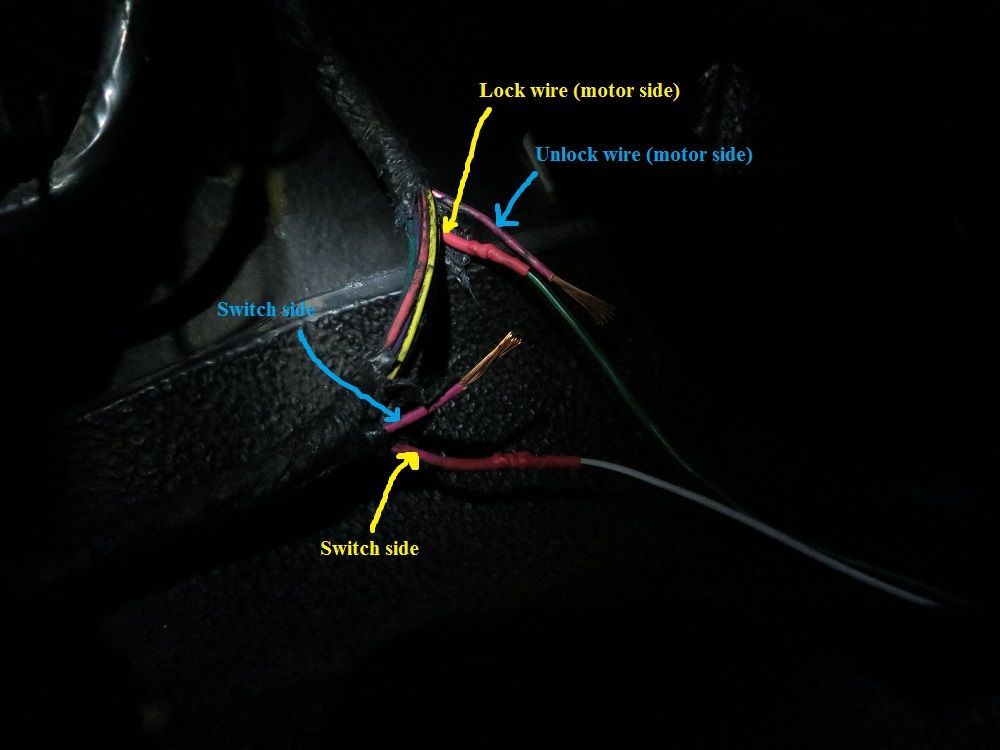
For Broncos 94-96, the wiring for the power unlock is pink/light green and the wiring for power lock is pink/yellow.
Once you find you wires for lock and unlock, you will have to cut them in half and test which side is which. To test them (starting with lock), connect your positive end of the multimeter to one side of the wire, and ground the other. Then, while still connected, hit your lock button. If the multimeter reads 12v, that is the switch side. Just to be safe, test the other side too the same way. If no voltage comes up, it is the motor side. Do this with both unlock and lock and make sure you know which end of the wire is which.
After the door lock connections are made, you can fuse wiring to power (as shown in the parking confirmation section.)
Section 7: Rear Window Wiring
Okay here is the diamand jewel of the crown to the whole project. I was able to complete this thanks to searching around on the internet and looking at other forums/threads etc. I wanted to list it here so it would be in a complete writeup and clear any other confusion people may have because I know I had some initially.
To start with this, you will need the other 5 prong relay and make connections for each prong.
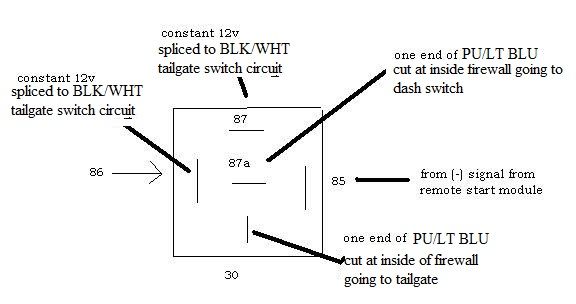
Here is a diagram I found and edited of how the relay should be set up:
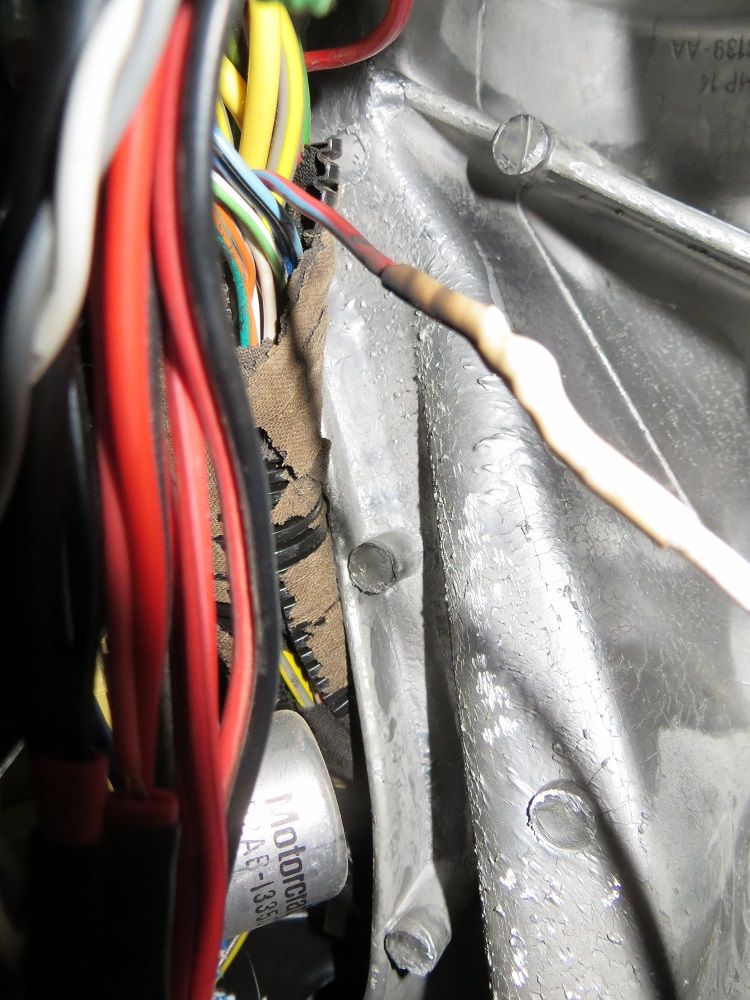
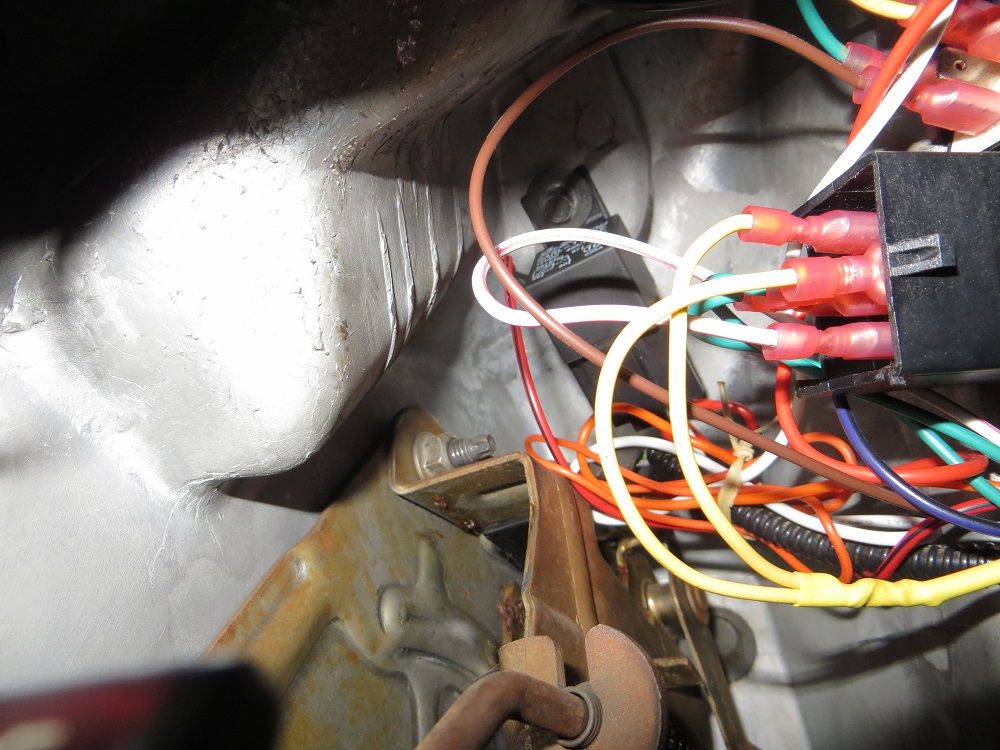
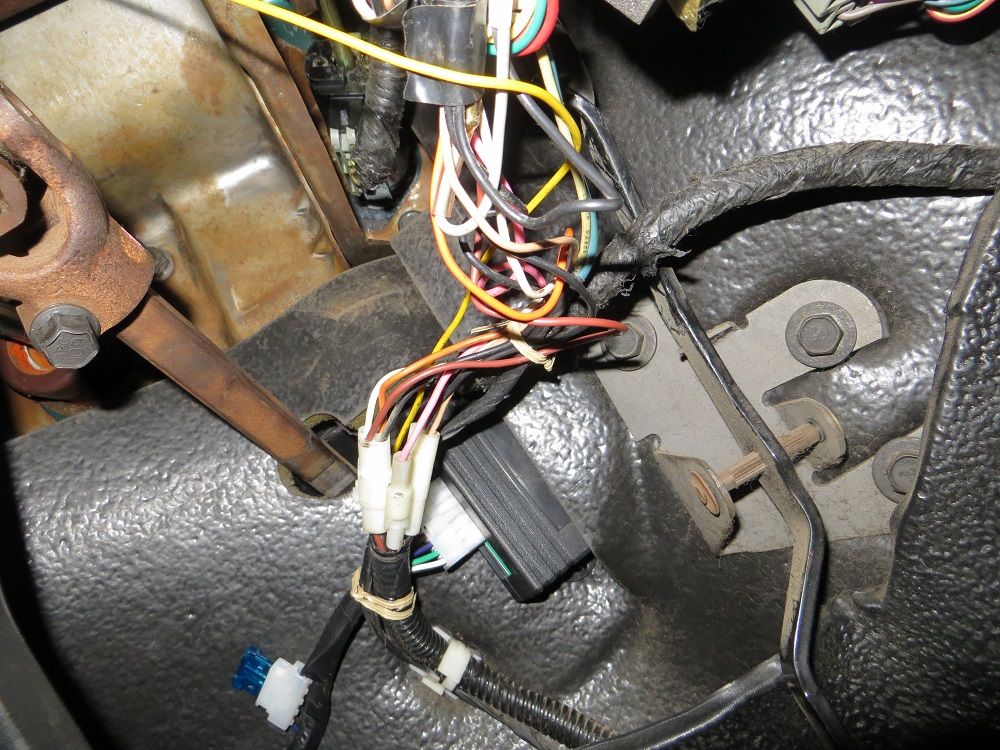
You can first start by finding the wiring that goes back to the tailgate. This wiring is located next to the firewall behind your clutch pedal (or if you are unlucky and have an automatic, behind and slightly to the left of your brake pedal). There are a whole bunch of wires coming in through some harness type thing. You are looking for two wires, one that is black with a white stripe (constant 12v) and one that is purple with a green stripe (window down wire.)
First, get a wire ready and tap it into the black and white wire as seen in this picture:
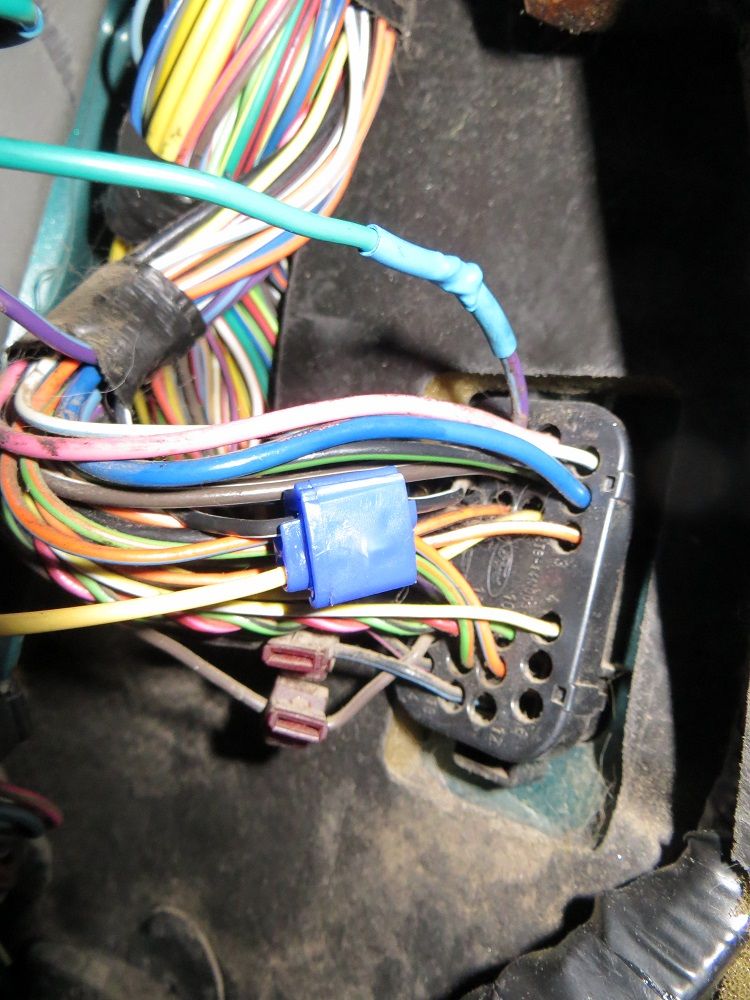
It is near the top left so make sure you get that one. Once you tap into it, you can check to make sure it has a constant 12v by using the multimeter and touching one end the the tapped wire with the positive end, and the negative end to ground. If it comes up as 12v you're good to go!
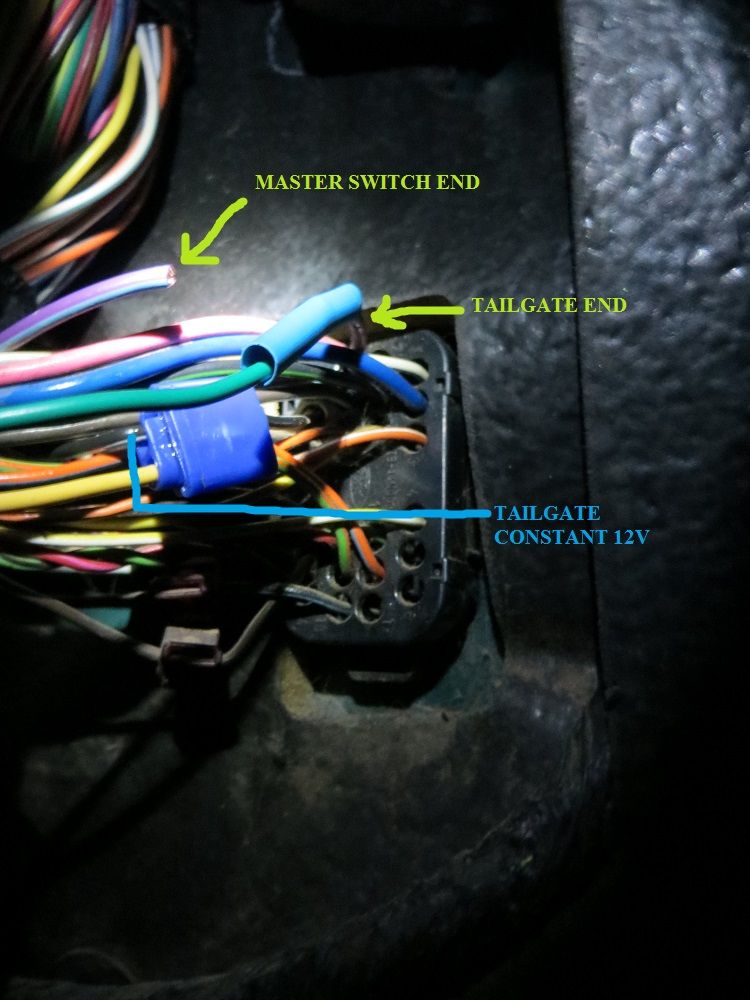
Next, you will cut the purple and green wire in half. With this wire, the end coming FROM the firewall goes BACK to the tailgate switch. The other end going UP into the dash goes to the switch. It is important not to get these wires mixed up.
Once you cut the wires in half, you wll have to connect the switch end of the wire the middle pin 87a, and the tailgate end of the wire to pin 30 of the relay. You will have to extend these wires with the extra you bought to get it to go to the relay. After you have these connected, you can take the wire you tapped in the black and white wire (constant 12 v) and make the opposite end have two connections. One of these connections goes to Pin 86, and the other to Pin 87. It doesn't matter what side goes where just as long as both pin 86 and 87 get a constant 12v.
After those wire are connected, you can connect the white wire with a red stripe to pin 85 on the relay. Now that this is hooked up, all your wiring should be done!
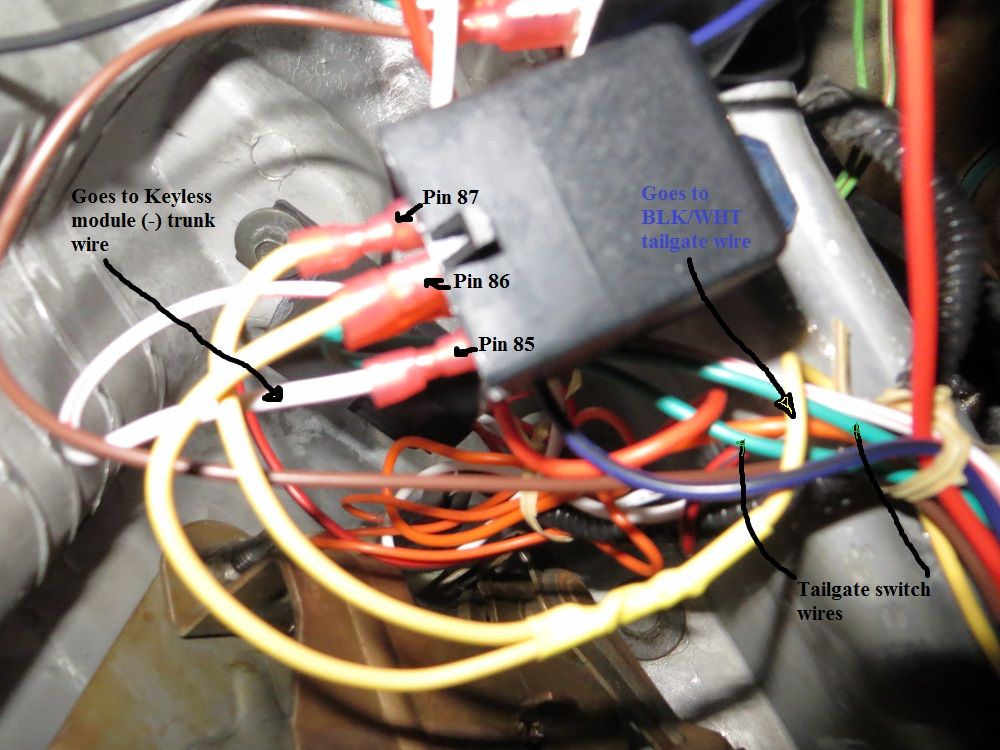
Make ABSOLUTELY SURE you connect the TAILGATE end of the window wire to pin 30 (bottom pin) and the SWITCH end of the wire to pin 87a (middle pin). If you mix these two around, you could blow a fuse or potentially damage a component on the wiring circuit.
Here is a picure showing all the prongs on the relay
I was running out of wiring so I used green wiring for both ends of the tailgate wires so hopefully that isn't confusing.
Anyways, now that everything is set up, its time to clean up your mess!
Section 8: Clean-up
You want to make sure that you secure your wires up away from any moving components and wrap them up well with electrical tape. If your wires are colse to the steering column, try and move them or make 100% sure they will never fall down and get caught up in the column. It happened to me once (because I had a mess up there from a previous install of something from a former owner) and it locked up my steering.
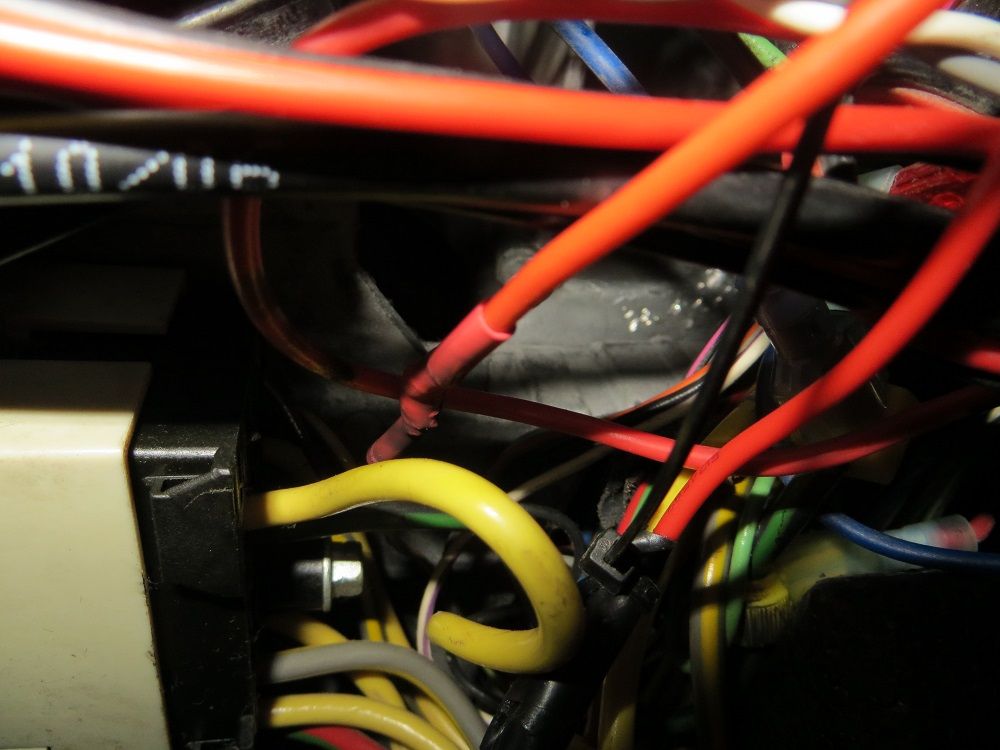
Here is where I hid my keyless module:
I wrapped the harness side of the wire with electrical tape. You can see I still have to clean up those wires at the top so they aren't as messy/dangerous.
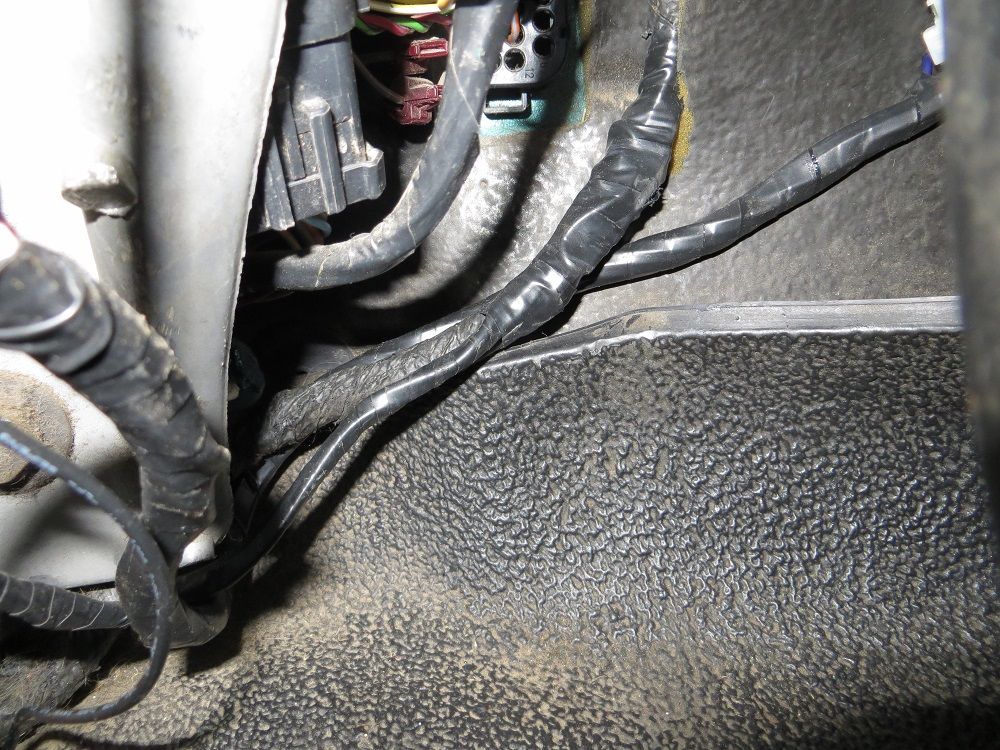
Here is where my wiring goes for the door locks all wrapped up:
Once you get everything fully secured, you can put all your paneling back together enjoy your system!!!! Of course, along the way, it is always good to make sure you made proper wiring connections so you don't put everything back together and realize something wasn't fully connected and now it's all wrapped up in tape.
Once you're done though, you can experience something as great as this:
<embed width="600" height="361" type="application/x-shockwave-flash" allowFullscreen="true" allowNetworking="all" wmode="transparent" src="http://static.photobucket.com/player.swf" flashvars="file=http%3A%2F%2Fvid1267.photobucket.c om%2Falbums%2Fjj558%2FBubbajones_ya%2FKeyless%2520 Entry%2520install%2Fvideo007_zps5af86a09.mp4">
video007_zps5af86a09.mp4 Video by Bubbajones_ya | Photobucket
(It was late and I have no good lights outside so I thought this would do. Maybe I'll get a better video up tomorrow after work, it looked WAY lighter when i reviewed it on the camera....)
Caution! Before starting make sure you are comfortable working with wiring (splicing, tapping, soldering etc.). If you mess up any wires in the walk-through it could prevent your vehicle from starting or blow fuses/etc. and become a mess! Make sure you know what wire is what and the connections made are done so properly and adequately protected.
I will not go into how to heatshrink wires/making proper connections/ or soldering. If you feel super uncomfortable and want to know more, just send me a message or you can probably find tons of good info on the series of tubes (internet).
This walk-through is based on the Bulldog Keyless entry system that can be purchased at Oreilly's /Autozone. Its a pretty inexpensive system so that's why I went with it.
Tool list:
-Wire splicer
-Pliers
-Screwdriver
-phillips head bit
-flathead bit
-torx bit (Sorry don't know exact size (t-40 i think)
-Multimeter
-Exacto Blade or sharp knife
-Flashlight
Needed Supplies:
-Electrical Tape
-Shrinkwrap
-Lighter
-Two extra 5 prong relays
-Extra wiring 18-14 gauge (Several feet to be safe)
-9 Wire connectors (18-14 gauge)
-Wire taps (5)
Highly Recommended Extras:
-Soldering Gun
-Extra Solder
-Variation of extra wiring (18-14 gauge)
Section 1: Diagrams
Section 2: Getting Started
Section 3: Initial Wiring
Section 4: Starter Immobilizer (optional)
Section 5: Parking Light Confirmation (optional)
Section 6: Door Lock wiring
Section 7: Rear Window Wiring (manditory (okay maybe not (or is it?)))
Section 8: Clean-up
Section 1: Diagrams
Here is the module wiring diagram for what the wire colors of the harness go to:

Starter Immobilizer instruction with included 5 prong relay and connector:

Parking light wiring confirmation instructions:

Door lock wiring instructions (For "Type C" vehicles which most Fords are)

Section 2: Getting Started
Before you begin ripping all your wiring apart, you will need to take off some panels to gain easier access to all the wiring. Depending on what you are planning to install will determine how much you have to take off. Some people decide not to install the starter immobilizer or parking light confirmation, which can save some time but not really that much. I explain how to proceed as if you were installing everything.
The panels you will need to take off to get access include:
-Drivers kick panel
-Instrument Cluster Bezel
-Drivers door panel (not 100% necessary but recommended)
To take off the kick panel, you will need to unscrew one screw from the black floor molding tab so you can get the bottom of the kick panel out from underneath it. The kick panel is held in by two of the door panel type clips and it should just pry off. I always pull mine off, but you can use a screwdriver/pliers or better yet door panel removal tool to get it off. Like I said I always have luck just ripping it off.
To take off the Cluster Bezel, you will need to take off both trim pieces to the right and left of the steering wheel. They are in place by clips so they will pry off with a flathead screwdriver. Once they are off, you can see there are torx screws hidden beneath them. After unscrewing the torx screws, you need to take off the headlight switch. To do this, turn the lights fully on. There is a metal clip on the back side of the **** that secures it to the bar. Use a small flathead screwdriver and pry the clip forward and the **** will come off. TURN THE LIGHTS BACK OFF so you don't drain your battery. Once this is off, the cluster will be able to be pried off. The rear window switch wiring will need to be unplugged from the bezel (it's a pain to pull out you may need to use a screwdriver and pry it off).
I won't go over taking off the door panels since I didn't need to do it, but there are plenty off good write ups on how to do that. It only has a few screws and lots of those plastic fastener things.
Section 3: Initial Wiring
You will want to know the general idea of where you want the module before you get to involved in wiring. I shoved mine behind some of the firewall backing near some other wiring stuff but there are plenty of places to hide it up in the dash if not a lot of aftermarket stuff is up there already.
First, you want to find the 12v constant wire to plug the red wire from the module harness into. There are several of these wires up in the dash underneath the steering wheel. All the big yellows ones should be constant 12v and you can tap into any of them. Use your multimeter to verify that they are always hot though just in case!

Next, connect your ground wire to the ground spot underneath the parking brake release:

You're now ready to move onto bigger and better things!
Section 4: Starter Immobilizer
If you choose to install this, find a good place where you will have your relay mounted. I mounted mine up underneath the dash where there was some bolt on the left hand side up above the parking brake pedal assembly. I unfortunately didn't take a picture where but you can mount it anywhere you please!
The diagram in Section 1 explains exactly how to hook this up so I won't go too into detail. I will provide pictures of what I had though.
The red wire from the bulldog relay kit is connected to the key side of the starter wire:

White wire from the bulldog relay kit is connected to starter side of the wire:

Next, connect orange wires from relay to harness!!

Section 5: Parking Light Confirmation
Same thing as last section, you'll need to find a spot for the relay if you choose to install this. Also, you will need to use one of the extra relays you bought here and make connections from the extra wiring you have to the relay. You will only use 4 of the 5 prongs on this relay. I also won't go too much into detail because the diagram in section 1 also explains the installation process.
This is why you took off the instrument cluster bezel. You need to access the brown wire which controls your parking lights. The brown wire will show 12v on your multimeter with the both the lights on and the parking lights on. It will show no voltage with the lights off.

Here is my relay mounted up under my dash:

The brown wire on pin 86 of the relay is one from the wiring harness of the module. The other wires are extra wires I bought and cut to length.
Here is a picture of the connections from the relay to the power wire:

Section 6: Door Lock Wiring
I was a little lucky in this section. My truck used to have manual windows and locks, but I converted them to auto by going to a junk yard and getting wiring/panels etc and buying new motors. I was at an advantage here because I routed my power lock wiring up against my firewall underneath the dash, when the stock wiring is up inside the dash and quite inaccessible. I have read that people have taken off their door panel to be able to access their door lock wiring easier to install keyless enty kits. The idea of what I did for what you have to do is identical, but you may have to do a little searching for your wires if you did not take off the door panel.
Like the last section. The diagram in section 1 explains the wiring quite well so refer to that for a complete list of what to do.
For Broncos 94-96, the wiring for the power unlock is pink/light green and the wiring for power lock is pink/yellow.
Once you find you wires for lock and unlock, you will have to cut them in half and test which side is which. To test them (starting with lock), connect your positive end of the multimeter to one side of the wire, and ground the other. Then, while still connected, hit your lock button. If the multimeter reads 12v, that is the switch side. Just to be safe, test the other side too the same way. If no voltage comes up, it is the motor side. Do this with both unlock and lock and make sure you know which end of the wire is which.

After the door lock connections are made, you can fuse wiring to power (as shown in the parking confirmation section.)
Section 7: Rear Window Wiring
Okay here is the diamand jewel of the crown to the whole project. I was able to complete this thanks to searching around on the internet and looking at other forums/threads etc. I wanted to list it here so it would be in a complete writeup and clear any other confusion people may have because I know I had some initially.
To start with this, you will need the other 5 prong relay and make connections for each prong.
Here is a diagram I found and edited of how the relay should be set up:

You can first start by finding the wiring that goes back to the tailgate. This wiring is located next to the firewall behind your clutch pedal (or if you are unlucky and have an automatic, behind and slightly to the left of your brake pedal). There are a whole bunch of wires coming in through some harness type thing. You are looking for two wires, one that is black with a white stripe (constant 12v) and one that is purple with a green stripe (window down wire.)
First, get a wire ready and tap it into the black and white wire as seen in this picture:

It is near the top left so make sure you get that one. Once you tap into it, you can check to make sure it has a constant 12v by using the multimeter and touching one end the the tapped wire with the positive end, and the negative end to ground. If it comes up as 12v you're good to go!
Next, you will cut the purple and green wire in half. With this wire, the end coming FROM the firewall goes BACK to the tailgate switch. The other end going UP into the dash goes to the switch. It is important not to get these wires mixed up.

Once you cut the wires in half, you wll have to connect the switch end of the wire the middle pin 87a, and the tailgate end of the wire to pin 30 of the relay. You will have to extend these wires with the extra you bought to get it to go to the relay. After you have these connected, you can take the wire you tapped in the black and white wire (constant 12 v) and make the opposite end have two connections. One of these connections goes to Pin 86, and the other to Pin 87. It doesn't matter what side goes where just as long as both pin 86 and 87 get a constant 12v.
After those wire are connected, you can connect the white wire with a red stripe to pin 85 on the relay. Now that this is hooked up, all your wiring should be done!

Make ABSOLUTELY SURE you connect the TAILGATE end of the window wire to pin 30 (bottom pin) and the SWITCH end of the wire to pin 87a (middle pin). If you mix these two around, you could blow a fuse or potentially damage a component on the wiring circuit.
Here is a picure showing all the prongs on the relay

I was running out of wiring so I used green wiring for both ends of the tailgate wires so hopefully that isn't confusing.
Anyways, now that everything is set up, its time to clean up your mess!
Section 8: Clean-up
You want to make sure that you secure your wires up away from any moving components and wrap them up well with electrical tape. If your wires are colse to the steering column, try and move them or make 100% sure they will never fall down and get caught up in the column. It happened to me once (because I had a mess up there from a previous install of something from a former owner) and it locked up my steering.
Here is where I hid my keyless module:

I wrapped the harness side of the wire with electrical tape. You can see I still have to clean up those wires at the top so they aren't as messy/dangerous.
Here is where my wiring goes for the door locks all wrapped up:

Once you get everything fully secured, you can put all your paneling back together enjoy your system!!!! Of course, along the way, it is always good to make sure you made proper wiring connections so you don't put everything back together and realize something wasn't fully connected and now it's all wrapped up in tape.
Once you're done though, you can experience something as great as this:
<embed width="600" height="361" type="application/x-shockwave-flash" allowFullscreen="true" allowNetworking="all" wmode="transparent" src="http://static.photobucket.com/player.swf" flashvars="file=http%3A%2F%2Fvid1267.photobucket.c om%2Falbums%2Fjj558%2FBubbajones_ya%2FKeyless%2520 Entry%2520install%2Fvideo007_zps5af86a09.mp4">
video007_zps5af86a09.mp4 Video by Bubbajones_ya | Photobucket
(It was late and I have no good lights outside so I thought this would do. Maybe I'll get a better video up tomorrow after work, it looked WAY lighter when i reviewed it on the camera....)
The Southernmost Mod
Joined: Dec 2004
Posts: 6,902
Likes: 21
From: Caracas, Venezuela

For me looking at those wiring photos and diagrams was like looking at Medusa's head (I REALLY dislike wiring, but I'll get the hang of it eventually). Great work nevertheless, I'll try to learn some then maybe try something like this.
Thread Starter
|
Fleet Mechanic
Joined: Dec 2006
Posts: 1,925
Likes: 10
From: Phoenix, AZ
Haha thanks Encho and Bigzirb!
Yeah with wiring.. I initially hated it. I never wanted to touch it, but when I installed my first overhead console I needed to dig in and tackle it because there was no wiring for it before. Then I went onto adding an electric fan, then tackled converting manual door locks and windows to power, so this wasn't anything too crazy. It seems intimidating at first, but if you make sure to follow what wire is what, its not too bad.
The thing that initially got me is that with wiring, you can't see where it snakes its way up to. When taking apart anything else, everything is right there in front of you so you know what you are doing, but with wiring, you have no clue where the wires will hide themselves up into. However, the coloring of the wires should always be the same wherever they are, so if you see the same colored wire in several spots, you know its all just one wire! (That is unless you wire stuff yourself with the same colored wire because that's the only spare wire you have laying around! Good thing I know what I wired up!)
I'll get a better video up of the window too! I just got back from watching White House Down and it was pretty good! Its about just as dark out tonight as last though so another video now won't do much good.

Thread
Thread Starter
Forum
Replies
Last Post
hoxiii
1980 - 1986 Bullnose F100, F150 & Larger F-Series Trucks
4
Feb 22, 2007 10:03 PM
dorkpunch
1967 - 1972 F-100 & Larger F-Series Trucks
7
Jun 9, 2005 11:53 AM


