
Overdrive button situation. Need help!


Fleet Owner


Joined: Oct 2005
Posts: 20,789
Likes: 1,753
From: Kentucky
Cut from my Ford service manual:
Overdrive Lock-Out Button, E4OD Automatic Transmission-Equipped Vehicles Only
Removal
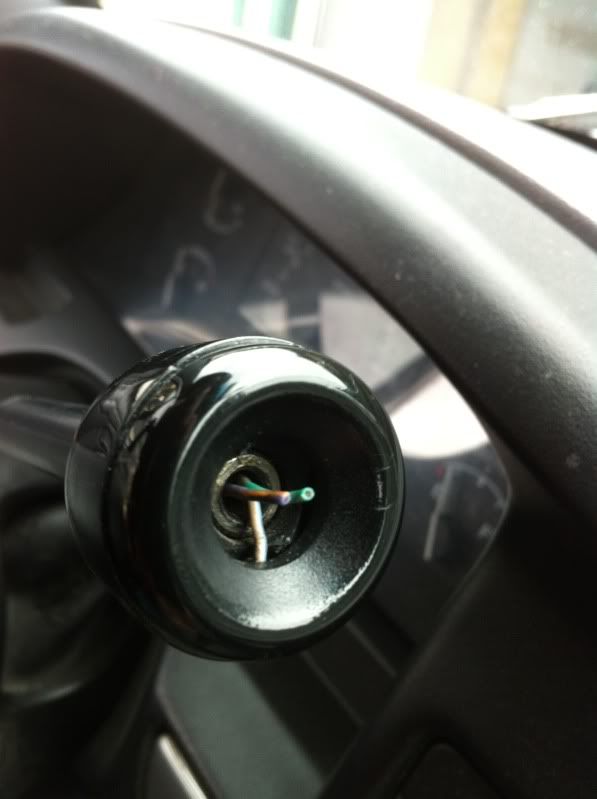
1. Remove the switch cover by inserting a thin-blade screwdriver into the recess at the end of the selector lever and unsnapping the cover from the selector lever.
2. Insert a thin-blade screwdriver into the slot on the switch and remove the switch by pulling switch out of the selector lever.
NOTE:
The indicator light cover can be removed from the selector lever if it is damaged. Carefully insert a thin-blade screwdriver into the selector lever and using the ridge on the cover slide cover off of selector lever.
Installation
NOTE:
If the indicator light cover was removed, install by positioning cover to selector lever and sliding into place. Make sure that the sides of the cover fit properly into the slots on the selector lever.
1. Position switch to selector lever making sure that the contract pins are properly oriented to the connector. Install switch by pushing into selector lever until bottom is felt.
2. Position switch cover to selector lever and snap into place.
3. Check switch for proper operation.
Overdrive Lock-Out Button, E4OD Automatic Transmission-Equipped Vehicles Only
Removal
1. Remove the switch cover by inserting a thin-blade screwdriver into the recess at the end of the selector lever and unsnapping the cover from the selector lever.
2. Insert a thin-blade screwdriver into the slot on the switch and remove the switch by pulling switch out of the selector lever.
NOTE:
The indicator light cover can be removed from the selector lever if it is damaged. Carefully insert a thin-blade screwdriver into the selector lever and using the ridge on the cover slide cover off of selector lever.
Installation
NOTE:
If the indicator light cover was removed, install by positioning cover to selector lever and sliding into place. Make sure that the sides of the cover fit properly into the slots on the selector lever.
1. Position switch to selector lever making sure that the contract pins are properly oriented to the connector. Install switch by pushing into selector lever until bottom is felt.
2. Position switch cover to selector lever and snap into place.
3. Check switch for proper operation.
Fleet Owner
Joined: Oct 2005
Posts: 20,789
Likes: 1,753
From: Kentucky
Here is the cap/button from Autozone: Dorman/Overdrive Shift Button Kit (49299) | AutoZone.com
The entire shifter, if you think you need one is here at Bronco Graveyard: 92-96 Shift Lever
Note the shifter does not come with cap/button noted before.
The entire shifter, if you think you need one is here at Bronco Graveyard: 92-96 Shift Lever
Note the shifter does not come with cap/button noted before.
Fleet Owner
Joined: Oct 2005
Posts: 20,789
Likes: 1,753
From: Kentucky
Just in case:
Gearshift Lever and Cover
Column Shift
Removal
1. Remove tilt lever by unscrewing from the column.
2. Turn ignition switch to RUN position. Using a 1/8-inch drift, depress lock cylinder retaining pin through access hole and remove lock cylinder.
3. Remove lower instrument panel cover retaining screws and remove cover.
4. Remove four retaining screws from lower shroud. Remove upper and lower shroud assemblies.
NOTE:
For F-Series and Bronco vehicles with an E4OD transmission, a protective cover (such as rag) must be placed between the shift lever and shroud opening during shroud removal. This will prevent damage to the shift lever shrink wrap.
5. Using a small screwdriver, pry rubber shift lever cover upper attachment from pedestal on lock cylinder housing. Slide cover toward shift lever handle to expose lever retaining pin.
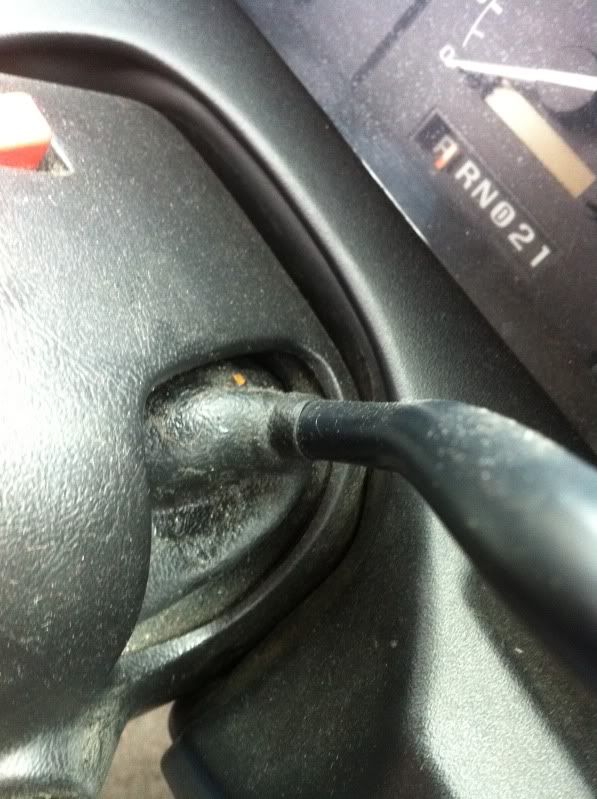
6. On vehicles equipped with an E4OD transmission, disconnect overdrive lockout button electrical connector.
7. Using a small drift, tap lever retaining pin from bottom for removal. Discard lever retaining pin. Remove shift lever from shifter housing assembly.
Installation
1. Insert shift lever through hole in rubber cover. Position cover on shift lever.
2. Verify that the shift lever anti-rattle clip is correctly positioned in the shift tube shift lever socket. Replace if required.
3. Insert shift lever into opening in shifter housing assembly.
4. Install a new pin into position and tap in place until the head seats against shifter housing assembly.
5. On vehicles equipped with an E4OD automatic transmission, connect overdrive lockout button electrical connector.
6. Position shift lever cover on the lock cylinder housing. Insert lower attachment into the slot on side of housing.
7. Position upper attachment on mounting pin.
8. Install upper and lower shroud with four screws.
NOTE:
For F-Series and Bronco vehicles with an E4OD transmission, a protective cover (such as rag) must be placed between the shift lever and shroud opening during shroud removal. This will prevent damage to the shift lever shrink wrap.
9. Install lower instrument panel cover and retaining screws.
10. Install lock cylinder into lock cylinder housing.
11. Install tilt lever onto column.
12. Check for proper start in PARK and NEUTRAL. Make sure start circuit cannot be actuated in DRIVE or REVERSE positions and the column is locked in the LOCK position.
Gearshift Lever and Cover
Column Shift
Removal
1. Remove tilt lever by unscrewing from the column.
2. Turn ignition switch to RUN position. Using a 1/8-inch drift, depress lock cylinder retaining pin through access hole and remove lock cylinder.
3. Remove lower instrument panel cover retaining screws and remove cover.
4. Remove four retaining screws from lower shroud. Remove upper and lower shroud assemblies.
NOTE:
For F-Series and Bronco vehicles with an E4OD transmission, a protective cover (such as rag) must be placed between the shift lever and shroud opening during shroud removal. This will prevent damage to the shift lever shrink wrap.
5. Using a small screwdriver, pry rubber shift lever cover upper attachment from pedestal on lock cylinder housing. Slide cover toward shift lever handle to expose lever retaining pin.
6. On vehicles equipped with an E4OD transmission, disconnect overdrive lockout button electrical connector.
7. Using a small drift, tap lever retaining pin from bottom for removal. Discard lever retaining pin. Remove shift lever from shifter housing assembly.
Installation
1. Insert shift lever through hole in rubber cover. Position cover on shift lever.
2. Verify that the shift lever anti-rattle clip is correctly positioned in the shift tube shift lever socket. Replace if required.
3. Insert shift lever into opening in shifter housing assembly.
4. Install a new pin into position and tap in place until the head seats against shifter housing assembly.
5. On vehicles equipped with an E4OD automatic transmission, connect overdrive lockout button electrical connector.
6. Position shift lever cover on the lock cylinder housing. Insert lower attachment into the slot on side of housing.
7. Position upper attachment on mounting pin.
8. Install upper and lower shroud with four screws.
NOTE:
For F-Series and Bronco vehicles with an E4OD transmission, a protective cover (such as rag) must be placed between the shift lever and shroud opening during shroud removal. This will prevent damage to the shift lever shrink wrap.
9. Install lower instrument panel cover and retaining screws.
10. Install lock cylinder into lock cylinder housing.
11. Install tilt lever onto column.
12. Check for proper start in PARK and NEUTRAL. Make sure start circuit cannot be actuated in DRIVE or REVERSE positions and the column is locked in the LOCK position.

Thread
Thread Starter
Forum
Replies
Last Post
Nightrain
1987 - 1996 F150 & Larger F-Series Trucks
15
Oct 25, 2006 09:59 PM


