


No spark
Moderator


Joined: Dec 2007
Posts: 7,987
Likes: 104
From: Boise, Idaho

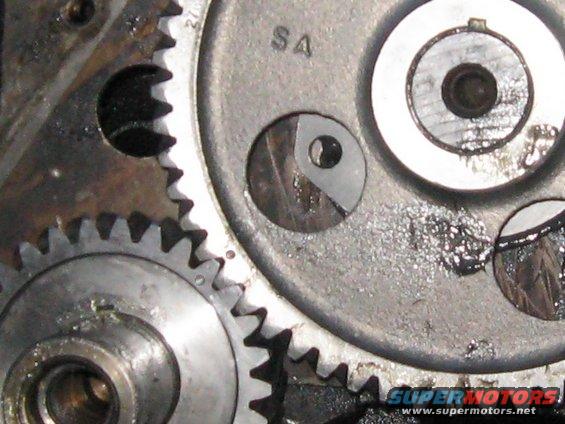
To get the crank gear off, I used a series of wedges, ranging from super thin, to thick. Just tapped the narrow ones behind it until there was more room. Moved up a size. Repeat. Moved up a size. Repeat. Until it slid off.
I don't know on the cam, since I didn't reuse my cam and just put a new one in. But, I've heard the thrust plate is easy to break, so you may want to get a new one for added insurance. They're not too expensive.
Ford 240 300 4.9 liter 6 cylinder engines Cylinder head bolts / fasteners
CAM-21, Thrust plate for Ford 240-300 inline six.
To put the new ones on, put them in the oven for half an hour at around 300�, lubricate the ends of the cam and crank with axle grease, and then take some hot pads and shove them on as hard as you can, and then tap them down the rest of the way.
The cam has a threaded end (at least mine did), that I could put a bolt into and tighten the cam gear the rest of the way down, but the crank needed tapping to get it the rest of the way.
Also, when you take the cam gear off, be sure to hang on to the spacer behind it. If you don't have one, you may want to get one. It's on that headbolts site in the "engine finishing kit". I think Ford put them on with a machine that was extremely precise (since if the gear is back too far, it'll rub), so the spacer makes it so you can't put the gear on too far.

New User
Joined: Jul 2012
Posts: 13
Likes: 0
Well got everything pulled this past weekend. Got the crank gear off easily with the traditional puller. The cam gear broke to pieces while trying to pull it off so I cut all of the fiber off of the center metal housing. Then I took a piece of square tubing that would slide over the housing and drilled 4 1/4-20 treaded holes on one end, welded a plate in the tubing about 2 inches away from that end, and welded a 3/8 nut in the center of that plate. Slid the tubing over the housing and locked the 4 bolts down and then started tightening the 3/8 bolt to pull the housing off. Worked well..... Lifted the engine and pulled the oil pan to remove all the small fiber gears..... Waiting on parts
Moderator
Joined: Dec 2007
Posts: 7,987
Likes: 104
From: Boise, Idaho
Sounds like you've dived in and are moving right along! Nice work. Fortunately, it sounds like you got the hard part behind you.
For the timing cover gasket set, I'd recommend the more expensive of the two. The higher end one comes with a repair sleeve for the harmonic balancer, as well as some good sealant. The repair sleeve will help with any leaks.
Also, be sure the timing cover is on very straight. Best way I've found to do it is to bolt the cover down loosely, then fully press on the harmonic balancer. Tighten down the bolts on the timing cover until they're snug. Then, pull the harmonic balancer back off and properly torque down the bolts on the cover. There are alignment tools for the job, but this has worked very well for me.
Last but not least, (I'm sure you know, but just in case) always make sure the two timing marks on the cam and crank gear point at each other.
Moderator
Joined: Dec 2007
Posts: 7,987
Likes: 104
From: Boise, Idaho
It's pretty straight forward.
Turn the engine until it's TDC on the #1 piston on the compression stroke. The timing mark should be on the 0� mark. Rotate the engine slightly until the timing mark is pointing at your desired timing (10� is a pretty good setting).
Note which direction the #1 spark plug post is on the distributor cap and then remove it and install the distributor with the rotor pointed towards the #1 post. It doesn't matter which direction the distributor sits, although some are easier than others (don't want the SPOUT connector hitting the block). If it doesn't fully seat, try a few different directions or rotate the engine slightly.
Once it's fully seated and the rotor is pointed towards the #1 spark plug post, remove the rotor and look down in the distributor and find the magnetic pickup (should be a black thing to one side) and locate the alignment marks on it. Rotate the distributor slightly until the closest arm on the stator (the six sided star) is RIGHT between the two alignment marks.
Once it is, tighten down the distributor, install the cap and rotor, put everything back together, and fire it up. If it bucks, pops, and sputters, you most likely got it put in 180� backwards.
Best of luck!
New User
Joined: Jul 2012
Posts: 13
Likes: 0
It's pretty straight forward.
Turn the engine until it's TDC on the #1 piston on the compression stroke. The timing mark should be on the 0� mark. Rotate the engine slightly until the timing mark is pointing at your desired timing (10� is a pretty good setting).
Note which direction the #1 spark plug post is on the distributor cap and then remove it and install the distributor with the rotor pointed towards the #1 post. It doesn't matter which direction the distributor sits, although some are easier than others (don't want the SPOUT connector hitting the block). If it doesn't fully seat, try a few different directions or rotate the engine slightly.
Once it's fully seated and the rotor is pointed towards the #1 spark plug post, remove the rotor and look down in the distributor and find the magnetic pickup (should be a black thing to one side) and locate the alignment marks on it. Rotate the distributor slightly until the closest arm on the stator (the six sided star) is RIGHT between the two alignment marks.
Once it is, tighten down the distributor, install the cap and rotor, put everything back together, and fire it up. If it bucks, pops, and sputters, you most likely got it put in 180� backwards.
Best of luck!
Turn the engine until it's TDC on the #1 piston on the compression stroke. The timing mark should be on the 0� mark. Rotate the engine slightly until the timing mark is pointing at your desired timing (10� is a pretty good setting).
Note which direction the #1 spark plug post is on the distributor cap and then remove it and install the distributor with the rotor pointed towards the #1 post. It doesn't matter which direction the distributor sits, although some are easier than others (don't want the SPOUT connector hitting the block). If it doesn't fully seat, try a few different directions or rotate the engine slightly.
Once it's fully seated and the rotor is pointed towards the #1 spark plug post, remove the rotor and look down in the distributor and find the magnetic pickup (should be a black thing to one side) and locate the alignment marks on it. Rotate the distributor slightly until the closest arm on the stator (the six sided star) is RIGHT between the two alignment marks.
Once it is, tighten down the distributor, install the cap and rotor, put everything back together, and fire it up. If it bucks, pops, and sputters, you most likely got it put in 180� backwards.
Best of luck!

Post Fiend
Joined: Jun 2003
Posts: 8,209
Likes: 12
From: Black Hills of SD
Yep, Ignition Module was the problem. It pays to trouble shoot. Replaced rotor, coil, distro cap and even before all that...fuel filters... I would advise any rookies to old ford trucks ,like me, that the Ignition Module is fairly cheap... 20.00$ or so at O reilley's... BUT while your in there go ahead and get the "special tool" to get the damn thing off. It is basically a 7/32 deep socket that is specially made to reach inside the deep holes holding the module on. No, all standard SAE sockets will not work because they are too fat to fit inside the deep holes. From there I would advise connecting the bottom front bolt first (the one closest to the radiator) and then the rear top bolt last.
Moderator
Joined: Dec 2007
Posts: 7,987
Likes: 104
From: Boise, Idaho
A lot of 300s have two timing marks on the balancer (mine does) with timing lines on the timing cover, and another set on the passenger side. I prefer the ones on the timing cover since they're 100x easier to see, especially while turning the distributor.
7mm is what I remember. I thought it was odd that it was metric.
FTE Stories
Ford Trucks for Ford Truck Enthusiasts

Top 6 Best Deals Available on New Fords & Lincolns Right Now
Brett Foote
This Hennessey Takes the Expedition Tremor's Off-Roading Capability to the Next Level
Verdad Gallardo
Top 10 Fords at 2026 Carlisle Ford Nationals
Joe Kucinski
3 Best / 3 Worst Parts of Modern Ford Ownership
Brett Foote
10 Amazing Upgrades That Solve Common Ford Truck Owner Headaches
Pouria Savadkouei
Every 2026 Ford Engine Explained
Brett Foote
10 Ugly Ford Trucks That We Still Kinda Love
Joe Kucinski
10 Things Every Truck Owner NEEDS (2026 Edition)
Michael S. Palmer
Rezvani's Latest Post-Apocalyptic Monster Is a Ford F-150 Raptor Underneath
Verdad Gallardo

Thread
Thread Starter
Forum
Replies
Last Post
rodp14
1980 - 1986 Bullnose F100, F150 & Larger F-Series Trucks
54
Jul 9, 2017 08:13 PM
copenhagenkid00
1987 - 1996 F150 & Larger F-Series Trucks
4
Apr 19, 2013 12:23 AM