


Need some sway bar help
Thread Starter
|
Junior User
Joined: Feb 2012
Posts: 89
Likes: 0
Need some sway bar help
Folks,
I am trying to replace my V10 4x4 sway bar and end link bushings and am stuck with some problems.
First, thanks to this site and:
2004 F250 Sway Bar Bushing Replacement
I was able to finally get the passenger link off. The truck is on the ground and I could not for the life of me see the spacer block on the frame.
Okay, so the links are off after WAY too long under the truck. So how the heck do I get the bolts out. I got one of the short ones out but the rest are really stuck in there.
Second, I have NO idea how I'm going to get the bushings out. I tried for an hour on the bolt-less side of the dogbone to hammer or "c-clamp" them out while in the vise. Without a shop press, do I have to resort to the "heat-n-beat" method? Is there no other way?
Finally, where is a good source for equivalent grade bolts. One of my nuts was apparently cross-threaded which is why it was miserable to remove. I think it screwed my threads up.
I'm goin nuts and about to just buy the whole damn end link.
Thanks in advance,
Brad
Veteran/Sheepdog


Joined: Feb 2012
Posts: 6,047
Likes: 110
From: Western AR

Where ya at, Aggie? I replaced mine with greasable links to avoid replacing any more bushings in the forseeable future. Tractor Supply carries grade 8 bolts/nuts for fair prices.
Truck needs to be on a level surface to make removal of the links go a little easier.
Truck needs to be on a level surface to make removal of the links go a little easier.
Moderator

Joined: Jul 2010
Posts: 12,051
Likes: 1,549
From: Media PA

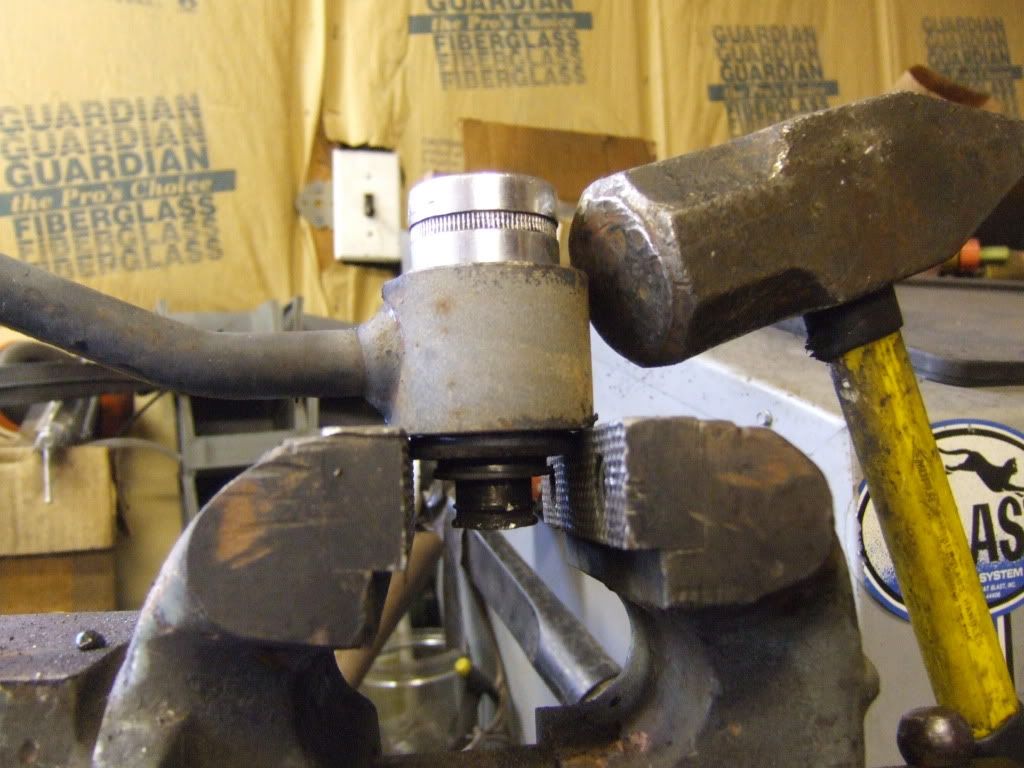
Aggie if you haven't gotten past these issues yet the bolts have an extra little 'shoulder' just below the head so they fit very snug into the bushings. If you put the nut on just enough to protect the end threads you should be able to drive the bolt out of the hole using your vice and a hammer. I went the heat-n-beat path but I think the bushing would still come out without the heat, maybe just a little more beating though. Use plenty of penetrating oil like PB Blaster and set the vice to support the endlink ring, don't clamp it in the vice. Then find something that will fit through the ring's hole and over the bushing to drive the bushing out, I had a 1 1/8" socket that fit perfectly. Use a decent sized hammer and don't be afraid to hit it hard, you aren't gonna reuse that bushing.
This photo shows how I supported the endlink with the vice while I beat the bushing out with a socket and mallet.
Good luck!
This photo shows how I supported the endlink with the vice while I beat the bushing out with a socket and mallet.
Good luck!
Thread Starter
|
Junior User
Joined: Feb 2012
Posts: 89
Likes: 0
Nicmike, I'm in NM but I'm a real Aggie. If I can't beat these bushings, I may go the greasable link route. But I haven't given up yet. I love Bastrop and was devastated about those fires. Hopefully you and yours were not affected.
WE3ZS, I saw your great write up. Thanks a lot. And thanks for the pointers. I'll try those tips and post back.
WE3ZS, I saw your great write up. Thanks a lot. And thanks for the pointers. I'll try those tips and post back.
Thread Starter
|
Junior User
Joined: Feb 2012
Posts: 89
Likes: 0
I gave up and found a shop near me where I could use their hydraulic press. 3 of the four bushings required 5 tons and the fourth required 7 tons of force to remove (according to their gauge).
I'm glad they're out.
I'm glad they're out.
Thread Starter
|
Junior User
Joined: Feb 2012
Posts: 89
Likes: 0
Well, the deed is done. But that was absolutely ridiculous. For something that was supposed to be simple, that was the most difficult R&R I've ever done.
The bolts and nuts were all worn and old. I decided to buy a whole new set of 1/2" grade 8 bolts, of appropriate length. Well, that was a mistake. They aren't exactly 1/2" and wouldn't fit in the new metal spacer.
I spent over an hour trying to get the last corroded bolt out of the removed bushing. The bolt was virtually destroyed and in terrible shape. I finally got it out by threading one of the new bolts in the old bushing and "pressing" it out with enormous torque. I was using a 2' breaker bar and nearly ripped my vise out of my bench. I let it soak in solvent and rust eater while I went to work on the remainder of the assembly.
I'm glad I saved those bolts; I was very close to trashing them. Without them, I'd be up a creek. I expected the bushings to be tough going in. But if I'd have known the bolts were going to be so tough to remove from the bushings and be in such bad shape, I'd have found a different approach. Hopefully these Energy Suspension bushings last the rest of the life of this vehicle, because I never wanna mess with those bolts again!
The whole ordeal lasted about 10 hours. I budgeted 1-2 hours thinking that was conservative. I guess brakes will wait until next week.
Thanks for the help guys.
Cargo Master
Joined: Feb 2012
Posts: 3,396
Likes: 1
From: Crowley, TX
Glad you finally got it done.. This is something i am going to tackle down the road. just not at this moment
Trending Topics
Super Moderator

Joined: May 2004
Posts: 29,380
Likes: 118
From: Central Coast of CA
FTE Stories
Ford Trucks for Ford Truck Enthusiasts

Top 10 Most Expensive Ford Trucks Ever Sold on Bring a Trailer
Joe Kucinski
2027 Ford Super Duty Buyer's Guide (Every Model, Engine, & Package)
Brett Foote
Top 10 Ford Truck Tragedies
Joe Kucinski
AEV FXL Super Duty - the Super Duty Raptor Ford Doesn't Make
Brett Foote
Lobo Vs Lobo: Proof the F-150 Lobo Should Be Even Lower!
Michael S. Palmer
Ford's 2001 Explorer Sportsman Concept Looks For a New Home
Verdad Gallardo
10 Best Ford Truck Engines We Miss the Most!
Joe Kucinski
2026 Shelby F-150 Off-Road: Better Than a Raptor R?
Brett Foote
2027 Super Duty Carhartt Package First Look: 12 Things You NEED to Know!
Michael S. PalmerModerator
Joined: Jul 2010
Posts: 12,051
Likes: 1,549
From: Media PA
I'm glad you got it done. Hopefully you used plenty of never-sieze or grease on everything to prevent future issues. With all of my recent and ongoing maintenance on three of our vehicles and three trailers I have been going through tubs and tubes of Mobil 1 synthetic grease like peanut butter!

Thread
Thread Starter
Forum
Replies
Last Post
RubenG
Excursion - King of SUVs
6
Feb 1, 2016 11:20 AM
baddad457
1968-Present E-Series Van/Cutaway/Chassis
17
Dec 15, 2013 02:47 PM
Marylyn
Excursion - King of SUVs
3
Aug 19, 2007 08:54 PM