


Head Clean Enough?
Thread Starter
|
Junior User
Joined: Aug 2011
Posts: 85
Likes: 0
From: Warrenton VA
Head Clean Enough?
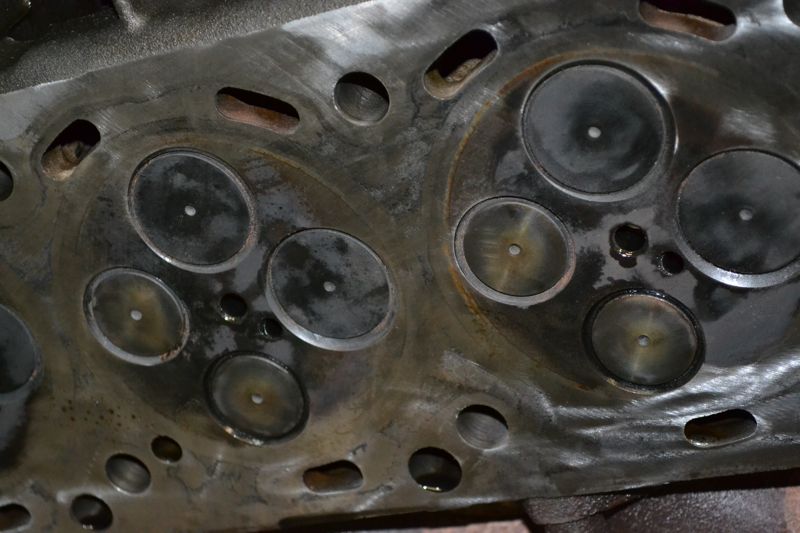
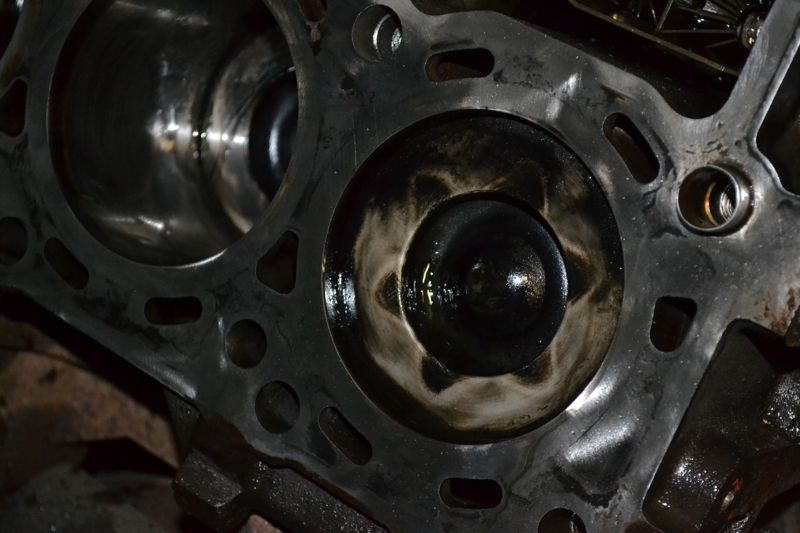
I'm doing the head gaskets on my 2005 F350 and have just finished cleaning the head and deck and checked both and couldn't find a single spot where I could fit my .005 feeler gauge underneath.
I'm ready to reassemble, but just wanted someone else to quickly glance at the images below and let me know if they look clean enough. I used a right-angle grinder with a "rust-remover" pad on the head side, and a 3M scouring pad on the deck side. By far the deck side is the worse of the two.
Deck Before Cleaning:
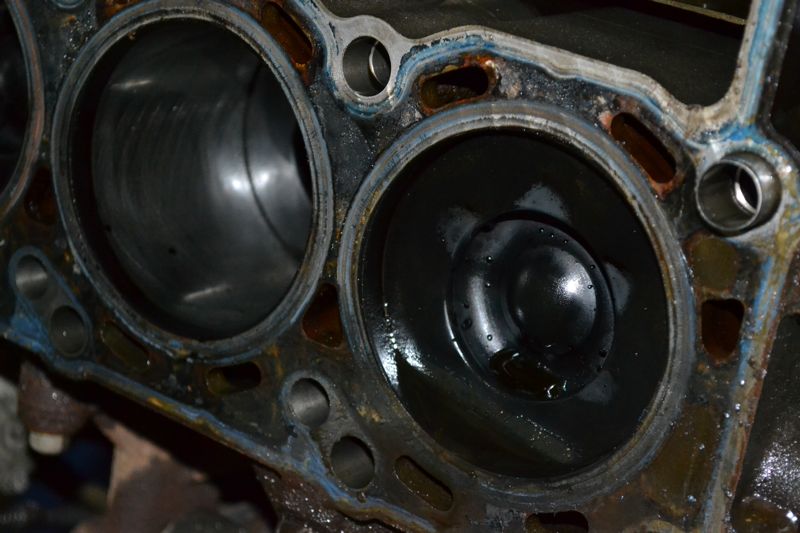
Deck After Cleaning:
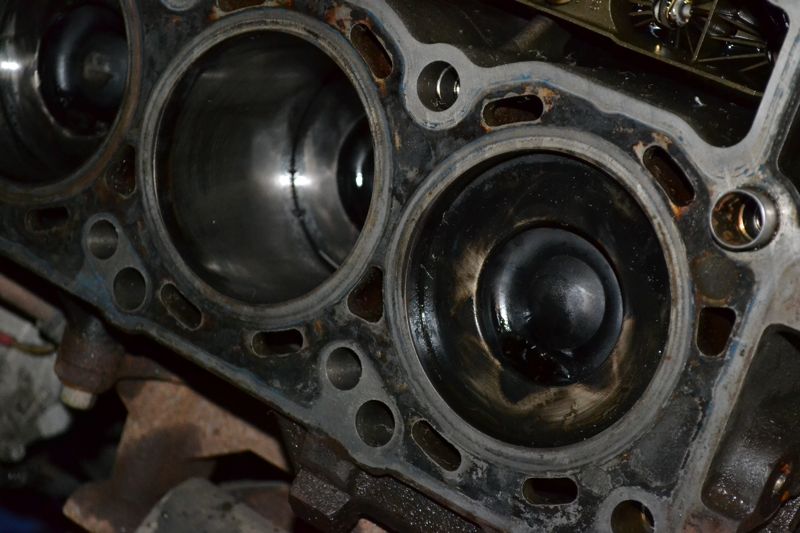
Head Before Cleaning:
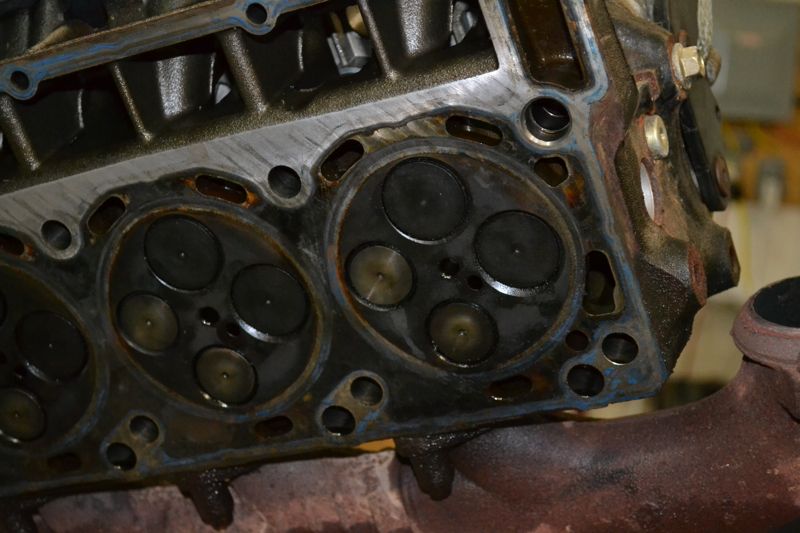
Head After Cleaning:
Tools:
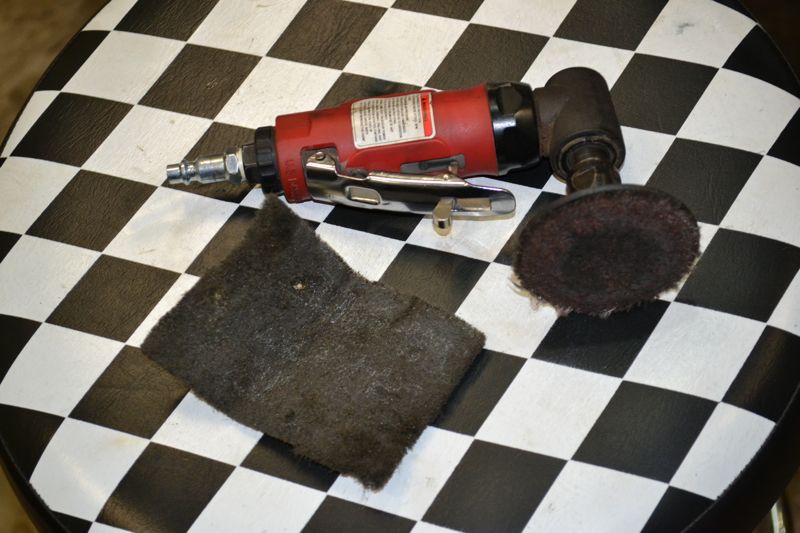
I'm ready to reassemble, but just wanted someone else to quickly glance at the images below and let me know if they look clean enough. I used a right-angle grinder with a "rust-remover" pad on the head side, and a 3M scouring pad on the deck side. By far the deck side is the worse of the two.
Deck Before Cleaning:
Deck After Cleaning:
Head Before Cleaning:
Head After Cleaning:
Tools:
Lead Driver


Joined: Feb 2011
Posts: 8,241
Likes: 155
From: L.A. (Lower Alabama)

There is kind of an art to this. The trick is to feel the surface to determine what is just discoloration and what is material left on the surface. Remove all the old gasket material, carbon etc. and ignore the stains. If you chase the stains you remove metal from the surface unevenly and increase the chances of a leak. It's hard to tell from a picture, it's more a feel thing. That 3m rust remover rotary pad is pretty coarse for this kind of job, it can remove metal quick. If you want it to look good I recommend a wire brush for you die grinder. It will shine it up (burnish) without removing much metal from the surface ( just watch out for wire the brush sheds). 
Last edited by Rusty Axlerod; Sep 27, 2011 at 07:25 PM. Reason: Add
Thread Starter
|
Junior User
Joined: Aug 2011
Posts: 85
Likes: 0
From: Warrenton VA
There is kind of an art to this. The trick is to feel the surface to determine what is just discoloration and what is material left on the surface. Remove all the old gasket material, carbon etc. and ignore the stains. If you chase the stains you remove metal from the surface unevenly and increase the chances of a leak. It's hard to tell from a picture, it's more a feel thing. That 3m rust remover rotary pad is pretty coarse for this kind of job, it can remove metal quick. If you want it to look good I recommend a wire brush for you die grinder. It will shine it up (burnish) without removing much metal from the surface ( just watch out for wire the brush sheds).
I decided to go ahead and use the rotary on the block too...
Hotshot
Joined: Apr 2010
Posts: 19,055
Likes: 235
From: Saratoga Springs,UT
Did you have a puke issue before??
if so did you find a bad head gasket
they do look clean I wouldnt worrey about the stains either
Last time I did it on my car I cleaned till smooth to the touch and didnt worrey to much about the stains dont want to remove any metal
if so did you find a bad head gasket
they do look clean I wouldnt worrey about the stains either
Last time I did it on my car I cleaned till smooth to the touch and didnt worrey to much about the stains dont want to remove any metal
Thread Starter
|
Junior User
Joined: Aug 2011
Posts: 85
Likes: 0
From: Warrenton VA
I'm no expert, but I don't think the leak was on the passenger side. I wasn't able to find any one area that indicated coolant or exhaust had breached the gasket.
Both are smooth to the touch (mostly) except for a few stubborn small spots, but I can see no gasket material remaining (blue stuff) or very much carbon or rust.
I coated everything in WD40 for tonight, and figured I'd finish up this side tomorrow night to give people some time to comment.
There's a whole lot of photos here:
Head Gasket Photos
Thread Starter
|
Junior User
Joined: Aug 2011
Posts: 85
Likes: 0
From: Warrenton VA
I have no problem getting them decked, but would rather not have the work done if it isn't needed.
Trending Topics
Post Fiend
Joined: Oct 2009
Posts: 12,123
Likes: 35
From: N. Fort Worth, tx

hmmm. dont look like someone followed the currect way to do things.. dont see the metal serface prep and brass or plastic scraper.
anyway as rusty said. remove the gasket not the stains.
anyway as rusty said. remove the gasket not the stains.
FTE Stories
Ford Trucks for Ford Truck Enthusiasts

10 Best Ford Truck Engines We Miss the Most!
Joe Kucinski
2026 Shelby F-150 Off-Road: Better Than a Raptor R?
Brett Foote
2027 Super Duty Carhartt Package First Look: 12 Things You NEED to Know!
Michael S. Palmer
10 Most Surprising 2026 Ford Truck Features!
Joe Kucinski
Top 10 Ford Trucks Coming to Mecum Indy 2026
Brett Foote
5 Best / 5 Worst Ford Truck Wheels of All Time
Joe Kucinski
Ford Super Duty: 5 Things Owners LOVE, 5 Things They LOATHE!
Joe Kucinski
Every 2026 Ford Truck Engine RANKED from WORST to FIRST!
Michael S. Palmer
The Best F-150 Deal of Every Trim Level (XL through Raptor)
Joe KucinskiHotshot
Joined: Apr 2010
Posts: 19,055
Likes: 235
From: Saratoga Springs,UT
Hey Great pics reps to yyou
puke is when theres enough pressure to force coolant out the Degass Bottle cap
so if there was no visible breach in the head gaskets theres 2 more possibilities in my mind
Cracked head/s
or
Headbolts streched
am I missing something here???
Im hopen just bad Bolts but never know alot of work to have to go thru again if its not
Iv heard rumors some of the headbolts ddnt get tightened to proper spec at the assembly plant
some have said they were only finger Tight
Did you find any headbolts like this
reps to yyoupuke is when theres enough pressure to force coolant out the Degass Bottle cap
so if there was no visible breach in the head gaskets theres 2 more possibilities in my mind
Cracked head/s
or
Headbolts streched
am I missing something here???
Im hopen just bad Bolts but never know alot of work to have to go thru again if its not
Iv heard rumors some of the headbolts ddnt get tightened to proper spec at the assembly plant
some have said they were only finger Tight
Did you find any headbolts like this
Post Fiend
Joined: Oct 2009
Posts: 12,123
Likes: 35
From: N. Fort Worth, tx
benny I have done more then 100 sets of heads never seen one finger tight. however if there was one it was then likly the result of a streched both. once that happens and the bolt gets longer then it should the tension /clamp force will be reduced.
there was an up date to the torque a number of years ago iirc one of the changes was a 3rd 90* turn.
there was an up date to the torque a number of years ago iirc one of the changes was a 3rd 90* turn.
Thread Starter
|
Junior User
Joined: Aug 2011
Posts: 85
Likes: 0
From: Warrenton VA
My original post:
https://www.ford-trucks.com/forums/1...-cleaning.html
Post Fiend
Joined: Oct 2009
Posts: 12,123
Likes: 35
From: N. Fort Worth, tx
youll be fine.however the info you seek can be found in the search box. I have stated it before at least a few times.
cast iron is pretty hard to screw up your in luck however you have altered the rms pattern. still not a big deal. just never do this to an aluminum part that you expect to seal again.
cast iron is pretty hard to screw up your in luck however you have altered the rms pattern. still not a big deal. just never do this to an aluminum part that you expect to seal again.
Thread Starter
|
Junior User
Joined: Aug 2011
Posts: 85
Likes: 0
From: Warrenton VA
I did not encounter any "loose" headbolts, but I used the impact gun to remove them. Some seemed tighter than others, but all were pretty similar.

Thread
Thread Starter
Forum
Replies
Last Post
BeauF0RD
1973 - 1979 F-100 & Larger F-Series Trucks
10
Jun 8, 2017 08:55 AM
82-100
1980 - 1986 Bullnose F100, F150 & Larger F-Series Trucks
15
Apr 28, 2009 08:29 AM