


Main Seal

Cargo Master
Joined: Sep 2007
Posts: 2,095
Likes: 2
From: Wahpeton ND
Pull the radiator out, Remove the belts off the harmonic balancer, pull the center bolt off the balancer, Pull the balancer using a harmonic balancer puller or a three jaw puller.
Pop out the old seal. Clean the bore where it sits with some emery or scotchbrite. Install new seal with a thin butter of permatex on the outer edge and some clean greese on the iner seal lips. Reinstall.
Using a three jaw may damage your harmonic. I have had about 80% succes doing it with them but I have hashed a few over the years.
This aint terribly hard project but it can be a long afternoon on your back.
Lead Driver


Joined: Mar 2008
Posts: 7,193
Likes: 385
From: Near Los Angeles
Unless I'm mistaken, the front cover has to come off too. Buy the Felpro kit with the sleeve that goes on dampener. Put in seal with the proper tool or a socket that fits. Use weather strip adhesive to glue o.pan front piece to pan, and let it dry well. Clean it first with something like laquer thinner. Use silicone at edges of gasket, where it meets the old one. Apply silicone in the keep slot on the dampener, and inside where it slides onto crank.
Take a long hard look at your timing gears while you're in there.
Take a long hard look at your timing gears while you're in there.
Moderator
Joined: Dec 2007
Posts: 7,987
Likes: 104
From: Boise, Idaho

Don't do what I did when I used a puller on the harmonic balancer.
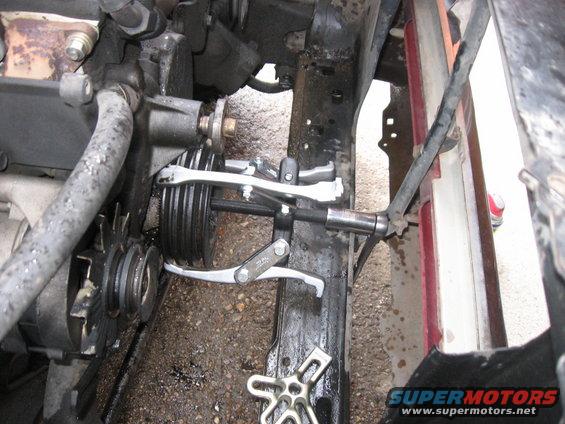
The center of the puller is the press that pushes the pulley off. I just put it in the hole on the end of the crank that the bolt came out of. Afterwards, I realized that it had been resting on the threads, and I had completely buggered up the end of the crank. Had to track down a tap to fix the threads. Most parts stores don't carry one that large in stock, so it had to be special ordered.
The center of the puller is the press that pushes the pulley off. I just put it in the hole on the end of the crank that the bolt came out of. Afterwards, I realized that it had been resting on the threads, and I had completely buggered up the end of the crank. Had to track down a tap to fix the threads. Most parts stores don't carry one that large in stock, so it had to be special ordered.
Trending Topics
Cargo Master
Joined: Sep 2007
Posts: 2,095
Likes: 2
From: Wahpeton ND
Call me crazy but I am almost certain that I installed mine on my rebuild after the timing cover was on.
I remember using a punch to sink it home. It was a chicago rawhide oil seal, green in color.
I remember using a punch to sink it home. It was a chicago rawhide oil seal, green in color.
FTE Stories
Ford Trucks for Ford Truck Enthusiasts

Top 10 Fords at 2026 Carlisle Ford Nationals
Joe Kucinski
3 Best / 3 Worst Parts of Modern Ford Ownership
Brett Foote
10 Amazing Upgrades That Solve Common Ford Truck Owner Headaches
Pouria Savadkouei
Every 2026 Ford Engine Explained
Brett Foote
10 Ugly Ford Trucks That We Still Kinda Love
Joe Kucinski
10 Things Every Truck Owner NEEDS (2026 Edition)
Michael S. Palmer
Rezvani's Latest Post-Apocalyptic Monster Is a Ford F-150 Raptor Underneath
Verdad Gallardo
Top 10 Most Expensive Ford Trucks Ever Sold on Bring a Trailer
Joe Kucinski
2027 Ford Super Duty Buyer's Guide (Every Model, Engine, & Package)
Brett FootePost Fiend
Joined: Dec 2007
Posts: 8,521
Likes: 16
From: Lost
AB brings up a great point. ALWAYS thread the center bolt back into the end of the crank after taking it out and removing the large washer, Before using a puller to get the balancer off.
Best way to protect the threads in the end of the crank snout......
Best way to protect the threads in the end of the crank snout......
Lead Driver
Joined: Mar 2008
Posts: 7,193
Likes: 385
From: Near Los Angeles

Elder User
Joined: Jun 2010
Posts: 509
Likes: 4
From: Casper, Wyoming
I do it a bit different by using a steering wheel puller to remove the balancer; that way I don't need to remove the radiator. The steering wheel puller is shorter and doesn't need as much space.
One more nit pick- when you go back together, I install the cover loosely and install the balancer to "center" the cover. Pull the balancer, tighten the rest of the bolts, reinstall balancer. You don't HAVE to do it this way, I've just had better success doing it. Don't forget to put a LITTLE sealant around the crank snout and on the washer that holds the balancer on to seal it.
Hotshot
Joined: Oct 2002
Posts: 18,488
Likes: 22
From: The Big, Oregon
All that I have seen had the seal inserted/removed from the inside. I've done these on 69, 73, 75, 78, 82, 84, 89, and 92 model year trucks so that's got the range pretty much covered. You could pop the seal out from the front on the Granada 250 IIRC.
Thread Starter
|
Senior User
Joined: Nov 2010
Posts: 281
Likes: 0
From: Delta Jct Alaska
Ok, the engine in mine is out of a 92, so it looks like I'll have to wait till summer, when istart working again, and pay someone else to do it. I don't have a shop or garage, so don't have a good place to do it =/

Thread
Thread Starter
Forum
Replies
Last Post
hanabi
Small Block V8 (221, 260, 289, 5.0/302, 5.8/351W)
1
Jul 21, 2008 05:53 PM
DT 466Man
Ford Inline Six, 200, 250, 4.9L / 300
1
Apr 29, 2005 10:41 PM