


Installing a Cam: How To...
Thread Starter
|
Moderator


Joined: Dec 2007
Posts: 7,987
Likes: 104
From: Boise, Idaho

Ok, so it's coming down to this weekend and I have a few questions left.
I have a spring compressor lined up. Schucks has one that can compress the springs without removing the intake or the head. However, if I don't remove the intake or head (and I don't have compressed air), is there a trick I can use to keep the valves from falling in? If not, no biggie, I'll just pull the intake/exhaust and place something in the port to hold up the valve.
Next, are there any tricks I need to know for replacing the valve seals and umbrella seals? Or are they pretty simple?
Lastly, any tricks/techniques to removing the harmonic balancer, and then crank timing gear? And what is the procedure for putting them back on? I have a standard puller lined up to rent, but want to be sure.
I have a Chilton's and Haynes manual, but there are often things they leave out, so was curious if anyone has any thoughts. I'm trying to avoid downtime, since I only have the weekend and it's my DD.

Elder User
Joined: Feb 2002
Posts: 504
Likes: 2
From: Saddle Brook United State
cam gear
Read the following, it is a post I wrote some time back. The engine being described is a 1990.
1. Remove the valve cover
2. loosen the rocker arms and remove the push rods and number them.
3. remove the distributor--- line up the dist to number 0ne first and note where the timing mark is ( should be between 0 and 10 degrees on the timing plate ) try not to turn over the engine from now on.
4. remove the valve lifter cover behind the dist, the long and wide tin thing on the drivers side of the engine.
5. remove the lifters and mark them as to where they were, an egg carton makes a good container.
6. the cam is held in with two bolts behind the gear , they are assessed through holes in the cam. If you have to turn the engine to get the cam to move return it to where it set in step 3.
7. You should be able to remove the cam, be VERY CAREFUL not to tear up the cam bearings when you pull the cam. Pull it out slowly and lift it at the same time and you will be able to feel the cam bearings as the journals slide in and out of the bearings, there 6 or so cam bearings you have to clear.
On my truck I had to remove the radiator, ac condenser, and grill and drop the bumper to clear the way for the LONG cam. At this point you can devise some way of removing the gear. As mine was fiber , I sawed off most of the gear and took a hack saw and carefully split the steel hub of the fiber gear. Even with all this I had to use the largest gear puller I had and it didn't give up easily.
A word of caution, when you unbolt the cam from the engine you will be unbolting the cam thrust plate, This is a cast iron oval plate just under 1/4 inch thick and it is ground on both sides. DO NOT TRY TO PUT A PULLER ON THIS PLATE to pull the gear you will end up with a two part plate. In fact you may have to break this plate to get the jaws of a puller behind the gear and if you are careful in splitting the gear hub you might save the plate Don't loose the cam gear key you can't get them. While this is all in parts on the ground look at the cam and lifters.Now is a good time to replace the cam, lifters ,thrust plate and push rods. Check the web for a Melling cam kit and timing gears( yes it is the same Melling that used to sponsor Bill Elliot in Nascar). It's stock and the cam kit will go for around $80. with cam and new lifters in the kit. The gear set is about $35 and the thrust plate is $20 or so. Push rods are $1.50
each. Gasket kit for the side cover and the front cover( get the one that comes with the front seal ).
Before you run out and do all this get a good manual for Fords and read up on this. I have described what you would do for a 1990. Yours might be slightly different. Its not as hard as it sounds , it just pisses you off when you find the cam won't clear the front bumper as it is too long
As far as timing the cam , replace both gears . A good puller will remove the crank gear easily, I think Auto Zone has a loner gear puller for the crank gear.If you replace the crank gear and you should, make sure the DOT IS FACING OUT!!! It is also cheap enough for you to buy a puller, about $15. Getting the gear on is the easy part as long as you REMEMBER---to put the spacer and thrust plate back on first. I am assuming your cam has the spacer and thrust plate behind the gear, I think they all do. To replace the gear you get a grade 8 bolt from home depot to match the threads inside the cam nose, mine was 7/16 x 14 tpi. Yours may be different but the grade 8 bolt is for safety so you don't break it off in the cam while you are using it to pull the gear on. Any way you put the spacer on first with the bevel to wards the cam and then the thrust plate , if it is worn get a new one from ford for $8, then the key goes back in the cam, save the original key as they are no longer available from ford and they seem to be a hardened key. Start the gear on the cam and make sure it is going on straight , I made an aligner out of some scrap brass turned on a lathe so it fit inside the gear and had a hole through it of 7/16 to match the bolt. Start the gear by hand , it won't go far, find a heavy washer with the inside hole the size of your bolt and the outside larger than the hole in the gear.Thread the bolt in the cam nose and tighten away, a little oil is helpful, and you will pull the gear on the cam. Be careful of the following----- on my cam the nose of the cam stuck out of the gear about 1/32 of an inch when seated all the way, and there was very little clearance between the thrust plate and the cam gear. It should be .005 or something like that. Using the above method the cam will stop moving when the nose hits the washer. I noticed at this point that the trust plate
had a lot of clearance and I realized that the gear had to keep moving. I made a spacer about 1/4 inch thick to put between the
washer and the gear so the nose would pull through more, the inside diameter of the spacer was larger than the cam nose.
Thread Starter
|
Moderator
Joined: Dec 2007
Posts: 7,987
Likes: 104
From: Boise, Idaho
Hey stractor,
Thanks for the writeup. I had found that earlier (and addressed it a couple pages ago). It was really useful in giving me some foresight as to what I'll be doing.
It didn't answer any of my questions though, which had more to do with the crank gear. I went ahead and got a new cam spacer and thrust plate, and the new gear is already pressed onto the new cam, so that's all done. Don't know about the crank gear and harmonic balancer though. As well as the valves, seals, etc.
Cargo Master


Joined: Mar 2008
Posts: 2,569
Likes: 207
From: Washington
The rope trick works by feeding the rope into the cylinder through the spark plug hole. It fills up the combustion chamber and prevents the valve from falling in. You can also do the same with an air compressor and an adapter from a compression tester that threads into the spark plug hole. The compressed air keeps the valves tight in their seats.
How to replace valve seals without taking off the heads
Replacing valve stem seals with head on car - Mazda MX6 Forums: MX6 Forum
How to replace valve seals without taking off the heads
Replacing valve stem seals with head on car - Mazda MX6 Forums: MX6 Forum
Thread Starter
|
Moderator
Joined: Dec 2007
Posts: 7,987
Likes: 104
From: Boise, Idaho
Hey Jim,
Thanks for those! Someone mentioned the "rope trick" earlier, but there wasn't an explanation of what it was. Seems pretty simple and straight forward. Should let me do the job without removing the intake/exhaust.
I was mainly looking for a technique for this because I don't have a compressor, or access to one.
Post Fiend
Joined: Dec 2007
Posts: 8,521
Likes: 16
From: Lost
One thing worth mentioning. Do 1 cyl's valves at a time, and rotate the crank to get the piston to the top of the bore. This allows for far less rope to be needed (when using that method) and also prevents the valve(s) from being able to fall very far if they aren't securely held in place. The latter can be an issue when using the compressed air, if the air hose pops loose, or the pressure isn't quite high enough.
FTE Stories
Ford Trucks for Ford Truck Enthusiasts

Rezvani's Latest Post-Apocalytic Monster Is a Ford F-150 Raptor Underneath
Verdad Gallardo
Top 10 Most Expensive Ford Trucks Ever Sold on Bring a Trailer
Joe Kucinski
2027 Ford Super Duty Buyer's Guide (Every Model, Engine, & Package)
Brett Foote
Top 10 Ford Truck Tragedies
Joe Kucinski
AEV FXL Super Duty - the Super Duty Raptor Ford Doesn't Make
Brett Foote
Lobo Vs Lobo: Proof the F-150 Lobo Should Be Even Lower!
Michael S. Palmer
Ford's 2001 Explorer Sportsman Concept Looks For a New Home
Verdad Gallardo
10 Best Ford Truck Engines We Miss the Most!
Joe Kucinski
2026 Shelby F-150 Off-Road: Better Than a Raptor R?
Brett FooteCargo Master

Joined: Feb 2003
Posts: 2,341
Likes: 5
From: Sacramento
Honestly, the Comp 268 isnt all that aggressive. It has better manners than you might think. My nephew has that cam, and with the AOD, the stock stall speed is right where the lopey turns velvetty smoooth. Mine is a regrind with close to the specs of an Isky 280. The loping 6 makes people do a double take. I have videos of both in the '300 sounds' thread. I can see why they recommend steeper gears with a choppy cam, the low rpms with a manual trans makes it buck sometimes. My last cam install was 15 years ago, 351C-4V, a 305 magnum Comp.
Lead Driver
Joined: Mar 2008
Posts: 7,182
Likes: 380
From: Near Los Angeles
AB--
Use the sleeve in the t.cover kit for the v.dampener. Glue it on. See if you can loan for free from A.Zone or O'reilleys, a seal driver set, and USE IT to install you t.cover seal. You'll notice two 'lips' on the seal. Fill between them with grease.
You'll have to use the v.dampener to center the seal on the crank. Apply silicone to inside of v.d. where it slips over crank, AND the keeper channel. Apply oil to v.d. sleeve to help it slide into seal. Use weather strip adhesive to bond gasket to t.cover, then silicone or gasket sealer where it rides on block. Once you get the v.d, on enough to center seal, get your bolts in. Take you time with them, and be careful not to torque the cover to one side or another. Put a little grease under the head of each bolt so it tightens w/o pushing the cover.
Then finish torquing the v.d. If you're really good, you can torque the v.d. bolt while securing a screw driver in the teeth of the flywheel with you feet. Of course you would need my super-human strength, but you might get lucky.
Good luck. I hope to read that that dude is burning rubber by Sunday evening!!
Thread Starter
|
Moderator
Joined: Dec 2007
Posts: 7,987
Likes: 104
From: Boise, Idaho
Well, I got a bit of work done today! Thought I'd share some pics.

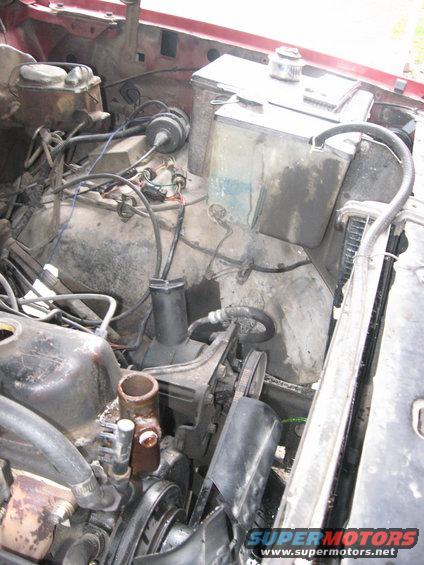
My engine.
First step was draining the radiator and the oil.
Pulled the hoses off.
Removing all the stuff in the way. Spark Plug wires, etc.

Pulled the radiator out. Super simple!
Unbolted the fan and pulled it off, as well as the belts.
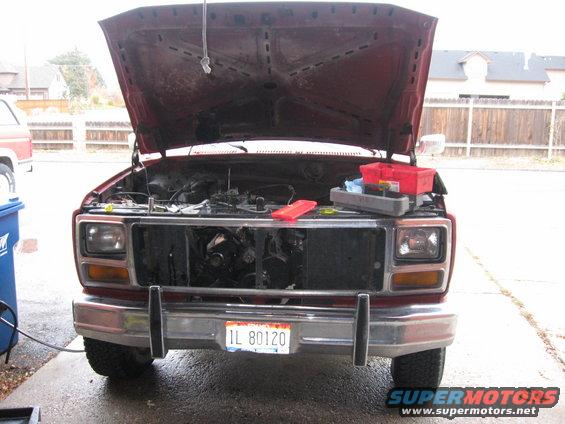
Removed the front grill to help give me space to work on stuff.
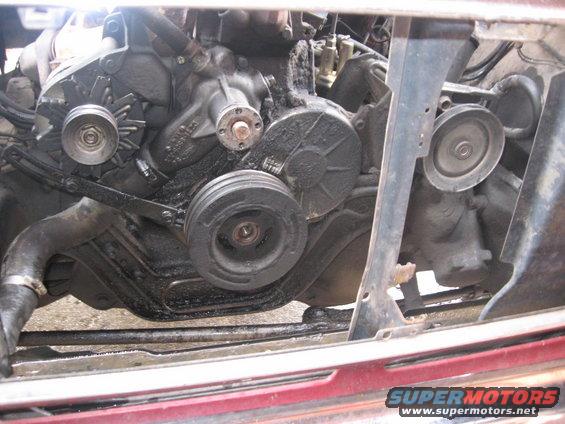
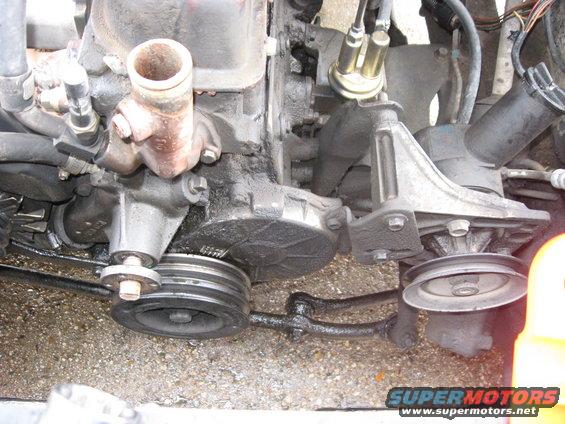
A view of the harmonic balancer, the next obstacle.
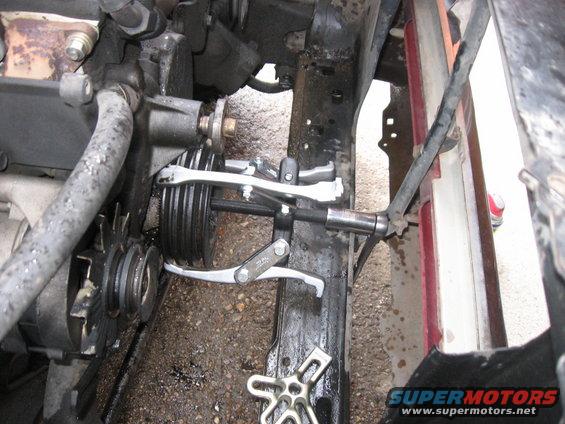
The pulley puller. I also had rented a harmonic balancer puller, but none of the bolts in it fit the thread on my harmonic balancer, so it was useless. I'm glad I rented both.
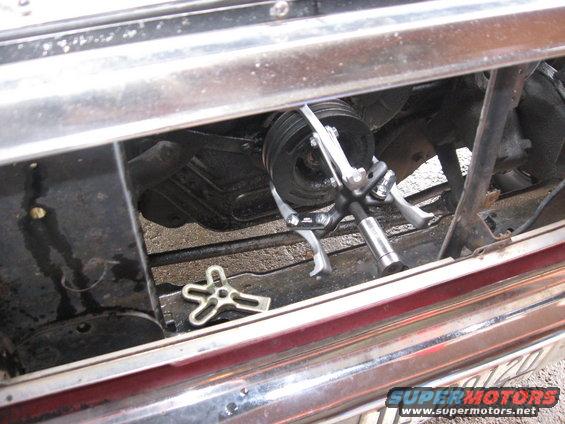
Another view of "The Claw". The thing was pretty heavy duty.
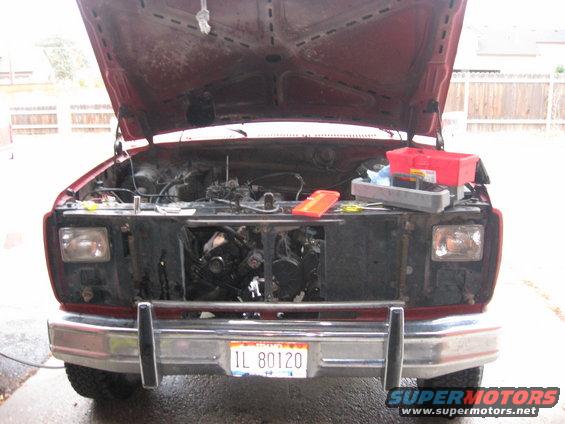
Realized that the rest of the chrome was really vulnerable to just leaning on it without the support of the grill, so I removed the rest of it to keep from breaking it.
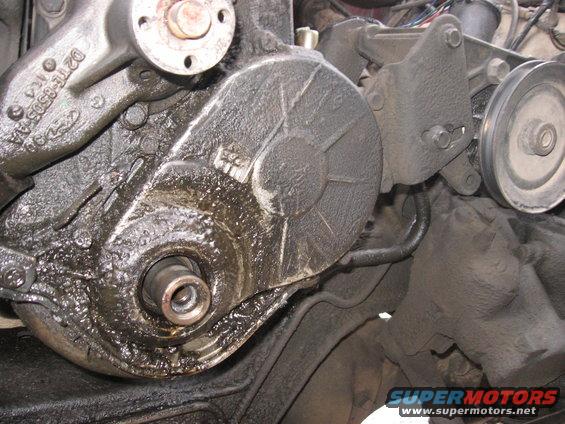
The harmonic balancer's off! What a bugger. I got frustrated and left it for a bit, and when I came back, it had popped loose. Kinda oily behind it, I'm thinking the timing cover seals may be bad.
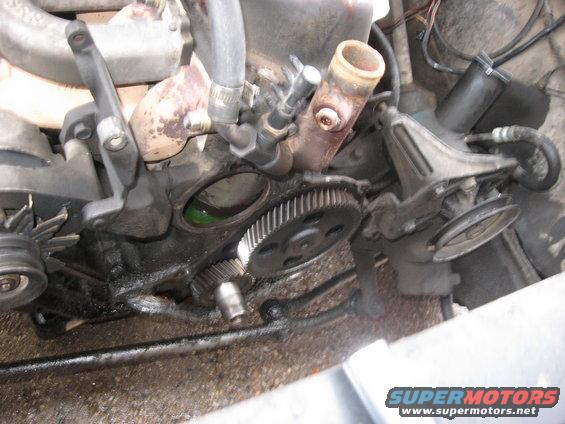
Timing cover removed. Finally can see my goal!
Another view.
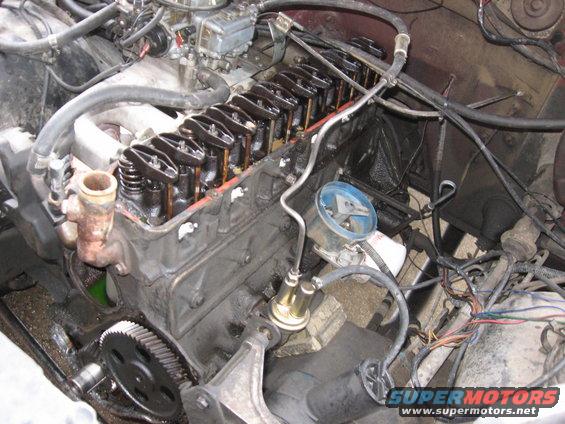
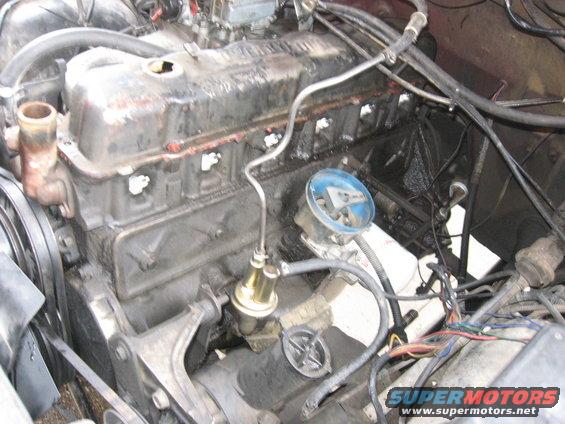
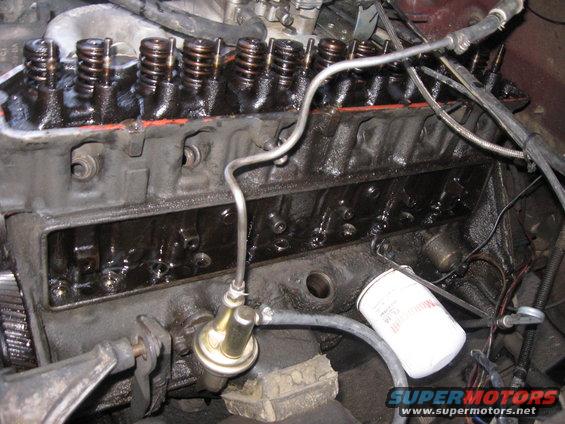
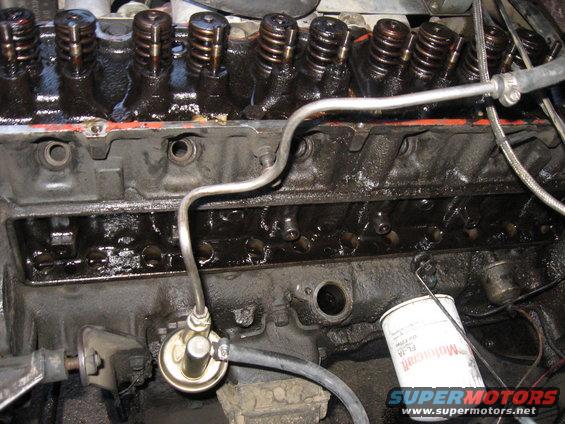
Pulled the valve cover off. It had been leaking oil again, so I'll be glad to seal it up when I put it back together.
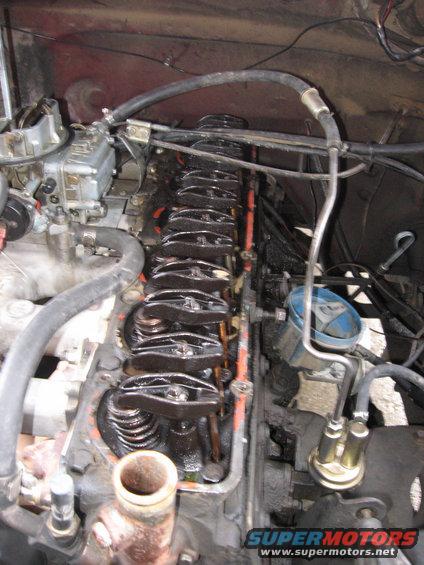
It'd been a while since I had the cover off, but I was very pleased to see that there was very little crusty oil. Everything looked clean and healthy.
Sorting the push rods and rocker arms.
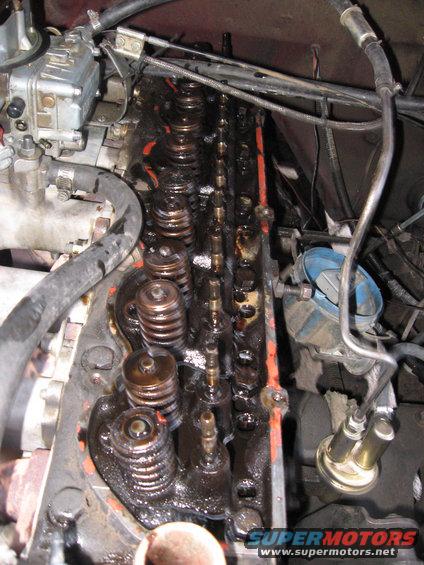
Rocker arms and push rods removed.
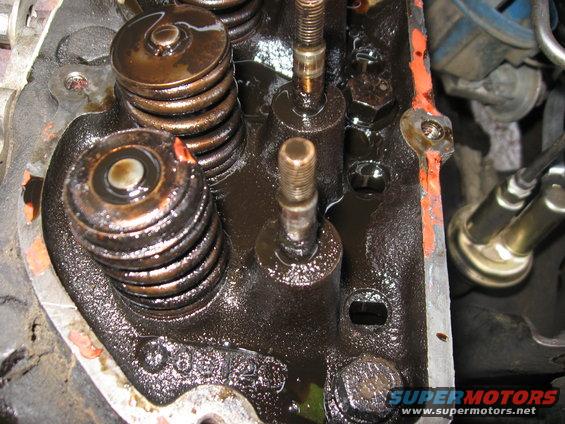
A picture of my rocker arm studs and push rod holes, for future reference.

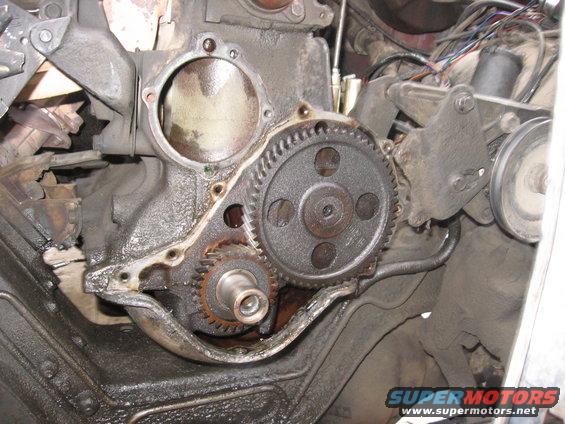
Lined up the timing marks.
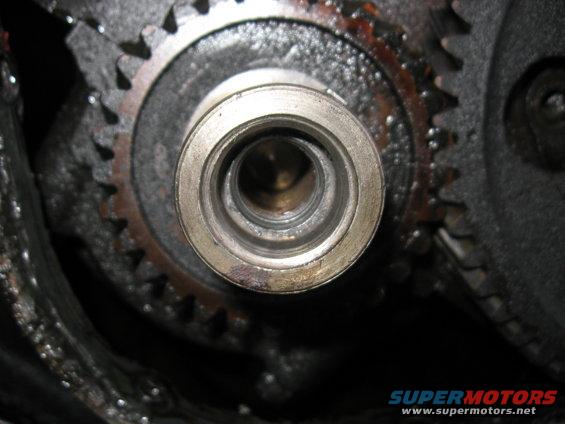
A very frustrating discovery! I tried to put the bolt back in and simply couldn't. I tried for a good while to get it to thread in and no luck. I think the rotation and pressure of the pulley puller buggered up the end of the threads. I'm going to have to address this. Hopefully it's as simple as a rethreading.

Pulled the lifter cover off.
This was SOOO much cleaner than the last time I was in here! I replaced the lifters about 2 years ago because they clacked and made horrible amounts of noise. They were all collapsed, and filled with crud. All the push rods were gunked up and nasty. (I imagine simply from sitting for all the years it had). However, this shows it's in overall much better health.
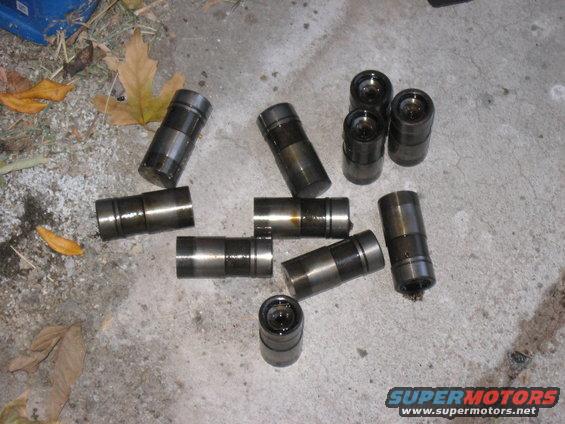
Lifters looked all clean and in good condition.
Last time I took the lifters out, it took me 10 hours. Each lifter was so oil-crud glued into the engine that I had to use needle nose to disassemble and remove the internals of each lifter while it was still in the engine. Then, I could clamp on to each lifter and slowly, slowly work them out. This time it took me 5 minutes and each one slid right out. Made me happy.

Close up of the lifters removed.
After this, the cam shaft was free to come out! However, I misunderstood how the cam was accessible and for some reason, thought that I could hold it up and off of the cam bearings by reaching through the lifter cover. Nope. So now, to be sure the cam lobes don't screw up the bearings, I need to remove the oil pan. No wonder everyone kept telling me to replace the oil pump "while I was in there" heh. Might as well get an EFI pan gasket and grind off the rises on my pan so I can install it.
Crawled underneath and unbolted the motor mounts. After this it was starting to get dark, so that's it for the day. More tomorrow! Hopefully I'll have F-250's super human strength when I'm putting it back together.
Any thoughts on the crank bolt hole? That's got me bugged for the evening.
My engine.
First step was draining the radiator and the oil.
Pulled the hoses off.
Removing all the stuff in the way. Spark Plug wires, etc.
Pulled the radiator out. Super simple!
Unbolted the fan and pulled it off, as well as the belts.
Removed the front grill to help give me space to work on stuff.
A view of the harmonic balancer, the next obstacle.
The pulley puller. I also had rented a harmonic balancer puller, but none of the bolts in it fit the thread on my harmonic balancer, so it was useless. I'm glad I rented both.
Another view of "The Claw". The thing was pretty heavy duty.
Realized that the rest of the chrome was really vulnerable to just leaning on it without the support of the grill, so I removed the rest of it to keep from breaking it.
The harmonic balancer's off! What a bugger. I got frustrated and left it for a bit, and when I came back, it had popped loose. Kinda oily behind it, I'm thinking the timing cover seals may be bad.
Timing cover removed. Finally can see my goal!
Another view.
Pulled the valve cover off. It had been leaking oil again, so I'll be glad to seal it up when I put it back together.
It'd been a while since I had the cover off, but I was very pleased to see that there was very little crusty oil. Everything looked clean and healthy.
Sorting the push rods and rocker arms.
Rocker arms and push rods removed.
A picture of my rocker arm studs and push rod holes, for future reference.
Lined up the timing marks.
A very frustrating discovery! I tried to put the bolt back in and simply couldn't. I tried for a good while to get it to thread in and no luck. I think the rotation and pressure of the pulley puller buggered up the end of the threads.
I'm going to have to address this. Hopefully it's as simple as a rethreading.Pulled the lifter cover off.
This was SOOO much cleaner than the last time I was in here! I replaced the lifters about 2 years ago because they clacked and made horrible amounts of noise. They were all collapsed, and filled with crud. All the push rods were gunked up and nasty. (I imagine simply from sitting for all the years it had). However, this shows it's in overall much better health.
Lifters looked all clean and in good condition.
Last time I took the lifters out, it took me 10 hours. Each lifter was so oil-crud glued into the engine that I had to use needle nose to disassemble and remove the internals of each lifter while it was still in the engine. Then, I could clamp on to each lifter and slowly, slowly work them out. This time it took me 5 minutes and each one slid right out. Made me happy.
Close up of the lifters removed.
After this, the cam shaft was free to come out! However, I misunderstood how the cam was accessible and for some reason, thought that I could hold it up and off of the cam bearings by reaching through the lifter cover. Nope. So now, to be sure the cam lobes don't screw up the bearings, I need to remove the oil pan. No wonder everyone kept telling me to replace the oil pump "while I was in there" heh. Might as well get an EFI pan gasket and grind off the rises on my pan so I can install it.
Crawled underneath and unbolted the motor mounts. After this it was starting to get dark, so that's it for the day. More tomorrow! Hopefully I'll have F-250's super human strength when I'm putting it back together.
Any thoughts on the crank bolt hole? That's got me bugged for the evening.
Elder User
Joined: Nov 2010
Posts: 536
Likes: 2
From: Jacksonville, NC
Man, this is looking really good so far. Hopefully, within the next few months, I'll be installing a cam in mine, and when I do, this thread will definitely come in handy.
You mentioned swapping in an EFI oil pan gasket.. What's the difference?
You mentioned swapping in an EFI oil pan gasket.. What's the difference?
Post Fiend
Joined: Dec 2007
Posts: 8,521
Likes: 16
From: Lost
AB, it's a bit late now, but for future reference, remove the large washer and thread the bolt back into the end of the crank before using a puller on the balancer......
Re-tapping the threads is a bit tricky, but can be done if you take your time. Use the stock bolt for a reference to get the right thread size/pitch tap.
Re-tapping the threads is a bit tricky, but can be done if you take your time. Use the stock bolt for a reference to get the right thread size/pitch tap.
Tuned
Joined: Nov 2009
Posts: 407
Likes: 0
From: Rochester
AB, I had the same problem one time when I left the socket and ratchet on the bolt and started it up! Boogered up the ends of the thread on the end of the crank and bolt. I ended up getting a new bolt the used at tap and it fixed the problem in two minutes. The tap is tapperd so it starts in farther than the bolt and will clean the threads up. Should be an easy fix. I was freakin out when it happened to me. I can't remember what size tap it is but it is standard I do remember that! Just be easy with it go in alittle back it out and then go alittle more just like you were tapping new thread to be safe. Good luck looks like everything is coming along!!
! Boogered up the ends of the thread on the end of the crank and bolt. I ended up getting a new bolt the used at tap and it fixed the problem in two minutes. The tap is tapperd so it starts in farther than the bolt and will clean the threads up. Should be an easy fix. I was freakin out when it happened to me. I can't remember what size tap it is but it is standard I do remember that! Just be easy with it go in alittle back it out and then go alittle more just like you were tapping new thread to be safe. Good luck looks like everything is coming along!!