Up pipe failure
#1
 04-23-2015, 10:53 AM


Join Date: Mar 2014
Posts: 757
Likes: 0
Received 0 Likes
on
0 Posts
#2
04-23-2015, 12:55 PM


One thing I've learned, keeping things unloaded and proper torque is important on a 6.4. NOTICE: Do not bend or twist the turbocharger inlet pipe or damage to the bellow on the turbocharger inlet pipe may occur.
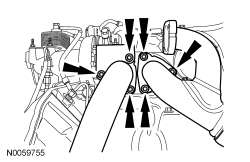
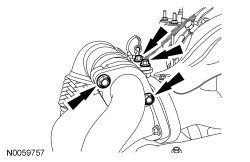
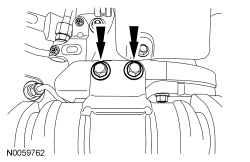
- Install new gaskets on the exhaust manifolds-to-turbocharger inlet pipe joints.
- Position the turbocharger inlet pipes, new turbocharger inlet pipe-to-turbocharger gaskets and the EGR-OC bracket, and loosely install new turbocharger inlet pipe-to-turbocharger bolts.
- NOTE: LH side shown, RH side similar.
NOTE: A new service bolt may be installed at the upper location at the LH exhaust manifold.
Loosely install the new turbocharger inlet pipe-to-exhaust manifold nuts.
- Tighten the LH turbocharger inlet pipe-to-turbocharger bolts and LH turbocharger inlet pipe-to-exhaust manifold nuts (and service bolt).
- Tighten the bolts to 24 Nm (18 lb-ft).
- Tighten the nuts (and service bolt) to 31 Nm (23 lb-ft).
- Tighten the RH turbocharger inlet pipe-to-turbocharger bolts and RH turbocharger inlet pipe-to-exhaust manifold nuts.
- Tighten the bolts to 24 Nm (18 lb-ft).
- Tighten the nuts to 31 Nm (23 lb-ft).
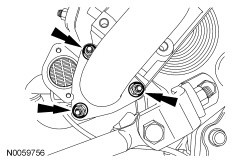
- NOTICE: Make sure the correct bolts are installed in the bracket or damage to the Exhaust Gas Recirculation (EGR)-Oxidation Catalytic Converter (OC) pipe may occur.
NOTE: EGR-OC pipe-to-RH turbocharger inlet pipe joint shown, EGR-OC pipe-to-horizontal EGR cooler joint similar.
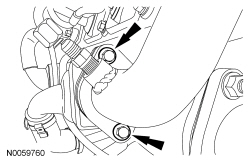
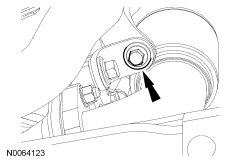
Position the EGR-OC pipe and loosely install new EGR-OC -to-bracket bolts. Install new gaskets and loosely install the new RH inlet pipe-to-EGR-OC pipe bolts and the new EGR-OC -to-horizontal EGR cooler bolts.
- Position the cylinder head bracket and install the EGR-OC bracket-to-cylinder head bracket washer and a new bolt. Loosely install the cylinder head bracket-to-cylinder head washers and a new bolt. Finger-tighten both bolts.
- Tighten the EGR-OC -to-EGR cooler bolts.
- Tighten to 31 Nm (23 lb-ft).
- Tighten the RH turbocharger inlet pipe-to-EGR-OC bolts.
- Tighten to 31 Nm (23 lb-ft).
- Tighten the EGR-OC -to-turbocharger bracket bolts.
- Tighten to 31 Nm (23 lb-ft).
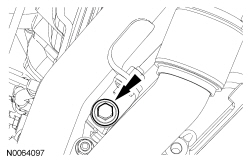
- NOTICE: Failure to install and correctly tighten the Exhaust Gas Recirculation (EGR)-Oxidation Catalytic Converter (OC) pipe bracket bolt will result in damage to the horizontal EGR cooler and possible engine damage.
Tighten the EGR-OC bracket-to-cylinder head bracket bolt.- Tighten to 31 Nm (23 lb-ft).
- NOTICE: Failure to install and correctly tighten the Exhaust Gas Recirculation (EGR)-Oxidation Catalytic Converter (OC) pipe bracket bolt will result in damage to the horizontal EGR cooler and possible engine damage.
Tighten the cylinder head bracket-to-cylinder head bolt.- Tighten to 62 Nm (46 lb-ft).
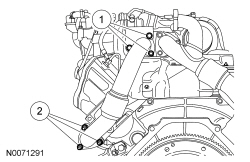
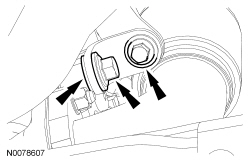
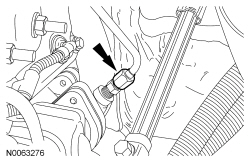
- Install the EP sensor tube fitting.
- Tighten to 20 Nm (177 lb-in).
- Connect the EGRT sensor electrical connector.
- NOTE: Do not install the exhaust downpipe until both turbocharger inlet pipes and the EGR-OC pipe are installed and all fasteners are tightened.
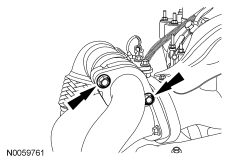
Position the exhaust downpipe into the vehicle and loosely install exhaust downpipe-to-OC bolts.
- Install a new exhaust downpipe-to-turbocharger gasket.
- Position the exhaust downpipe to the turbocharger and install and pre-tighten a new exhaust downpipe-to-turbocharger clamp.
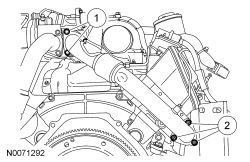
- Make sure the exhaust downpipe clip is over the lip on the turbocharger.
- Align the new exhaust downpipe-to-turbocharger clamp so that the exhaust downpipe clip and the opening in the exhaust downpipe-to-turbocharger clamp are aligned and tightened to maintain position.
- Align the downpipe so that the area just above the flat in the pipe is approximately 20 mm (0.787 in) from the frame.
- Pre-tighten to 10 Nm (89 lb-in) to stiffen the joint.
- Make sure the exhaust downpipe clip is over the lip on the turbocharger.
- Tighten the exhaust downpipe-to-OC bolts.
- Tighten to 40 Nm (30 lb-ft).
- Tighten the exhaust downpipe-to-turbocharger clamp.
- Tighten to 15 Nm (133 lb-in).
#4
04-24-2015, 01:19 AM
Join Date: Mar 2014
Posts: 757
Likes: 0
Received 0 Likes
on
0 Posts
#5
04-24-2015, 07:38 AM
With that pipe in particular, because its bolted to the top of the turbo and at the rear of the turbo, torsional loads on the pipe are a factor. That's why you have a sequential install procedure. Because of the attachment points (top of the turbo and exhaust mounting flange) that's where the stresses are on the pipe itself. Any torsional stresses at the other end (exhaust manifold side) the pipe will fail at the bellows. I too have installed dozens of them.
#6
04-24-2015, 08:39 AM
Join Date: Mar 2014
Posts: 757
Likes: 0
Received 0 Likes
on
0 Posts
#7
06-02-2015, 01:56 PM
With that pipe in particular, because its bolted to the top of the turbo and at the rear of the turbo, torsional loads on the pipe are a factor. That's why you have a sequential install procedure. Because of the attachment points (top of the turbo and exhaust mounting flange) that's where the stresses are on the pipe itself. Any torsional stresses at the other end (exhaust manifold side) the pipe will fail at the bellows. I too have installed dozens of them.
Do you have to pull the cab to replace the up pipes?
Trending Topics
#8
06-02-2015, 04:24 PM
I've only done a partial cab lift on the ones I've replaced. The main purpose of this, is to enable removal of the downpipe. Once that pipe is removed, removing the right front wheel and inner fender will give you fairly decent access to that pipe. Make sure you have a NEW six point 10mm socket!!!
#9
06-02-2015, 06:10 PM
Ok...Thank you for that. I'm going down to look at the truck tomorrow. It has 197K, should that scare me off with a 6.4? I have a 99 7.3 now with over 400K so mileage doesn't really bother me. My current truck is rusting to pieces, time for a replacement.
Forgive my ignorance, whats a partial cab lift?
Forgive my ignorance, whats a partial cab lift?
#10
06-03-2015, 09:08 PM
Join Date: Mar 2014
Posts: 757
Likes: 0
Received 0 Likes
on
0 Posts

Thread
Thread Starter
Forum
Replies
Last Post
pilgrimbizket
1994.5 - 1997 7.3L Power Stroke Diesel
17
10-26-2019 12:46 PM