Ford F-150: How To Install Leveling Kit
F-150s, F-250s, and pretty much every other Ford truck comes from the factory with a rear-end that's a little bit higher than the front. That might be a little bit better for aerodynamics but it doesn't look good and it limits space in the front wheel wells. Get the look you want with room for more tire with a leveling-lift kit.
This article applies to the Ford F-150 (2004-2014)
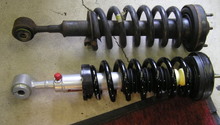
All F-150s come with a raked stance. That means that the rear of the truck sits two or three inches higher than the front. That "stinkbug" stance isn't an attractive look. It also limits the maximum tire size on the front end. The easiest way to lift the front end is by using a strut spacer. These components fit between the top of the hat of the strut and the strut bracket. While we’ll focus on the eleventh generation F-150, the idea is still the same for the twelfth generation, however because of the electric power steering, it will be a good idea to disconnect the negative battery cable prior to starting work.

Leveling kits are very simple, but there are some parts you’ll need to uninstall in order to remove the strut from the truck. While you’re getting your jack and jack stands, you’ll want to get out your wrenches, sockets, and hammer.

Materials Needed
- 15mm Socket and a matching wrench
- 18mm deep socket
- 21mm deep socket
- 30mm socket
- 1-1/16-inch wrench
- Breaker bar socket wrench
- Pitman arm puller (optional)
- Pry bar
Step 1 - Loosen lug nuts
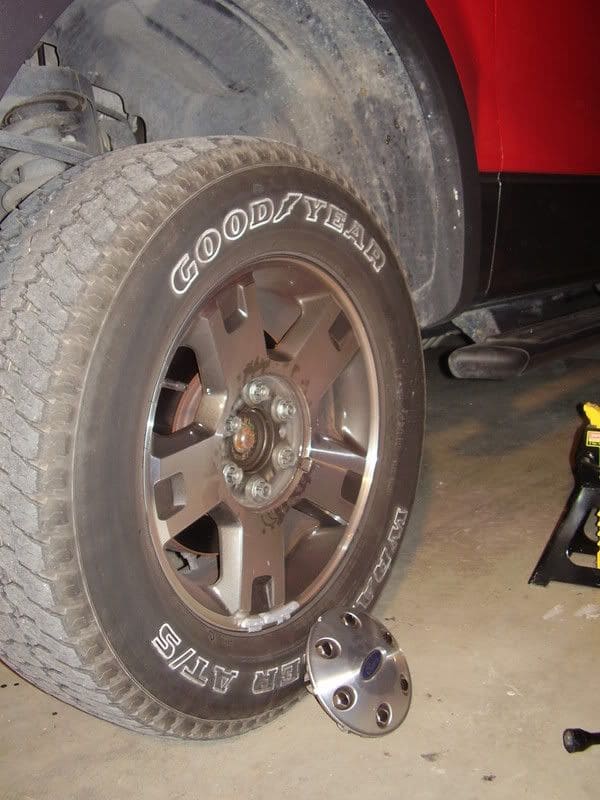
First loosen the lug nuts before lifting the truck with your 21 mm socket and socket wrench or tire iron. Trucks with OEM wheels will have to pop off the center cap in order to access the lug nuts. Do this with a flat head screw driver or the flat portion of your tire iron. Use a rag or towel between the tool and the wheel to keep scratches to a minimum.
Step 2 - Safely jack up the front end of the truck
Chock one of the rear wheels and place the truck in neutral, then lift the truck with the jack. Do not use the parking brake as you do need to allow the rear wheels to move a little bit as you lift the truck. This will allow the jack to work properly as it’s not trying to fight the rear wheels as it pivots up.
After getting the F-150 into the air high enough to remove the front tires, place two jack stands at the frame of the truck. Finish unscrewing the lug nuts and remove the tires.

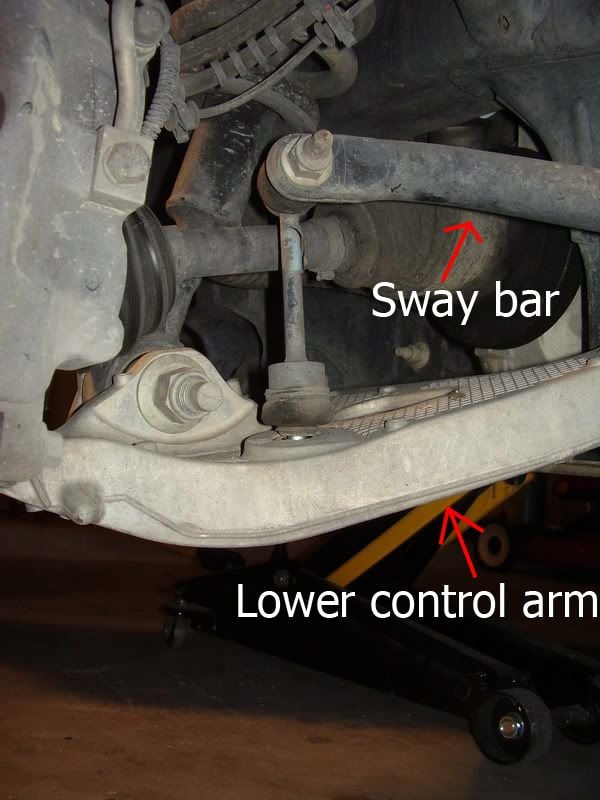
Step 3 - Unbolt sway bar end-link
Unbolt the sway bar link from the control arm with an 18mm socket. It’s easiest to remove it from the control arm, but removing the link nut at the sway bar itself isn't hard either.
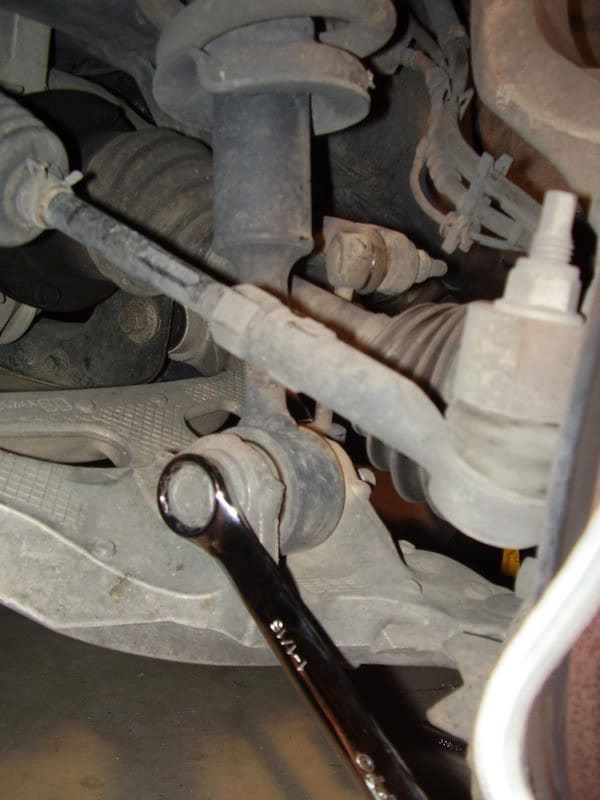
Step 4 - Loosen upper ball joint
Next, loosen the upper ball joint nut but don’t completely remove it. Either use your hammer to knock out the ball joint from the spindle or use a Pitman arm puller to pry the joint apart. If you use a hammer, strike the spindle near the ball joint. Don't actually hit the ball joint or control arm, or else you will cause unnecessary damage to the suspension. You might be able to simply pull the two apart if they're loose enough.
-

Figure 4. Remove the bolt connecting these the control arm (top) and the wheel hub. Spray with a penetrating lubricant (PB blaster, liquid wrench, et cetera) if the bolt is stuck. -

Figure 5. Ford recommends using a pitman arm puller to separate the two. If you don't want to buy one, you could also use a few taps with a hammer, or a pickle fork.
Step 5 - Loosen lower strut bolt
Fit a 30mm socket to the lower strut bolt and hold the nut with a 1-1/16-inch wrench. This can be a very, very tight nut and it may be wise to rent or borrow a power tool to help. A long breaker bar may assist a little as well, but have a friend ready to hold either wrench. Remove the bolt.
It's okay to skip this step if removing the bolt is too difficult, but you do have to loosen it. Swing the strut downward to install the lift spacer to the top of the strut if the strut hasn't been unbolted.
Step 6 - Move wheel spindle out of the way
With the lower strut bolt out or loose, take your jack and place it under your lower control arm to keep it slightly elevated and remove the upper ball joint nut. Take your pry bar and lift up on the upper control arm as you move your spindle out of the way. Use ratchet straps or strong line to keep the spindle supported and don’t let it flop around.

Step 7 - Remove nuts from top of strut
Now, remove the three nuts holding the strut top to its bracket. Those should be 15mm and remove the slowly if you have removed the lower strut bolt. Now, allow the jack to slowly drop the lower control arm and the strut assembly will follow. Be sure that it doesn’t drop out and on to the floor. If you still have the lower strut bolt on the lower control arm, you may have to pry down on the lower control arm a bit so the strut comes out of the bracket.
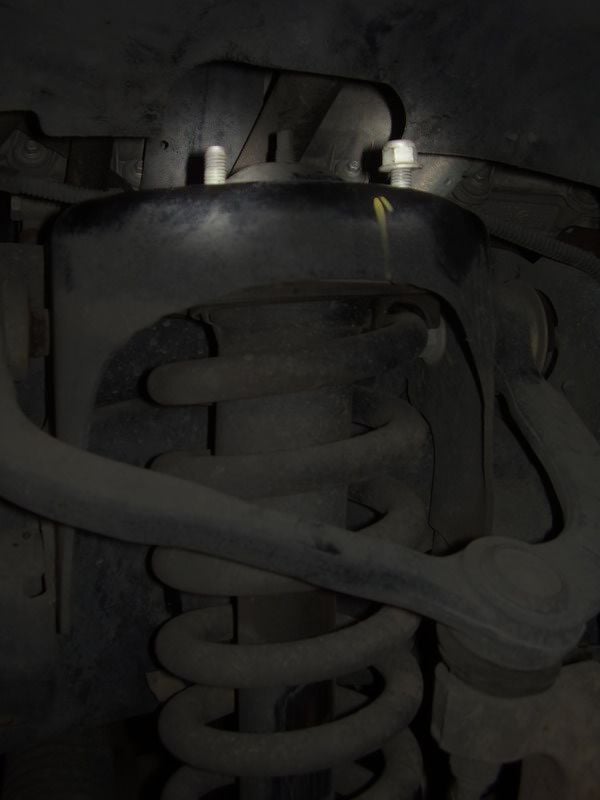
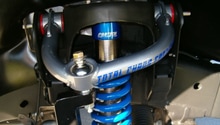
Step 8 - Install spacer to top of strut
Follow the manufacturer’s instructions as they all vary somewhat. Some will use an extended stud on the strut bolts. Other spacer have studs already pressed in and will only need to be bolted to the strut. Now put everything back together in the reverse order and get ready to do the other side.

After installing a leveling kit or doing any other suspension modification, your first trip should be towards the alignment shop. You have changed the angles of the control arms and tie-rods. In doing so, you have changed the camber and toe at the very least, but we recommend getting a full alignment—including caster.
Newly lifted truck drivers should be prepared for a little bump steer. Essentially, as the truck moves up and down, the angles of the suspension create steering input. That’s because the effective length of the tie-rod will change through compression and rebound. Since the steering rack is in front of the axle, it will push the spindle to toe out on bump (spindle in up travel) and toe in on rebound (spindle in down travel). If it was at the rear of the axle, you’d see the opposite action (in on bump, out on compression). The only way to cure this is to change the angle of the tie-rod back to level with a rod-end with a high-misalignment spacer or build a new spindle made for the 2.5-inch lift.
Related Discussions and Sites
- How to Install a Leveling Kit - F150Online.com
- 2011+ Truck Power Steering Warning - Ford-Trucks.com
- How-To Install Leveling Kit - F150Forum.com