


Rear Cab Corner tweeking?
Thread Starter
|
Elder User
Joined: Sep 2006
Posts: 741
Likes: 0
From: Katy(Houston), Texas
Nothing Ford...he's into nerf guns and video games. At the rate this build is going he will be getting the F100, all my tools, and some good advice from me on his 18th. birthday 

Posting Guru
Joined: Jul 2006
Posts: 1,276
Likes: 0
From: Westminster,Md
Any chance of salvaging any of the original panel and fitting some it into the area mentioned?
I threw all sheetmetal I removed into a pile for odds and ends just in case, some of it came in handy...the original metal ,because it's heavier..is easier to weld.
I threw all sheetmetal I removed into a pile for odds and ends just in case, some of it came in handy...the original metal ,because it's heavier..is easier to weld.
Thread Starter
|
Elder User
Joined: Sep 2006
Posts: 741
Likes: 0
From: Katy(Houston), Texas
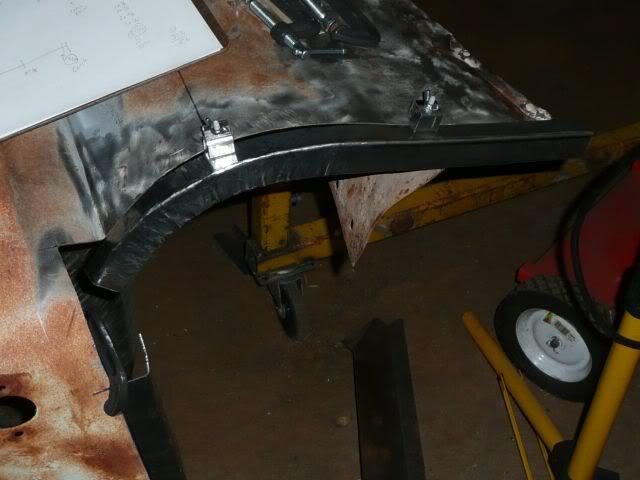
Good thought but I did try to see if that was a possibility. The original area in question is rusted through. I've been working on it and have it fitting better but now I have to cut and fit a filler piece to re-make the flange area. I'm in the process of fitting an extra door to make sure it all lines up correctly. My original door has a big dent by the door edge from top to bottom so it doesn't have a straigh door edge. The extra door has the hinge mount bolts rusted in so I'm soaking them with PB Blaster to see if I can get them out. I hope I will be able to get them out this weekend and get everything lined up.
More Turbo
Joined: Jan 2007
Posts: 593
Likes: 15
From: Wichita, KS
You "should" be able to pull a profile from the other side. Use posterboard, or whatever, to trace the edge of the door jamb. Then make the new panel fit it. You could do the same with the replacement door's edge as well. Nothing beats using the real thing, but this might be a bit faster and easier on the back.
Dave
Dave
Hotshot


Joined: Oct 2004
Posts: 15,882
Likes: 88
From: Durham NC
As said, none of the replacement panels are going to be a perfect fit, the die forms are made from castings off of existing parts not from machined steel dies and the presses used are much smaller so the bends are not going to be as crisp which ends up causing a size difference. The overseas manufacturer doesn't have an entire pristine cab to work from or test the fit and the resulting parts are as good as he can produce for the contracted price and were accepted by the distributor. Many times the parts are not even seen by the distributor before they arrive here. He accepted the prototype part only or may not have even seen that. If you want perfect fitting patch panels, you will need to make them yourself (not really that difficult and doesn't require any major equipment if only making one or two copies) or pay the price to someone who has the skills to do it, I can do it, but are you willing to pay me several hundred $s per patch?
I can't tell from the pictures, but did you cut away the original (rusted out) metal or are you trying to fit the patch over the top?
I can't tell from the pictures, but did you cut away the original (rusted out) metal or are you trying to fit the patch over the top?
Hotshot
Joined: Oct 2004
Posts: 15,882
Likes: 88
From: Durham NC
OK. Just looked like an awful lot of cutting up needed. I woder how much that affected the fit problems you are having now. My plan of attack if faced with that much of a misfit would likely to have been to first test fit the patch over the original metal before cutting it away. If I saw a lot of problems, I'd then verify that the two sides of the cab matched using templates as mentioned, never know what kinds of "tweaks" the body received in it's lifetime. If I couldn't massage the original metal and the patch to fit any better, then I'd have cut off the formed area that goes into the door post from the rest of the patch. I would have then worked with each section seperately, splitting the steps down the corners rather than cutting across them. worse case scenario I would have made a new section to fit the door post by bending L shaped pieces and shaping them into the needed curves with my shrinker/stretcher. Lacking a shrinker/stretcher, I would have made the "steps" out of individual strips of sheetmetal cut to shape and welded together at the corners all from the back side, to make cleanup easier and to produce sharp corners on the face side. If any of this doesn't make sense to anyone in readying it, please feel free to ask for a more detailed description.
FTE Stories
Ford Trucks for Ford Truck Enthusiasts

Rezvani's Latest Post-Apocalytic Monster Is a Ford F-150 Raptor Underneath
Verdad Gallardo
Top 10 Most Expensive Ford Trucks Ever Sold on Bring a Trailer
Joe Kucinski
2027 Ford Super Duty Buyer's Guide (Every Model, Engine, & Package)
Brett Foote
Top 10 Ford Truck Tragedies
Joe Kucinski
AEV FXL Super Duty - the Super Duty Raptor Ford Doesn't Make
Brett Foote
Lobo Vs Lobo: Proof the F-150 Lobo Should Be Even Lower!
Michael S. Palmer
Ford's 2001 Explorer Sportsman Concept Looks For a New Home
Verdad Gallardo
10 Best Ford Truck Engines We Miss the Most!
Joe Kucinski
2026 Shelby F-150 Off-Road: Better Than a Raptor R?
Brett FooteThread Starter
|
Elder User
Joined: Sep 2006
Posts: 741
Likes: 0
From: Katy(Houston), Texas
Ok, I think I get what you are saying. Maybe time to add a shrinker streacher to my tool collection. I would assume I will find a few more opportunities to use it. I hate buying a tool to only use it once or twice but from doing a little research on the S/S it seems like something that will come in handy. From checking it out on youtube.com the learning curve doesn't seem like something too far over my head.
Thread Starter
|
Elder User
Joined: Sep 2006
Posts: 741
Likes: 0
From: Katy(Houston), Texas
I would have then worked with each section seperately, splitting the steps down the corners rather than cutting across them. worse case scenario I would have made a new section to fit the door post by bending L shaped pieces and shaping them into the needed curves with my shrinker/stretcher.
More Turbo
Joined: Jan 2007
Posts: 593
Likes: 15
From: Wichita, KS
...Maybe time to add a shrinker streacher to my tool collection. I would assume I will find a few more opportunities to use it. I hate buying a tool to only use it once or twice but from doing a little research on the S/S it seems like something that will come in handy....
Dave
Hotshot
Joined: Oct 2004
Posts: 15,882
Likes: 88
From: Durham NC
Indeed you can with a lot of practice and time (not quite sure how you shrink with a BP and flat surface tho), but a S/S set makes a 5 minute job out of forming an L shaped piece of metal into a curve or making a 1/2 dome. To make that rear corner patch you could have formed a J shaped curve along a straight length of sheet then used the shrinker on the bottom edge to pull it around into a curve. The flange could then have been formed over the edge of an anvil or using a wooden die form. The S/S would have made quick work of curving L shaped strips for the steps in the door post.
See my "body mods" gallery for pix of the taillight housings I formed with my S/S. I purchased my set from Tools and Equipment - When Quality Counts, Count on Tools Plus. The sell the set of 2 complete tools (since you typically use them together buy both rather than 1 body with jaws that need to be changed constantly) for 329. including shipping. They are made in the USA and of high quality. When I bought mine they also sold a very well made stand to hold them both for 50.00.
See my "body mods" gallery for pix of the taillight housings I formed with my S/S. I purchased my set from Tools and Equipment - When Quality Counts, Count on Tools Plus. The sell the set of 2 complete tools (since you typically use them together buy both rather than 1 body with jaws that need to be changed constantly) for 329. including shipping. They are made in the USA and of high quality. When I bought mine they also sold a very well made stand to hold them both for 50.00.
More Turbo
Joined: Jan 2007
Posts: 593
Likes: 15
From: Wichita, KS
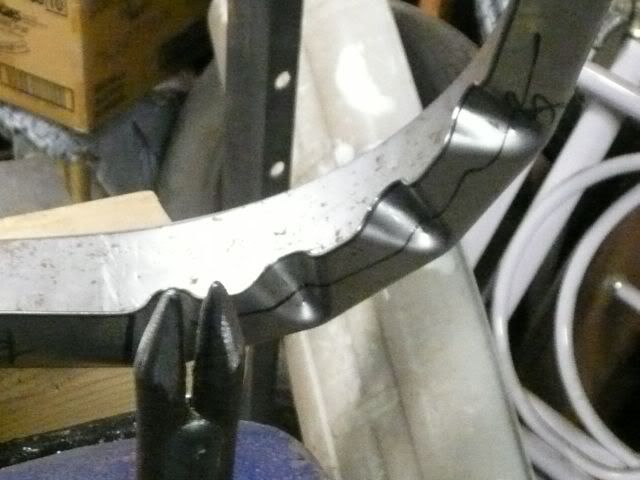
AX, I'm not saying that it is a super easy process, but I have less than $20 in all of my HF body hammers and used 3/8" and 1/2" drops to make my tucking forks. I can't see spending almost $350 for a tool that isn't going to see a lot of use. I have less than 20 minutes worth of shrinking in the part below. I've included a pic of the tucking fork I used as well. (You are right though, a flat surface and a hammer aren't going to do much shrinking without a way to form tucks.)
Dave
Dave
Hotshot
Joined: Oct 2004
Posts: 15,882
Likes: 88
From: Durham NC
OK, yes you need to "tuck" or "flute" the edges to shrink the metal. I'd like to see a better pic of your tucking fork, I have made one from 3 short lengths of 3/8" rod welded to the jaws of a pair of vice grip pliers (two lengths on the sides of 1 jaw, one length in the center of the other jaw so a flute was formed when the jaws were squeezed. I admire your forming skills, but I could have formed that same piece in less than 5 minutes and adjusted the curve if needed in less than that. Depends on what you have more of time/skills or money (or are a tool junkie like me) if you find you have run out of uses for the S/S you can easily sell it and recoup most of your investment. I really like the simplicity and precision work I can do with it, it is also surprising how tight a bend you can form in CRS. The S/S can also be used on Al or SS, both of which would be difficult to hammer form.
More Turbo
Joined: Jan 2007
Posts: 593
Likes: 15
From: Wichita, KS
I hope the OP doesn't mind this related tangent...
Here are the two tucking forks I use. The one standing up is made of 3/8" round. The one laying down is made of 1/2" round. I agree that the S/S is faster. In my case, I don't have the floor space for the tools I have, and I can't really afford the nice Lancaster S/S types. My tucking forks sit in a drawer with my dollies when not being used. Al can be shrunk fairly easily by hand, though it does have to be annealed. SS is just plain hard to do by hand, though it can be done. The difficult part about Al is that it moves so fast, but experience helps there.
edit: forgot the tucking fork pic.

I also like the fact that a tucking fork can be made to get pretty deep. The Lancaster can only reach so far into a panel, even the deep-throat ones.
Here is a piece I made entirely by hand. It was just to see how a couple of things would fit, so I didn't planish it very well, but you can see that it can be done. This would be similar to the OP's panel.

Dave
Here are the two tucking forks I use. The one standing up is made of 3/8" round. The one laying down is made of 1/2" round. I agree that the S/S is faster. In my case, I don't have the floor space for the tools I have, and I can't really afford the nice Lancaster S/S types. My tucking forks sit in a drawer with my dollies when not being used. Al can be shrunk fairly easily by hand, though it does have to be annealed. SS is just plain hard to do by hand, though it can be done. The difficult part about Al is that it moves so fast, but experience helps there.
edit: forgot the tucking fork pic.
I also like the fact that a tucking fork can be made to get pretty deep. The Lancaster can only reach so far into a panel, even the deep-throat ones.
Here is a piece I made entirely by hand. It was just to see how a couple of things would fit, so I didn't planish it very well, but you can see that it can be done. This would be similar to the OP's panel.
Dave