


One pin...
Thread Starter
|
Lead Driver

Joined: Dec 2004
Posts: 7,669
Likes: 13
From: San Jose, CA
One pin...
...is what prevented me from removing the left rear leaf spring. The right side shackle pins came out without any problems and the rear shackle pin on the left rear leafspring was not a problem. However, when I got to the left front pin, I spent over an hour trying to get it out.
Plus, the manual states to get the pins out from inside the frame rail. Not a problem for the rear pins, but the front pins are blocked by a steel plate. Not sure if this is only for the Panel design. Had to drill a hole in the plate in order to get my punch positioned straight. Even after heating, lubrication and beating on it with all my strength, the pin moved only about an 1/8 of an inch.
There goes my plan of dropping off the springs tomorrow at the shop to get them re-arched. Now I have to figure out another plan on how to remove the pin tomorrow.
I was so frustrated that I wanted to throw all of the tools around me. This is when I know that it's time to walk away and relax. Tomorrow is another day and may yield better results.
Also, one of the U-bolts in the rear is bent. Does anyone have a spare that you won't need?

Post Fiend
Joined: May 2008
Posts: 7,641
Likes: 21
From: Poway, Ca.
The guys at the spring shop used many bad words when they tried to get my front pins out of the rear springs - MANY!
Eventually they ended up grinding off the rivets holding on the bracket and removing the brackets to get the pins out.
Then they just bolted them back on during assembly.
And, they told me you never EVER reuse U-bolts after they have been torqued the first time. I think a full set for the backs is only $25??!!??
Pic:
Junior User
Joined: Apr 2010
Posts: 93
Likes: 0
From: Daytona Beach, FL
The best place for information about the advisability of re-arching springs is Eaton Springs.
Leaf Spring Tech - Eaton Detroit Spring Forum
I had the same problem with the front pins on my 51. Here is what I did:
As you have already done, drill a hole in the angled bracket inside the frame rail so you can line-up on the pin
.
Remove the zerk fitting (grease fitting) and apply Liquid Wrench or whatever product you want.
Use an appropriately sized socket to drive the pin in only SLIGHTLY towards the frame.
You want to move it just enough to break the friction that is holding it.
Be careful to not move it in too far as it will then not line-up with the hole and you'll never get it out.
Once you have got it to move a little, go around the the inside and try to drive it out.
You may have to repeat the process of a little in, then a little out until it breaks free.
It will come out just keep working at it.
When you reinstall your NEW pins, be care that you line them up so the flat areas will align with the new retaining bolts.
Good Luck
Junior User
Joined: Apr 2010
Posts: 93
Likes: 0
From: Daytona Beach, FL
Forgot to mention you should also be replacing the brass bushings.
You can drive them out by using a spark plug socket. Just find one that fits.
The new bushings should be placed in your freezer the day before to shrink them. They will go in a little easier that way.
I would suggest you use a block of wood on the bushing then hammer on the block not the bushing to drive them in. That way you won't damage them.
Thread Starter
|
Lead Driver
Joined: Dec 2004
Posts: 7,669
Likes: 13
From: San Jose, CA
Thanks for the advice everyone. The front pin on the right rear spring came out by me just twisting it out from the outside of the frame rail by using the zerk fitting.
I even loosened the e-brake cable to give me more room to swing a hammer. My other obstacle is the fuel tank. The fuel tank in the Panel is mounted about an inch or so away from the front of the rear spring on the left side of the frame rail. It's hard to swing a hammer in that already tight area with the fuel tank in place.
I've heated the shackle several times, as well as lubricated it several times. It seems like I need a longer punch due to the space constraints. I'm going to buy a steel rod today and cut it to the length that I need and use it as the punch. There's no room to hit the pin from the outside of the frame rail. The body of the Panel is in the way.
I need to remove that pin today! I'm on a time schedule to get the truck somewhat finished by the last weekend in September.
Cargo Master


Joined: Feb 2008
Posts: 2,795
Likes: 129
From: Windermere Valley,B.C. Ca

 advocate for a moment, I had a friend who�s favorite quote was �who makes those rules�? Yes, we all have deadlines and timetables, but for the most part who crates most of that stress, us!
Not sure if you have room or if it would help but I have heard of using a air inmpct / muffler zip gun with the punch bit.
I cut mine off (for good!).

Trending Topics

Lead Driver


Joined: Oct 1999
Posts: 6,777
Likes: 553
From: Kalispell, MT
When I replaced my pickup bushings I made a punch from drill rod the length and shape needed to get to the pin.
As I'm sure you've been doing, it also helps to shift the springs/frame back and forth and up and down. The pins get ridges worn into the surface that allow them to hang up on the multiple edges you have to slide them past.
As I'm sure you've been doing, it also helps to shift the springs/frame back and forth and up and down. The pins get ridges worn into the surface that allow them to hang up on the multiple edges you have to slide them past.
FTE Stories
Ford Trucks for Ford Truck Enthusiasts

3 Best / 3 Worst Parts of Modern Ford Ownership
Brett Foote
10 Amazing Upgrades That Solve Common Ford Truck Owner Headaches
Pouria Savadkouei
Every 2026 Ford Engine Explained
Brett Foote
10 Ugly Ford Trucks That We Still Kinda Love
Joe Kucinski
10 Things Every Truck Owner NEEDS (2026 Edition)
Michael S. Palmer
Rezvani's Latest Post-Apocalyptic Monster Is a Ford F-150 Raptor Underneath
Verdad Gallardo
Top 10 Most Expensive Ford Trucks Ever Sold on Bring a Trailer
Joe Kucinski
2027 Ford Super Duty Buyer's Guide (Every Model, Engine, & Package)
Brett Foote
Top 10 Ford Truck Tragedies
Joe KucinskiThread Starter
|
Lead Driver
Joined: Dec 2004
Posts: 7,669
Likes: 13
From: San Jose, CA
I have an air punch gun. However, the punch on it is not long enough. I didn't try to wiggle the spring itself as mtflat suggested. Hard to do that with just having two hands. I'll try to have someone help me out today.
If my long rod as a punch idea doesn't work out, then I'm thinking about making a tool for the air punch gun.
If my long rod as a punch idea doesn't work out, then I'm thinking about making a tool for the air punch gun.
Post Fiend
Joined: May 2008
Posts: 7,641
Likes: 21
From: Poway, Ca.
 LOL!
LOL!Too bad you can't have Bob just photoshop that out of there for you!
Thread Starter
|
Lead Driver
Joined: Dec 2004
Posts: 7,669
Likes: 13
From: San Jose, CA
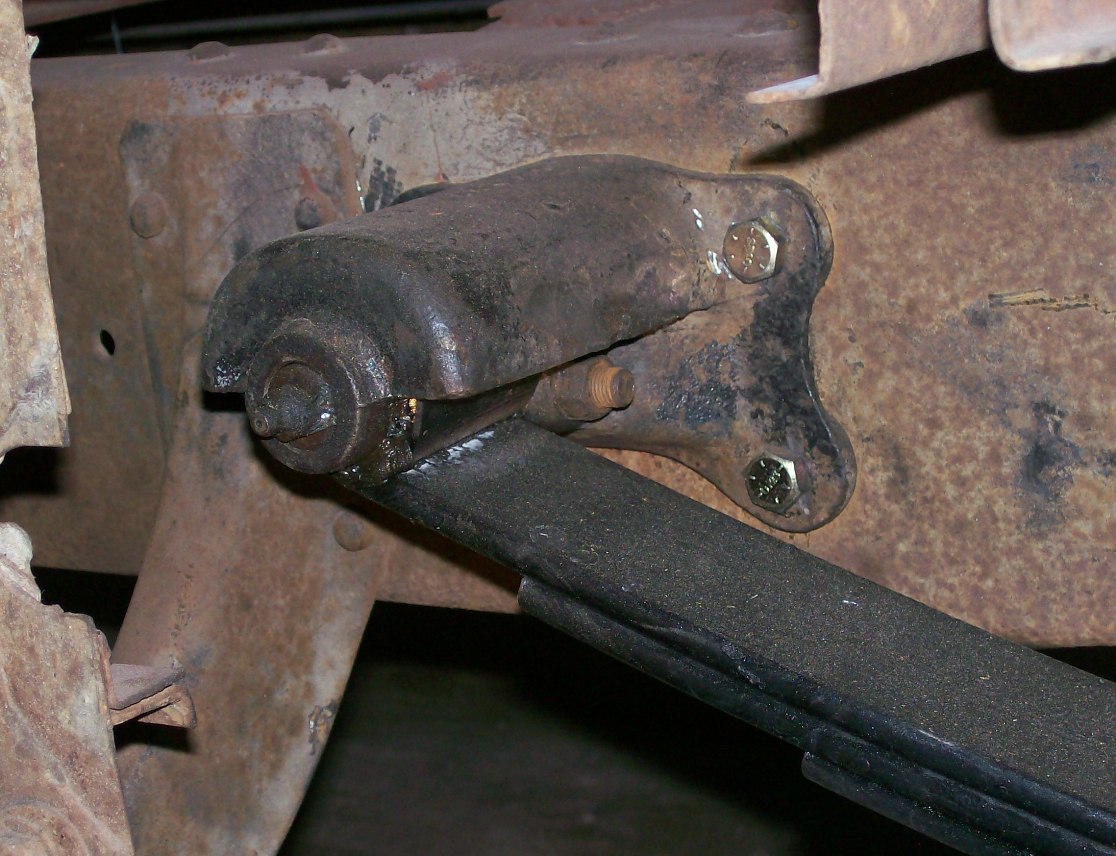
The pin is finally out!!!
I went to the local metal yard and bought a 5' length (their minimum) of 5/8" thick rod that I was going to cut to the length I needed and use the rod as the punch. As I was walking out of the warehouse to my car, I came upon a bucket full of long bolts, about 12" in length. I picked one up and it seemed that it would fit the bill. Since I already spent $10 on the rod, the guy at the shop told me that I could take the bolt.
Came home and within a matter of minutes, the last stubborn pin was out. As you can see by the markings on the rivet in the crossmember plate above the bolt, this is where my actual punch was positioned. It wasn't long enough and I couldn't get a good impact on it due to the curve in the crossmember. A longer "punch" solved that issue.

Not fun to hammer the "punch" with the fuel tank nearby. Not a lot of room to swing a hammer.

Removed both leaf spring assemblies only to find that I have 8 leafs on each. I think I'm supposed to have 10 or 11. I can see that some are missing as the indent is there in the remaining bottom leaf. Also, the ends are cut off very crudely from some of the leafs. I don't think that's factory. Hopefully, the spring shop can remedy the issues.


I went to the local metal yard and bought a 5' length (their minimum) of 5/8" thick rod that I was going to cut to the length I needed and use the rod as the punch. As I was walking out of the warehouse to my car, I came upon a bucket full of long bolts, about 12" in length. I picked one up and it seemed that it would fit the bill. Since I already spent $10 on the rod, the guy at the shop told me that I could take the bolt.
Came home and within a matter of minutes, the last stubborn pin was out. As you can see by the markings on the rivet in the crossmember plate above the bolt, this is where my actual punch was positioned. It wasn't long enough and I couldn't get a good impact on it due to the curve in the crossmember. A longer "punch" solved that issue.
Not fun to hammer the "punch" with the fuel tank nearby. Not a lot of room to swing a hammer.
Removed both leaf spring assemblies only to find that I have 8 leafs on each. I think I'm supposed to have 10 or 11. I can see that some are missing as the indent is there in the remaining bottom leaf. Also, the ends are cut off very crudely from some of the leafs. I don't think that's factory. Hopefully, the spring shop can remedy the issues.
Junior User
Joined: Apr 2010
Posts: 93
Likes: 0
From: Daytona Beach, FL
If what you are trying to achieve is to raise the truck up, using the correct amount of leaves may do that and you won't need to re-arch a leaf. The springs should contain 10 leaves and be 2-inch wide.
You could also add a non-stock stiffer leaf to do the same thing.
You could also add a non-stock stiffer leaf to do the same thing.
Posting Guru
Joined: May 2010
Posts: 2,068
Likes: 7
From: Moyie, BC Canada
The shackle pins remove to the out side ( grease zerk side). The easiest way to accomplish this is to remove the whole spring assembly. Shackles and all - Shave off the rivets and replace with grade 8 bolts. Assemble the springs and shackles as a unit back onto the frame. 

Logistics Pro
Joined: Aug 2007
Posts: 3,773
Likes: 169
From: Pt.St.Lucie , Fla.
Ilya . looks like you are going to be needing some e-brake cable boots also .Maybe make you a package price deal on those and some freah air tube parts. Am working on the molds now . Will have them made soon . Have the material to make the inside buck and then will have the same profile reproduced in aluminum . Have some fresh rubber also . I will be using a one of my NOS boots for this process which I am not too enthused about .Any one else that needs these stay tuned . Will post some pics of the new reproduction item . Later , Denny

Cross-Country
Joined: Oct 2004
Posts: 95
Likes: 21
From: Cape Cod
11 leaf panel springs
"If what you are trying to achieve is to raise the truck up, using the correct amount of leaves may do that and you won't need to re-arch a leaf. The springs should contain 10 leaves and be 2-inch wide."
I don't have any reference materials with me and I shouldn't be poking around on the web right now, but I believe the Panel Trucks had 11-leaf rear springs, different from the pickups.
Jonas
I don't have any reference materials with me and I shouldn't be poking around on the web right now, but I believe the Panel Trucks had 11-leaf rear springs, different from the pickups.
Jonas