


Transmission mounts

Thread Starter
|
New User
Joined: Nov 2008
Posts: 9
Likes: 0
Transmission mounts
Im putting togther a 1951 f-100 but i am switching to a chevy drivetrain a 400 sbc with a th350 i have the new motor mounts but was wondering if anyone knows of a new tranny crossmembers that will still keep the brake booster in its location, or if anyone has just cut out some of the old mount to make room and mounted it that way just wantedc some ideas on how to do it an the truck was orginally a flathead with a 3spd stick

Senior User
Joined: Oct 2008
Posts: 214
Likes: 0
From: Kansas City, MO
I had a crossmember fabricated for me because I didn't know that TCI had them. But TCI sells brake booster sets along with a tranny crossmember for your truck. With the brake booster setup, you have to cut out the original crossmember. The links are:
48-52 Ford P/U Bolt-In Trans-M is the tranny mount.
48-52 Ford P/U Pwr Pedal Assy For Disc/Disc Brakes is the brake booster setup, if you're interested in that.
48-52 Ford P/U Bolt-In Trans-M is the tranny mount.
48-52 Ford P/U Pwr Pedal Assy For Disc/Disc Brakes is the brake booster setup, if you're interested in that.

Senior User
Joined: Aug 2008
Posts: 277
Likes: 1
From: Sacramento, California
I got one from Speedway for $50 although I don't believe it would work with the original clutch and brake pedal setup. The catalog lists it for the 53-56 F-100s but it works on our F-1s as well. Someone used the 53-56 F-100 brake pedal setup that easily bolts to the frame and will clear the trans crossmember with the F-100 master cylinder, however I don't think it would work with a brake booster. I'm running a 350 SBC with a THM350 in my F-1 using the front saddle mount for the engine.
Senior User

Joined: Nov 2007
Posts: 494
Likes: 1
From: Guelph
Check my gallery. I modified the original crossmember to fit my trans. When I installed my trans I didnt have any rejection proplems with the Ford part going into the Ford frame. You may find rejection issues doing your swap.I dont think there is a anti rejection medication for this proplem yet. You may want to stick to matching manufactures just to be safe.LOL
Cargo Master


Joined: Feb 2008
Posts: 2,793
Likes: 128
From: Windermere Valley,B.C. Ca

Have a look at this post, sometimes even the stuff that is supposed to go together, doesn’t.

<O
 </O
</Ohttps://www.ford-trucks.com/forums/8...agreement.html

Freshman User
Joined: Mar 2009
Posts: 38
Likes: 0
From: Seaside, OR
Not trying to hijack this thread
But.....I also have a '51 F1 and just pulled the flathead and 3 spd out of mine last night. I am wanting to put in a 302/C4 combo. I guess my question would be more aimed towards reg1952 but isn't the stock transmission crossmember too far forward for the combo I want to install? If not, that's awesome. I still want to use the original brake system because I just replaced all of it, master cylinder and all.
But.....I also have a '51 F1 and just pulled the flathead and 3 spd out of mine last night. I am wanting to put in a 302/C4 combo. I guess my question would be more aimed towards reg1952 but isn't the stock transmission crossmember too far forward for the combo I want to install? If not, that's awesome. I still want to use the original brake system because I just replaced all of it, master cylinder and all.

Post Fiend
Joined: May 2008
Posts: 7,641
Likes: 21
From: Poway, Ca.
Not trying to hijack this thread
But.....I also have a '51 F1 and just pulled the flathead and 3 spd out of mine last night. I am wanting to put in a 302/C4 combo. I guess my question would be more aimed towards reg1952 but isn't the stock transmission crossmember too far forward for the combo I want to install? If not, that's awesome. I still want to use the original brake system because I just replaced all of it, master cylinder and all.
But.....I also have a '51 F1 and just pulled the flathead and 3 spd out of mine last night. I am wanting to put in a 302/C4 combo. I guess my question would be more aimed towards reg1952 but isn't the stock transmission crossmember too far forward for the combo I want to install? If not, that's awesome. I still want to use the original brake system because I just replaced all of it, master cylinder and all.
On my truck what was done was the stock transsmission cross member was cut out with enough of it left on the left side to support the stock master cylinder.
Then, a pipe type cross member was bolted in farther aft to support the new Auto Transmission. Although I have a 390/C6 combo, and that cross member is probably a little farther back than with a 302/C4, I think the set up would be about the same. I'm sure you could fab up a cross member as well.
Here's a picture from behind. It's hard to get a feeling for depth, but the brake light switch on themaster cylinder ends right where the new tranny cross member sits. You can just make out the two cut pieces of the original cross member:


Trending Topics
Freshman User
Joined: Mar 2009
Posts: 38
Likes: 0
From: Seaside, OR
Hey Julie.....I just found a recently restored but wrecked '72 LTD with a 400/Auto combo in it. I'm thinking this might be a great donor for my engine/transmission. I'm wondering....did you use the pipe type cross members for the engine and trans both? The type you can pickup up from CPP? Also-did you have any clearance issues or regrets going with the big block?
FTE Stories
Ford Trucks for Ford Truck Enthusiasts

2027 Ford Super Duty Buyer's Guide (Every Model, Engine, & Package)
Brett Foote
Top 10 Ford Truck Tragedies
Joe Kucinski
AEV FXL Super Duty - the Super Duty Raptor Ford Doesn't Make
Brett Foote
Lobo Vs Lobo: Proof the F-150 Lobo Should Be Even Lower!
Michael S. Palmer
Ford's 2001 Explorer Sportsman Concept Looks For a New Home
Verdad Gallardo
10 Best Ford Truck Engines We Miss the Most!
Joe Kucinski
2026 Shelby F-150 Off-Road: Better Than a Raptor R?
Brett Foote
2027 Super Duty Carhartt Package First Look: 12 Things You NEED to Know!
Michael S. Palmer
10 Most Surprising 2026 Ford Truck Features!
Joe Kucinski
Post Fiend
Joined: May 2008
Posts: 7,641
Likes: 21
From: Poway, Ca.
The engine and transmission were installed in the truck when I got it. Although it was a 360 (that I replaced with a 390 PI) and had the C6 rebuilt as well.
The pipe transmission cross member was in it as was the pipe type engine mount system.
Just about everything the PO did, I have had to tear apart and start over (or it's fallen out by itself).
About two weeks after I got the new engine in it I snapped that motor mount pipe off at its mounting on the passenger (torquing) side. It was an aftermarket (or possibly made by the PO) set up - poorly designed, constructed, and installed. Had I not had the over the frame headers, which caught the engine on the way down, I would have been in trouble.
I took it to my welding guy, Loni Sparks (for all you San Diego County folks)- who by the way also made my headers, and had him fab up a completely new, well designed and strengthened tube type motor mount system, and make and install new mounts for the transmission cross member. He does excellent work!!!!!
Both mounts designed, fabricated, frame boxed at the mounting spot, and installed for $500. He was kind of mad at me for driving the truck down there with the engine hanging on his headers - it didn't even scratch them!!!!!
I would think the aftermarket mounts would hold up OK. I had Loni Make newer and stronger/bigger because I just have problems with throttle response and burning out because of my shoes - you know the heels and all.
Here's a couple pics - the first one is the old mount just before it broke (you can see the upper support starting to twist) Note the bad angles to handle torquing.
The new mount system is much better - no problems at all.
OBTW!!!! In looking at the pics, it reminded me of something. If you use this kind of set up, make sure you can get to your oil drain plug - either get a rear drain plug or lengthen the bottom tube to add some space!


That 400/auto (probably a C6) would be a great combo. I had a few challenges space wise. The engine fit in OK with no problems. I had to go to the smaller 18" T-bird 7 blade HP fan to clear the front cross member. There was VERY little room between the C6 and the transmission cover (just enough for the brake cable to slip between). There is about 3/4 inch of clearance between the tops of the valve covers and the firewall. I had to solder a copper 45* fitting on my lower heater tube to get it over the valve cover. The throttle was no problem as I used the stock pedal and linkage - just brazed an extension on it on the drivers side (I think we talked about that in the "has anyone used the stock throttle" thread last week). I used the stock steering column but used the upper shift arm to shift the automatic tranny, and tied the lower shift lever to the unused clutch pedal that I dropped through the floor. I made a shift rod that just cleared both the engine and brake pedal, and had to change the shifters from the truck shifters (which sit at about 100* from vertical) to car shifters which are 1/2 inch shorter and sit at about 130* from vertical (to clear the block). I think most of this I had to do because I wanted to stick with the stock steering column for looks. If that shift rods lower nut moved over 3/4 of a turn, the shift rod will fall into the brake pedal path when pulling the shifter down onto low gear (1st). I shaved about 1/8 inch off the corner of the brake pedal where it turns to come into the cab. I tightened it up and have newer had a problem (and I test it regularly). You can do it, but we are talking about an inch and in two or three cases fractions of an inch in clearance tolerance.
Other problem was exhaust. You have three choices: Use a Toyota steering box and route custom headers down the drivers side between the new steering box and the motor mount; get a stock exhaust manifold from the passenger side, bolt it on back wards on the drivers side exhaust toward the front then loop it down and back; or go over the frame with custom made headers. I have a full front tilt with no inner fenders so that was the way for me. I posted pics of those in the other post this week about big block headers. I can send it to you all again if you like.
If you go over the frame with headers and are planning on installing an IFS, INSTALL YOUR IFS and motor mounts first and make the headers to go around them. I didn't do that and bought a MII IFS and the shock tower that get welded on top of the frame was blocked by the headers - so I'm rebuilding the stock front end (which in my 55 was pretty good once everything was replaced).
I'm getting pretty long here so if you want pics and stuff, we can start a new thread or PM me and I'll send you the pics. As dramatic as all this stuff sounds it wasn't too hard and if you decide on the 400 I can help you with the other stuff.
One last pic of the transmission linkage I made from underneath....Space issues Naaaaaaaaaah!


The pipe transmission cross member was in it as was the pipe type engine mount system.
Just about everything the PO did, I have had to tear apart and start over (or it's fallen out by itself).
About two weeks after I got the new engine in it I snapped that motor mount pipe off at its mounting on the passenger (torquing) side. It was an aftermarket (or possibly made by the PO) set up - poorly designed, constructed, and installed. Had I not had the over the frame headers, which caught the engine on the way down, I would have been in trouble.
I took it to my welding guy, Loni Sparks (for all you San Diego County folks)- who by the way also made my headers, and had him fab up a completely new, well designed and strengthened tube type motor mount system, and make and install new mounts for the transmission cross member. He does excellent work!!!!!
Both mounts designed, fabricated, frame boxed at the mounting spot, and installed for $500. He was kind of mad at me for driving the truck down there with the engine hanging on his headers - it didn't even scratch them!!!!!
I would think the aftermarket mounts would hold up OK. I had Loni Make newer and stronger/bigger because I just have problems with throttle response and burning out because of my shoes - you know the heels and all.
Here's a couple pics - the first one is the old mount just before it broke (you can see the upper support starting to twist) Note the bad angles to handle torquing.
The new mount system is much better - no problems at all.
OBTW!!!! In looking at the pics, it reminded me of something. If you use this kind of set up, make sure you can get to your oil drain plug - either get a rear drain plug or lengthen the bottom tube to add some space!
That 400/auto (probably a C6) would be a great combo. I had a few challenges space wise. The engine fit in OK with no problems. I had to go to the smaller 18" T-bird 7 blade HP fan to clear the front cross member. There was VERY little room between the C6 and the transmission cover (just enough for the brake cable to slip between). There is about 3/4 inch of clearance between the tops of the valve covers and the firewall. I had to solder a copper 45* fitting on my lower heater tube to get it over the valve cover. The throttle was no problem as I used the stock pedal and linkage - just brazed an extension on it on the drivers side (I think we talked about that in the "has anyone used the stock throttle" thread last week). I used the stock steering column but used the upper shift arm to shift the automatic tranny, and tied the lower shift lever to the unused clutch pedal that I dropped through the floor. I made a shift rod that just cleared both the engine and brake pedal, and had to change the shifters from the truck shifters (which sit at about 100* from vertical) to car shifters which are 1/2 inch shorter and sit at about 130* from vertical (to clear the block). I think most of this I had to do because I wanted to stick with the stock steering column for looks. If that shift rods lower nut moved over 3/4 of a turn, the shift rod will fall into the brake pedal path when pulling the shifter down onto low gear (1st). I shaved about 1/8 inch off the corner of the brake pedal where it turns to come into the cab. I tightened it up and have newer had a problem (and I test it regularly). You can do it, but we are talking about an inch and in two or three cases fractions of an inch in clearance tolerance.
Other problem was exhaust. You have three choices: Use a Toyota steering box and route custom headers down the drivers side between the new steering box and the motor mount; get a stock exhaust manifold from the passenger side, bolt it on back wards on the drivers side exhaust toward the front then loop it down and back; or go over the frame with custom made headers. I have a full front tilt with no inner fenders so that was the way for me. I posted pics of those in the other post this week about big block headers. I can send it to you all again if you like.
If you go over the frame with headers and are planning on installing an IFS, INSTALL YOUR IFS and motor mounts first and make the headers to go around them. I didn't do that and bought a MII IFS and the shock tower that get welded on top of the frame was blocked by the headers - so I'm rebuilding the stock front end (which in my 55 was pretty good once everything was replaced).
I'm getting pretty long here so if you want pics and stuff, we can start a new thread or PM me and I'll send you the pics. As dramatic as all this stuff sounds it wasn't too hard and if you decide on the 400 I can help you with the other stuff.
One last pic of the transmission linkage I made from underneath....Space issues Naaaaaaaaaah!
Post Fiend
Joined: May 2008
Posts: 7,641
Likes: 21
From: Poway, Ca.
Hi Stevo ("We are Stevo - Steeeee -Eeeeee-Veeee-Ooooooh")
Wow, you've got three post going on this now. So I thought I'd post these in tha first one so all the links we inserted in the other two would show this update.
They say "one picture is worth a thousand words." Well, you know me: so I had to post three
I think they pretty much speak for themselves and sum up the F1 stock cross member C6 swap questions:


Wow, you've got three post going on this now. So I thought I'd post these in tha first one so all the links we inserted in the other two would show this update.
They say "one picture is worth a thousand words." Well, you know me
: so I had to post three I think they pretty much speak for themselves and sum up the F1 stock cross member C6 swap questions:
Senior User
Joined: Aug 2008
Posts: 277
Likes: 1
From: Sacramento, California
Hey Julie, I guess you have one of those really heavy right foot like some of us do! I bet with that FE it really lights them tires up! You should have left the clutch pedal up and made it just as a dummy to freak people out especially since you're using the stock column and the three in the tree linkage. By the way nice job!

Senior User
Joined: Jan 2008
Posts: 173
Likes: 0
From: Petaluma, CA
Hey Julie or anyone else running a bigblock Ford (mine's a 460) with a C6 setup. I dry fitted my engine yesterday with the old tranny cross member cutout in the center. The engine goes back alot further now, but the heads now touch my firewall and will need at least another inch back past the fire wall in order to clear the front main cross member bellow the stock radiator mounts. So my question to you guys is, did you cut your firewall and custom make a new tranny tunnel, or did you cut the fron frame member bellow the radiator mounts to get the clearance there that you needed? My engine sits low enough with the aftermarker engine motor mounts from Classic Performance Parts, that it either has to go farter back into the fire wall, or be cutting the front frame crossmember to clear the stock crank pulley. Pictures of setups you guys are running from the engine compartment would be appreciated. Thanks, Steve.
Post Fiend
Joined: May 2008
Posts: 7,641
Likes: 21
From: Poway, Ca.
Good Question!
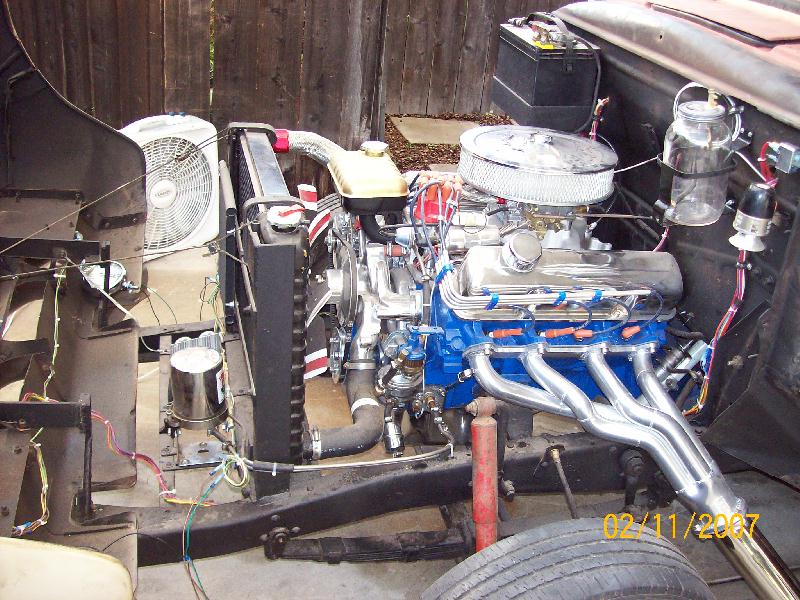
My 390 is about 1/2 inch from the firewall - remember you still ahve to put valve covers on the engine and have enough room to tighten them - also take a look at where your heater tubes will be coming out from the firewall. You might need to solder on a 1/2 inch 45* or an elbow to make it work.
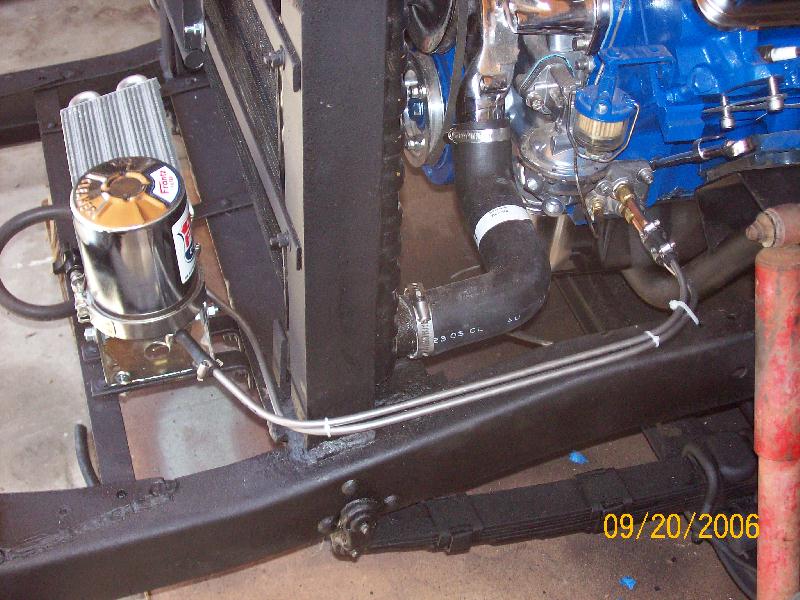
On my truck th eplan was always to cut the front cross member. I did that because I had planned to put on a full front tilt and the the radiator support needed to be a dash narrower than the stock one to allow the hood clearance. So, I put in a new fromt cross member and heavy radiator support. Be sure if you do that, and with your motor mounting that you have enough room for your fan (unless you go electric) on the bottom and the shroud. The 390 is a VERY tight fit - or should I more correctly say It didn't quite fit and we made it fit. Here is a picutre of my front/radiator area.
In the top picture the forward set of vertical metal bars is the carrier for the full front tilt. The joint between the headlight wind panel and the two (upper and lower) valances bolts up to it.

And the firewall clearance:
My 390 is about 1/2 inch from the firewall - remember you still ahve to put valve covers on the engine and have enough room to tighten them - also take a look at where your heater tubes will be coming out from the firewall. You might need to solder on a 1/2 inch 45* or an elbow to make it work.
On my truck th eplan was always to cut the front cross member. I did that because I had planned to put on a full front tilt and the the radiator support needed to be a dash narrower than the stock one to allow the hood clearance. So, I put in a new fromt cross member and heavy radiator support. Be sure if you do that, and with your motor mounting that you have enough room for your fan (unless you go electric) on the bottom and the shroud. The 390 is a VERY tight fit - or should I more correctly say It didn't quite fit and we made it fit. Here is a picutre of my front/radiator area.
In the top picture the forward set of vertical metal bars is the carrier for the full front tilt. The joint between the headlight wind panel and the two (upper and lower) valances bolts up to it.
And the firewall clearance:
Elder User

Joined: Apr 2002
Posts: 692
Likes: 3
From: Gatesville, TX
I cut the transmission cross member out, but left enough to mount the original pedals. I got a second original cross member and modified it for the transmission mount. Bolted it in the frame behind the original one. Mounted the Booster and master on it. Made an extension for the push rod coming from the pedal. Worked out real well.
Senior User
Joined: Jan 2008
Posts: 173
Likes: 0
From: Petaluma, CA
Thanks for the info both of you. After contiplating it today, I'm inclined to cut the front member back to clear the pulley, much easier than relocating gas petal, and making a new tranny tunnel.It's a beefy member and I only need about 1 " off the engine compartment side of it in the center! I've also gone back and forth on a fan blade vs. electric fan. I want to go with an aluminum remake of the original radiator, custom built for my engine and tranny, so I'm hoping when I'm done to be able to have the clearance to mount the radiator to the stock mounts. If the radiator mounts to the grill side of the bracket it will fit, if it mounts to the engine compartment side it will not!


Thread
Thread Starter
Forum
Replies
Last Post
bigsixguy
1973 - 1979 F-100 & Larger F-Series Trucks
15
Nov 6, 2022 10:53 AM
undertow91
1948 - 1956 F1, F100 & Larger F-Series Trucks
3
Dec 13, 2009 09:43 PM
oldmansimek
1980 - 1986 Bullnose F100, F150 & Larger F-Series Trucks
4
Dec 25, 2006 11:50 AM
