


OK Heaters one more time...
Thread Starter
|
Freshman User
Joined: Oct 2008
Posts: 49
Likes: 0
OK Heaters one more time...
<TABLE width="100%" border=0 itxtvisited="1"><TBODY itxtvisited="1"><TR itxtvisited="1"><TD vAlign=top itxtvisited="1">I will take it to a shop if I have too. I have read a few different posts telling different ways to replace these.
I would like to try it my self. I just cant understand if I need to pull the blower from under the dash or behind the a/c in the motor compartment??? The directions I have read are not very clear to me about what exactly and where? Are there any with Pictures?
I have AC..1975 f250 460 and 4x4. I am in CR.
It sure is cold. I thought about trying the fan/heater that plugs into the cig/lighter. Any experience????
IowaHighBoy
Thread Starter
|
Freshman User
Joined: Oct 2008
Posts: 49
Likes: 0
Thanks to the board I got it working. Replaced the heater switch a few weeks back.
As it got colder the blower started to freeze. Finally stopped.
I needed to flush the core too. But now that the blower is gone I should replace them at the same time?
As it got colder the blower started to freeze. Finally stopped.
I needed to flush the core too. But now that the blower is gone I should replace them at the same time?
Ford Parts Specialist
Joined: Nov 2006
Posts: 88,826
Likes: 790
From: Simi Valley, CA

The keyword is A/C.
With factory A/C, you have a heater water valve which is controlled by vacuum. It splices into the heater hose-passenger side behind the carb.
When you slide the lever on the control panel to heat, the valve is supposed to open.
But...it doesn't...it's a POS, and is notorious for getting stuck in the closed or partially closed position.
D4AZ18495A .. Heater Water Valve (Motorcraft YG136)
MSRP: $28.72 / FTEpartsguy.com price: $17.23.
Have you verified this valve is working?
Check its vacuum hose, it runs from the backside of the heater control panel (connects to the A/C Heater Control Selector Valve Assy), to a nipple on the top of the valve.
This selector valve bolts to the backside of the A/C Heater control panel, has 8 male fittings where all the heater A/C vacuum lines connect.
The "kicker switch" for the A/C compressor is located on the top of this valve.
Thread Starter
|
Freshman User
Joined: Oct 2008
Posts: 49
Likes: 0
The keyword is A/C.
With factory A/C, you have a heater water valve which is controlled by vacuum. When you slide the lever on the dash to heat, the valve is supposed to open.
But...it doesn't...it's a POS, and is notorious for getting stuck in the closed or partially closed position.
D4AZ18495A .. Heater Water Valve (Motorcraft YG136)
Have you verified this valve is working?
Ford Parts Specialist
Joined: Nov 2006
Posts: 88,826
Likes: 790
From: Simi Valley, CA
1973/79 F100/350 A/C Heater Blower Motor Resistor / 1978/79 Bronco
Is the blower defective, did the switch fail, or could it be the blower motor resistor?
The resistor is specific to trucks with A/C, it's not the same resistor as used with a heater only.
D3TZ19706A .. Blower Motor Resistor-Use with A/C / Obsolete
Fits: 1973/79 F100/350 / 1978/79 Bronco / All with factory installed A/C.
Several dealers, and one obsolete parts vendor has this resistor available:
Bob Allen Ford in Overland Park KS has one: 800-676-0675
Beckman Motors in Garnet KS has one.
Kinsel L/M in Beaumont TX has one: 800-816-2894.
Green Sales Co. in Cincinnati OH has four: 800-543-4959
Trending Topics
Thread Starter
|
Freshman User
Joined: Oct 2008
Posts: 49
Likes: 0
Why did the blower motor fail?
Is the blower defective, did the switch fail, or could it be the blower motor resistor?
The resistor is specific to trucks with A/C, it's not the same resistor as used with a heater only.
D3TZ19706A .. Blower Motor Resistor-Use with A/C / Obsolete
Fits: 1973/79 F100/350 / 1978/79 Bronco / All with factory installed A/C.
Several dealers, and one obsolete parts vendor has this resistor available:
Bob Allen Ford in Overland Park KS has one: 800-676-0675
Beckman Motors in Garnet KS has one.
Kinsel L/M in Beaumont TX has one: 800-816-2894.
Green Sales Co. in Cincinnati OH has four: 800-543-4959
Wow You do have a lot of number info!!!! If it was the resister wouldn't I be able to trouble shoot it? Bypass it or get some level of blower activity?
FTE Stories
Ford Trucks for Ford Truck Enthusiasts

Top 6 Best Deals Available on New Fords & Lincolns Right Now
Brett Foote
This Hennessey Takes the Expedition Tremor's Off-Roading Capability to the Next Level
Verdad Gallardo
Top 10 Fords at 2026 Carlisle Ford Nationals
Joe Kucinski
3 Best / 3 Worst Parts of Modern Ford Ownership
Brett Foote
10 Amazing Upgrades That Solve Common Ford Truck Owner Headaches
Pouria Savadkouei
Every 2026 Ford Engine Explained
Brett Foote
10 Ugly Ford Trucks That We Still Kinda Love
Joe Kucinski
10 Things Every Truck Owner NEEDS (2026 Edition)
Michael S. Palmer
Rezvani's Latest Post-Apocalyptic Monster Is a Ford F-150 Raptor Underneath
Verdad GallardoThread Starter
|
Freshman User
Joined: Oct 2008
Posts: 49
Likes: 0
I am determined to try it myself. I'll try to follow these directions:
Heater Core Removal and Installation For 1973-1979 Ford F-Series Trucks
<CENTER>By Thomas Hogan
</CENTER><!--BOXAD-->
Are pictures available
</TD></TR></TBODY></TABLE>
Heater Core Removal and Installation For 1973-1979 Ford F-Series Trucks
<CENTER>By Thomas Hogan
</CENTER><!--BOXAD-->
- Disconnect the battery ground cable.
- Remove the air cleaner.
- Drain the engine coolant below the level of the heater core.
- Remove the heater hoses from the heater core.
- Remove the screw fastening the A/C hose support bracket to the firewall.
- The expansion valve is located on the right side of the evaporator core housing. Remove the insulating tape covering the valve.
- Remove the two screws holding the plate over the opening that the A/C hoses exit the evaporator housing. Remove the plate and the seal.
- Remove the glove box liner.
- Separate the A/C duct from the register in the instrument panel and free the clip holding it to the plenum. Remove the duct from under the dash.
- Remove the vacuum hose from the vacuum motor on the right hand side of the air box.
- Remove the rear housing cover from the evaporator housing. The cover is retained by 4 nuts and one bolt. Disconnect the fresh air tube from the rear cover. After the cover is removed reinstall one nut to secure the evaporator housing to the firewall.
- Gently remove the capillary tube from the evaporator core. Disconnect the wires from the icing sensor. Remove the plate the sensor is mounted to.
- Remove the plenum by extracting the two screws above the transmission tunnel that hold the plenum to the dash.
- Remove the screws securing the evaporator.
- Pull the evaporator from the case and secure it above the case.
- Remove the heater core.
- Remove the heater air control door. There are no screws this is retained by a spring clip and snaps off.
- Remove the arm that supports the air control door and the retainer that secures the pivot arm.
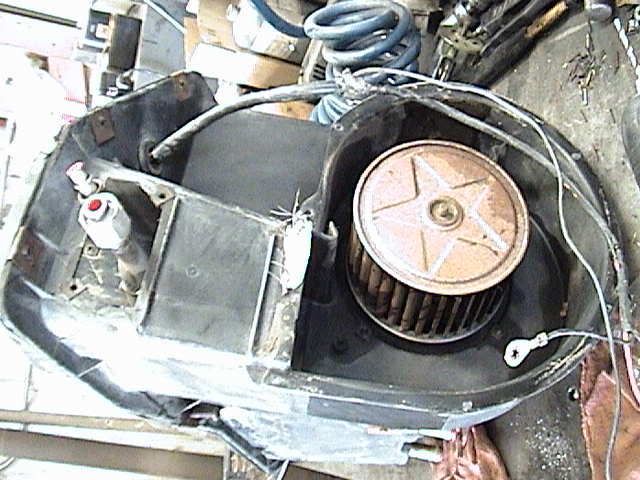
- Remove the blower motor.
- Transfer the blower wheel to the new motor.
- Reverse the disassembly steps to assemble the heater A/C box.
Are pictures available
</TD></TR></TBODY></TABLE>
Postmaster
Joined: Aug 2005
Posts: 2,760
Likes: 8
From: Gadsden Purchase
Originally Posted by IowaHighBoy
I am determined to try it myself.
{snipped the long list of directions we are all "too" familiar with;}
I hope it does not take too long.
{hope in one hand and spit in the other and see which one fills up first;}
To be honest I not sure what all the parts are they describe.
Are pictures available
{hope in one hand and spit in the other and see which one fills up first;}
To be honest I not sure what all the parts are they describe.
Are pictures available
Right inside your service manual! ;)
But before you tear into that sucker...
How do you know the blower is bad?
You got a test meter?
Did you "hot wire" the blower to see if it'd run?
Did the dangged thing make a bunch of racket then quit?
What?
A lot of effort has been put in this and it's time to answer some questions.
Doing that job is not something you want to do unless it's needed -for sure-.
And yes, change out both the blower motor and the heater core while you
are in there and get the best parts you can find. IMO
Alvin in AZ '75 F150 360FE
ps- I didn't follow those directions but I'm a contrary sucker! :)
pps- I dropped the apron and worked on it from the outside.
Thread Starter
|
Freshman User
Joined: Oct 2008
Posts: 49
Likes: 0
Yes it was making all kinds of noise and getting slower and slower. It would stop and start too.
I'll get working on it tonight. I picked up the parts on the way home and now need to get the kids to bed.
Is the service manual available online?
I'll get working on it tonight. I picked up the parts on the way home and now need to get the kids to bed.
Is the service manual available online?
Thread Starter
|
Freshman User
Joined: Oct 2008
Posts: 49
Likes: 0
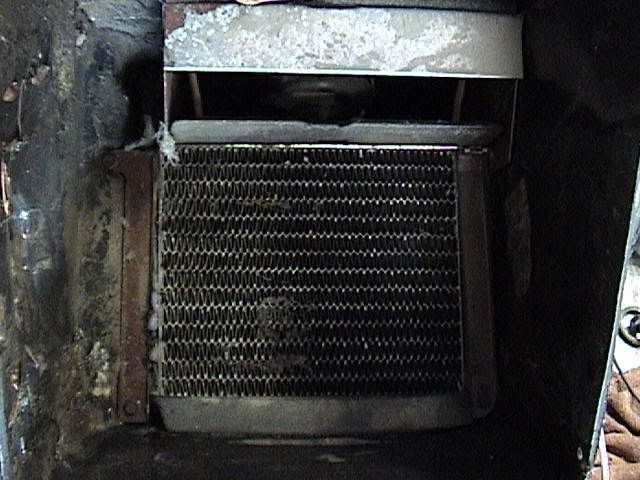
[*]Remove the rear housing cover from the evaporator housing. The cover is retained by 4 nuts and one bolt. Disconnect the fresh air tube from the rear cover. After the cover is removed reinstall one nut to secure the evaporator housing to the firewall.
</TD></TR></TBODY></TABLE>[/QUOTE]
OK this step is getting me. I only see 3 nuts and one bolt and is this glued on too?
What is the secret to getting it off?
One nut on top one on the bottom and one on the left side. Where is the other nut.
</TD></TR></TBODY></TABLE>[/QUOTE]
OK this step is getting me. I only see 3 nuts and one bolt and is this glued on too?
What is the secret to getting it off?
One nut on top one on the bottom and one on the left side. Where is the other nut.

Thread Starter
|
Freshman User
Joined: Oct 2008
Posts: 49
Likes: 0
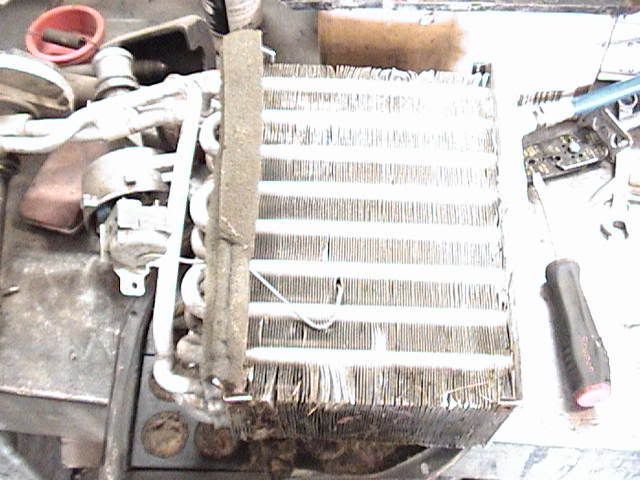
Thanks for posting the pix... Looks like a lot of people take it off from the engine compartment. I now have the evaporator in the way. It says secure it above the case. There is no above the case. We are working under the dash???? Any body have any ideas??? The evaporator seems to big to pull our and sit to the side, especially while the AC hoses are connected to it.
Posting Guru
Joined: Mar 2005
Posts: 1,004
Likes: 0
From: In the Middle
I was able to do mine all from under the dash. For the evaporator, you have removed the small cover from around the hoses under the hood? And taken the hoses loose from the firewall?
You found the 4 nuts and 1 bolt?
.
You found the 4 nuts and 1 bolt?
.