


Frame swap under way
Thread Starter
|
Elder User
Joined: Nov 2005
Posts: 998
Likes: 2
From: Benton, AR
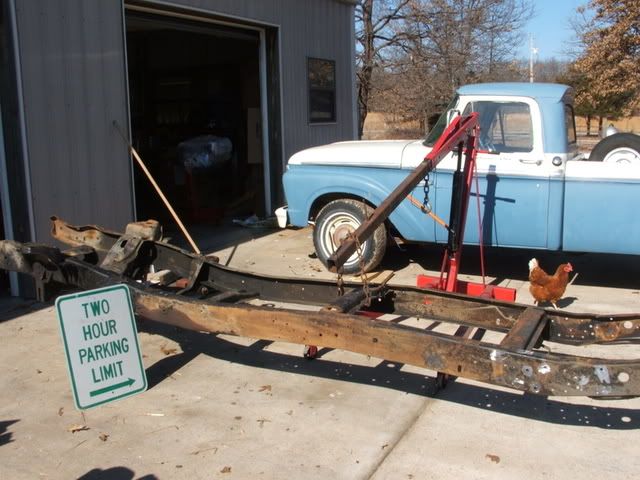
Ask and ye shall receive. Here are some pics of the tear down/axel relocation progress. Also this morning the powder coater called and had some parts ready 3 days ahead of schedule.
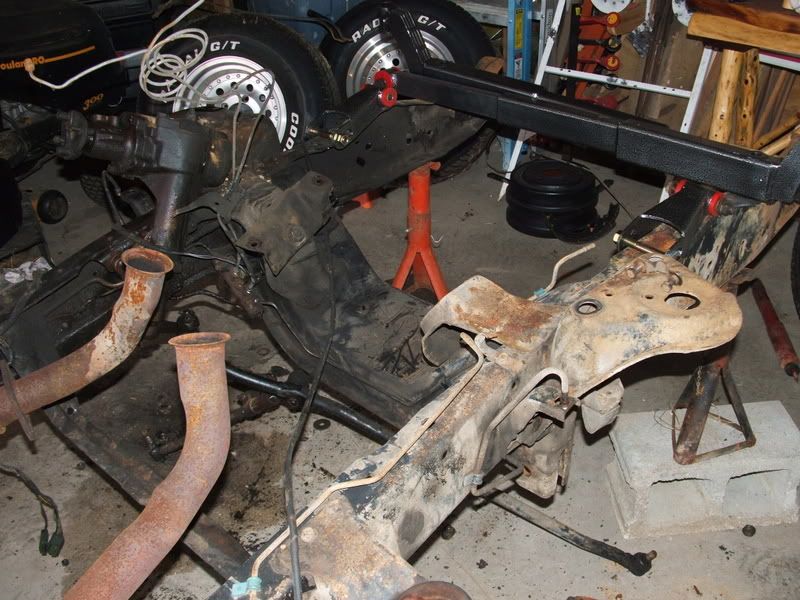
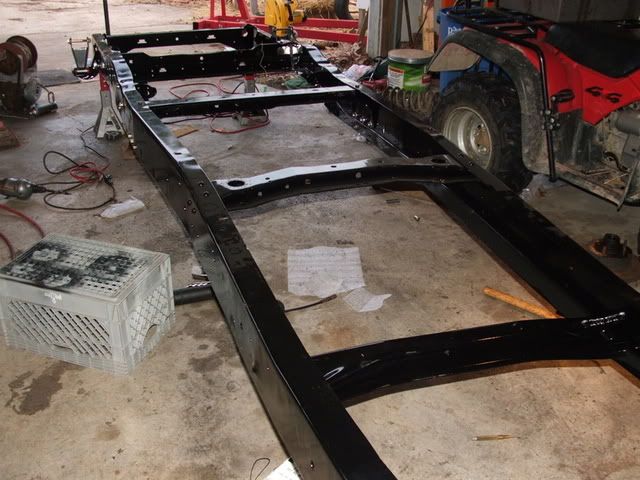
Bare frame:
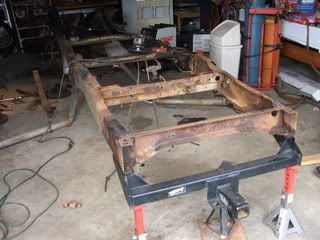


Rivet removal tools. My family is not interested in getting greasy so I didn't have a problem. For those working with children/friends, use caution! Some rivets drop out, some shoot out like a bullet. I have these little buggers all over the shop.

Fresh from the powder coaters
Heres a close up. The color is called silver vane.
And finally here is the engine that is just waiting to cause tickets and ruin tires, lol. Since I work sporadically on things I wrapped it to prevent rust. Picked up some march pulleys from ebay for this beuty.

Here is the pile of stuff I dropped off today. He quoted a price $100 cheaper today to powder coat the frame, so I will likely go that route. I'm going to be scared to drive this thing on a dirt road when I get through.
Front and rear sway bars and oil pump relocation kit are ordered. Also went with a crane rocker arm conversion kit for the motor. Allows you to use the stock perches but convert to roller rockers. They fit the 351/400M motors also. Now I just need to shop around for some nice rollers.
Bare frame:
Rivet removal tools. My family is not interested in getting greasy so I didn't have a problem. For those working with children/friends, use caution! Some rivets drop out, some shoot out like a bullet. I have these little buggers all over the shop.
Fresh from the powder coaters
Heres a close up. The color is called silver vane.
And finally here is the engine that is just waiting to cause tickets and ruin tires, lol. Since I work sporadically on things I wrapped it to prevent rust. Picked up some march pulleys from ebay for this beuty.
Here is the pile of stuff I dropped off today. He quoted a price $100 cheaper today to powder coat the frame, so I will likely go that route. I'm going to be scared to drive this thing on a dirt road when I get through.
Front and rear sway bars and oil pump relocation kit are ordered. Also went with a crane rocker arm conversion kit for the motor. Allows you to use the stock perches but convert to roller rockers. They fit the 351/400M motors also. Now I just need to shop around for some nice rollers.
Thread Starter
|
Elder User
Joined: Nov 2005
Posts: 998
Likes: 2
From: Benton, AR
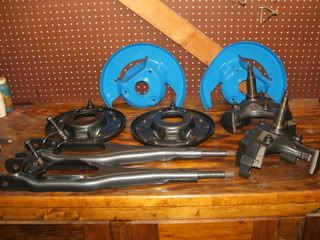
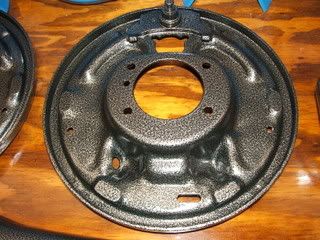
Here is the latest. I picked up the frame from powder coating Friday. This was as far as I got this weekend. I have all of the rear spring holders and crossmember relocated 3 inches forward. I was going to reuse the front hanger and just move it up, but after looking at it, I'm just going to get the DJM front hangers that go in the stock holes. The bottom of these actually mount through the crossmember. Anyhow, here is a couple before and a couple of after.
************Before**********************
*************After**************************
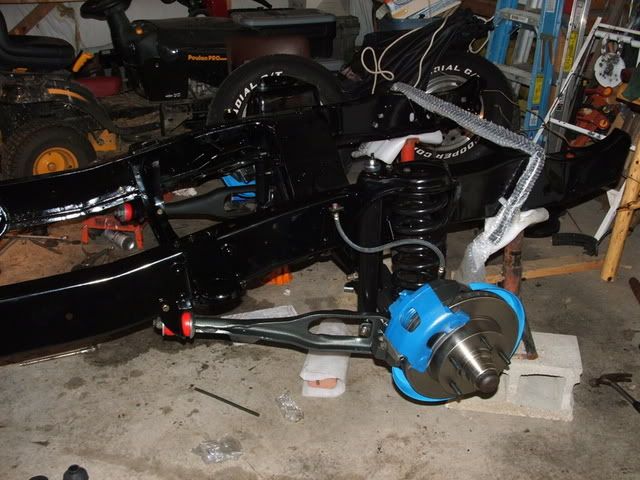

PS, don't get mixed up and put the radius arms of backwards. I got to put the front end together twice this weekend.
Will try to have the rearend buttoned up next weekend. I have some ranger brackets and have some 65 mustang bucket seat frames that are bead blasted and ready for pickup. Will be taking the tie rods for powder coating. Also plan to have some other misc stuff blasted so I can paint it (like the power steering pump).
************Before**********************
*************After**************************
PS, don't get mixed up and put the radius arms of backwards. I got to put the front end together twice this weekend.
Will try to have the rearend buttoned up next weekend. I have some ranger brackets and have some 65 mustang bucket seat frames that are bead blasted and ready for pickup. Will be taking the tie rods for powder coating. Also plan to have some other misc stuff blasted so I can paint it (like the power steering pump).

Senior User
Joined: Jul 2003
Posts: 262
Likes: 0
From: Upstate South Carolina
As to the frame rivets, I cut riveted parts off Ford frames all the time. Here is what I learned.
1. Torches. Only when the gas tank is removed or you have much experience around torches. I do and still get surprised from time to time! You don't want surprises when you are working in your shop and on your baby! Also, unless you are VERY careful and experienced cutting these rivets you will not enjoy the final result. Cutting the rivet without touching the good part is an art more than a science.
2. Chisel and hammer. Nice method if you are as tough as the hammer yourself! LOL! Makes my whole body hurt the next day! You can get a nice result if it is flat surfaces. The rivets are soft compared to your good large chisel so if you have a nice flat surface to run the chisel and room to swing the BFH you will like this method. Curved surfaces wil dig into your good part if not careful.
3. Grinder. Probably the best method for home and garage projects. You can control the violence and not harm your baby. You can grind it down to a paper thin layer before the good part, hit the rivet with a big punch and it will raise the paper thin remains of the rivet for you to grind the rest of the way without touching your good part.
4. Drilling. Can be the hardest but cleanest method. You have to have some very top end tools to make it efficient. Specialized tools as well if the rivets are hard to reach.
5. Most important is remove ALL rivets from the good part, THEN start punching out the rivets and/or separating the part from the rivets. Reason, most times the rivets are holding at 90 degree angles and one plain will hold the other plain in place against you. Also, the rivet shaft holds just as hard in each and every layer it runs through. Easier to remove your part then regrind/chisle,cut the remaining rivet shaft flush and drive the rest out. Some areas on the frame the rivet passes through 3 layers, forget about it. THe rivet swells between layers. Remove the good part, regrind, remove the next part, regrind. If you don't plan to remove the second(middle) part, best to drill out the rivet. If you just drive it through the remaining double layers it will likely bend a "nipple/funnel" shape in your good parts.
1,2,3,4 you might know about but 5 is hard won secrets I share with my Ford Truck blood brothers!


Lead Driver


Joined: Aug 2003
Posts: 6,305
Likes: 18
From: Boulder Creek, Ca

drof46, looking good!!  Seems there have been a number of members who have done the swap; unfortunately, I have not been able to find many pic's of the entire project in progress, keep it up. Also appreciate the comments on the steps taken, and some of the obsticles encountered. Please continue, thank you!
Seems there have been a number of members who have done the swap; unfortunately, I have not been able to find many pic's of the entire project in progress, keep it up. Also appreciate the comments on the steps taken, and some of the obsticles encountered. Please continue, thank you!
Thread Starter
|
Elder User
Joined: Nov 2005
Posts: 998
Likes: 2
From: Benton, AR
mikestrucks,
I don't think your list of rivet removal is different methods, but a progression of how the do-it-yourselfer tries to remove them, lol. I started with a cutoff wheel (piece of junk), moved to the torch and removed more than I wanted, switched to the grinder, then when one did not want to come out I tried drilling the center to release some of its death grip. On several pieces (rear shock mounts) I put the piece in a vise after removal from the frame, ground flush and beat it out of the brackets. Placing the rivet location close to the vise kept distortion of the piece to a bare minimum.
Thanks for the comments. As long as the people that run this site don't run me off, this will likely be a start to finish thread for my entire build. May take a couple years, but I'll keep going. My biggest fear is the body work. I have 0 experience with that. If I have to pay someone to do the majority of it, my progress will slow way down. I am keeping all the pics and will post a frame off gallery in the future. I will pick and choose the best pics from start to finish.
later
Posting Guru
Joined: Oct 2008
Posts: 1,038
Likes: 11
From: Southern AB

Hey Drof 46 been following your thread some and enjoy seeing what you are doing. In fact I am doing a swap from a 64 to a 75 right now as well.
I Also plan on lowering mine but I will need to get new rims as mine are a bit to wide which kinda sucks as I like mine but oh well gotta get some more shiney chrome.lol.
I am not looking foward to moving my rear axle as well, I had to take the rivets off of the cab mounts anyhow so I would say that I am experience and will probably use a 4" grinder with cutoff wheel and hammer and punch for the rear end rivets.
I took my frame and sandblasted it and then primed and painted it Gloss Black and like how it turned out. I currently have the cab and front clip sitting in place. The box I had to modify a bit as I didn't like the cab box spacing and my floor of the bed was rotten so I have replaced it all. Also I didn't like the way my box sat it was like a v between the cab and box so i raised the bed floor 2" and lowered the back by using 1-1/2"x3" channel laying flat and at the front I used the same but stood it up so it was 3" which made it sitdown in the back. I am alomst ready to mount the box and drill the new holes in the bed.
I just started to replace my cab floor pans and mount members about 30% done that and then I can install all the new cab rubbers and bolts. I plan on painting and undercoating everything so that when I start the body work all I will have to do is pop the bed back to paint the back of the cab and front of the bed.
Well just thought I would share and like seeing what you are doing, keep posting pics.
I have pics in my gallery check it out.
D
FTE Stories
Ford Trucks for Ford Truck Enthusiasts

Top 10 Most Expensive Ford Trucks Ever Sold on Bring a Trailer
Joe Kucinski
2027 Ford Super Duty Buyer's Guide (Every Model, Engine, & Package)
Brett Foote
Top 10 Ford Truck Tragedies
Joe Kucinski
AEV FXL Super Duty - the Super Duty Raptor Ford Doesn't Make
Brett Foote
Lobo Vs Lobo: Proof the F-150 Lobo Should Be Even Lower!
Michael S. Palmer
Ford's 2001 Explorer Sportsman Concept Looks For a New Home
Verdad Gallardo
10 Best Ford Truck Engines We Miss the Most!
Joe Kucinski
2026 Shelby F-150 Off-Road: Better Than a Raptor R?
Brett Foote
2027 Super Duty Carhartt Package First Look: 12 Things You NEED to Know!
Michael S. Palmer
Senior User
Joined: Jan 2006
Posts: 194
Likes: 0
From: Minneapolis
rivet removal
For rivet removal just make an X on the head of the rivet with a cut off wheel and use an air hammer with a chisel in it to remove the head. You may be able to use the corner of the chisel to push the body of the rivet out, or put a punch tool in the air hammer for that part of the job. The air hammer is your friend, but wear extra heavy gloves because it will beat up your hands some by the end of a long day. It works great for separating spot welded parts, too.
I usually wear some soft cotton gloves, but I pull a heavy pair of leather gloves on top of them for working on this stuff.
I usually wear some soft cotton gloves, but I pull a heavy pair of leather gloves on top of them for working on this stuff.
Thread Starter
|
Elder User
Joined: Nov 2005
Posts: 998
Likes: 2
From: Benton, AR
Well day one of my 3 day weekend was spent with the wife (valentines). Day 2 started off with a little snow but I finally got in gear and made some progress this weekend.
The yoke on the 3rd member was smaller than the one for my truck so I pulled it off. Looks like the guy was telling the truth about the rebuild based on this new looking gasket and the teeth on my ring and pinion were pristine. Original yoke like where it was but came off and is being blasted.

Got my DJM front hangers in. Wow those are stronger and better made than orignal ford hangers. The 3 inch axel relocation has been pretty smooth. The hanger eye closest to the cab did require a washer between the frame and mount to keep it level. Other than that it went on without any problems.

Gas tank had some surface rust so I assumed the worst. Pulled the hoses and sending unit. To my surprise it looked like brand new inside. Took the power washer and cleaned off all the dirt, grime, and moderate surface rust. Will use a rust converter spray paint to coat tank and then gloss black to match frame. Using heat lamp to dry out gas and water in tank.

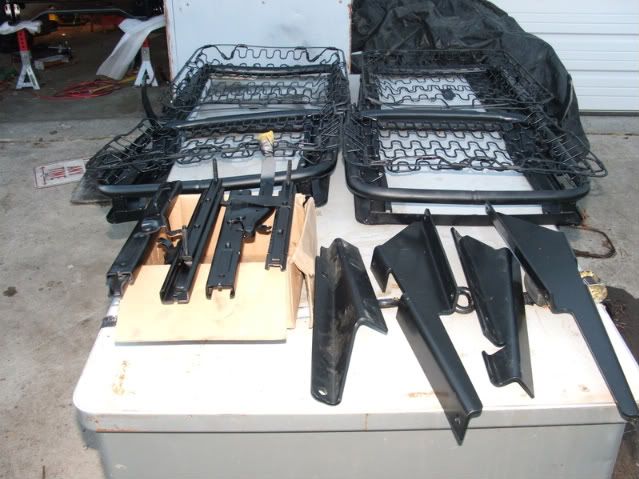
I picked up my 65 mustang bucket seat frames and tracks from blasting. I know this is a little overboard since no one will even see the springs and most of the frame, but I wanted to start with a clean product and go from there. Got them primed and painted today. Also have some repop ranger bucket seat brackets as seen in pics. Now I just needs some new burlap, foam, and upholstery and I will be pulling out the bench seat.

Well thanks for looking at my junk.
****If anyone has a sway bar mounted to DJM drop beams, please drop me a line.****
Later
The yoke on the 3rd member was smaller than the one for my truck so I pulled it off. Looks like the guy was telling the truth about the rebuild based on this new looking gasket and the teeth on my ring and pinion were pristine. Original yoke like where it was but came off and is being blasted.
Got my DJM front hangers in. Wow those are stronger and better made than orignal ford hangers. The 3 inch axel relocation has been pretty smooth. The hanger eye closest to the cab did require a washer between the frame and mount to keep it level. Other than that it went on without any problems.
Gas tank had some surface rust so I assumed the worst. Pulled the hoses and sending unit. To my surprise it looked like brand new inside. Took the power washer and cleaned off all the dirt, grime, and moderate surface rust. Will use a rust converter spray paint to coat tank and then gloss black to match frame. Using heat lamp to dry out gas and water in tank.
I picked up my 65 mustang bucket seat frames and tracks from blasting. I know this is a little overboard since no one will even see the springs and most of the frame, but I wanted to start with a clean product and go from there. Got them primed and painted today. Also have some repop ranger bucket seat brackets as seen in pics. Now I just needs some new burlap, foam, and upholstery and I will be pulling out the bench seat.
Well thanks for looking at my junk.
****If anyone has a sway bar mounted to DJM drop beams, please drop me a line.****
Later
Thread Starter
|
Elder User
Joined: Nov 2005
Posts: 998
Likes: 2
From: Benton, AR
Well its time for another update.
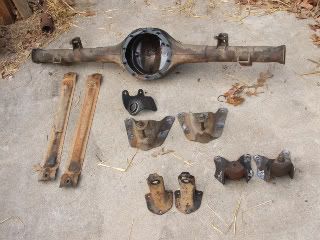
To save a couple bucks on rear leaf springs I just had the original blasted and powder coated. I purchased new poly bushings for them. The gas tank was cleaned and painted. Managed to mess up the sending unit when removed, so I have a new sending unit. The rear end was dropped 4 inches and I went with some DJM drop shocks. New brake cylinders, springs, shoes, and brake cables installed. Heres a pic of how the rear end turned out.

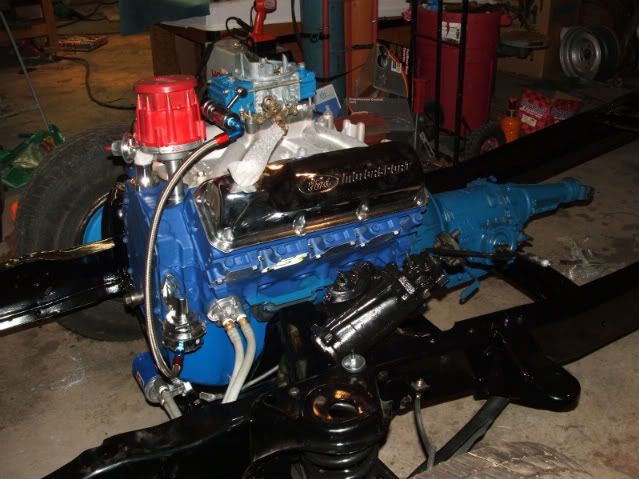
This is the the intake I have chosen to go with on the engine (torker). I plan to run a cold air intake which is on the way. I really like the looks of duel side draft air cleaner but have yet to get one.

Cut another corner. I ordered a B&M C4 transmission rebuild kit. I was going to get someone to rebuild it, but the instruction are very good. Tore it down and kept track of all the parts. Had the case blasted. Managed to get it all back together without any extra parts. I need to go back over it with some soapy water and a scrubby to get some dirty finger prints off. Then I plant to paint it. Tucked inside is a TCI torque converter. I did luck out and my donar C4 already had the H code servo.

Still need to figure out what I'm going with on the gas line. Need to get new brake lines cut, bent, and installed. Driveshaft needs to be shortened 3 inches. After that the frame, running gear, engine, and trans are all done. Still need to get the front and rear sway bars installed. After they are bolted up its time to think about getting the old sheet metal tranferred over.
//////////////////////////////////////////////////////////////////////////////////
I want to add traction bars. Most are made for axel flips. If anyone has some suggestions on where to find some that fit a 79 F-100(my donar frame) with the spring over the axels, drop me a line. I may just end up making some myself.
//////////////////////////////////////////////////////////////////////////////////
Hardest part of the build is trying to get my fingers and nails clean for mondays when the shirt and tie come back out, lol.
To save a couple bucks on rear leaf springs I just had the original blasted and powder coated. I purchased new poly bushings for them. The gas tank was cleaned and painted. Managed to mess up the sending unit when removed, so I have a new sending unit. The rear end was dropped 4 inches and I went with some DJM drop shocks. New brake cylinders, springs, shoes, and brake cables installed. Heres a pic of how the rear end turned out.
This is the the intake I have chosen to go with on the engine (torker). I plan to run a cold air intake which is on the way. I really like the looks of duel side draft air cleaner but have yet to get one.
Cut another corner. I ordered a B&M C4 transmission rebuild kit. I was going to get someone to rebuild it, but the instruction are very good. Tore it down and kept track of all the parts. Had the case blasted. Managed to get it all back together without any extra parts. I need to go back over it with some soapy water and a scrubby to get some dirty finger prints off. Then I plant to paint it. Tucked inside is a TCI torque converter. I did luck out and my donar C4 already had the H code servo.
Still need to figure out what I'm going with on the gas line. Need to get new brake lines cut, bent, and installed. Driveshaft needs to be shortened 3 inches. After that the frame, running gear, engine, and trans are all done. Still need to get the front and rear sway bars installed. After they are bolted up its time to think about getting the old sheet metal tranferred over.
//////////////////////////////////////////////////////////////////////////////////
I want to add traction bars. Most are made for axel flips. If anyone has some suggestions on where to find some that fit a 79 F-100(my donar frame) with the spring over the axels, drop me a line. I may just end up making some myself.
//////////////////////////////////////////////////////////////////////////////////
Hardest part of the build is trying to get my fingers and nails clean for mondays when the shirt and tie come back out, lol.
Posting Guru
Joined: Oct 2008
Posts: 1,038
Likes: 11
From: Southern AB
Hey Drof46 things are looking awesome gotta say I am a bit envious as I haven't been able to get much done on mine lately.
But a couple questions for you the rear shock mounts on the frame other than being more work do you think there is a huge difference if you wouldn't have moved them? Just something I wondered.
Also have you given any thought to where your gas tank filler is going to end up?
Where did you get your new brake hose on the rear?
I also see you moved the crossmember between the frame where the front rear axle mounts are do you think that was necessary to relocate that? again just a thought.
Well keep the pics coming as I love to see what other guys are doing with there slicks.
D
Thread Starter
|
Elder User
Joined: Nov 2005
Posts: 998
Likes: 2
From: Benton, AR
Thanks for the questions and comments guys.
1. But a couple questions for you the rear shock mounts on the frame other than being more work do you think there is a huge difference if you wouldn't have moved them? Just something I wondered.
I wanted to keep the original angle on the shock mounts. Figured Ford must have had a reason. With the axel and shocks installed there is only aprox 1/2" of clearance between the axel and shock housing. Without relocation this would have likely hit each other. You could always move the axel and leave the shock mounts. If clearance is not affected then you could leave them.
2. Also have you given any thought to where your gas tank filler is going to end up?
I will be going with a thru the bed floor fill hole. There is a great looking cap that I plan to use. I will post a pic with the website when I find it again. If you do a search for a mustang tank on this forum it should bring up an article that is close to what I have planned.
3. Where did you get your new brake hose on the rear?
Both front and rear rubber brake lines came from good ole Autozone. I'm sure others carry them to. These are for a 79 but I'm sure the rear especially fits many other years.
4. I also see you moved the crossmember between the frame where the front rear axle mounts are do you think that was necessary to relocate that? again just a thought.
You could likely get away without moving this crossmember. However if you move the axel it will make your brake lines 3 inches longer. Autozone also carried the e-brake lines. The second consideration is the front spring perch has two of its four holes that mount through this crossmember. I wanted to keep the strength of having the crossmember and spring perch remain as one. Also by moving this crossmember it actually saved me some measuring. The crossmember has one bolt at the top. You can measure the hole depth and then over 3 inches. Do this for both sides, bolt that hole up, then you can use the cross member holes that already exist as a template for the new holes. Mount both holes on the bottom of the spring perch through these new holes, then you have a template for the top holes. Drill through the spring perch top holes into the frame and bolt it up. Keeps everything lined up good.
A side note: I have yet to see what type of end is on the 66 E-Brake. I do not think it is compatible with the 79. I kept the e-brake pedal from the 79 and will likely go that route. The length will be off, but you can cut this cable and use ferruls to re-attach them together again.
Thread Starter
|
Elder User
Joined: Nov 2005
Posts: 998
Likes: 2
From: Benton, AR
Very productive weekend.
Rear sway bar mounted. Painted transmission, but I think it needs one more coat. Poor engine and trans have 3 different shades of blue. Oh well at least its not orange. Managed to get engine and trans mounted. Now I have an empty engine stand. Might be time to get that 390 off the ground. Had time after mounting the engine to install the oil filter relocation kit.

Rear sway bar mounted. Painted transmission, but I think it needs one more coat. Poor engine and trans have 3 different shades of blue. Oh well at least its not orange. Managed to get engine and trans mounted. Now I have an empty engine stand. Might be time to get that 390 off the ground. Had time after mounting the engine to install the oil filter relocation kit.