


Fabricating Steps?

Thread Starter
|
Tuned

Joined: May 2007
Posts: 446
Likes: 7
Fabricating Steps?
So I've passed all my safety tests and I get to go out in the shop for my sophmore ag class. We've got mig, arc, and tig welder, torches, plasma cutter, all kinds of stuff. There are only 6 kids in my class so we pretty much get to go off on our own. For my first project i want to build a set of steps for my truck. Nothing facy just something to help get in and out and maybe even look cool.
Im pretty green when it comes to fabricating and welding my own parts but im ready to learn. So if anyone has some step maybe someone else has made there own. I would like a picture of even some purchased steps just to see where they mount on the truck.
Thanks for the help
JAcob
Im pretty green when it comes to fabricating and welding my own parts but im ready to learn. So if anyone has some step maybe someone else has made there own. I would like a picture of even some purchased steps just to see where they mount on the truck.
Thanks for the help
JAcob

Senior User
Joined: Dec 2006
Posts: 392
Likes: 0
From: tom bean tx
josh 88 ford did but he did not do a write up on it. i seen them on the truck in a newer post, i am attemting to do my own but i am a little stumped on the frame mounts, maybe some one will tell us...
Senior User
Joined: Dec 2006
Posts: 392
Likes: 0
From: tom bean tx
crap some thing went wrong, any ways pull up his name and hit all posts by josh88ford then go down to pics of lifted trucks and then find his post its the last pic on his reply. maybe he will see this and just post his pics~~~~~~~~~

Senior User
Joined: Oct 2005
Posts: 446
Likes: 1
From: Germany
Do a search for Frederic and look at some of his posts, or send him a PM. If you come up with something practical, I'd rather give an ambitious kid (young adult to be PC) a donation for a set for myself. No hurry, I'm around if you come up with something useful.
Dave
Dave

Posting Guru
Joined: Aug 2007
Posts: 2,026
Likes: 0
From: Belle Mead NJ
Tomorrow morning I will take a pic of how my Western steps mount, there is a cool little bracket at the back that slips over the frame and then with a bolt it tightens to the frame. Im sure you can fab up the stuff. I loved welding in school, I still do a bunch to this day. Mostly for friends and such.
Trending Topics

Elder User
Joined: Jan 2006
Posts: 718
Likes: 0
i'll give you a more detailed post with pictures when I get home tonight. Its a really easy process.
FTE Stories
Ford Trucks for Ford Truck Enthusiasts

3 Best / 3 Worst Parts of Modern Ford Ownership
Brett Foote
10 Amazing Upgrades That Solve Common Ford Truck Owner Headaches
Pouria Savadkouei
Every 2026 Ford Engine Explained
Brett Foote
10 Ugly Ford Trucks That We Still Kinda Love
Joe Kucinski
10 Things Every Truck Owner NEEDS (2026 Edition)
Michael S. Palmer
Rezvani's Latest Post-Apocalyptic Monster Is a Ford F-150 Raptor Underneath
Verdad Gallardo
Top 10 Most Expensive Ford Trucks Ever Sold on Bring a Trailer
Joe Kucinski
2027 Ford Super Duty Buyer's Guide (Every Model, Engine, & Package)
Brett Foote
Top 10 Ford Truck Tragedies
Joe Kucinski

Elder User
Joined: Jan 2006
Posts: 718
Likes: 0
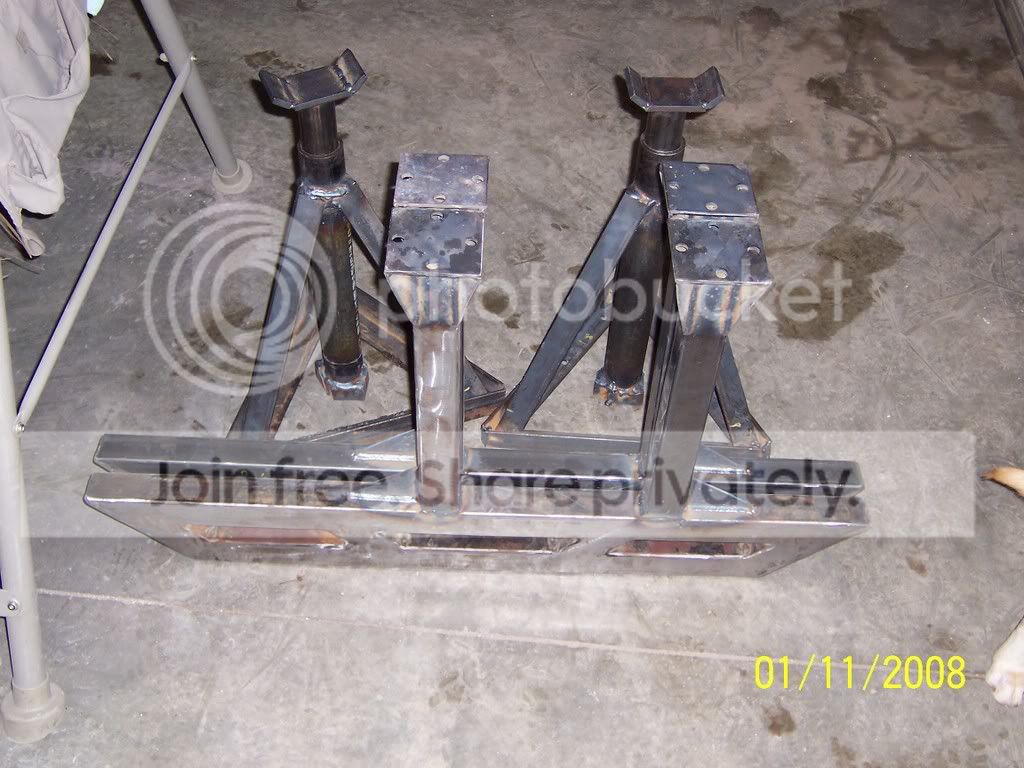
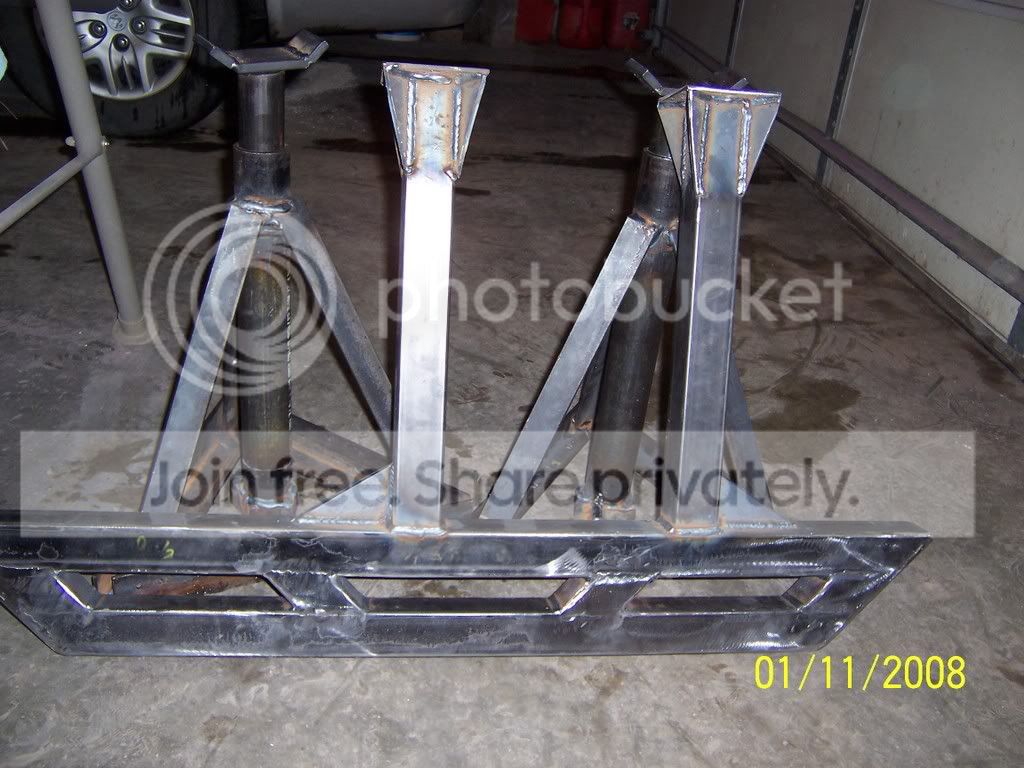
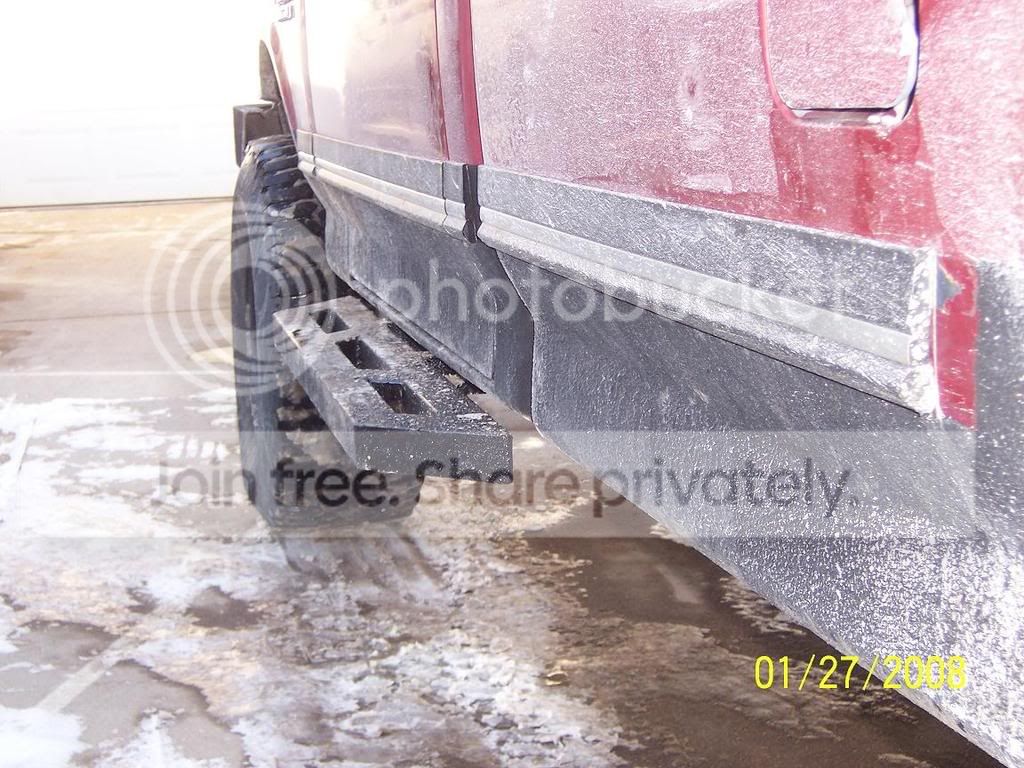
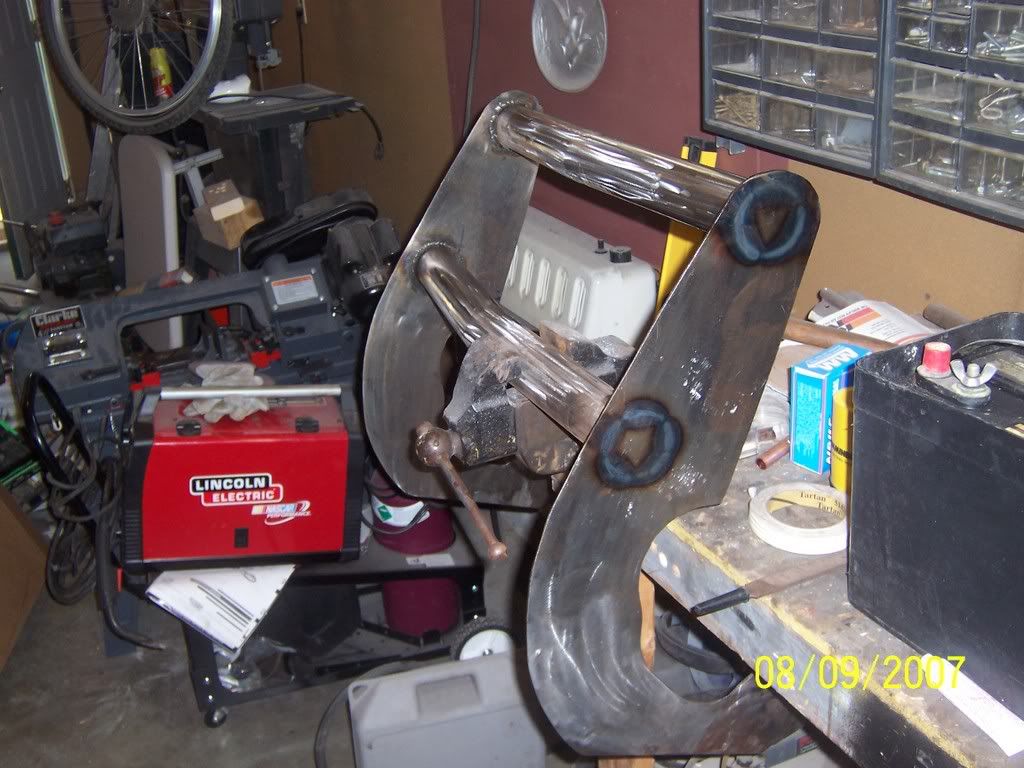
Alright here we go. These steps I made are heavy duty. They arent cheap ones from Westin which will kink if you land on a rock, possibly jacking from it ect. They are made from 2x2x 1/8 walled steel tubing. The thicker you go, the more heavy duty they get TO A POINT. A lot is how you mount them and gussets
I have an 88 f150, with dual tanks. If you look at the drivers side frame rail, theres no room to mount anything. I made the actual steps first. I work at a fabrication shop so I used their bandsaw. I highly suggest you find some that will cut almost perfect 45� cuts. Otherwise you'll be doing a lot of fill welding on the insides, which is near impossibly to get it cleaned up, let a lone fit a grinder in there. A tip when cutting with a bandsaw is measuring from the blade to the edge of the part. Sure you can hook the tap on the oppsotie side of the blade, but bigger blades are 1/16 thick....making your part 1/16 short. Again, if you want to do more math, go for it.
Figure out the overall length you want. Mine goes from the front of the door to middle of the cab corners. You can either do the math or just do what I did. Because the material is 2x2, I cut 8 middle pecies which was cut at 45, paralell sides. That is //. Then find a surface that is Flat and True. Sometimes the floor isnt the best bet. The flatter it is, the better the sets are going to turn out, via less cleanup. Tack on your two outer middle peices(the 2", paralell sides) coincident with your 45 cut on your long peice(coincident meaning the edge is on the same plane. or for simipler terms, one side of both the parts should touch, say a ruler. Not just a part, ALL of that side) It will be where to top, long peice will be an open end, and the middle part will be closed..you'll come back and plate the sides later, thats why its important to have the sides almost perfect
Once thats tacked, the sides coincident, measure for the shorter end of the step. Just measure from end to end. Then cut the 45's oppsoite, just like the top. If you did it right, that peice whould also be coincident on both ends. If you didnt, recheck your measurements(thats why its good to measure twice before cutting, maybe even doing a few test cuts to get ahold of the bandsaw and measuring the peices. Measure it again once you cut it.)
If they lined up, take your two inside pieces and put them however you went them to be. Go ahead and tack together your small side, and tack everything up on that side. When you tack, it might be a good idea to clamp everything down if your not experienced. Theres a right and wrong way to tack. You could tack the top peices, go to unclamp everything and have everything slightly bent upwards. Thats because your heating up the metal and then shinking it. For every degree you heat up Mild steel, it expands .0005 of an inch. You figure a few hundred degrees on just a tack. And you wonder why warpage happens. Tack the top and both sides of each part. For future reference, you can tack the opposite side of something if you need to go back and tweak it a little bit, making that tack a pivot point. Drag something straight and true over it to see if you have anything not level. Fix if while you still have a chance. Thats the nice thing about metal, you can put on and take off. Once everything is good to go, turn it around and tack the otherside before fully welding everything
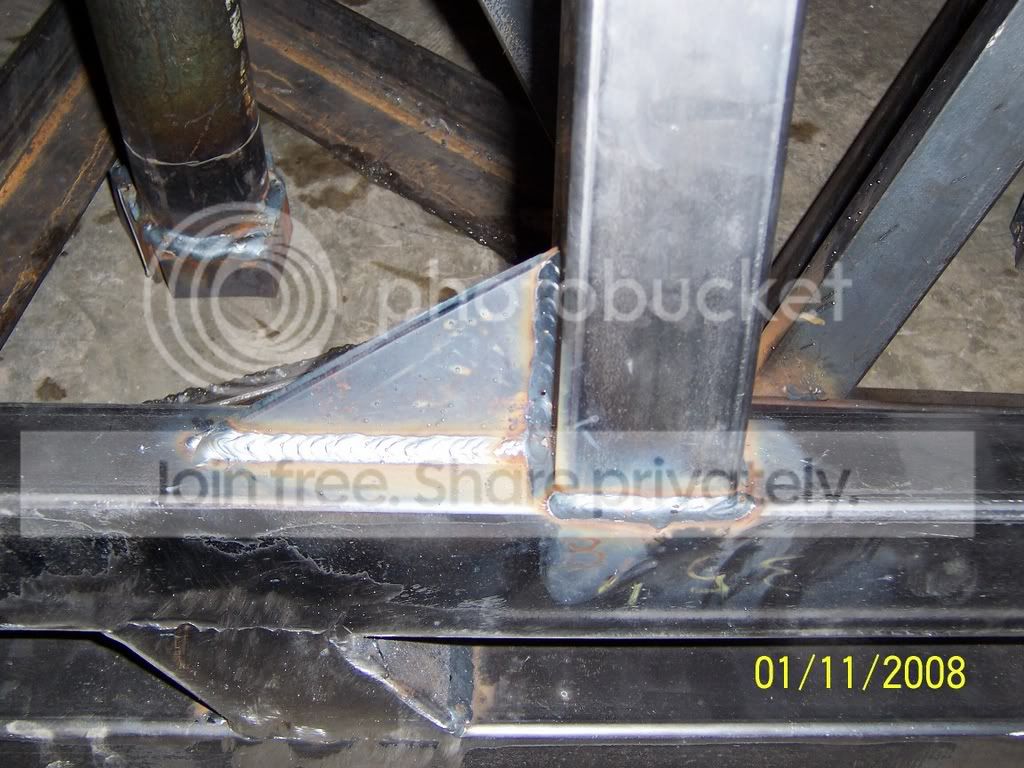
For the sides, do your measuring of what you need. I have a few ironworkers at work, so it was a breeze for me, but you can pick up some 2"x1/8-1/4" flatstock and just make one cut(per side). Mild steel piping has radius corners on them. Just keep that in mind so you dont have to do fill welding or uneeded grinding. I went ahead and grround all my welds smooth. Again, if you dont have a peice flat, your not going to get everything flat without having a little ripple, dip or whatever, which will show up in paint. Powdercoat and bedlining, you dont have to worry about it.
The mounting.
I made my mount braces 18". Again, you can do whatever you like. For the mount plate, I wouldnt go any thinner than 1/4" unless you plan on gussetting them well like I did. Find out where you can mount them. I found a small opening in the frame rail right after the pump. The passanger side is wide open so just cope the drivers side measurements.
I dont know what it is, but I made my mount braces square to everything, but apparently the frame. I had everything welded up and went to drill the holes to find the frame must bend JUST slightly. Enough to where I had to cut one of the brace mounts and angle it slightly. So what I suggest is get a buddy and bring the mounts to where you can mount them, and then the steps. Mark on the frame where they were at, and then either tack them onto the steps, measure the angles and grind to get them to fit, OR drill your holes, bolt the mount braces on and then grind so the steps fit. Take your time and think this process out. You'll want everything to be lined up, not having one mount brace 1/4" lower then where it out be flush onto the step.
For drilling the wholes, just have someone hole the brace mounts in place, and centerpunch the center of the mount holes.
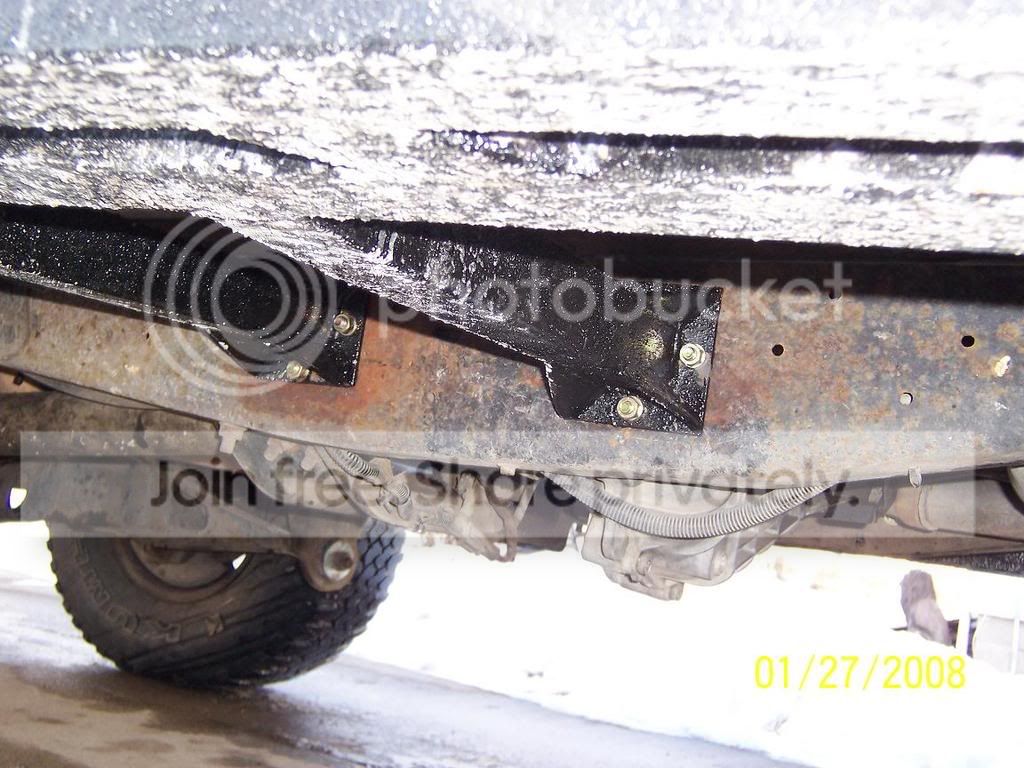
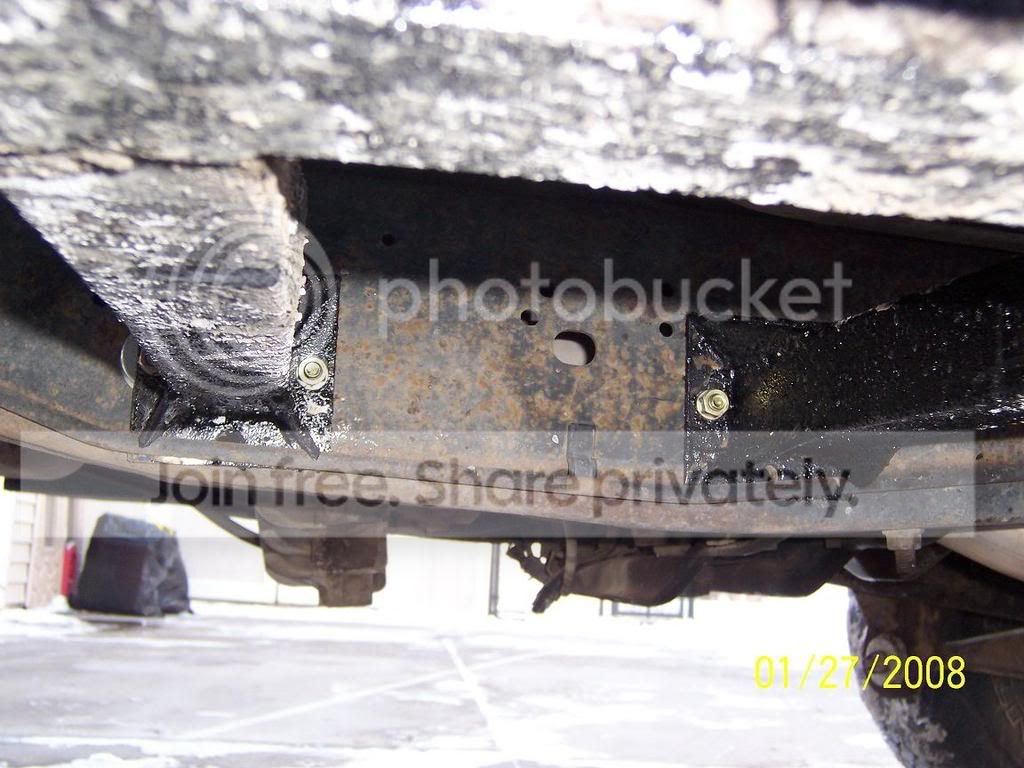
theres a fuel tank breather hose or something on the passanger side frame rail, so keep that in mind when you make your mounts and/or gussets.
feel free to ask questions. I go to school fulltime and work fulltime, and its friday...I am sure i am forgetting something!
-Josh
I have an 88 f150, with dual tanks. If you look at the drivers side frame rail, theres no room to mount anything. I made the actual steps first. I work at a fabrication shop so I used their bandsaw. I highly suggest you find some that will cut almost perfect 45� cuts. Otherwise you'll be doing a lot of fill welding on the insides, which is near impossibly to get it cleaned up, let a lone fit a grinder in there. A tip when cutting with a bandsaw is measuring from the blade to the edge of the part. Sure you can hook the tap on the oppsotie side of the blade, but bigger blades are 1/16 thick....making your part 1/16 short. Again, if you want to do more math, go for it.
Figure out the overall length you want. Mine goes from the front of the door to middle of the cab corners. You can either do the math or just do what I did. Because the material is 2x2, I cut 8 middle pecies which was cut at 45, paralell sides. That is //. Then find a surface that is Flat and True. Sometimes the floor isnt the best bet. The flatter it is, the better the sets are going to turn out, via less cleanup. Tack on your two outer middle peices(the 2", paralell sides) coincident with your 45 cut on your long peice(coincident meaning the edge is on the same plane. or for simipler terms, one side of both the parts should touch, say a ruler. Not just a part, ALL of that side) It will be where to top, long peice will be an open end, and the middle part will be closed..you'll come back and plate the sides later, thats why its important to have the sides almost perfect
Once thats tacked, the sides coincident, measure for the shorter end of the step. Just measure from end to end. Then cut the 45's oppsoite, just like the top. If you did it right, that peice whould also be coincident on both ends. If you didnt, recheck your measurements(thats why its good to measure twice before cutting, maybe even doing a few test cuts to get ahold of the bandsaw and measuring the peices. Measure it again once you cut it.)
If they lined up, take your two inside pieces and put them however you went them to be. Go ahead and tack together your small side, and tack everything up on that side. When you tack, it might be a good idea to clamp everything down if your not experienced. Theres a right and wrong way to tack. You could tack the top peices, go to unclamp everything and have everything slightly bent upwards. Thats because your heating up the metal and then shinking it. For every degree you heat up Mild steel, it expands .0005 of an inch. You figure a few hundred degrees on just a tack. And you wonder why warpage happens. Tack the top and both sides of each part. For future reference, you can tack the opposite side of something if you need to go back and tweak it a little bit, making that tack a pivot point. Drag something straight and true over it to see if you have anything not level. Fix if while you still have a chance. Thats the nice thing about metal, you can put on and take off. Once everything is good to go, turn it around and tack the otherside before fully welding everything
For the sides, do your measuring of what you need. I have a few ironworkers at work, so it was a breeze for me, but you can pick up some 2"x1/8-1/4" flatstock and just make one cut(per side). Mild steel piping has radius corners on them. Just keep that in mind so you dont have to do fill welding or uneeded grinding. I went ahead and grround all my welds smooth. Again, if you dont have a peice flat, your not going to get everything flat without having a little ripple, dip or whatever, which will show up in paint. Powdercoat and bedlining, you dont have to worry about it.
The mounting.
I made my mount braces 18". Again, you can do whatever you like. For the mount plate, I wouldnt go any thinner than 1/4" unless you plan on gussetting them well like I did. Find out where you can mount them. I found a small opening in the frame rail right after the pump. The passanger side is wide open so just cope the drivers side measurements.
I dont know what it is, but I made my mount braces square to everything, but apparently the frame. I had everything welded up and went to drill the holes to find the frame must bend JUST slightly. Enough to where I had to cut one of the brace mounts and angle it slightly. So what I suggest is get a buddy and bring the mounts to where you can mount them, and then the steps. Mark on the frame where they were at, and then either tack them onto the steps, measure the angles and grind to get them to fit, OR drill your holes, bolt the mount braces on and then grind so the steps fit. Take your time and think this process out. You'll want everything to be lined up, not having one mount brace 1/4" lower then where it out be flush onto the step.
For drilling the wholes, just have someone hole the brace mounts in place, and centerpunch the center of the mount holes.
theres a fuel tank breather hose or something on the passanger side frame rail, so keep that in mind when you make your mounts and/or gussets.
feel free to ask questions. I go to school fulltime and work fulltime, and its friday...I am sure i am forgetting something!
-Josh
Senior User
Joined: Oct 2005
Posts: 446
Likes: 1
From: Germany
Originally Posted by icrman
My advice is, when going to build something. Just try to find some on a truck that you like, and then look at them and how they were made. Goto meets of others that have trucks and get ideas.
Dave
Thread Starter
|
Tuned
Joined: May 2007
Posts: 446
Likes: 7
Josh88Ford , Those are Nice and so square and clean. Im gonna print off those pictures and show them to my shop teacher. I like those alot. I dont know if mine need to be that beefy. Ive got some pieces of diamond plate out in the garage. Im gonna see it I cant like put that on the top of my steps. Or inset it in them. I dunno Ive got the whole rest of the year to work on them. hopefully it wont take me long but who knows. It was either steps or a brushguard. I figured steps would be easier.
Elder User
Joined: Jan 2006
Posts: 718
Likes: 0
I thought about doing that too by taking out those two middle peices. It would be pretty easy but you'd have to make something for drainage. it took me a night to make mine.
You'll be able to cut all your parts out in a class period if you have all your dimensions figured out
Grille gaurd
You could buy a sheet of steel and plasma cut out the part. You'd just need to have it be where it rolls under the bumper and connects to two points of rhte frame on each side.
You'll be able to cut all your parts out in a class period if you have all your dimensions figured out
Grille gaurd
You could buy a sheet of steel and plasma cut out the part. You'd just need to have it be where it rolls under the bumper and connects to two points of rhte frame on each side.