


Another Bumper Build

Thread Starter
|
Elder User
Joined: Jan 2006
Posts: 718
Likes: 0
Another Bumper Build
For those asking how I built my last one, here you go.
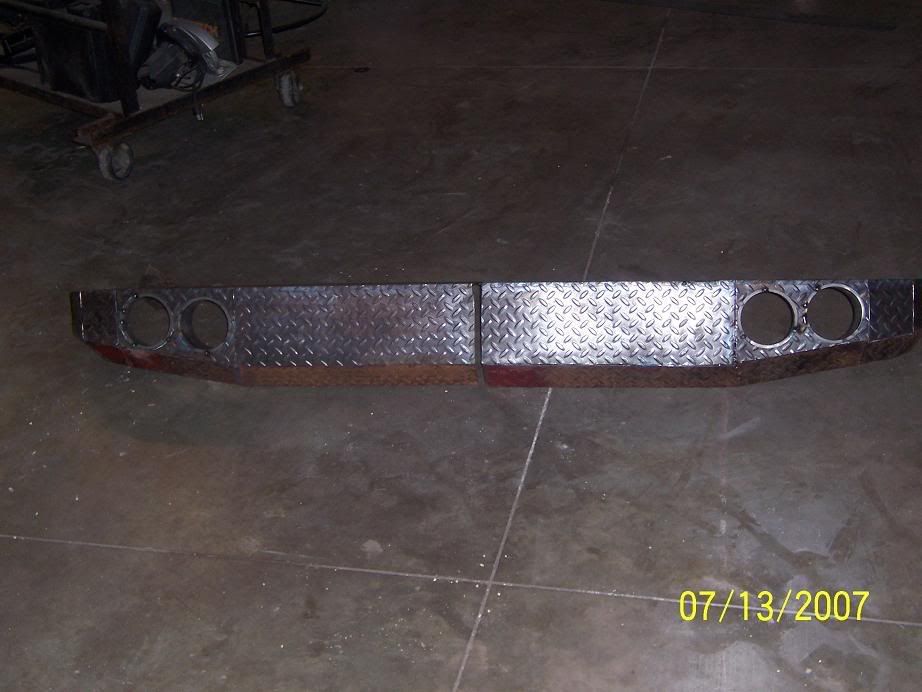
For this bumper, I using up my 1/8" diamondplate. It is going off the same design as my first bumper, only thinner on the sides, and possible 4 inset lights instead of two. The sheets were only 4' wide, so I have to split the bumper.
I highly suggest making a cardboard template first. Find the shape of the front of the truck. THIS BUILD IS FOR 87-91 FULLSIZE AND BRONCO'S
Here are the measurements I am using


Cut your top profile out. File or grind so the edges are smooth. The front parts will be welded 90� from the top.

I am currently building this bumper, so I will be posting my progress until it is finished.
Here is one side cleaned up

Hole saw to put the inset lights.

if your starting with barely any tools, its going to be rather spendy. I am using a 4 1/2" angle grinder with cutting discs that are $1 a peice. I have already used 7-8.
For this bumper, I using up my 1/8" diamondplate. It is going off the same design as my first bumper, only thinner on the sides, and possible 4 inset lights instead of two. The sheets were only 4' wide, so I have to split the bumper.
I highly suggest making a cardboard template first. Find the shape of the front of the truck. THIS BUILD IS FOR 87-91 FULLSIZE AND BRONCO'S
Here are the measurements I am using
Cut your top profile out. File or grind so the edges are smooth. The front parts will be welded 90� from the top.
I am currently building this bumper, so I will be posting my progress until it is finished.
Here is one side cleaned up
Hole saw to put the inset lights.
if your starting with barely any tools, its going to be rather spendy. I am using a 4 1/2" angle grinder with cutting discs that are $1 a peice. I have already used 7-8.

Post Fiend
Joined: Jun 2002
Posts: 13,873
Likes: 3
From: Atlanta GA
> I am using a 4 1/2" angle grinder
Myself, when I fab stuff I use a sawzall with metal cutting blades and oil. I do use my 4.5 grinder with metal cutting wheels for small stuff, but, way too slow for a bumper project or making straight lines. That newer circular saw with the tung. wheel looks like a good fab tool in Northern's catalog.
Myself, when I fab stuff I use a sawzall with metal cutting blades and oil. I do use my 4.5 grinder with metal cutting wheels for small stuff, but, way too slow for a bumper project or making straight lines. That newer circular saw with the tung. wheel looks like a good fab tool in Northern's catalog.
Thread Starter
|
Elder User
Joined: Jan 2006
Posts: 718
Likes: 0
I am probably going to sell this one. I was going to see which one was better, and sell the other, but the diamondplate wouldnt go with my back one. I am trying to get some money for college. Its either fabbing stuff and selling that, or get another part time job. HMMM...
I plan on painting this one being its diamondplate.
Onto some progress..
5" hole saw. Drill press was a little too fast and had to buy two of them.

Because this section is angled, you can't weld the piping flush, because then your lights will point out angled. In this picture, this shows how I do it. The front of the bumper is straight, so going off that, push the piping out to the reference line. Then measure both sides of the piping to find how far it sticks out, finding your angle.


The inside one was only 1/4" out, So I just left it for now. I will have the outside ones pointing straight out, so I might angle the inside ones someway..
so the same to the outer..

Picture of the bandsaw

Cut

Measure the backs to make sure they are even

I plan on painting this one being its diamondplate.
Onto some progress..
5" hole saw. Drill press was a little too fast and had to buy two of them.
Because this section is angled, you can't weld the piping flush, because then your lights will point out angled. In this picture, this shows how I do it. The front of the bumper is straight, so going off that, push the piping out to the reference line. Then measure both sides of the piping to find how far it sticks out, finding your angle.
The inside one was only 1/4" out, So I just left it for now. I will have the outside ones pointing straight out, so I might angle the inside ones someway..
so the same to the outer..
Picture of the bandsaw
Cut
Measure the backs to make sure they are even
Thread Starter
|
Elder User
Joined: Jan 2006
Posts: 718
Likes: 0
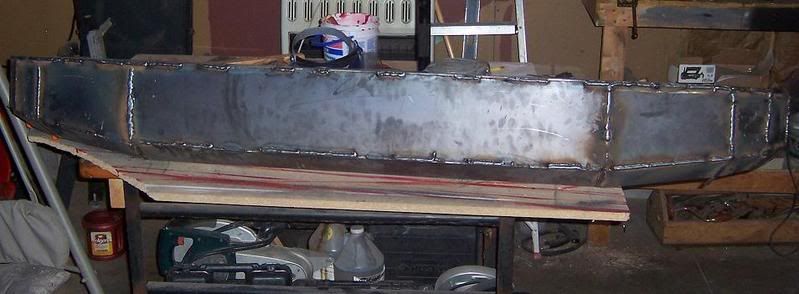
now that all the front peices are tach welded, time for the bottom flange. I am making mine 3".

Use whatever angle you want and tach it. BUT when you go from a 90� cut to an angled cut, you will have a gap. I gave the top part of that flange 1/2 more then the 21 1/2 on bottom, to make up for that.
Now, when I cut my angled peices, I tach the first one up, then take the second peice and mark on the first peice where to cut. 90� off the bumper..

continue you that for the last two peices.
to be continued...
Use whatever angle you want and tach it. BUT when you go from a 90� cut to an angled cut, you will have a gap. I gave the top part of that flange 1/2 more then the 21 1/2 on bottom, to make up for that.
Now, when I cut my angled peices, I tach the first one up, then take the second peice and mark on the first peice where to cut. 90� off the bumper..
continue you that for the last two peices.
to be continued...
Trending Topics
Postmaster
Joined: Mar 2006
Posts: 4,635
Likes: 0
From: The Wilderness
Looking good! I really liked your last bumper, and am looking to build something for my truck this fall if I can find time, your instructions will prove invaluable! Thanks!
Josh
Josh
FTE Stories
Ford Trucks for Ford Truck Enthusiasts

Top 10 Fords at 2026 Carlisle Ford Nationals
Joe Kucinski
3 Best / 3 Worst Parts of Modern Ford Ownership
Brett Foote
10 Amazing Upgrades That Solve Common Ford Truck Owner Headaches
Pouria Savadkouei
Every 2026 Ford Engine Explained
Brett Foote
10 Ugly Ford Trucks That We Still Kinda Love
Joe Kucinski
10 Things Every Truck Owner NEEDS (2026 Edition)
Michael S. Palmer
Rezvani's Latest Post-Apocalyptic Monster Is a Ford F-150 Raptor Underneath
Verdad Gallardo
Top 10 Most Expensive Ford Trucks Ever Sold on Bring a Trailer
Joe Kucinski
2027 Ford Super Duty Buyer's Guide (Every Model, Engine, & Package)
Brett Foote


Thread Starter
|
Elder User
Joined: Jan 2006
Posts: 718
Likes: 0
Thanks,
That is actually the reasoning for making this additonal bumper. See if theres enough interest, and if the moneys right. I already have about 30 hours, so @ $20/hr, thats $600. I will have at least another 10-20 hours into it.
Its hard to compete with other vendors that have jigs, laser cuts and machine welded and come out selling them where you think is a reasonable price for hand building it.
I'll have to check out pirate..
