




disc brake conversion for 49f1

Thread Starter
|
Fleet Mechanic


Joined: Oct 2004
Posts: 1,719
Likes: 506
From: clinton,tn
Originally Posted by Goobzilla
Also for 1949 f1, I would take the opportunity to drill & tap the spindles to relocate the upper zerk while everything is still apart. While it can be done in place, doing it on a workbench makes things much easier. Use the time now to locate a #3 (.2130) drill bit. It took me checking 5 different stores before I came across one.

Elder User
Joined: Jul 2002
Posts: 520
Likes: 0
From: Wellington, CO
Originally Posted by gusso
goobzilla, Do you drill and tap for the zerk fitting without taking anything apart? Gusso
Elder User
Joined: Jul 2002
Posts: 520
Likes: 0
From: Wellington, CO
Here's some pics to see.
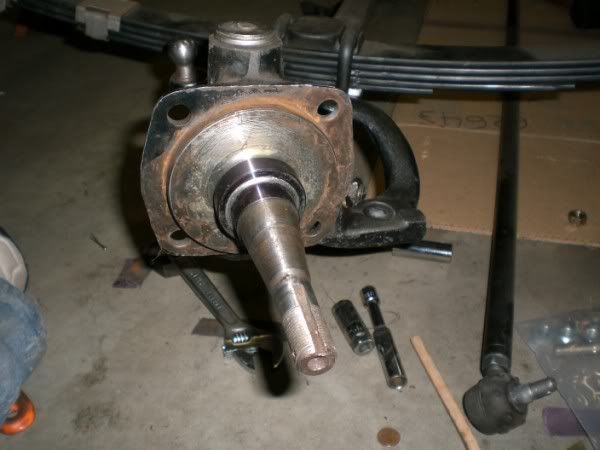
1. Front view spindle with bearing adapter installed
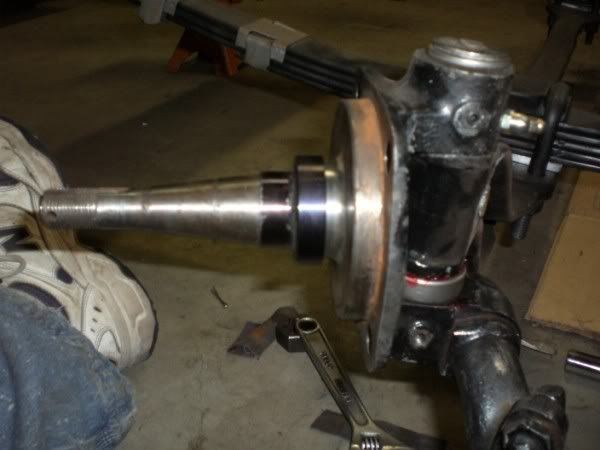
2. Side view spindle w/bearing adapter (Note: redrilled zerk & setscrew)
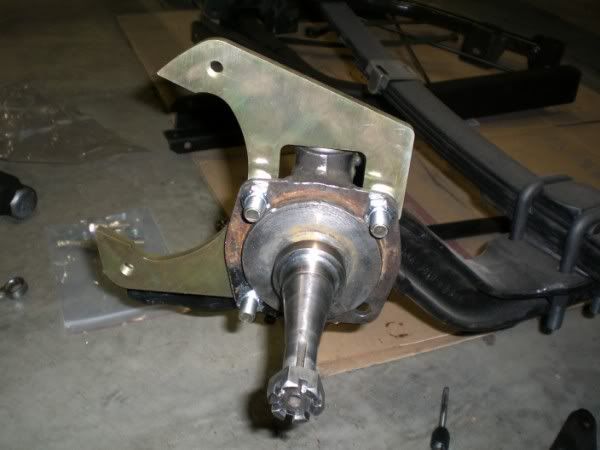
3. Front View w/Caliper bracket installed
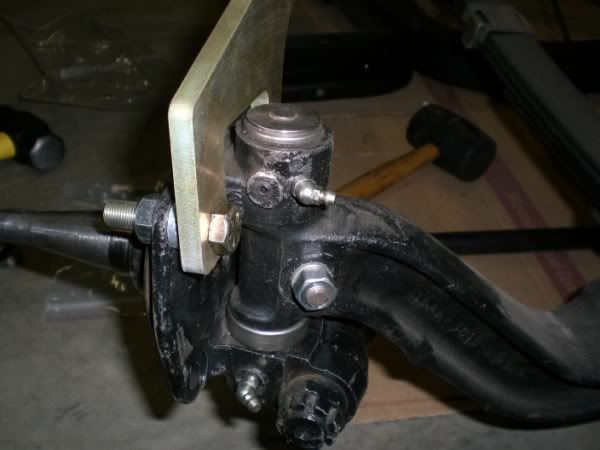
4. Side view w/Caliper bracket installed. Note I also turned around the spindle locking bolt for more clearance.
I've got the bearings, seals and rotors in the shop ready to install, but the calipers won't be in until tomorrow.
1. Front view spindle with bearing adapter installed
2. Side view spindle w/bearing adapter (Note: redrilled zerk & setscrew)
3. Front View w/Caliper bracket installed
4. Side view w/Caliper bracket installed. Note I also turned around the spindle locking bolt for more clearance.
I've got the bearings, seals and rotors in the shop ready to install, but the calipers won't be in until tomorrow.

Senior User
Joined: Feb 2006
Posts: 100
Likes: 0
From: rochester n.y.
installed a kit from mid-fifty,I think it was a CPP kit,struggled with the bearing adaptors like everyone else. used alot of emery paper and heat.My kingpins were good so I had to relocate the grease fittings with the spindles assembled.drilling the spindles was difficult,the spindles are soft,but the bit buttoms out on the kingpin which is harder than hell.need a lot of patience,drill bits,a bench grinder,had to make bottom taps and drills.I have a 54 f250 spindles are same as f100
Roast em' if you got 'em
Joined: Mar 2005
Posts: 21,984
Likes: 9,838
From: Rio Rancho, NM

I didn't have to drill and tap mine for zerks. It's been a couple of years but I think all I did was install a zerk with a 90 degree angle. My kit came from ECI but it sure looks the same.
Bobby
Bobby

Posting Guru
Joined: Apr 2004
Posts: 1,908
Likes: 2
From: Seattle WA.
Senior User
Joined: Feb 2006
Posts: 100
Likes: 0
From: rochester n.y.
Bobby on one side straight or 90 degree fittings will work but the other side has to be moved. I have heard of people notching the caliper brackets but I did not feel comfortable going that route.if you have a choice,drill the spindle without the kingpin installed,for a good clean hole,good grease flow,I really struggled with the last couple thousands of a inch of metal to get a good clean hole.
FTE Stories
Ford Trucks for Ford Truck Enthusiasts

2027 Ford Super Duty Buyer's Guide (Every Model, Engine, & Package)
Brett Foote
Top 10 Ford Truck Tragedies
Joe Kucinski
AEV FXL Super Duty - the Super Duty Raptor Ford Doesn't Make
Brett Foote
Lobo Vs Lobo: Proof the F-150 Lobo Should Be Even Lower!
Michael S. Palmer
Ford's 2001 Explorer Sportsman Concept Looks For a New Home
Verdad Gallardo
10 Best Ford Truck Engines We Miss the Most!
Joe Kucinski
2026 Shelby F-150 Off-Road: Better Than a Raptor R?
Brett Foote
2027 Super Duty Carhartt Package First Look: 12 Things You NEED to Know!
Michael S. Palmer
10 Most Surprising 2026 Ford Truck Features!
Joe Kucinski
Elder User
Joined: Jul 2006
Posts: 532
Likes: 1
From: Athens, GA, USA
Originally Posted by Goobzilla
Well,
I guess I did get them driven home yesterday. It just turns out I'm not as smart as I think am (as usual). The smart guys at work say the adapters are bottomed out on the spindle shoulder. It just looks weird that the adapters don't press flush to the flat face of the spindle. A quick check with a machinist's scale shows that the gaps are identical on both spindles. I think CPP's directions could be a lot better in some respects. Some more pictures would help out a lot.
I guess I did get them driven home yesterday. It just turns out I'm not as smart as I think am (as usual). The smart guys at work say the adapters are bottomed out on the spindle shoulder. It just looks weird that the adapters don't press flush to the flat face of the spindle. A quick check with a machinist's scale shows that the gaps are identical on both spindles. I think CPP's directions could be a lot better in some respects. Some more pictures would help out a lot.
Roast em' if you got 'em
Joined: Mar 2005
Posts: 21,984
Likes: 9,838
From: Rio Rancho, NM
Originally Posted by f250red
Bobby on one side straight or 90 degree fittings will work but the other side has to be moved. I have heard of people notching the caliper brackets but I did not feel comfortable going that route.if you have a choice,drill the spindle without the kingpin installed,for a good clean hole,good grease flow,I really struggled with the last couple thousands of a inch of metal to get a good clean hole.
I'll take a closer look at it the next chance I get
Bobby
Elder User
Joined: Jul 2002
Posts: 520
Likes: 0
From: Wellington, CO
Well, we got a little bit of progress today, but I'm waiting on 2 spindle washers to arrive via carrier pigeon to complete final assembly.
Some advice for others: 1. You have to remove quite a bit of metal from the bearing adapters to get the inner wheel bearing to slip over. A little sanding drum on the Dremel and emery cloth got everything put together nicely.
2. An 1 1/8" socket makes the perfect driver for knocking outer bearing race out of the Volare rotors.
Other than that, things are progressing well. My calipers came in today and they fit the bracket perfectly. I'll load 'em up with pads and sit on the porch waiting for my washers. Then we can finish assembly.

I don't want to jinx it, but I'm actually starting to think it may all fit together.
Some advice for others: 1. You have to remove quite a bit of metal from the bearing adapters to get the inner wheel bearing to slip over. A little sanding drum on the Dremel and emery cloth got everything put together nicely.
2. An 1 1/8" socket makes the perfect driver for knocking outer bearing race out of the Volare rotors.
Other than that, things are progressing well. My calipers came in today and they fit the bracket perfectly. I'll load 'em up with pads and sit on the porch waiting for my washers. Then we can finish assembly.
I don't want to jinx it, but I'm actually starting to think it may all fit together.
Elder User
Joined: Jul 2002
Posts: 520
Likes: 0
From: Wellington, CO
So to try and wrap this up, I got everything together today:
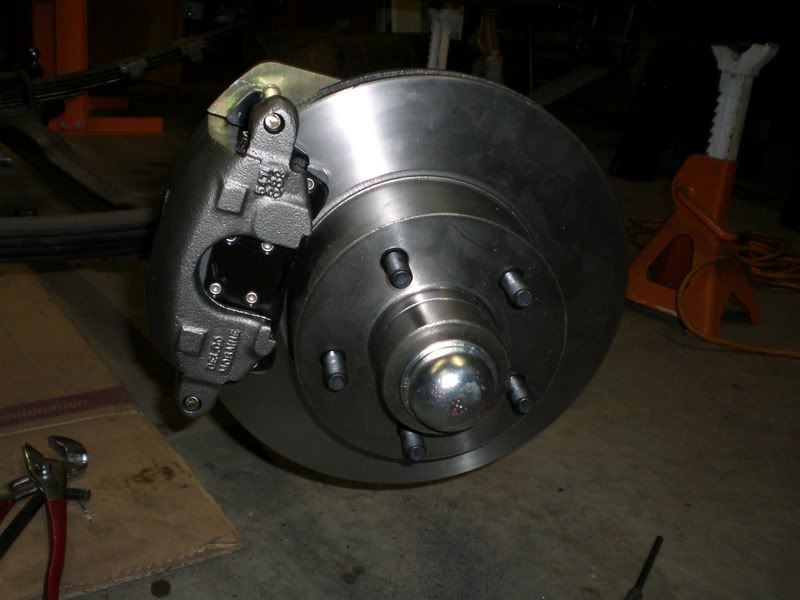
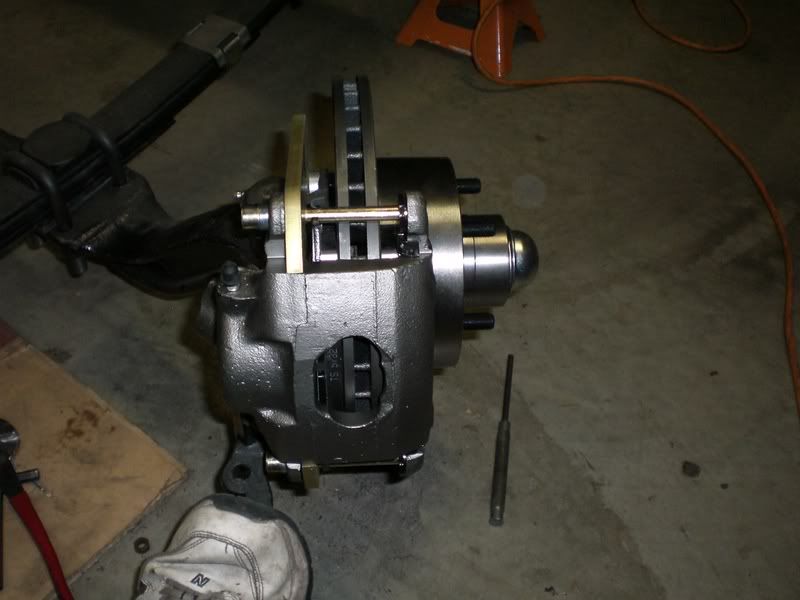
Everything fit in place, which eliminated all doubt (to me) that my bearing adapters were fully seated. The B-1195 spindle washers that I got on Ebay were a little to big to allow the dust caps to seat in the spindle, but a little customization with a grinder made everything work out.
I guess my only lingering question at this point is how tight to go on the spindle nut. Instructions really don't give any info. How much bearing preload should I put on these wheel bearings? I'm guessing the right answer is "some, but not too much" but I don't have a good feel for it. Any advice?
Great kit, recommend it to anyone. Remember, if you're going with the 5 on 4.5 kit for 48-56 remember the part # for the seals is incorrect. Part # is 9406S not 94065. If there's any questions I'll do my best to answer them.
Everything fit in place, which eliminated all doubt (to me) that my bearing adapters were fully seated. The B-1195 spindle washers that I got on Ebay were a little to big to allow the dust caps to seat in the spindle, but a little customization with a grinder made everything work out.
I guess my only lingering question at this point is how tight to go on the spindle nut. Instructions really don't give any info. How much bearing preload should I put on these wheel bearings? I'm guessing the right answer is "some, but not too much" but I don't have a good feel for it. Any advice?
Great kit, recommend it to anyone. Remember, if you're going with the 5 on 4.5 kit for 48-56 remember the part # for the seals is incorrect. Part # is 9406S not 94065. If there's any questions I'll do my best to answer them.
Cargo Master


Joined: Aug 2004
Posts: 2,575
Likes: 36
From: Greenville, SC

It is a feel thing. I usually tighten it until it starts loading up the bearing (the rotor will have some drag when you start to rotate it) and back off one cotter pin slot on the nut. Then I make sure I have no play by pulling the rotor back and forth and also make sure the rotor spins freely, if the rotor has "drag", it is too tight, if the rotor moves when you pull or push against it, it is too loose.
Thread Starter
|
Fleet Mechanic
Joined: Oct 2004
Posts: 1,719
Likes: 506
From: clinton,tn
look's good goob,mine should be in the first of the week and i can get started on it.i am going to put the front axle and toyota power steering box in this week end.i will wait on the spindle's until i get the bearing adapter's on and grease fitting's moved.you keep up the good work and good picture's too.

Thread
Thread Starter
Forum
Replies
Last Post
FLJ
Brakes, Steering, Suspension, Tires, & Wheels
4
Sep 8, 2015 12:42 AM
Dskeet6
1948 - 1956 F1, F100 & Larger F-Series Trucks
2
Apr 14, 2015 08:35 PM
rwrogers
1961 - 1966 F-100 & Larger F-Series Trucks
1
Jun 30, 2014 10:02 AM
rangergirl94
1987 - 1996 F150 & Larger F-Series Trucks
9
Dec 12, 2012 09:03 AM
