


New mirrors
Laughing Gas


Joined: Sep 2003
Posts: 1,072
Likes: 25
From: San Mateo, CA
Great job, Bob! Lots of people have wanted good sized adjustable stock mirrors for awhile now, me included. Thanks for the hard work and great documentation.
Brian, here's a couple of the old threads discussing these mirrors:
https://www.ford-trucks.com/forums/5...in-1956-a.html
https://www.ford-trucks.com/forums/4...our-truck.html
Brian, here's a couple of the old threads discussing these mirrors:
https://www.ford-trucks.com/forums/5...in-1956-a.html
https://www.ford-trucks.com/forums/4...our-truck.html
Thread Starter
|
Hotshot


Joined: Jan 2001
Posts: 16,893
Likes: 3,133
From: SE Wisc. (the Rust Belt)
The set up I have built is a design in progress. I still need to tweek the hinge bracket a little to make it fit. I will do this on the next ones I built. I just wanted to get the idea out there so if someone wanted to make them they at least had a idea of how to do it.
I am also rethinking the bottom tip of the adjustable arm. I am concerned I will not be able to pinch the flattend end of the arm in the hinge bracket enough to prevent the arm from working itself down. The original mirror arms had a flat end clamped with two tub like spacers:
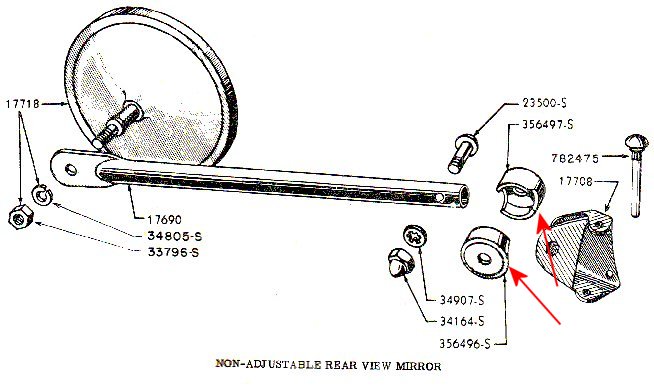
I think this design might work better than trying to clamp the pinched end. I am going to try to come up with a economical (read cheap) way to make the tube type spacers. If someone has a better idea I hope you will contribute you thoughts on the subject. I would like to find a part to use for this that doesn't have to be professionally altered or built, something that can be done in the garage on the cheap. When I was at the hardware store I found a stainless pipe coupling for $1.50 that could be cut in half and have a arc ground out of one end. The hard part would be cutting the stainless but I might try that.
I am also rethinking the bottom tip of the adjustable arm. I am concerned I will not be able to pinch the flattend end of the arm in the hinge bracket enough to prevent the arm from working itself down. The original mirror arms had a flat end clamped with two tub like spacers:
I think this design might work better than trying to clamp the pinched end. I am going to try to come up with a economical (read cheap) way to make the tube type spacers. If someone has a better idea I hope you will contribute you thoughts on the subject. I would like to find a part to use for this that doesn't have to be professionally altered or built, something that can be done in the garage on the cheap. When I was at the hardware store I found a stainless pipe coupling for $1.50 that could be cut in half and have a arc ground out of one end. The hard part would be cutting the stainless but I might try that.
Roast em' if you got 'em

Joined: Mar 2005
Posts: 22,017
Likes: 9,975
From: Rio Rancho, NM

Bob,
Before messing with the tube type spacers I think I would just put a large "star" type lock washer on either side of the pinched section. In either case, tube type or pinched, you are going to be fighting the same problem....the large lever arm of the mirror against the clamping force of the bolt.
It seems to me that Ford used the tube type spacers as just that, spacers. Since the clamp pieces are stamped and have a rolled edge it looks like the tube type spacers just fill in the rolled edge. (I havent had my hands on any of these parts, I'm just going by the diagram and your pics....I could be missing something)
Bobby
Posting Guru
Joined: Feb 2002
Posts: 1,392
Likes: 2
From: Michigan
With drivers side mirror I have for my F-3, those "tube spacers" do fill in the space between the metal brackets, but also are a part of the clamping system that holds the mirror arm (keeps the metal brackets from getting bent under the bolt pressure). I could see adding in a star washer though between the spacer and bracket to help hold the arm more solid.
Thread Starter
|
Hotshot
Joined: Jan 2001
Posts: 16,893
Likes: 3,133
From: SE Wisc. (the Rust Belt)
This is the set up I currently have:
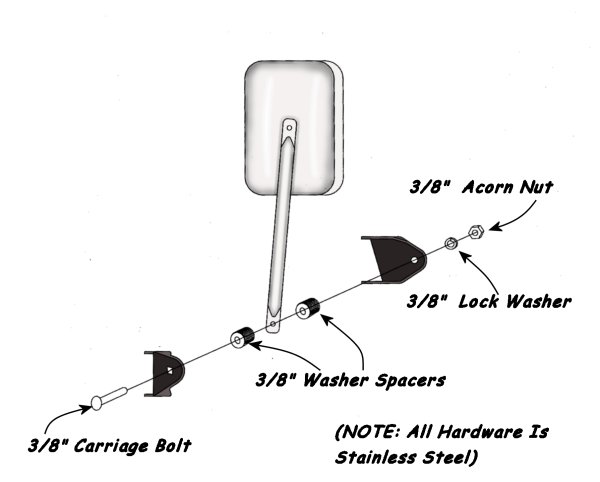
As I am looking at it I can see a great potential for multiple slippage areas between each of the washers I am using for spacers. I think if I used two tube type spacers instead of the washers, along with a star washer between the spacers and brackets, I would have a lot firmer grip. Also, if I notch out the spacers to fit around the arm it would offer addtional strenght. Now that I am looking it over better I think I'll head off to the hardware store this weekend and pick up a couple of the stainless couplers. I'll have to figure out a way to reduce the ID of the couple so it will fit around the 3/8" bolt and also allow me to use the star washers. I'll make something that looks like the stock set up in Nathan's drawing.
Thankfully, I have a very well stocked independent hardware store nearby.
Roast em' if you got 'em
Joined: Mar 2005
Posts: 22,017
Likes: 9,975
From: Rio Rancho, NM
Bob,
Just tossing out ideas here...
Instead of making 2 seperate spacers, would it be possible to take a short lenght of pipe, cap either end(maybe weld a washer in each end) and drill out a hole in one side for the mirror arm to fit into. Then it would just take a pair of star washers, one on either end between the pipe and the clamp. Less parts, less hassle.....maybe
Bobby
Thread Starter
|
Hotshot
Joined: Jan 2001
Posts: 16,893
Likes: 3,133
From: SE Wisc. (the Rust Belt)
Bobby,
I am thinking about getting the stainless pipe coupling or a piece of pipe, whichever is cheapest, cutting it to length, welding a stainless washer on one side and grinding the half moon out of the other end. I don't have my MIG welder set up for stainless so I am just going to use mild steel wire to zap a couple of spot welds. The biggest pain is cutting the stainless. By using two equal sized pieces the arm will be centered between the tow brackets.
I am thinking about getting the stainless pipe coupling or a piece of pipe, whichever is cheapest, cutting it to length, welding a stainless washer on one side and grinding the half moon out of the other end. I don't have my MIG welder set up for stainless so I am just going to use mild steel wire to zap a couple of spot welds. The biggest pain is cutting the stainless. By using two equal sized pieces the arm will be centered between the tow brackets.
FTE Stories
Ford Trucks for Ford Truck Enthusiasts

Top 10 Fords at 2026 Carlisle Ford Nationals
Joe Kucinski
3 Best / 3 Worst Parts of Modern Ford Ownership
Brett Foote
10 Amazing Upgrades That Solve Common Ford Truck Owner Headaches
Pouria Savadkouei
Every 2026 Ford Engine Explained
Brett Foote
10 Ugly Ford Trucks That We Still Kinda Love
Joe Kucinski
10 Things Every Truck Owner NEEDS (2026 Edition)
Michael S. Palmer
Rezvani's Latest Post-Apocalyptic Monster Is a Ford F-150 Raptor Underneath
Verdad Gallardo
Top 10 Most Expensive Ford Trucks Ever Sold on Bring a Trailer
Joe Kucinski
2027 Ford Super Duty Buyer's Guide (Every Model, Engine, & Package)
Brett FooteThread Starter
|
Hotshot
Joined: Jan 2001
Posts: 16,893
Likes: 3,133
From: SE Wisc. (the Rust Belt)
I thought I would revive this thread. It's been a long time since I made my original posts but I've been really busy at work and I haven't had a chance to work on any of my trucks.
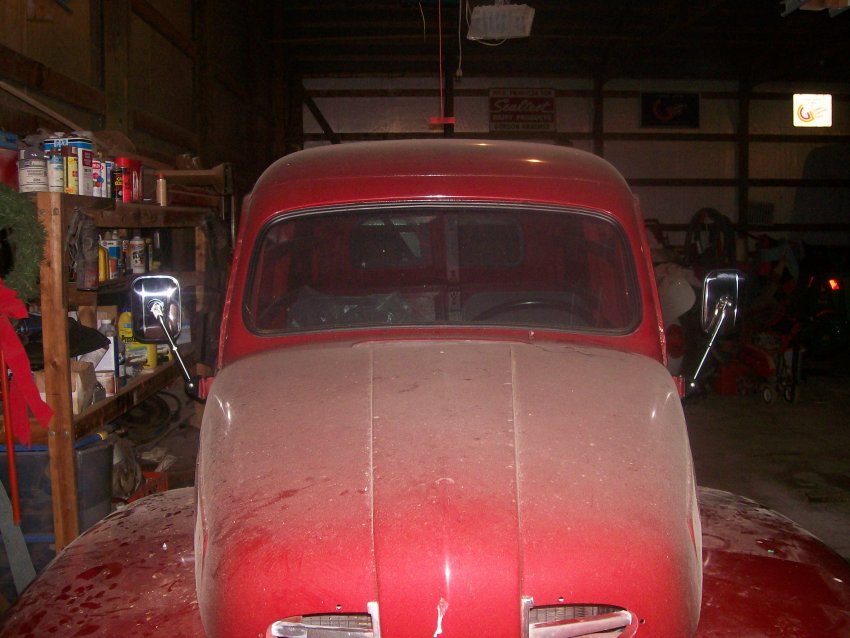
Anyways, I finally took some time out to worke on my panel. I was able to fabricate a matching set of mirror brackets for the passenger's side. I simply made them the same way as I did the driver's side but reversed the metal forms to make mirrored parts. Here's my final results:

I also rethought the spacers in the bracket.
Originally I was going to use a stack of stainless washers but then I thought maybe the mirror arm wouldn't be held in place firmly enough. This weekend I went to the local chain auto parts store and had the guy behind the counter match the original spacer to a stock freeze plug. He found one that was the same diameter and all I did was grind two round gouges to accept the arm and a 3/8" hole in the center. I also cut the crimped section of the arm and drilled the tube to look like the stock arm.
Anyways, I finally took some time out to worke on my panel. I was able to fabricate a matching set of mirror brackets for the passenger's side. I simply made them the same way as I did the driver's side but reversed the metal forms to make mirrored parts. Here's my final results:
I also rethought the spacers in the bracket.
Originally I was going to use a stack of stainless washers but then I thought maybe the mirror arm wouldn't be held in place firmly enough. This weekend I went to the local chain auto parts store and had the guy behind the counter match the original spacer to a stock freeze plug. He found one that was the same diameter and all I did was grind two round gouges to accept the arm and a 3/8" hole in the center. I also cut the crimped section of the arm and drilled the tube to look like the stock arm.
Postmaster
Joined: Jun 2004
Posts: 4,190
Likes: 2
From: Riverside, So Cal

Bob -
Those really look cool. They turned out very nice.
I hope to make a pair for my 56 similar to what you did. The difference will be the lower bracket, where I want to adapt the "bar" that is part of the 56 stock mirror to the extended arms you have. I'll keep them stored inside the truck.
I'll run the stock mirrors until I tow my RV, then I'll swap out to the extended ones so I can see around the trailer. Two screws on each side and they are swapped out.
Thanks for the great idea.
Roast em' if you got 'em
Joined: Mar 2005
Posts: 22,017
Likes: 9,975
From: Rio Rancho, NM
Bob,
WOW! They really came out great!! I'm glad to see them mounted up on the panel.
I can imagine what it must have been like trying to drive the panel without a rearview mirror. My 49 truck is scary enough as it is, the little peep mirrors aren't worth a darn. Its a good thing its hot hear as I have to poke my head out the window to see whats back there.
Nice work!
Bobby


Thread
Thread Starter
Forum
Replies
Last Post
bobj49f2
1948 - 1956 F1, F100 & Larger F-Series Trucks
216
Aug 9, 2025 09:32 AM
Archion
Excursion - King of SUVs
82
Jun 14, 2016 08:02 PM
Junior Junior
1980 - 1986 Bullnose F100, F150 & Larger F-Series Trucks
4
Apr 16, 2013 04:49 PM
bobj49f2
1948 - 1956 F1, F100 & Larger F-Series Trucks
18
Dec 28, 2007 12:06 PM