When you click on links to various merchants on this site and make a purchase, this can result in this site earning a commission. Affiliate programs and affiliations include, but are not limited to, the eBay Partner Network.
Decided to try my hand at automotive painting as I have a front fender that doesn’t match and my spare tire cover was covered in primer as well as there are few other areas that need touching up.
I know bodyshops are really expensive so I had a quart of single stage mixed up by a reputable auto body supply shop using the original “cinnamon glow” paint code.
I invested a few hundred dollars in semi decent equipment including a Devilbiss Finish Line hvlp spray gun.
After watching a few dozen YouTube videos on spray gun set up and proper techniques, I decided to attempt the box side spare tire cover first as it was already in primer so my reasoning was that I couldn’t make it much worse….
Anyway, it didn’t need any rust repair, just lots of sanding and a little filler here and there to smooth over a few dings. Once the prep was done, I applied to coats of the Nason single stage this morning. I have to admit that I am pleasantly surprised at how well it actually turned out!!! Hopefully the shine fades a bit once it is fully cured but overall, I’m pleased with the results. Can’t wait to reinstall the trim and get it installed back on the truck!
Looks good!
And I applaud your willingness to try something new.
I've always said, just because you HAVEN'T done something doesn't mean you CAN'T do something.
You prove my point.
Looks like you pulled it off. Looks good. At some point I will have to paint mine. It will be my first time too. I’m good with a rattle can just never had to mix my own paint yet. I’ve used HVLP for woodworking projects so I think it will go ok. Hope yours turns out the way you pictured in your head. Looks good in the pic.
Single stage rattle can paint job on the hood. It was green. It's a shade or 2 lighter than the OG....but that's fine. Next up will be to paint a pass. side door and pass side fender to match. There's a auto body supply place local that I'm getting the paint from... At least the Sequoia brown color. I can get Wimbledon White at O'Reilly's. Yours looks good! I've always heard that it's all about the prep work. So true. A pic of the 79 I had....the box was replaced and I rattle canned it to match. Lots of Scotchbright pads and about 6-8 cans of paint. I miss that truck...
Looks good I could not do better myself and I had been painting 30 years ago, dont like body work so went on to do other work for money, then painted my truck 4 years ago.
Only thing different is the gun as I went with Devilbiss Starting Line kit (3 guns: primer, small touch up, paint) I bought from Eastwood when on sale.
I also went with the Dekup liners for the cups and added the larger cups to all 3 guns.
The liners make clean up a breeze as all you have to clean is the where the cups screw on (twist lock) and the head. The liners get thrown away so no cup to clean. Vary little thinner used for cleaning.
If you find the rest of the truck is dull get a slow speed buffer / polisher and go to town on the rest of the truck.
Start with rubbing compound but go easy as it will be easy to buff thru the paint on the edges of the body.
Then follow up with polish and the truck should look like new.
Dave ----
Looks like you got a good pattern on the metallic, that's tough for a beginner, and it laid out nice.
If you're going with a single stage I usually use urethane. not only does it hold up a little better but it lays out flatter than enamel. I'm a decent painter but I need any advantage I can get.
I've seen those liners but never used them. my guns are Anest Iwata's, but the cups are pretty generic I think. if I can find some that fit I might try them. thinner cost as much as paint used to and it takes a lot to clean a gun up good.
Looks like you got a good pattern on the metallic, that's tough for a beginner, and it laid out nice.
x2 on this one. Somewhere in my trucks history, part of it was repainted. You couldn't tell until I de-oxidized and polished it. Yikes, stripes. The hood looks like a watermelon. I have it in my head to try repainting it some day. I have some limited experience decades ago, but still haven't decided if I am brave enough for a metallic. Kudos to you for just diving in and getting it done.
Prep was definitely the more time consuming portion of the job. I noticed that the previous "obviously re-sprayed" paint coat had a bunch of bubbles in it once I sanded through the initial primer. I sanded the bubbles out and laid down a coat of fresh primer. Wouldn't you know it, the bubbles re-surfaced through the new primer. Contamination I thought. Sanded down again, cleaned surface with all kinds of cleaning and degreasing products including lacquer thinner and when I re-sprayed the primer again, yep, more bubbles. Ended up sanding the area again but this time down to bare metal. What ever contamination in the previous paint was stubborn and sanding down to bare metal was the only way to eliminate it. Definitely a bit frustrating but my motto that I try to follow is "do it once, do it right" and I didn't want a repeat of the previous painters problem.
I probably spent more time on prep than I needed to but the painting supplies weren't cheap and I wanted to do as much as possible to increase my odds of success. Plus I was sort of dragging things out to avoid the actual painting portion which I was pretty nervous about. The last painting video I watched before attempting the painting portion of the job, was by a youtuber who posts under the name "Paint Society". He provided a lot of really helpful information in his video but his last piece of advice really hit home. He said "Don't over-think it. Just get out there and lay down some paint". That was exactly what I needed to hear so I mixed up the paint this morning and got at it.
In hindsight, the actual painting part of the job was pretty easy and kinda fun.... Painting took almost no time compared to all the previous sanding and prep work. While I am happy with the results and look forward to doing more paint work now, I also have a new appreciation for why good body shops charge what they do. The body work and prep is definitely time consuming and not an area you want to skimp on but its not rocket science either. While I have an air powered orbital sander, my 12" dura-block sanding block was probably the best investment in terms of getting the panel surface straight and flat before painting.
Aside from the usual different grades of sand paper, filler, primer. and tack cloth, I also highly recommend cranking up some good tunes and having a supply of cold beer on hand to prevent your throat from becoming too parched from all that sanding dust... Oh, and also invest in a good mask/respirator to keep all that dust out of your lungs : )
I will post another picture of the newly painted panel on the truck once it has sufficiently cured!
Tough color for your first time and you pulled it off. Looks great. Takes a lot of skill to make new paint match old paint.
As Abraham Lincoln once said "Panel painting will never match. Especially silvers, whites and Cinnamon Glow".
I panel painted my spare cover 25 years ago trying to match 35 year old paint. It's still noticeable.
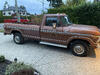
Got the trim and attaching hardware reinstalled today. Installed the newly painted panel on the truck and was kind of apprehensive about how well it would match (or not…. 😬
Happy to say that it matched surprisingly well. The rest of the truck still needs a good polish as previously suggested but overall, the results are a big improvement over the former brown primer finish!
















 I have it in my head to try repainting it some day. I have some limited experience decades ago, but still haven't decided if I am brave enough for a metallic. Kudos to you for just diving in and getting it done.