When you click on links to various merchants on this site and make a purchase, this can result in this site earning a commission. Affiliate programs and affiliations include, but are not limited to, the eBay Partner Network.
Got almost everything hooked up, but the seat heaters so I had to try what I had, out:
For starters, the USB ports are upside down, the transmission gauge is way too bright and the rear lights don�t work at all.
So I rectified the USB port easily. I ordered a Autometer Dimmer Switch that I need to tie into the tranny gauge. Hopefully, that won�t create more issues.
The rear lights have me perplexed.
I ran a 16 gauge wire (had some already) from right rear light to the left rear light and then on to the �accessory� prong on the back of my switch. Each light had a ground black wire that I attached to the truck frame near by each light. I jumper the two positive prongs on the back of the switch to the auxiliary fuse block as well as the two negative prongs on the back of the switch to the negative receptacle on the fuse block.
I grounded the lights by extending the black (negative) wire and I drilling out an existing hole in the truck frame, filing down paint and weather coating to bare metal with dremel tool, used �star� lock washers and dialectic grease. I grounded both rear lights like this. Each light had one white wire and one black wire. My assumption was/is that the black is negative and white is positive. If this is wrong, then that�s the explanation.
Thanks for any input.
If the lights are LED then polarity matters, if they're regular incandescent , then polarity (which wire is the + and which is the -) doesn't matter.
On a side note; I dig your whole setup there. You made good use of the factory space, looks custom but not ugly. I've been thinking about what to do with that useless bag hook space, so I may take some inspiration from you on your dash/ switch setup.
.
.
.
Thanks for the compliment.
l am using LED lights. This is how I have it set up now:
I thought I checked all the boxes, but obviously not.
What do I need to do different?
Thanks.
Did you bench test the lights first? Might as well start with the simplest test first. The second simplest is verifying the aux fuse box has power, then that your specific fuse for the lights is good. Then do similar with your wire run into the cab, make sure those wires convey power to the lights. Then I'd verify the switch is doing what it's supposed to (easy multimeter continuity test).
Did not bench test the lights.
Power does go through fuse block because other devices hooked up do work.
I did change out fuses with negative results.
I guess I have to pull out my multimeter and figure out how to use it.
So, how about the wire diagram? Good, bad I know it�s ugly.
I always test my gear before i put it on the vehicle these days where possible, so many times i have gotten dud parts over the years and had to do job twice.
When i built the roof rack for the Excursion and the Expeditions as well, i put them togeather on the work bench, lighting controllers and all, hooked up to a 12v source and made sure everything worked, and then put them on the roof with help, because with my prior back and knee injuries i knew once its on the roof, fixing anything would be near impossible for me, and i would have to pay someone.
Did not bench test the lights.
Power does go through fuse block because other devices hooked up do work.
I did change out fuses with negative results.
I guess I have to pull out my multimeter and figure out how to use it.
So, how about the wire diagram? Good, bad I know it�s ugly.
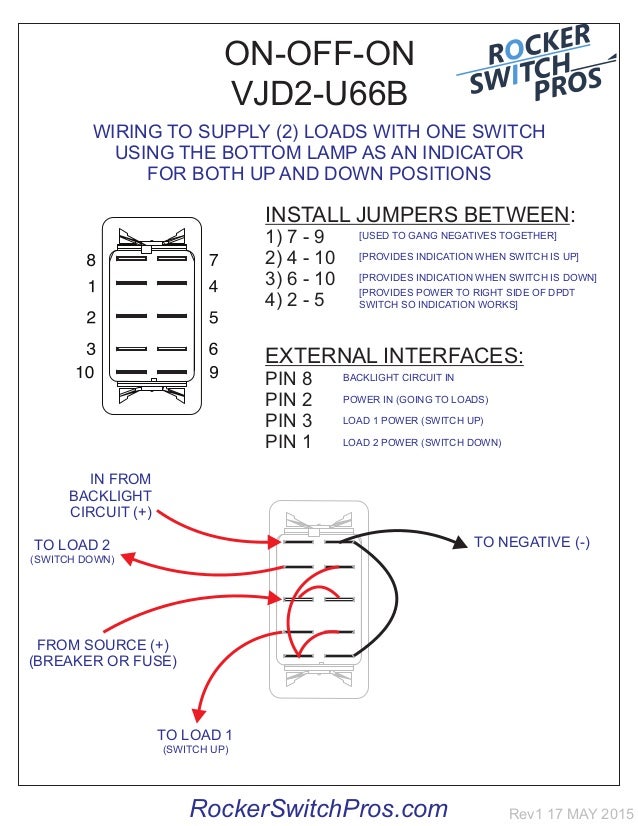
What is the box in you diagram, and what do the numbers mean?
Assuming its a relay, and your "3" is terminal 30 of the relay and "7" is 87, and "6" is 86, then yeah the wring is wrong. If the numbers refer to something else could you explain it better ?
.
.
.
Assuming that the numbered item in the diagram is the rocker switch, 2 and 6 shouldnt be connected, see below from https://madcomics.blogspot.com/2020/...g-diagram.html. Perhaps jump the switch for now to confirm the rest of everything is good, then switch around connections on the back of the rocker until it works haha.
This is the backside of the switch.
I have a 75 amp relay installed before the auxiliary fuse block (pic below). I have a separate wire for terminals 7 and 8 as well as 2 and 6 connecting to the fuse block. I called the vendor, who advised that 2 and 6 can be attached to the same fuse block terminal so long as it is switched with the ignition, which it is. Terminal 3 is now going to the light�s white wire.
8 gauge wire from battery positive to relay on left.
8 gauge wire from relay to fuse block positive.
8 gauge wire from fuse block negative to battery negative.
I see, what looks like relays, inline between the heated seats and their respective on/off switches. I�m going to try installing another relay between the auxiliary lights and toggle switch and see what that does.
Seeing that terminal #3 says �to your relay or acc.� I take that as a hint for a separate relay.
Did you ever determine which wires coming off of the lights were actually positive or negative? I would take one of the lights off and bench test it with a battery to see which it is before doing anything else with relays etc. None of that will help if the wires are reversed.
This Hennessey Takes the Expedition Tremor's Off-Roading Capability to the Next Level
Slideshow: The VelociRaptor Expedition gains a lift, upgraded suspension, Brembo brakes, and trail-ready equipment while retaining the stock 440-horsepower EcoBoost V6.
Rezvani's Latest Post-Apocalyptic Monster Is a Ford F-150 Raptor Underneath
Slideshow: Called the Fortress, the 850-horsepower pickup combines Raptor underpinnings with military-inspired features, survival equipment, and a starting price of $285,000.