When you click on links to various merchants on this site and make a purchase, this can result in this site earning a commission. Affiliate programs and affiliations include, but are not limited to, the eBay Partner Network.
You CAN do the 92-94 E-Series tail lights (yellow turn)
After spending half of a day looking at ancient posts for the fun of it, I came across a couple of posts where people asked about using the 92-94 E-Series van tail lights with the yellow turn signals. The general consensus was that it probably wasn't worth doing because the Excursions are hard-wired for the turn signals and stop lamps to share a bulb, and who knows what you would have to do to get past it. Well, I like a challenge, so I looked into it...
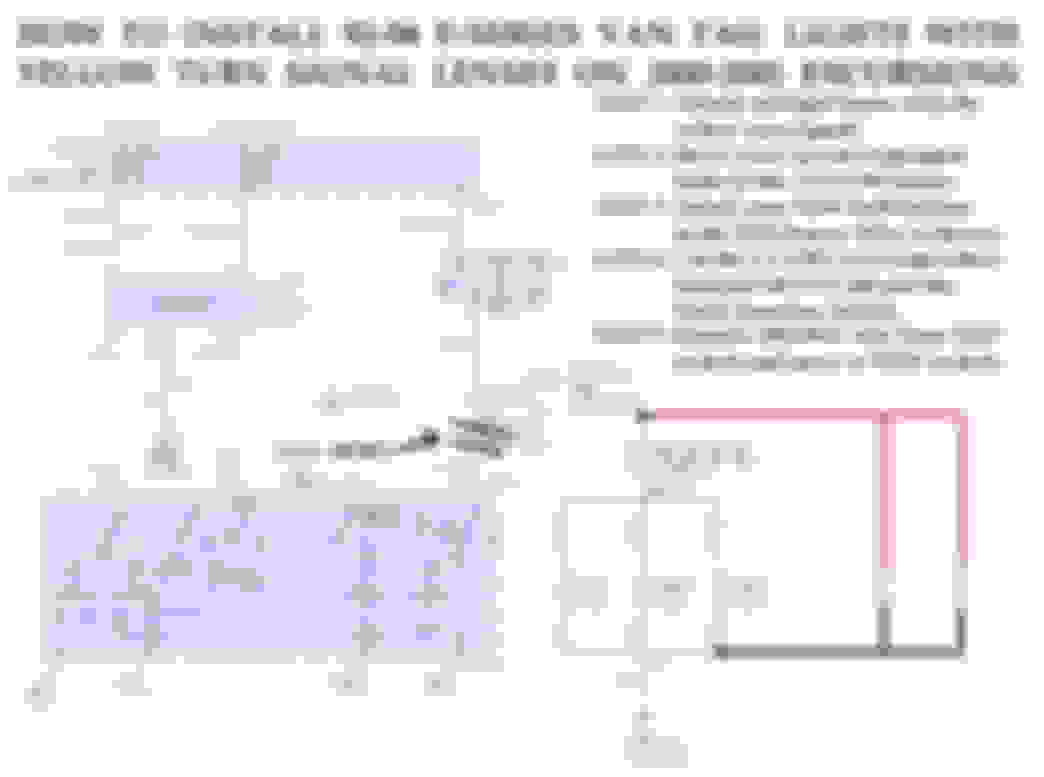
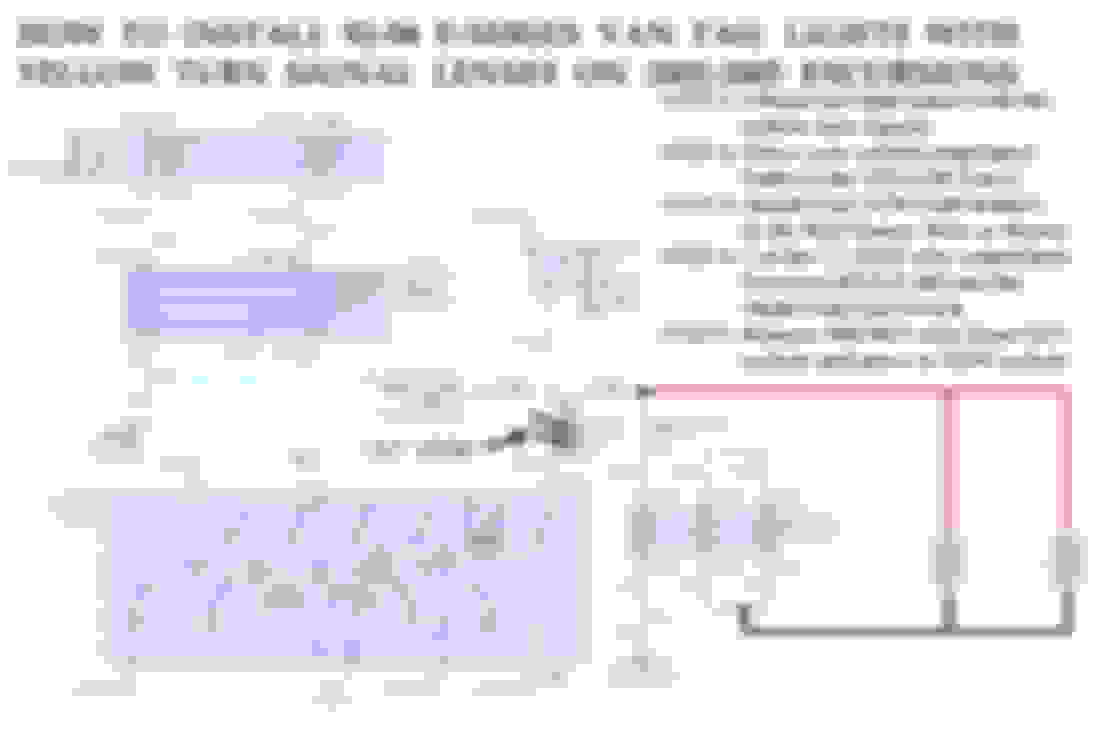
The first thing I found was that there are two different schematics for the brake and signal system- one for 2000-2001, and one for 2002-2005. While the Multi-Function Switches and wiring are slightly different, the concept is essentially the same. Just to be clear, I made TWO diagrams for this mod, so choose your year. (NOTE- I have no idea if the change was made exactly for the 2002 model year, or if it happened mid-year in 2001 or 2002- either way, this mod is simple enough to figure out regardless).
The second thing I discovered is that the signal and stop lamp system have NOTHING to do with the GEM module, as feared in a previous post, so this mod shouldn't freak out the electronics. I'll give a summary of how I arrived at this mod after the diagrams, but for those who are here for the meat and potatoes, here is the preliminary information and the diagrams...
ITEMS NEEDED:
A pair of 92-94 E-Series van tail lights with the yellow turn signal lenses
A pair of bulb holders (for dual filament bulbs- like the ones currently on your Ex)
A pair of dual filament bulbs for the above
PROCEDURE:
Remove your current tail light lenses. Each lens has two bulb holders- one with two wires going to it and one with three wires going to it. IGNORE the one with two wires- that is your backup lights and WILL NOT be altered in this mod. Just insert this holder into the CLEAR section of the 92-94 lenses.
Next, cut the brown wire from the three-wire connector. BOTH sides will be brown. This is the parking light feed, and will be moved to the new bulb socket. Attach the brown wires to the NEW sockets in the position where they will power the DIMMER SIDE of the dual filament bulb (if the new sockets are the same as what you already have on the Excursion, it would be the same location on the new socket as it was on the old one. Check your new sockets to verify).
OPTIONAL- The above step removed power to the dim side of the existing original bulbs, which is really not a problem as this will be a turn signal only bulb when we are through. If you so choose, you can jumper where the brown wire used to be on the sockets to the NON-BLACK wires on the sockets to make BOTH filaments operate with the turn signals. I have no idea how much (if any) brighter it would make the turn signals, but if one filament ever burns out, the other would still operate. This is optional and up to you.
The new sockets need a ground. My pictures show the grounds for illustration purposes, but the easiest way to do it is to join the black wires of the new sockets to the black wires of the old sockets. Boom, you have ground. You can now insert the OLD sockets into the YELLOW portion of the 92-94 lenses.
That leaves one wire left to deal with in the new sockets- the stop light wire. There are a few different ways to do this. My diagrams are for illustration purposes to show where you want to grab power from- so basically, anywhere along the wire that feeds the third brake light is fine. You can pick up power right out of the brake pedal switch if you feel like running a wire the length of the truck, but up near the third brake light is easiest and shortest. Once you have that taken care of, you can insert the NEW sockets into the RED portion of the 92-94 lens, and install the completed lenses onto the Excursion.
YOU ARE NOT DONE YET- THIS LAST STEP IS EXTREMELY IMPORTANT- You have to locate the LIGHT GREEN wire coming out of your Multi-Function Switch and CUT IT. This cut MUST be made between the switch and SPLICE 240- the safest place to make this cut is as close to the Multi-function Switch as possible to avoid cutting any of the other light green wires after the splice. cutting the wrong wire after the splice could kill brake lights altogether or kill brake light power to the trailer connector. If you cut it close to the MFS, you avoid these possibilities. BE VERY CAREFUL THAT YOU HAVE THE RIGHT WIRE- there are also two other light green wires going to this switch- one has a white stripe and the other has an orange stripe. You DO NOT want to cut these wires- ONLY cut the solid light green wire with NO STRIPE.
Again, this wire MUST be cut, because if you don't, the turn signal bulbs (in the yellow lens) will still act like they did with the old setup- they will come on with the brake pedal, and one will come on solid while the other blinks when you brake with the signal on. Cutting this wire removes the brake light from the realm of the turn signal system, and lets it operate independently of the signals, just like the 92-94 lens requires.
Here are the diagrams... (NOTE- I forgot about the brown wire stuff when I made these, so it was thrown in as "step 5" but not drawn on the diagram)
For those interested in the nerd factor behind this mod, here is the theory behind it. In both types of switches, the voltage for the brake lights enters the MFS through the light green wire (with no stripe). However, this wire has a splice before it ever gets to the MFS to provide voltage to the third brake light and trailer connector. What this means is those two items operate any time the brake pedal is pushed REGARDLESS of what the MFS is doing. Since the 92-94 van lenses ONLY use the red portion for brake lights, we want the red portion to operate exactly like the third brake light and trailer connector. This is why we tie the new brake light bulb into this circuit WITHOUT going through the MFS.
Also, the reason we move the brown wires to the red portion is because they are solely for the park lamps (or, running lamps in my neck of the woods). These wires didn't go through the MFS to begin with, as they are powered any time the park lights or headlights are on. We moved those to the new sockets so we don't have yellow lights glowing when the park lights are on.
So why do we have to cut the LIGHT BLUE wire at the MFS if we already spliced the new stop lamps into the third brake light circuit? The short answer is because if you don't, your RED lights will work as expected (park lamps and brake lamps), but your YELLOW lights will still function like your original tail lamps did. Failure to cut the light green wire will cause:
1- The yellow lights will come on solid when you step on the brake
2- One yellow light will come on solid and the other one will blink when you brake with a signal on
To explain why, we need to see what happens inside the MFS. The light blue wire only has power when you step on the brake. inside the MFS, the first set of contacts this wire hits is the hazard switch. If the hazards are on, this wire hits a dead contact, meaning in stock configuration, you have no brake lights on the vehicle when the hazards are on (go ahead, go check your vehicle, I'll wait). AFTER the mod, you will still have red brake lights when the yellow hazards are on, because the brake pedal voltage no longer goes through the MFS. In my opinion, this is a safer way to go, because if for whatever reason you are actually driving with your hazards on, people will still know when you are stopping.
If the hazards are OFF, the voltage from the light blue brake circuit is allowed to pass on to the next step- turn signals. On 2000-2001 models, the entire set of turn signal contacts are moved through one common bar. On 2002-2005 models, there are separate bars for left and right. That slight difference really doesn't amount to much for our purposes, as the end result is the same. What happens is this- when your foot is on the brake pedal and the left turn signal is on, the bar moves so that the contacts do a few things- it moves the brake lamp voltage to a dead contact on the left side (to prevent the left from lighting up solid), it moves the brake lamp voltage to an available contact on the right side (so that the right side CAN light up solid), and it also makes a live connection to the turn signal relay on the left side. End result- left side blinks, right side comes on solid. And like I said, the 2002-2005 MFS does it a little differently internally, but the result is the same.
Therefore, after the mods are done at the lamps, if you don't cut the light blue wire, your yellow lights will still get the whole brake light manipulation that the MFS provides internally. You stop this by not giving the MFS stop light voltage in the first place (the cutting of the light blue wire). We already established that the new RED brake lights now work with the third brake light without ever going through the MFS, we just had to stop the new YELLOW lights from acting like the old tail lights. Cutting the light blue wire in the correct location does just that.
This isn't really a hard mod to do. If you have ever replaced a melted or cracked bulb socket, you can do this mod. The hardest part was figuring out what needed to be done, and why. Since I went ahead and did that part for ya, you get the easier part of just doing it if you like the unique look of the yellow turn signals. All I ask for in return is... PICS OR IT DIDN'T HAPPEN
I haven't bought lenses yet because I haven't actually did it to my Excursion, but I did try it out by setting up a spare body harness, lights and turn signal switch, and feeding the whole thing power like it would have if it was in a vehicle. I would think Amazon or Ebay would have the lenses though.
I basically got into this when I was reading some old-**** threads here one night, then decided to give it a try on a mocked up harness- mostly out of boredom because Fed Ex hasn't delivered the rest of my parts to finish up my suspension. But I wanted to make sure it worked before I posted a how to.
I've been looking at doing this because it's been suggested that yellow turn signals are safer by some studies. Yellow turn signals are also required in some countries in Europe... Not that my Excursion is seaworthy.
Great info....I did this conversion over a decade ago when the rig was still nearly new. I don't recall everything about it...but do want to offer one important piece of info.
On my 2005, I cut the above mentioned green wire inside the steering column cover. All worked fine on the truck until I hooked up the trailer. If memory serves, we only had trailer brake or turn signal lights but not both. How we got around the problem was to install one of those Hoppy trailer wiring adapters. It looks like a rubber disc and acts as a go-between for vehicles with separate stop and turn signals. If memory serves, we installed this just after the trailer wiring relays under the hood to get the trailer lights working correctly.
I also seem to remember that I got the stop light feed from the CHMSL.
Thanks for the added info, Matt. I didn't really think about trailer lights while figuring this out. Reps sent.
For those interested, the lenses are on Rock Auto for pretty cheap.
I sure didn't expect it either! I did the tail light swap in the fall, and when I hooked up the trailer in the spring to get it inspected...I found the problem.
TIPS, while they're fresh in my mind, because I JUST finished my turn signal conversion.
1.) The best place to get the brake light signal is a round connector above the headliner, dead center of the truck. You're looking for a Light Green wire. Splice into the light green wire twice and send one wire left and one wire right.
2.) Route the wire into the D-Pillar at the top. You can use any hole available. There is a large one at the very top. When you remove your stock tail lights, shove your arm up into the hole. At the top, you'll feel a plastic panel. It's held in with foam tape. You can push it up out of the way and you'll find the wire you dropped into the D-pillar. Then simply use your finger to hook the plastic panel and pull it back down flat.
3.) When you go to disconnect the Light Green wire from the Multi-Function switch, you don't have to cut it. If you want to be able to return to stock setup, you can remove the pin from the connector. If you disconnect the grey connector from the Multi-Function switch and look at it, you'll see that there's a red or orange bit of plastic. You can use needle nose pliers to pull this out. This protects all the pins in the connector. Use a sewing needle or a probe from a multimeter to push the little tab down that retains the pin for the Light Green wire. It should slip out. Then, simply wrap it up in tape and tuck it away.

 11-30-2018, 04:55 PM


 But I wanted to make sure it worked before I posted a how to.


