When you click on links to various merchants on this site and make a purchase, this can result in this site earning a commission. Affiliate programs and affiliations include, but are not limited to, the eBay Partner Network.
I agree, that factory nylon line seems to last a very long time, though it is a little hard to deal with the connections on the ends sometimes when they fail and break. On low pressure applications I have just slipped the nylon line up inside a rubber fuel hose and gently clamped on it with a hose clamp and it seems to hold up fine. I would not do this on a high pressure fuel line though.
And I would not run rubber line the whole way either. Whenever I have to go ahead and replace the nylon line, I use metal line. The copper nickel line they sell now is very easy to bend by hand and threads through the frame almost like stiff electrical wire. And it uses regular flare fittings, and short pieces of rubber hose with clamps works fine with it also.
X3 what they said.
I also would not run rubber line in place of the plastic.
The other thing I see if you replace the line is how to make connections? Don't they use some crazy fancy type of clamp?
Dave ----
X3 what they said.
I also would not run rubber line in place of the plastic.
The other thing I see if you replace the line is how to make connections? Don't they use some crazy fancy type of clamp?
Dave ----
They use a o-ring fitting. The fitting where the nylon line hooks on is usually just a barb without a clamp. I have gently heated the fitting and then slid the nylon line over the barb and made it work, though I always use a hose clamp on it too.
The other side of the nylon fitting is a female with a o-ring. Anything that accepts this fitting will have a long smooth pipe with a bump on it. The o-ring slides on this long smooth connection and seals around it, the bump is used with a keeper to lock the fitting on.
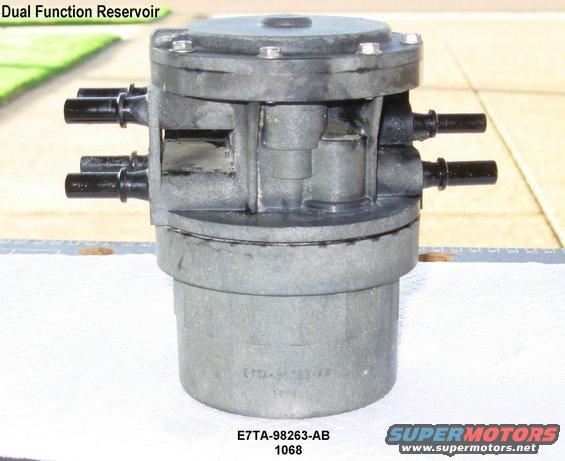
Here are the fittings that go onto the nylon lines. You can see the barb where the nylon pushes up on the fitting, and you can see the female part of the fitting, there is a o-ring down inside it. You can also see the white horseshoe shaped clip. This pulls up and out, you slip the fitting over the long smooth pipe so the o-rings seals, and then you shove the horseshoe clip back down beyond the bump in the line, and that keeps it from coming off.
Here's a picture of a later model filter reservoir. You can see the smooth pipes that the o-ring fitting slips up on, and the bump where the clip slides down beyond to hold it in place.
Dropped the tank today and it wasn’t too bad. Hardest part was getting the filler hose off of the tank so it could drop.
The light duty cinch strap idea worked so well I didn’t need the floor jack, and the ability to drop one side way down gave good access to the top of the tank for disconnecting the hoses. The supply and return lines were the fancy quick disconnect type just like Dave described, and I really appreciated knowing how to unlock them. In addition to the supply and return lines there’s an additional fuel pick up for the generator and that was a rubber line attached with a regular screw clamp.
The generator pick up is just an unrestricted tube that only extends 3/4 into the tank (so that you can’t run yourself out of gas with the generator and leave yourself stranded) and I keep an external fuel pump and a bunch of fuel line in my emergency kit so I can tap the generator fuel supply line to feed the carb if the in tank pump ever goes out.
Lastly there’s also a small diameter tank vent line and unfortunately the hose barb on the plastic check valve (Pretty much like a PCV valve) broke off easy. The check valve is pressed into a rubber grommet and is not part of the sending unit. Hopefully I can find a replacement.
Otherwise I’ve got a bit of a rusty bottom and the pick up sock looks clogged. Hopefully I can find a new sock because the new pick up, fuel pump and sender assembly I ordered didn’t come with one.
Appreciate your advice on the fuel lines, let me know what you think about the rusty spot inside the tank. For the most part the tank was pretty clean so I reckon it’s rust particles that showed up in the filter and clogged the sock.
Why is the top of the tank red primer? It looks like it may have been replaced before. I would wire brush and pick at any rust spots on the top of the tank. These tanks are not that expensive new. It's up to you whether you want to just put a new tank in or go with the old one, and replace it later when it needs it. If you decide to keep what you have, I would still wire brush/pick at the rust spots on top of the tank, and then give it another coat of rusty metal primer.
The parts round up phase of the process has been fruitful. The local Ford stealer-ship had the exact tank vent and grommet and I got a full Airtex fuel sender and pump assembly and tank seal on line.
As for the fuel strainer, I gave my local Napa guys a hard time because everything they came up had a larger size opening for the pump to press into and the dimensions of the strainers and locations for the pump inlet were all different than the original. So in desperation I ordered an OEM on E-bay... only to discover the new fuel pump inlet is larger than the original and the Napa strainers fit just fine. I guess I owe them boys an apology! I also doubt matching the dimensions of the original strainer perfectly is necessary. Fortunately with the tank vent and grommet removed I can visually check to see how the strainer sits inside the tank with the sender and pump assembly installed.
The Airtex pump and sender assembly I received Is a perfect match, looks well built, and the sending unit ohms match the original at full, empty, and all points in between. Airtex has a high opinion of themselves however due to some reviews I found on line I wonder about thier quality. I really don�t want to have to drop the tank again! Which has got me wondering if it would be advisable to modify the fuel pick to an unobstructed tube so I can run an external pump that�s serviceable in the field.
I�ve been doing my home work on the fuel lines and I guess the fancy plastic stuff is latest and greatest, but I still wonder about the age and condition of the (32 year old) seals inside the fittings. The Ford place turned me on to a local company that makes up various fuel and hydraulic lines and I�m going to see how much they want for a length of fuel line with the right fittings jammed into each end.
Also wondering about some kind of rubber tape for the tank straps? When I took the straps off there was some kind of material between the tank and the straps and I�m wondering what I should use to replace it. Recommendations?
Finally, I think the funky red paint on the tank is original because of the part number and label that�s on it. The exterior of the tank doesn�t look bad in person and I feel good about touching it up with some Rustolium paint and running it. However I�d like opinions and recommendations on that picture of the corrosion inside on the bottom of the tank. Anything there I should worry about?
... also doubt matching the dimensions of the original strainer perfectly is necessary. Fortunately with the tank vent and grommet removed I can visually check to see how the strainer sits inside the tank with the sender and pump assembly installed.
The inlet filter has to fit correctly or it will be bypassed.
I’ve been doing my home work on the fuel lines and I guess the fancy plastic stuff is latest and greatest, but I still wonder about the age and condition of the (32 year old) seals inside the fittings. The Ford place turned me on to a local company that makes up various fuel and hydraulic lines and I’m going to see how much they want for a length of fuel line with the right fittings jammed into each end.
Don't worry about the fittings at this point. Retain the factory lines/fittings. Those fittings can be serviced/replaced with the same style service replacements if leakage occurs. Pressurize the pump and check for any leakage before firing..
Also wondering about some kind of rubber tape for the tank straps? When I took the straps off there was some kind of material between the tank and the straps and I’m wondering what I should use to replace it. Recommendations?
Asphalt roofing felt, cut to size.
Finally, I think the funky red paint on the tank is original because of the part number and label that’s on it. The exterior of the tank doesn’t look bad in person and I feel good about touching it up with some Rustolium paint and running it. However I’d like opinions and recommendations on that picture of the corrosion inside on the bottom of the tank. Anything there I should worry about?
The RED is most likely paint over-spray. If a body company, it was probably sitting close to the spray booth.
As for the bubbling of the lower seam, maybe take a wire brush and see is there are any perforations starting under the bubbling. If so, consider replacement.
The Airtex pump and sender assembly I received Is a perfect match, looks well built, and the sending unit ohms match the original at full, empty, and all points in between.
I really don�t want to have to drop the tank again! Which has got me wondering if it would be advisable to modify the fuel pick to an unobstructed tube so I can run an external pump that�s serviceable in the field.
The original configuration worked perfectly for 32 years and you want to modify it? Dang, that is amazing longevity for a fuel pump.
An in-tank pump typically lasts much longer than an external pump. The big factor is abundant cooling from being submersed in fuel.
This is a motorhome, right? What's right above the pump? Can you make a hatch in the floor for access? That way you'd have the best of both worlds. You'd have an in-tank pump for reliability and adequate access when this new pump needs to be replaced by your descendants 32 years down the road...
This is a motorhome, right? What's right above the pump? Can you make a hatch in the floor for access? That way you'd have the best of both worlds. You'd have an in-tank pump for reliability and adequate access when this new pump needs to be replaced by your descendants 32 years down the road...
I thought about the access hatch idea but its a no go since it would mean cutting through the hardwood parquet entryway floor, down through the subfloor, and out though the 1/4” fiberglass outer skin. I don’t think I wanna mess with all that.
The absurd notion of my descendants working on Noline another 30 years from now is not lost on me. In fact I’ve had other people tell me the same thing! But I say it’s no more absurd than the idea the truck would be here in 2018 to the people who originally designed and built her in 1986. I’m just a care-taker.
Anyway, put the tank back in, added a couple gallons, jumped power to the pump and got 6 PSI fuel pressure at the return valve. Pump was kinda loud without much gas in the tank so I only ran it for a minute or two.
Next steps, fix the fuel leaks at the carb inlet and return valve, finish plumbing in the generator fuel line, check for leaks at the tank fittings, and add another 10 gallons so I can drive it to the gas station.
Truck is running great with the new fuel pump and now I’m wondering if it had been suffering from a subtle kind of fuel starvation (leaning out) for a while. It pulled well enough before but seemed to “run out of breath” on long pulls or much over 3,000 RPM, but now it seems to pull longer and harder, and higher into the RPM range.
After reassembly i checked fuel fuel pressure and flow at the carb inlet. Pressure before was an inconsistent 1 or 2 PSI and it pumped 1/4 gallon in 1 minute. Now I’m getting 5 PSI and 1/2 gallon of flow in 1 minute ~ double what I had before.
I wasn’t able to reuse the .09” fuel return valve because the fittings were scored and it leaked no matter how I tightened it but the new .04” return value went on fine.
I replaced the tape between the tank and straps with a thin PCV tape a buddy uses to wrap crab pots and it seems perfect for the job.
None of the local parts houses stock the quick disconnect fuel hose fittings so I finally ordered some on line. I didn’t actually need them but wanted a few just to have on hand. In a pinch I think I could use them to rig an external fuel pump to the frame rail fuel filter.
Thats about all I can think of right now, happy holidays fellow Ford enthusiasts and keep on truckin’!
In tank fuel pump / sending unit replacement update.
A few months and a few hundred miles later I notice the fuel gauge is reading 1/8 to 1/4 low... but only while the truck is running. NOT running with the key on the fuel gauge is accurate.
So between painting the outside of the tank real good, and using a plastic PCV tape between the tank and tank straps, I guess the fuel tank isn’t grounded well enough for the in tank pump and sender.
Added a jumper ground wire from the tank to the frame and the gauge is good again.
It's supposed to have a ground wire in the harness that goes to the sending unit. I think that runs up in the harness to the front, either on the driver's side kick panel or up in behind the radio on the firewall. But I am a big proponent in adding grounds like you did, a lot easier than tracing the problem out in the harness. Just remember if you have any other problems with the lights back there or something like that, the same ground in the harness may serve the lights, and you may need to add a ground for those too at some later date. Also try to put something on your bolted connection to keep it from corroding.
Thought I'd add a few comments somewhat related to the fuel gauge grounding comment and a memory lapse correction.
About a year ago, I embarked on a customization and redesign of the dash gauge cluster on my 1982 E350 based Born Free motorhome. I was tired of the auxiliary gauges I had disbursed on the windshield pillar and the radio containing bezel. My redesign replaced the standard speedometer/oil pressure/coolant temp/current and fuel gauges with a set consisting of a GPS-driven speedometer-tachometer combo/wideband air-fuel ratio/water temp/oil pressure/voltage/fuel level/ and vacuum. I designed an ABS plastic insert that fit into the original 1982 cluster bezel. I also added a variety of indicator lights to duplicate the stock instrument lights with additional indicators for my electric radiator fan controller status, fog and driving light status, radiator overflow and washer fluid level status and tire pressure monitoring. I also added control switches for the auxiliary lights and my air horn to the bezel controlling the headlights and wipers. To that bezel, I added a LPG tank level gauge. Finally, to the radio bezel, I integrated an analog clock. All the gauges were sourced from Speedhut.
The point of this (related to this thread) is that in my case, my E350 is equipped with dual tanks and I wanted to retain the in-tank fuel sensors as well as the dash switch that selected the appropriate tank AND switched the senders reporting to the indicating gauge. Going through the EVTM for the 1982 E350, I located the color coded wires in the original connector going to the OEM dash gauge cluster. I measured the voltage loss on the ground lines in the harness with the new gauges operating and found always less than 0.1 volt loss, even after terminal cleaning. In any case, connecting the sensor input wire for the Speedhut fuel level gauge to the gauge harness wire (which was coming from the fuel selector switch) resulted in correct full and empty readings after calibration. The selector switch operated perfectly with the aftermarket gauge.
Now back to impaired memory repair. When I first purchased this motorhome, the dual tank system with internal fuel tank electric pumps fed the tank selector solenoid which passed fuel to a Carter electric fuel pump. This electric pump fed fuel to the mechanical fuel pump on the side of the 460 which then sent fuel directly to the carb (no diverter present prior to the carb fuel input). Repeated vapor lock was my unrequested pleasure going up and down the grapevine entering the Los Angeles Basin. I researched the issue and quickly added the stock (for 1983 and on) diverter flow system just prior to the carb inlet. The vapor lock situation paid absolutely no attention to the the presence of the partial flow diverters. Tried larger orifices. Same non impact. CHP was now getting familiar with my favorite 1 - 2 hr rest position astride the highway. Then, in a spirit of some disgust, I removed the mechanical fuel pump, added the Holley fuel pressure regulator with fuel return, tapped into the fuel fill inlet pipes for the two tanks to add fuel return capability and finally a 5-port fuel selector solenoid. I used rubber fuel injector grade fuel lines to connect everything and encased all fuel lines in the engine compartment with aluminum heat shield tape. I have not experienced vapor lock since. This account should correct my erroneous rendition earlier in this thread.
Sorry for the misinformation. Neural damage at age 74!
 11-11-2018, 07:29 AM