
1988 F-150 XLT Lariat Restoration
#1
 04-21-2016, 09:46 PM

1988 F-150 XLT Lariat Restoration
I'll use this topic specifically for any questions, concerns, and progress regarding my truck.
I bought this 2 years ago from a used car dealer in Illinois. What got me interested was that it had been driven from Nevada only a couple months before, which meant no rust. In the pictures in the ad, the rocker panels, fender wells, quarter panels, everything, was totally rust-free. However, being a truck from one of the hottest states resulted in the original paint being burned off on the hood and roof, even down to the bare metal in some spots! After my Dad drove it back, it was parked alongside our driveway, and left untouched for a year and a half. Last fall, we tried starting it so we could move it farther down the driveway, but it wouldn't even turn over. We checked the battery, and the warranty expired in 2003! Not having enough time to get a new battery, it was towed to its new location. Last Sunday, we finally got a new battery for it; hooked it up, cranked the ignition for 3 seconds, and it roared to life! You can't exactly kill a Ford! Except for a little tugging to the left (probably from the front left tire being low) it ran and drove (as far as my driveway and an empty clearing would let me take it) beautifully!
So far, I've cleaned the interior a bit, removed the fender trim so I can take care of a little bubbling paint, and sanded/primed some surface rust. My next challenge will be removing the headlight assemblies to clean and bleach the lenses, as well and polishing the reflectors. I've read some topics around here about removing them, but hear different ways to do it. Does someone have a PDF of the original owner's manual for '87 to '91, and if so, does it have a diagram or instructions on how to remove those assemblies?
For now, pictures!


I bought this 2 years ago from a used car dealer in Illinois. What got me interested was that it had been driven from Nevada only a couple months before, which meant no rust. In the pictures in the ad, the rocker panels, fender wells, quarter panels, everything, was totally rust-free. However, being a truck from one of the hottest states resulted in the original paint being burned off on the hood and roof, even down to the bare metal in some spots! After my Dad drove it back, it was parked alongside our driveway, and left untouched for a year and a half. Last fall, we tried starting it so we could move it farther down the driveway, but it wouldn't even turn over. We checked the battery, and the warranty expired in 2003! Not having enough time to get a new battery, it was towed to its new location. Last Sunday, we finally got a new battery for it; hooked it up, cranked the ignition for 3 seconds, and it roared to life! You can't exactly kill a Ford!
Except for a little tugging to the left (probably from the front left tire being low) it ran and drove (as far as my driveway and an empty clearing would let me take it) beautifully!So far, I've cleaned the interior a bit, removed the fender trim so I can take care of a little bubbling paint, and sanded/primed some surface rust. My next challenge will be removing the headlight assemblies to clean and bleach the lenses, as well and polishing the reflectors. I've read some topics around here about removing them, but hear different ways to do it. Does someone have a PDF of the original owner's manual for '87 to '91, and if so, does it have a diagram or instructions on how to remove those assemblies?
For now, pictures!


#2
04-21-2016, 09:52 PM
#3
04-21-2016, 09:55 PM
I was 15 then, and didn't have my license. My truck wasn't licensed either, so we were both in a stick situation! For whatever reason, I sort of stalled after I got my temps a year ago. I'm 17 now (still have my temps), and got very serious about finally getting my license a couple months ago. Now I'm very serious about getting my truck on the road!

#5
04-21-2016, 10:25 PM

#6
04-22-2016, 08:26 AM
Post Fiend
Join Date: Mar 2011
Location: Backwoods of Snowflake AZ
Posts: 10,080
Likes: 0
Received 2 Likes
on
2 Posts
You will have to remove the grille first then, there are four nuts on the inside of the radiator support on each side. Remove the nuts and the bulbs and the entire assembly comes out. To remove the headlight itself from the assembly the adjuster screws have to be loosened all the way but it is extremely hard not to cross thread it removing it. The turn signal is bolted on with 2 bolts to the assembly. To remove the actual lense you would have to soften the glue then reglue it which I highly do not recommend unless your headlights are sealed well now.
Good luck with the restoration on the truck looks like it has a lot of potential.
Trav
Good luck with the restoration on the truck looks like it has a lot of potential.
Trav
#7
04-22-2016, 09:00 AM
You will have to remove the grille first then, there are four nuts on the inside of the radiator support on each side. Remove the nuts and the bulbs and the entire assembly comes out. To remove the headlight itself from the assembly the adjuster screws have to be loosened all the way but it is extremely hard not to cross thread it removing it. The turn signal is bolted on with 2 bolts to the assembly. To remove the actual lense you would have to soften the glue then reglue it which I highly do not recommend unless your headlights are sealed well now.
Good luck with the restoration on the truck looks like it has a lot of potential.
Trav
Good luck with the restoration on the truck looks like it has a lot of potential.
Trav
I heard one way, which involved removing the battery and coolant tank, accessing some screws from the back of the assembly. I would like to avoid messing with the adjustment screws if possible; if they're set perfectly now, that could jeopardize the allignment when I put it all back together. I think the glue is already shot; lots of moisture has gotten inside, so it may be a good idea to reseal it with silicone after I clean them out.
Trending Topics
#8
04-22-2016, 04:49 PM
Post Fiend
Join Date: Mar 2011
Location: Backwoods of Snowflake AZ
Posts: 10,080
Likes: 0
Received 2 Likes
on
2 Posts
Thanks for the response!
I heard one way, which involved removing the battery and coolant tank, accessing some screws from the back of the assembly. I would like to avoid messing with the adjustment screws if possible; if they're set perfectly now, that could jeopardize the allignment when I put it all back together. I think the glue is already shot; lots of moisture has gotten inside, so it may be a good idea to reseal it with silicone after I clean them out.
I heard one way, which involved removing the battery and coolant tank, accessing some screws from the back of the assembly. I would like to avoid messing with the adjustment screws if possible; if they're set perfectly now, that could jeopardize the allignment when I put it all back together. I think the glue is already shot; lots of moisture has gotten inside, so it may be a good idea to reseal it with silicone after I clean them out.
Trav
#9
12-11-2016, 08:16 PM
It's been awhile, but here's how far along I am since my last post...
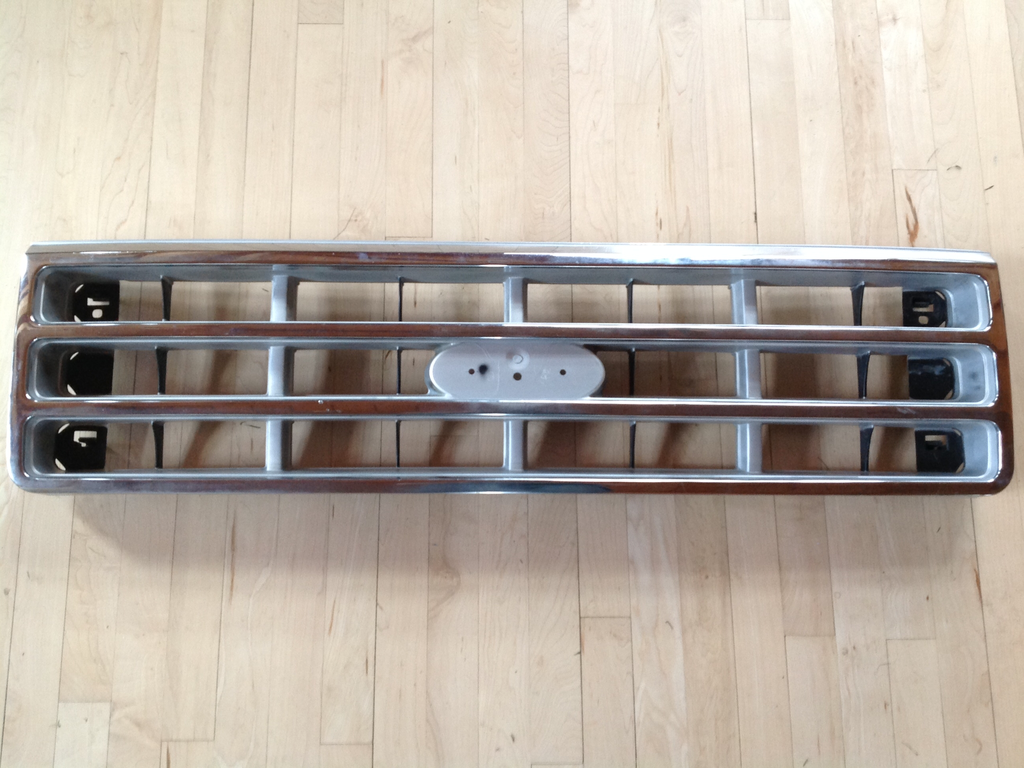
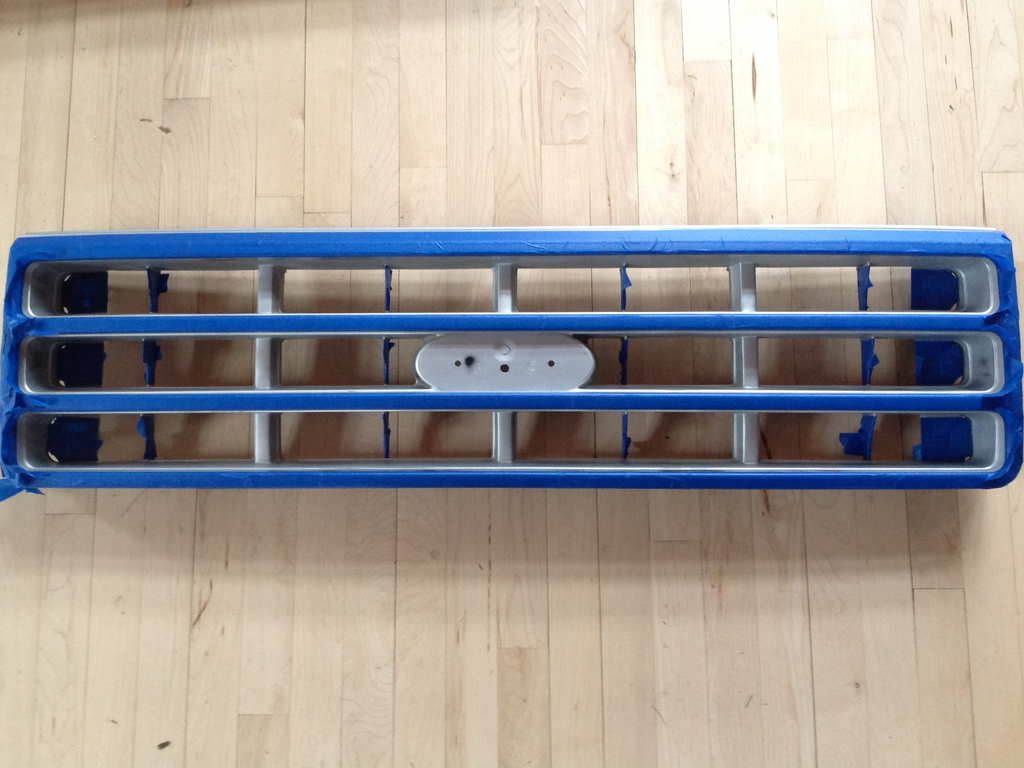
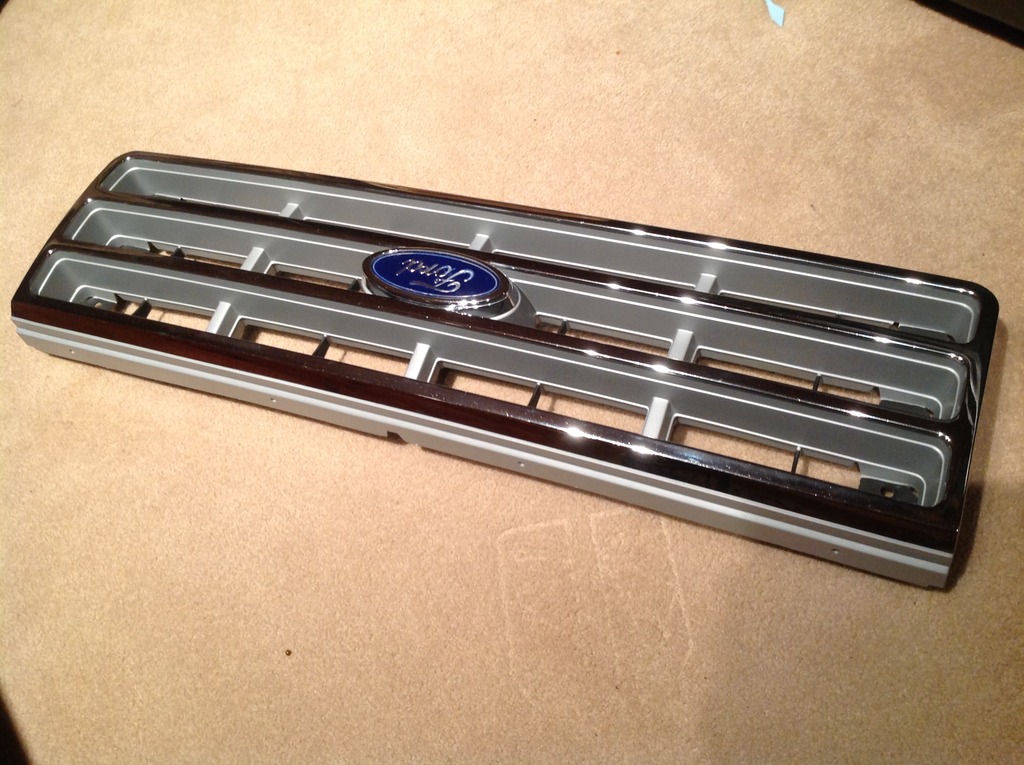
The grille was originally coated in some kind of metallic finish which wore off over time. Since I didn't know how to replicate that coating, I found a spray paint that matched it exactly. I sanded the rough edges down with 800 grit, masked the chromed parts off, painted it, and clearcoated it in matte clear.
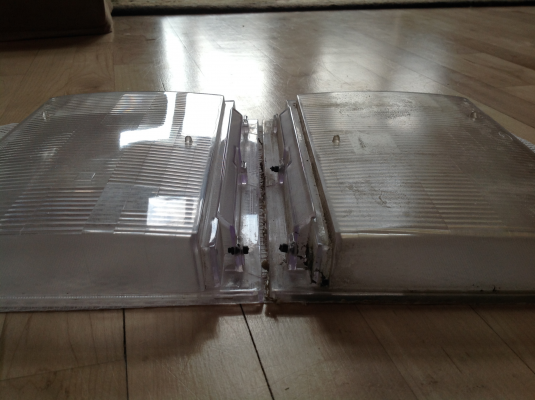
The headlights, upon further inspection, were apparently dulled and worn a long time ago. Someone's terrific idea was to clearcoat the lenses (of course, without prepping them first) with a non UV-resistant paint. The result was a finish that was yellowed, chipping off, and rough with pieces of sand and grit trapped under the paint. I used EasyOff oven cleaner to remove the paint, and 800 grit sandpaper to smooth the surface, followed by 2000 grit and polish. I used a dremel with a polishing attachment to polish the lettering on the bottom of the lenses.

I bought some replacement nuts to attach the headlights to the truck, and still need some more to attach the battery tray in place after being powdercoated.
A few months ago, I was using a wire brush on a drill to remove a rust bubble on the rear fenders. After a few seconds, the brush started spraying white dust. Oh great, Bondo!! Sadly, I discovered a 6-inch-long section of rusted-through sheetmetal on both rear fenders, above the fender wells. It's not much, not even structural, but it still irritates me! I'm not going to try patching it, so I'll let the body shop take care of it. I checked the rockers and cab corners, and I hit solid steel after paint, so everything else appears to be fine.

The grille was originally coated in some kind of metallic finish which wore off over time. Since I didn't know how to replicate that coating, I found a spray paint that matched it exactly. I sanded the rough edges down with 800 grit, masked the chromed parts off, painted it, and clearcoated it in matte clear.


The headlights, upon further inspection, were apparently dulled and worn a long time ago. Someone's terrific idea was to clearcoat the lenses (of course, without prepping them first) with a non UV-resistant paint. The result was a finish that was yellowed, chipping off, and rough with pieces of sand and grit trapped under the paint. I used EasyOff oven cleaner to remove the paint, and 800 grit sandpaper to smooth the surface, followed by 2000 grit and polish. I used a dremel with a polishing attachment to polish the lettering on the bottom of the lenses.


I bought some replacement nuts to attach the headlights to the truck, and still need some more to attach the battery tray in place after being powdercoated.
A few months ago, I was using a wire brush on a drill to remove a rust bubble on the rear fenders. After a few seconds, the brush started spraying white dust. Oh great, Bondo!! Sadly, I discovered a 6-inch-long section of rusted-through sheetmetal on both rear fenders, above the fender wells. It's not much, not even structural, but it still irritates me! I'm not going to try patching it, so I'll let the body shop take care of it. I checked the rockers and cab corners, and I hit solid steel after paint, so everything else appears to be fine.
#11
12-12-2016, 06:55 AM
Posting Guru
Join Date: Oct 2009
Location: Ohio
Posts: 1,431
Likes: 0
Received 0 Likes
on
0 Posts
Sorry I'm just now coming to this post. Once I saw that it came from Nevada, and saw the condition of the headlights, I was going to tell you that sanding the lenses down was about the only option to restore their shine. Mine came from Utah, and was formerly a construction company's truck, so the headlights were in pissy condition...hazed over real bad. None of the over the counter remedies did much, other than help it pass inspection. A week or so later, they'd be dulled up again. A good sanding with 1000 grit first, then toothpaste as a media and sanded with 2000 grit seemed to do the best for me. The nubs were a pain to work around, but it worked out in the end.
The Western desert states can kill paint in just a few years. Mine was baked and wind sanded so bad that the clear came up in sheets. All I've done so far is sand it down and spray a coat of primer in hopes of prolonging my time. I'll likely attack it better this coming Summer.
Sharp truck, BTW. With some TLC, it should shine up like a new penny, giving you many years of good service. Just don't drive it or treat it like a car...it's far from capable of the moves a car can get away with. Take care of it, and it will last another 28 years.
#12
12-12-2016, 07:52 AM
Thanks guys! I plan on a mild restoration, completely factory. The truck will be repainted, undercoated, and everything will be nice and shiny! 
I used Meguiar's Compound to polish the lenses, what I've used for vintage phone restoration for the past 3 years.
The paint on the passenger's side of the truck is starting to peel off down to the primer, and the paint is baked off on the hood and roof. Yup, it was definitely a desert truck!
I know that the rust on the rear fenders was probably caused by water trapped between the body and fender trim. What I don't understand is: how did the fenders rust completely through from salt-free water? But of all things to rust out on a 30 year old truck, I would much rather have the fenders go than rockers, cab corners, body mounts, doors, floors, frame, etc. Everything except the rear fenders is completely rust free!
When this is restored, I will be one of those car owners that obsesses over every flaw, and thoroughly washes everything once a week! The way I will be taking care of it, my truck will definitely outlive me!
Honestly, I instinctively understand how a truck handles more than a car, I've driven nothing but trucks so far.
#13
03-02-2017, 07:44 AM

#15
03-04-2017, 05:29 PM

Thread
Thread Starter
Forum
Replies
Last Post
S-10 warrior
1987 - 1996 F150 & Larger F-Series Trucks
3
07-18-2016 05:37 AM
Notmeofficer
1973 - 1979 F-100 & Larger F-Series Trucks
41
06-06-2016 10:53 PM