When you click on links to various merchants on this site and make a purchase, this can result in this site earning a commission. Affiliate programs and affiliations include, but are not limited to, the eBay Partner Network.
I do a lot of kiteboarding and other outdoor stuff and with a hard tonneau this is the perfect vehicle....except having to dive for stuff at the back of the bed.
I spent a ton of time looking at options for a slide. Commercial are way expensive and overkill so I decided to make my own. I also wanted it quickly removable for heavy or dirty loads.
Giant drawer slides are very expensive and I found some ideas on line for using skateboard bearings and square tube as slides.
Worked out really well. Coated it all in Behr Overdeck textured...which is like bed liner but 1/3 the price.
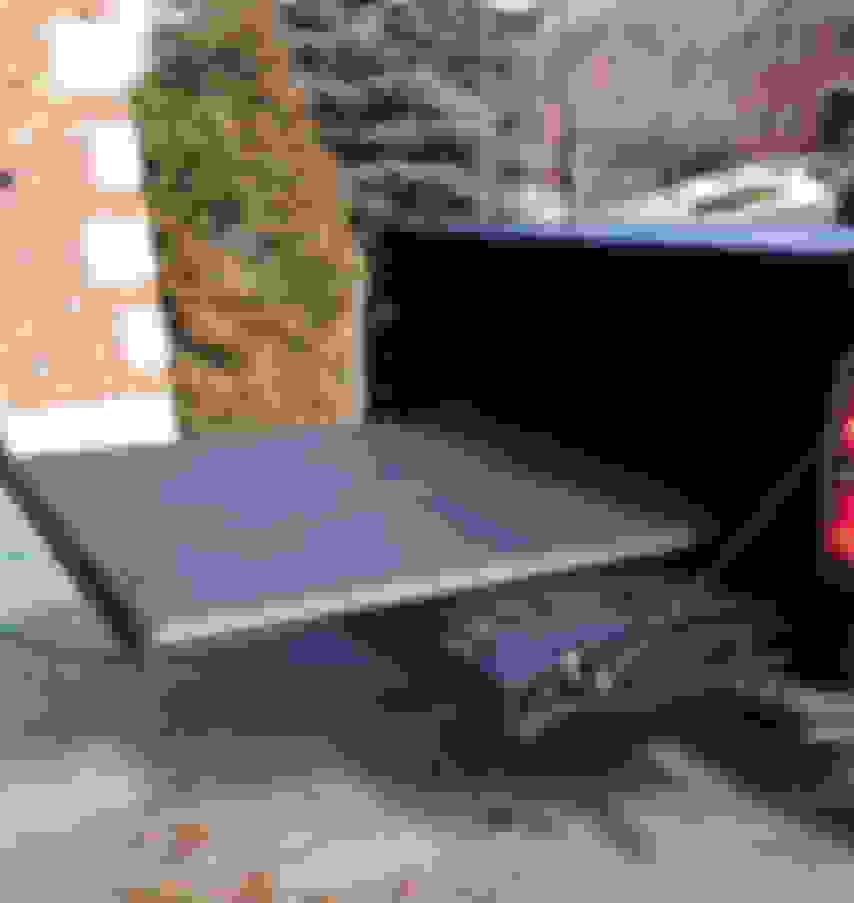
Note the extended picture it is resting a bit on the tailgate because I have not added ballast at the front of the base. Used a 50 lb 1/2" steel plate.
Base ply notched for full length and to ensure captive between closed tailgate and front wall.
Set up to drill accurately spaced holes
Testing spacing
Close up of bearing
Bearings
Rails and runners mocked up
Testing fully assembled
Extended
Painted and with retention pin to stop from over extending. Slider is locked in place on its own when tailgate is closed.
Very nice! I really like your idea for the rollers/track. I did one myself, went a different route with it. Its not installed right now, built it for my 2005, just traded it in on a 2014. Waiting to get my cap installed before putting it in this one. Will post some photos.
I read several different bed slides and decided to design my own. The bottom 1/2 osb, side rails 2x8. I used 5/8 roller bearings from harbor freight 15 of them. On the drawer I used 3/4 ply and build the sides with 1x4. I decided to use a 2x2 angle iron 1/8" for the bearings to roll on and a 2x2 1/8 flat for the center rollers
Anyhow the outer box is attached to a full sheet of ply, so the inside is 45" when you subtract the space for the 2x (3"), so I built the drawer 94 1/2" x 44 1/4 to leave space for the angle metal. I glued and screwed everything.
Right now I am letting the drawer tip on the tail gate and it is working great, but I could put regular bearings above the drawer to hold it. If I do that, I will probably put some 3/4" angle metal on top the drawer so that it is metal to metal instead of metal to wood.
Let me know if this isn't clear or you want some pics...I painted it with black semi-gloss.
Last edited by RRRSkinner; Apr 1, 2015 at 11:24 PM.
Reason: clarity
I read several different bed slides and decided to design my own. The bottom 1/2 osb, side rails 2x8. I used 5/8 roller bearings from harbor freight 15 of them. On the drawer I used 3/4 ply and build the sides with 1x4. I decided to use a 2x2 angle iron 1/8" for the bearings to roll on and a 2x2 1/8 flat for the center rollers
Anyhow the outer box is attached to a full sheet of ply, so the inside is 45" when you subtract the space for the 2x (3"), so I built the drawer 94 1/2" x 44 1/4 to leave space for the angle metal. I glued and screwed everything.
Right now I am letting the drawer tip on the tail gate and it is working great, but I could put regular bearings above the drawer to hold it. If I do that, I will probably put some 3/4" angle metal on top the drawer so that it is metal to metal instead of metal to wood.
Let me know if this isn't clear or you want some pics...I painted it with black semi-gloss.
This Hennessey Takes the Expedition Tremor's Off-Roading Capability to the Next Level
Slideshow: The VelociRaptor Expedition gains a lift, upgraded suspension, Brembo brakes, and trail-ready equipment while retaining the stock 440-horsepower EcoBoost V6.
Rezvani's Latest Post-Apocalyptic Monster Is a Ford F-150 Raptor Underneath
Slideshow: Called the Fortress, the 850-horsepower pickup combines Raptor underpinnings with military-inspired features, survival equipment, and a starting price of $285,000.