


"How-To" Install bedsides
Thread Starter
|
Fleet Owner


Joined: May 2009
Posts: 21,437
Likes: 76
From: Gilbert, PA
"How-To" Install bedsides
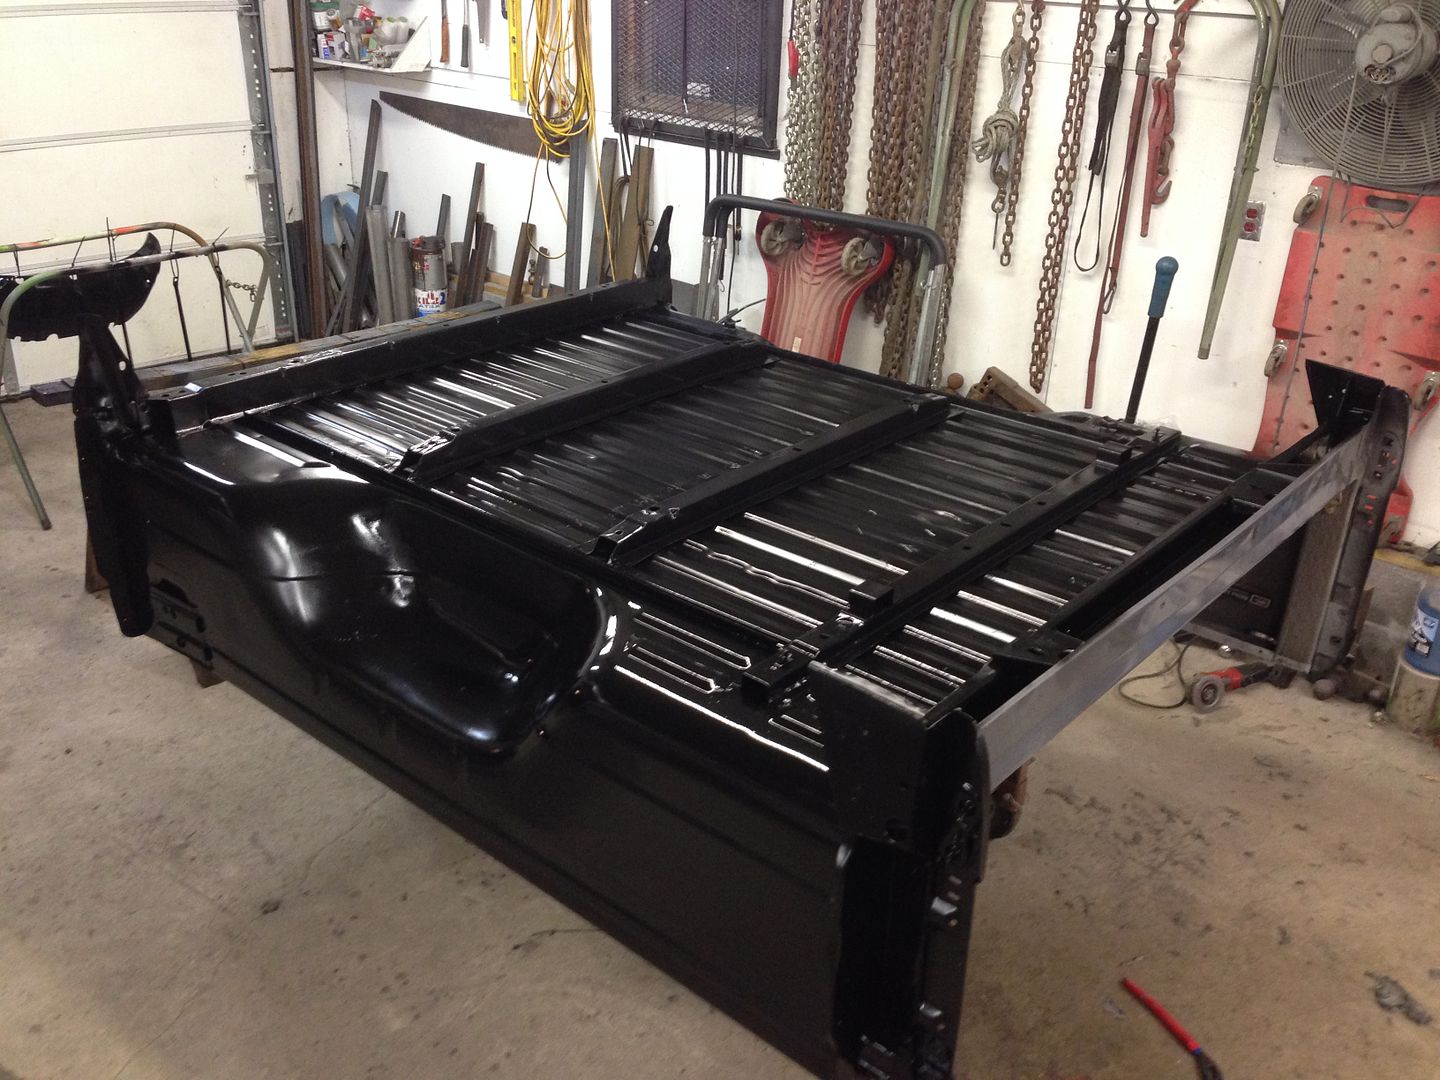
I been asked many times what is involved with replacing bed sides. So I figured I would do a step by step procedure an show what all is involved. I live in the North East and my trucks get driven in all weather conditions so I go the EXTRA MILE to make sure the repair lasts a LONG TIME. I may be going overboard for the southern guys, but If you live anywhere near salt and plan on keeping the truck for any amount of time, I HIGHLY recommend doing doing exactly this.
1st.
Take the bed off the truck(unhook wiring, fuel fillers and 6 bolts holding the bed down. Remove exhaust shields from the underside of the bed and set on a stable level set of horses.
2nd.
Find the spot welds that hold the skins on to the bed. There are A LOT approx 80 spot welds on a short bed. You will need a 1/8" bit and 3/8" spot weld bit.(inner lip{30}, wheel well{15}, front edge of bed{15}, rear tailgate opening{15}), small lip under tail light{5})
Spot weld bit

3rd.
Drill into the center of each spot weld with the 1/8" bit, but do NOT drill all the way thru. Just make a dimple for the centering bit of the spot bit to stay in place.

4th.
After putting the dimple in each weld, use the Spot drill to "cut out" each spot weld. Again, you do NOT want to go all the way thru. Just thru the outer skin, NOT the inner structure.
5th.
You need a body chisel to cut thru the remainder of the weld. You just get between the panel and hammer it thru the weld. If you have to hammer really hard, you did not drill out the spot weld correctly. If you did, the chisel will cut right thru. Once all the welds are cut, you can remove the side. Same procedure for each side.
(NOTE, mine has the huge well well opening because I converted my try to a dually)

6th.
Now this is my perogative but again, I drive in the elements and I want it to last I sandblast the ENTIRE underside of the bed, The inner wheel well arches and associated hardware(note drain holes added to the inner arches to allow for drainage AND accessibility to clean. I remove the arch completely to do a better job of cleaning and painting)


Thread Starter
|
Fleet Owner
Joined: May 2009
Posts: 21,437
Likes: 76
From: Gilbert, PA
7th.
I then spray all the freshly sandblasted metal with POR15 as a primer/sealer(note POR ONLY sticks to rusted or sandblasted metal. It does NOT work on CLEAN new metal or painted surfaces). Then I topcoat while the POR15 is still tacky with Black Tractor paint or chassis paint. Both are very tough and have the correct sheen for a chassis(NOTE, I use NO HARDENER to keep it soft and resist chipping).


8th.
I prep the backsides of the new bed skins. I do NOT sandblast the skins. They are far too thin to take the abuse from the sandblaster and I risk warping them. I simply sand them with 220grit paper to thoroughly rough the E-coat. I then spray Epoxy Primer as a sealer and protector. The again while the Primer is still tacky, I topcoat with the tractor Black or chassis black.(no pics yet, I am doing this as I type, pics come later. I will finish the write up as I proceed)
New sides

Thread Starter
|
Fleet Owner
Joined: May 2009
Posts: 21,437
Likes: 76
From: Gilbert, PA
It was a late night the other night so i did not make much progress.
But tonight I got some more done
I had to remove the partial front bulkhead on the aftermarket sides(I want to retain my original ones) and I also removed the "tailgate mounting support"(again i wanted to retain my original pieces)
Partial bulkhead

tailgate support

then sanded the E-coat thoroughly

2 coats of Epoxy prime


2 Coats of "chassis black"


Hopefully this weekend I can get at least one of the sides bonded on

Elder User
Joined: Feb 2013
Posts: 856
Likes: 3
From: Livonia, MI
Excellent. I'll be paying attention to this thread as I'll be doing the same thing. I do have a question though: Why did you use epoxy and not Por15 on the new skins as the sealer/protector? I know Por15 doesn't stick to new metal very well, but you sanded the e-coat - is that not a rough-enough surface for the Por15 to stick to?
Postmaster
Joined: Aug 2005
Posts: 4,728
Likes: 8
From: Cleveland, TN
Excellent. I'll be paying attention to this thread as I'll be doing the same thing. I do have a question though: Why did you use epoxy and not Por15 on the new skins as the sealer/protector? I know Por15 doesn't stick to new metal very well, but you sanded the e-coat - is that not a rough-enough surface for the Por15 to stick to?
Thread Starter
|
Fleet Owner
Joined: May 2009
Posts: 21,437
Likes: 76
From: Gilbert, PA
Excellent. I'll be paying attention to this thread as I'll be doing the same thing. I do have a question though: Why did you use epoxy and not Por15 on the new skins as the sealer/protector? I know Por15 doesn't stick to new metal very well, but you sanded the e-coat - is that not a rough-enough surface for the Por15 to stick to?

Mountain Pass
Joined: Dec 2006
Posts: 249
Likes: 0
From: Osburn, ID
Awesome post! I thought I was thorough. You do excellent work. I've seen so many poor box side jobs which fail due to rust but the way you're doing it I can't see it failing. Thanks for sharing.
Trending Topics
Elder User
Joined: Feb 2013
Posts: 856
Likes: 3
From: Livonia, MI
OK, I guess I should rephrase my question then: If I have a piece of metal that is painted, and I "rough it up" (ie, so that the paint is sanded but not removed) with sand paper, will POR15 stick to it? I get that it won't stick to clean metal, or a clean, painted surface. Brad, you said that you sanded the e-coat - I would think that a sanded surface would be rough enough for POR15 to stick to.
FTE Stories
Ford Trucks for Ford Truck Enthusiasts

Top 6 Best Deals Available on New Fords & Lincolns Right Now
Brett Foote
This Hennessey Takes the Expedition Tremor's Off-Roading Capability to the Next Level
Verdad Gallardo
Top 10 Fords at 2026 Carlisle Ford Nationals
Joe Kucinski
3 Best / 3 Worst Parts of Modern Ford Ownership
Brett Foote
10 Amazing Upgrades That Solve Common Ford Truck Owner Headaches
Pouria Savadkouei
Every 2026 Ford Engine Explained
Brett Foote
10 Ugly Ford Trucks That We Still Kinda Love
Joe Kucinski
10 Things Every Truck Owner NEEDS (2026 Edition)
Michael S. Palmer
Rezvani's Latest Post-Apocalyptic Monster Is a Ford F-150 Raptor Underneath
Verdad GallardoThread Starter
|
Fleet Owner
Joined: May 2009
Posts: 21,437
Likes: 76
From: Gilbert, PA
OK, I guess I should rephrase my question then: If I have a piece of metal that is painted, and I "rough it up" (ie, so that the paint is sanded but not removed) with sand paper, will POR15 stick to it? I get that it won't stick to clean metal, or a clean, painted surface. Brad, you said that you sanded the e-coat - I would think that a sanded surface would be rough enough for POR15 to stick to.
Laughing Gas
Joined: Dec 2007
Posts: 959
Likes: 8
From: Imperial, MO
OK, I guess I should rephrase my question then: If I have a piece of metal that is painted, and I "rough it up" (ie, so that the paint is sanded but not removed) with sand paper, will POR15 stick to it? I get that it won't stick to clean metal, or a clean, painted surface. Brad, you said that you sanded the e-coat - I would think that a sanded surface would be rough enough for POR15 to stick to.
Senior User
Joined: Oct 2013
Posts: 259
Likes: 0
From: Southwestern, Ontario
Wow! I can't wait to see the final product! Awesome work as always Brad.
How many hours does it take you to do a job like this? What sort of price range would the paint, cleaners, etc run? Just trying to gauge when/if this might be a viable job for myself to take on.
How many hours does it take you to do a job like this? What sort of price range would the paint, cleaners, etc run? Just trying to gauge when/if this might be a viable job for myself to take on.
Thread Starter
|
Fleet Owner
Joined: May 2009
Posts: 21,437
Likes: 76
From: Gilbert, PA
1 hour to remove bed
2.5 hours to remove both sides
2 hour to sandblast underside of bed
2 hours to POR and paint bottom side of bed
2 hour to prep bed sides
1 hour to prime & paint bed sides
___________
10.5 so far
Material
$406 drivers side skin
$438 passenger side skin
$38 1 qt POR15
$106 for 3 quarts of epoxy prime and hardener
$47 for gallon of chassis black
$68 for 2 quarts of color
$130 for gallon of clear w hardener
$36 for 300lbs of sand
_____________________________
$1269 so far

Senior User
Joined: Oct 2013
Posts: 259
Likes: 0
From: Southwestern, Ontario
If I didn't have to sandblast the bed liner off the bottom side of the bed.....
1 hour to remove bed
2.5 hours to remove both sides
2 hour to sandblast underside of bed
2 hours to POR and paint bottom side of bed
2 hour to prep bed sides
1 hour to prime & paint bed sides
___________
10.5 so far
Material
$406 drivers side skin
$438 passenger side skin
$38 1 qt POR15
$106 for 3 quarts of epoxy prime and hardener
$47 for gallon of chassis black
$68 for 2 quarts of color
$130 for gallon of clear w hardener
$36 for 300lbs of sand
_____________________________
$1269 so far