

Project Frankenstein-'75 Ford Crew Cummins


Thread Starter
|
Junior User
Joined: Oct 2010
Posts: 53
Likes: 0
From: Murrieta
Project Frankenstein-'75 Ford Crew Cummins
Hi guys I've been posting in a few other sections of the forums here but after looking at how these projects tend to go it's easier to have 1 build thread i figure.
My project started in late 2010 with a cancer ridden cab and chassis out of Pennsylvania.
So Cal is rare for crew cabs and I have always loved the crew cabs so I had this one shipped. I picked it up for a few hundred bucks.
My first dent was my grandfathers '73 highboy which he called Henry-as in Henry Ford.
A couple years ago my wife commented on how "Frankenstien" this truck was turning into and the name kind of stuck. So say hello to Frank.
Here's what I started with.
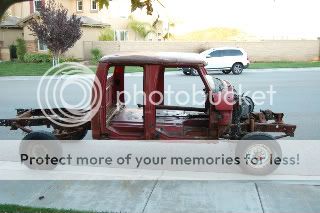
Rotten Roof (More on this in bit)
35+ years of salty winter roads did its job on this old boy
The point here is we stared out real rough. I told my wife i wanted a project. I hadn't rebuilt a car since high school. That was 20 years ago. Boy did I get what I asked for.
My project started in late 2010 with a cancer ridden cab and chassis out of Pennsylvania.
So Cal is rare for crew cabs and I have always loved the crew cabs so I had this one shipped. I picked it up for a few hundred bucks.
My first dent was my grandfathers '73 highboy which he called Henry-as in Henry Ford.
A couple years ago my wife commented on how "Frankenstien" this truck was turning into and the name kind of stuck. So say hello to Frank.
Here's what I started with.
Rotten Roof (More on this in bit)
35+ years of salty winter roads did its job on this old boy
The point here is we stared out real rough. I told my wife i wanted a project. I hadn't rebuilt a car since high school. That was 20 years ago. Boy did I get what I asked for.
Thread Starter
|
Junior User
Joined: Oct 2010
Posts: 53
Likes: 0
From: Murrieta
So now my juices were flowin'.
I knew from the beginning this would get a Cummins.
I found one about an hour away that had 240k.
My advice to those of you considering a build like this. If possible buy the whole Dodge Cummins donor truck and not just the motor.
I didn't know much about these engines at the time and later found out that alot of parts were stripped off this thing. I could have bought a whole running truck for what i have in miscellaneous parts. Including the NV4500 that I had to purchase separately.
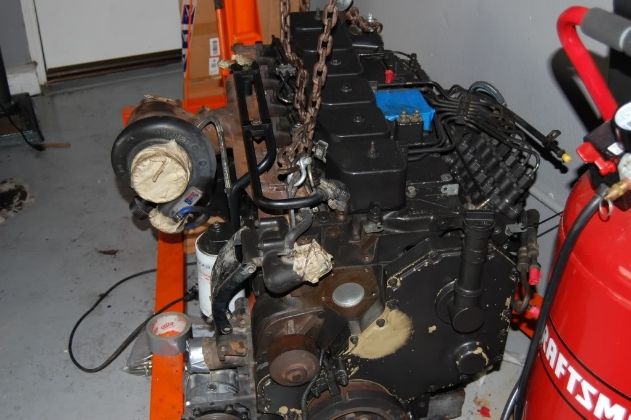
Here is how she showed up. Notice the entire FEAD is gone.
I knew from the beginning this would get a Cummins.
I found one about an hour away that had 240k.
My advice to those of you considering a build like this. If possible buy the whole Dodge Cummins donor truck and not just the motor.
I didn't know much about these engines at the time and later found out that alot of parts were stripped off this thing. I could have bought a whole running truck for what i have in miscellaneous parts. Including the NV4500 that I had to purchase separately.
Here is how she showed up. Notice the entire FEAD is gone.
Thread Starter
|
Junior User
Joined: Oct 2010
Posts: 53
Likes: 0
From: Murrieta
After stripping and cataloging what parts were on the truck I set about getting this Cummins familiar with it's new home.
Note: This is nothing that hasn't already been posted about elsewhere by other fantastic fabricators. This is my thanks to those of you who laid the ground work me and others.
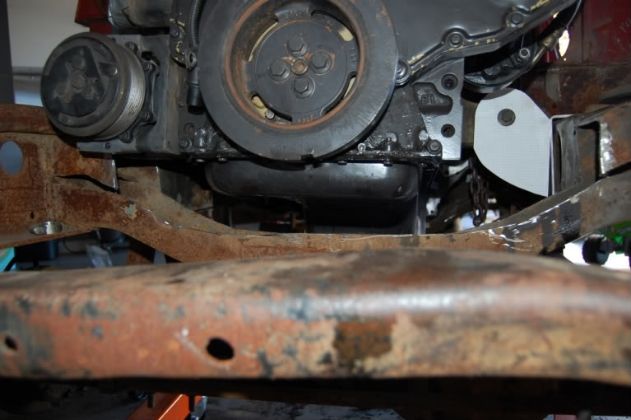
Very common practice of cutting front crossmember and clearancing for A/C compressor. I later re-welded the top back on to keep it as factory as possible.
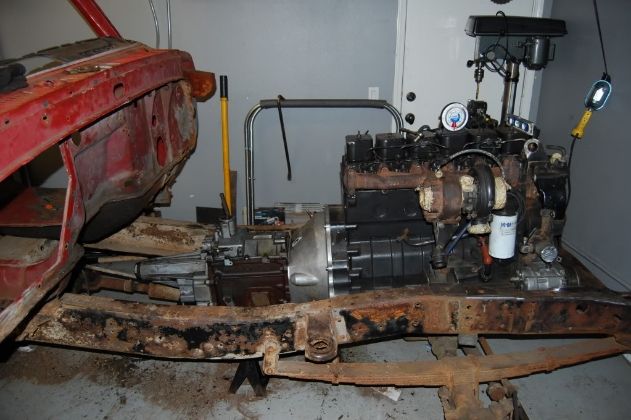
After taking the motor and tranny in and out what felt like a 100 times here it sits.
Those with a keen eye will notice the 2wd Cummins tailhousing. I have a post coming up on the NV4500 rebuild. But as it is now I installed a Chevy mainshaft so I could accomodate a fixed output yoke.
Im running divorced NP205.
Here we are all nestled snug up against the cab.
Note: This is nothing that hasn't already been posted about elsewhere by other fantastic fabricators. This is my thanks to those of you who laid the ground work me and others.
Very common practice of cutting front crossmember and clearancing for A/C compressor. I later re-welded the top back on to keep it as factory as possible.
After taking the motor and tranny in and out what felt like a 100 times here it sits.
Those with a keen eye will notice the 2wd Cummins tailhousing. I have a post coming up on the NV4500 rebuild. But as it is now I installed a Chevy mainshaft so I could accomodate a fixed output yoke.
Im running divorced NP205.
Here we are all nestled snug up against the cab.
Postmaster
Joined: Nov 2012
Posts: 2,806
Likes: 8
From: Langley, BC
If I were you, I'd completely restore the chassis before building on it. You have everything apart. If there was ever a time to do it, it's now. Get it sandblasted and spray some Rustoleum on there.
Thread Starter
|
Junior User
Joined: Oct 2010
Posts: 53
Likes: 0
From: Murrieta
Ask and you shall receive.
I have a few more posts to get this build up to speed but since you asked...
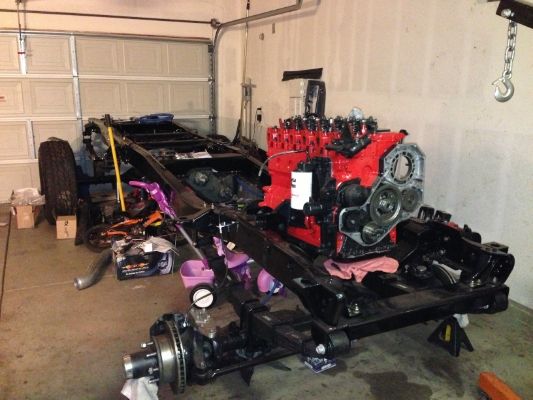
It has been sandblasted and painted with single stage urethane.
More on this gloss black beauty in a few posts.
This build is almost done and I'm working on getting all the pics here.
Here is the teaser pic of the finished product.
I have a few more posts to get this build up to speed but since you asked...
It has been sandblasted and painted with single stage urethane.
More on this gloss black beauty in a few posts.
This build is almost done and I'm working on getting all the pics here.
Here is the teaser pic of the finished product.
Thread Starter
|
Junior User
Joined: Oct 2010
Posts: 53
Likes: 0
From: Murrieta
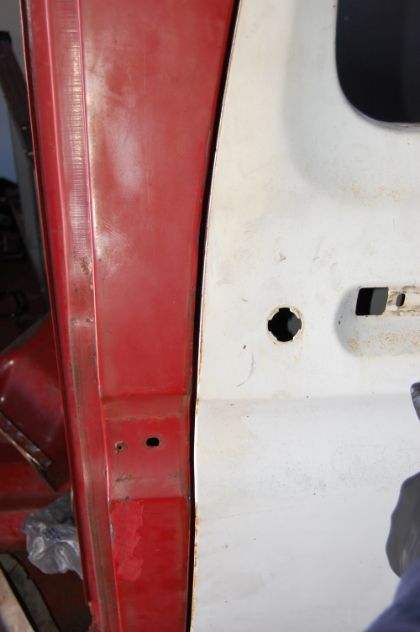
With that done i set about on 5 months of painstaking cab restoration.
Let me start by saying this. My need to keep numbers matching cab and chassis should have never gotten in the way of the $750 rust-free cab I found in Oregon that I let go.
Had I known about Marti and their reproduction VIN tags I would be driving this thing right now.
Fred Flintstone eat your heart out.
The more I cut into this thing the more it became apparent that I would need a donor cab. Some of the rusted and rotted parts aren't made aftermarket.
Plus aftermarket sheetmetal is considerably thinner than OEM sheetmetal.
Well that was fun now what?
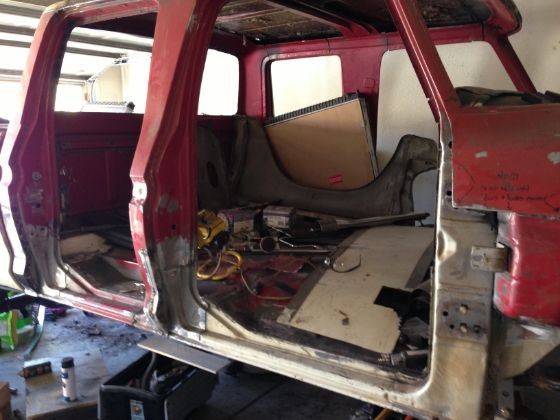
I ended up using the pillar posts out of the donor cab and replacing/fabricating new sheetmetal panels. Awesome lesson in measure twice cut once.
Let me start by saying this. My need to keep numbers matching cab and chassis should have never gotten in the way of the $750 rust-free cab I found in Oregon that I let go.
Had I known about Marti and their reproduction VIN tags I would be driving this thing right now.
Fred Flintstone eat your heart out.
The more I cut into this thing the more it became apparent that I would need a donor cab. Some of the rusted and rotted parts aren't made aftermarket.
Plus aftermarket sheetmetal is considerably thinner than OEM sheetmetal.
Well that was fun now what?
I ended up using the pillar posts out of the donor cab and replacing/fabricating new sheetmetal panels. Awesome lesson in measure twice cut once.
Trending Topics
Thread Starter
|
Junior User
Joined: Oct 2010
Posts: 53
Likes: 0
From: Murrieta
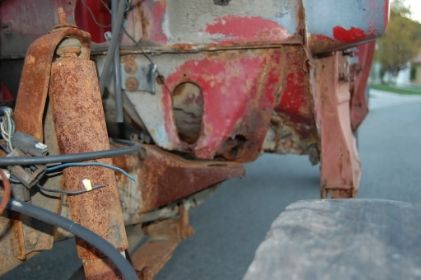
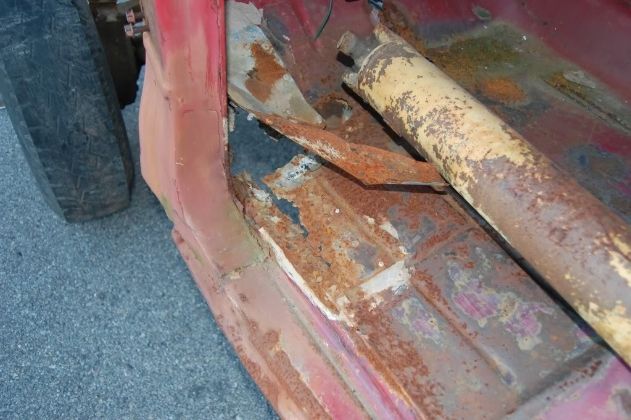
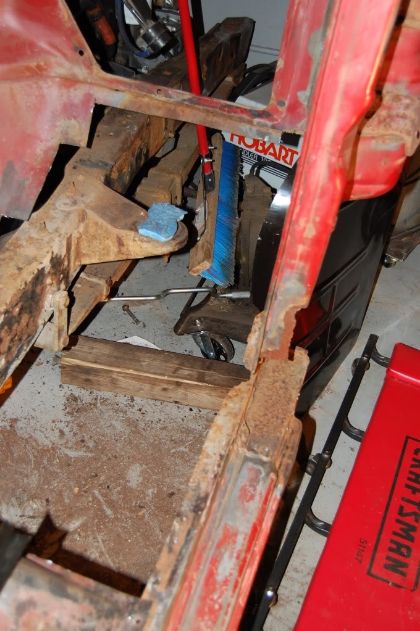
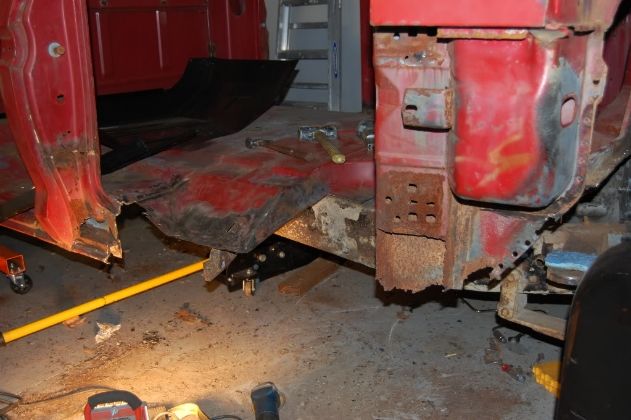
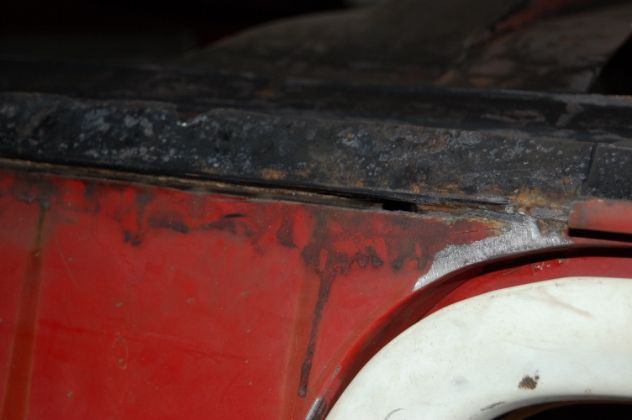
After rebuilding every singe rocker panel and making sure the doors would fit, it was time to move to the undercarriage.
Undercoating has its benefits but when its applied incorrectly and bubbles rupture allowing moisture and salt to invade, its a disaster.
8 weeks of dissolving, scraping and grinding off this junk you get this.
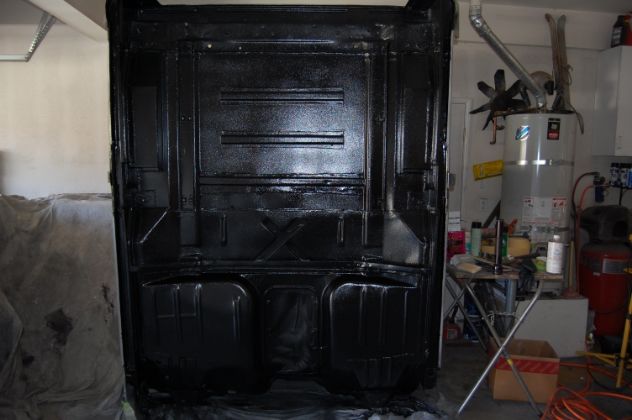
After epoxy priming and going through a case of seam sealer. I used the 3M no cleanup body schutz that was paintable. It laid on great and covered up some areas of bodywork I stopped caring about.
Top coat is 20% gloss urethane enamel.
Undercoating has its benefits but when its applied incorrectly and bubbles rupture allowing moisture and salt to invade, its a disaster.
8 weeks of dissolving, scraping and grinding off this junk you get this.
After epoxy priming and going through a case of seam sealer. I used the 3M no cleanup body schutz that was paintable. It laid on great and covered up some areas of bodywork I stopped caring about.
Top coat is 20% gloss urethane enamel.
Thread Starter
|
Junior User
Joined: Oct 2010
Posts: 53
Likes: 0
From: Murrieta
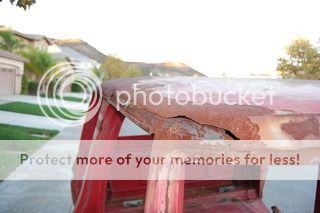
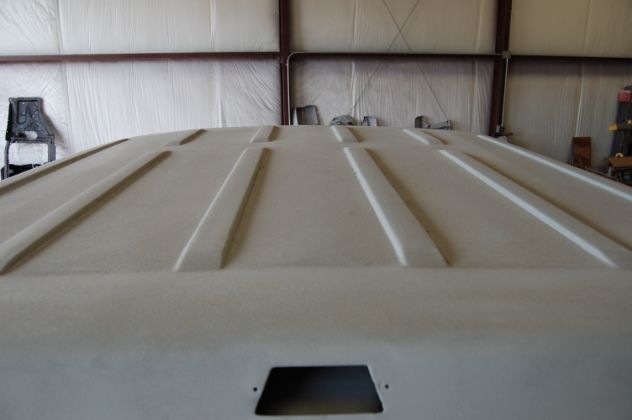
Remember the roof from the first post?
After sourcing a corrugated roof from an Econoline van I cut the roof out.
Yikes!
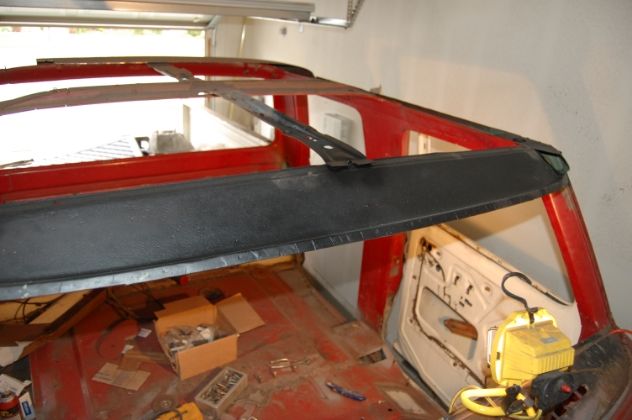
There's some great posts on the 3-piece assembly of the dentside roof. Search for them if you want to see more
I stripped mine completely down to the frame and worked my way up. I have removed the rusted out drip rail and roof. I sprayed on some rust inhibitor on here.
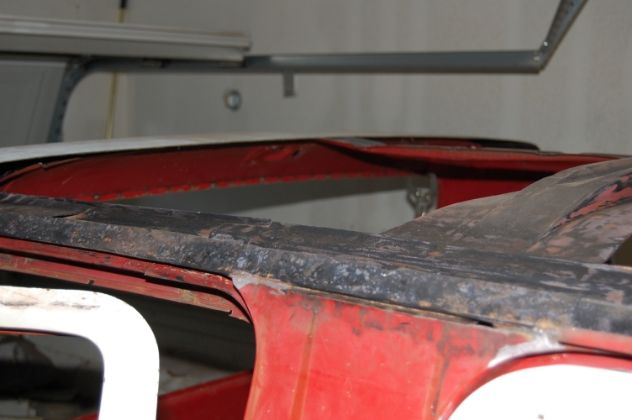
Donor cab front section of roof ready for spot welds.

Took about 40 hours to get this thing straight but man does it look sweet.
Sturdy too. No more tin can sound.
After sourcing a corrugated roof from an Econoline van I cut the roof out.
Yikes!
There's some great posts on the 3-piece assembly of the dentside roof. Search for them if you want to see more
I stripped mine completely down to the frame and worked my way up. I have removed the rusted out drip rail and roof. I sprayed on some rust inhibitor on here.
Donor cab front section of roof ready for spot welds.
Took about 40 hours to get this thing straight but man does it look sweet.
Sturdy too. No more tin can sound.

Thread Starter
|
Junior User
Joined: Oct 2010
Posts: 53
Likes: 0
From: Murrieta
Those of you who have done bodywork know it's a pain and tedious.
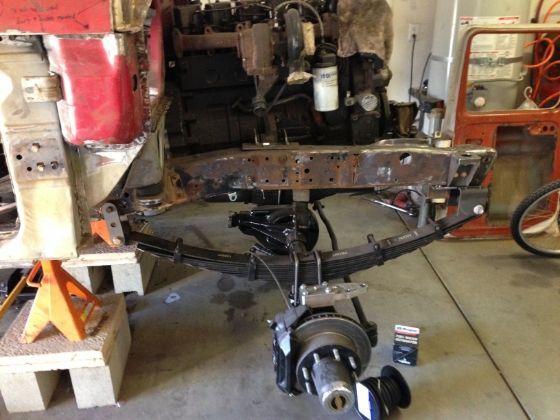
I felt at this point i needed to get the drivetrain set up so I could get the frame out to blast.
The original front D60 was closed knuckle type.
A two month search ended on ebay when i found, ironically enough, a '79 kingpin Dana 60 out of Pennsylvania. I must have some connection to this place haha.
It was rusty and the brakes were shot so it got a complete tear down. The ring gear was in great shape. I replaced 1 axle shaft due to some rust and a leaky seal. Napa supplied new brakes, and I put new Warn locking hubs as the original plastic hubs were cracked and faded.
I converted it to crossover steering also.
I needed 4" of lift to run the 37" tires I wanted so after some more forum searching I decided on Super Duty Springs.
A call to Ruffstuff Specialties got me a spring hanger kit and it was time to get the welder ready to go.
Here's what the front end looks like all mocked up and bolted in.
Thread Starter
|
Junior User
Joined: Oct 2010
Posts: 53
Likes: 0
From: Murrieta
Now for one of the more expensive mistakes.
What I am about to write here I admit was my ignorance and lack of knowledge. I would like to say that had the guy been honest I could have saved a ton of money.
A local parts search revealed a "D80" for what seemed like a good price. *1st clue.
I knew enough to take a wire brush and make sure the stamping said 80 on it.
Of course it didn't. So after negotiating and pointing out the mis-post we negotiated a deal for the axle. I would have preferred a D80 but I figured I would just run this axle for now until I need a beefier one later.
A forum search revealed Automatic Dodge Cummins Came with D70 and Manual Cummins had D80's.
Here's where i made my mistake and should have walked away. I noticed the pinion was moving excessively when I spun the axle, about 1/2" in and out. I still bought the thing and headed home. Those of you who know axles would have realized the pinion bearing had failed and was flopping around.
I had no idea what i was doing as I had never rebuilt any axles before. After getting it home and tearing it down the ring-gear was chipped.
SOB! Now I'm mad, mostly at myself. The junkyard guy who sold it to me knew it was bad. OH yea he turned his head when I spun the axle. *2nd clue
I jump in my car go back up there and politely tell him what happened. I didn't want a beating so I kept my cool.
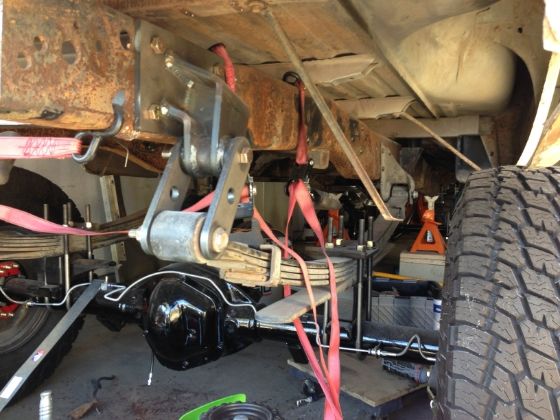
He knocked off a few hundred more but..threw in a set of 63" Chevy springs with front frame perches. So I'm happy now.
Here's what the rear end looks like now.
Ruffstuff shackle flip kit.
Chevy 63" springs
Rebuilt Dana 70 limited slip
TSM Disc Brake conversion
What I am about to write here I admit was my ignorance and lack of knowledge. I would like to say that had the guy been honest I could have saved a ton of money.
A local parts search revealed a "D80" for what seemed like a good price. *1st clue.
I knew enough to take a wire brush and make sure the stamping said 80 on it.
Of course it didn't. So after negotiating and pointing out the mis-post we negotiated a deal for the axle. I would have preferred a D80 but I figured I would just run this axle for now until I need a beefier one later.
A forum search revealed Automatic Dodge Cummins Came with D70 and Manual Cummins had D80's.
Here's where i made my mistake and should have walked away. I noticed the pinion was moving excessively when I spun the axle, about 1/2" in and out. I still bought the thing and headed home. Those of you who know axles would have realized the pinion bearing had failed and was flopping around.
I had no idea what i was doing as I had never rebuilt any axles before. After getting it home and tearing it down the ring-gear was chipped.
SOB! Now I'm mad, mostly at myself. The junkyard guy who sold it to me knew it was bad. OH yea he turned his head when I spun the axle. *2nd clue
I jump in my car go back up there and politely tell him what happened. I didn't want a beating so I kept my cool.
He knocked off a few hundred more but..threw in a set of 63" Chevy springs with front frame perches. So I'm happy now.
Here's what the rear end looks like now.
Ruffstuff shackle flip kit.
Chevy 63" springs
Rebuilt Dana 70 limited slip
TSM Disc Brake conversion


Posting Guru
Joined: Feb 2009
Posts: 1,088
Likes: 4
That's one heck of a project. Nice work. Looks like it's coming along nicely.
Just so you know, 'number matching' is a Chevy thing (except when it comes to early Mustangs). There is no VIN on the cab of a Dentside, it's on the frame rail. The tag on the door is the warranty plate. It does have the VIN on it, but if you replace the driver's door, it can be put on the new door. Most of the time this isn't done, though, so you end up with a door with a VIN different from what's on the frame.
If you want/need a new warranty plate or safety certificate for the door pillar, these can be obtained from Marti Auto.
