




Replacing Front Axle U-Joints

Thread Starter
|
New User
Joined: Feb 2013
Posts: 24
Likes: 0
Replacing Front Axle U-Joints
I have a 2005 F250 6.0. I recently picked my truck up from getting inspected and they informed that my front right Axle U-joint has a ton of play and needs to be replaced. I am a do it yourself kind of guy which most of us are. If any one could help me out with some step-by-step info and info on special tools (if needed) on how to tackle this beast it would be GREATLY appreciated. My plates expire friday so I will need to do this over the weekend. Also, while it is apart, any recommendations on seals I might need to replace in the process? Please share, any information helps guys! Thanks.

Laughing Gas


Joined: Mar 2012
Posts: 1,052
Likes: 28
From: Portal, AZ

Basically you want to look at Knuckle seal replacement the axle comes out from there
https://www.ford-trucks.com/forums/1...info-here.html
check out all the links in the thread I provided in there for more detailed photos and such
This thread at post 14 will direct you to part numbers for the axle itself
good luck!
******** charset="UTF-8" src="chrome://hdv/content/hdv.js" type="application/javascript">*********>
https://www.ford-trucks.com/forums/1...info-here.html
check out all the links in the thread I provided in there for more detailed photos and such
This thread at post 14 will direct you to part numbers for the axle itself
good luck!
******** charset="UTF-8" src="chrome://hdv/content/hdv.js" type="application/javascript">*********>

Fleet Mechanic
Joined: Aug 2012
Posts: 1,760
Likes: 21
I did my ball joints this past summer and I had the axles out to do the job.
You need to remove the hub and the hub/bearing assembly and the knuckle seal.
Tools you will need are good/correct pair of Snap ring pliers, and the knuckle seal installer. A ball joint press may be needed to change out the u-joint.
I believe there are 4 seals The hub seal, which I think is just a gasket, the hub/bearing O-ring, the knuckle seal, and the axle dust seal. There is an updated axle dust seal BRS170 is it I believe.
The knuckle seal may be able to be saved if careful. I would recommend replacing the hub/bearing O-ring and the hub seal.
If you have vacuum operated hubs then the seals become very important.
.
You need to remove the hub and the hub/bearing assembly and the knuckle seal.
Tools you will need are good/correct pair of Snap ring pliers, and the knuckle seal installer. A ball joint press may be needed to change out the u-joint.
I believe there are 4 seals The hub seal, which I think is just a gasket, the hub/bearing O-ring, the knuckle seal, and the axle dust seal. There is an updated axle dust seal BRS170 is it I believe.
The knuckle seal may be able to be saved if careful. I would recommend replacing the hub/bearing O-ring and the hub seal.
If you have vacuum operated hubs then the seals become very important.
.
Mountain Pass
Joined: Apr 2010
Posts: 170
Likes: 1
Here is a youtube link briefly covering the steps below:
<O ></O>
></O>
1) Starting with the tire off, remove the caliper and caliper mount bracket as one assembly. Place securely and tie off to the side to ensure caliper hose does not kink nor get tugged on.<O</O
2) Remove rotor and inspect for abnormal wear/grooves. (Replace during install if required)<O</O
3) Next remove locking hub by removing 3 ea mount screws. Slightly wiggle up and down until hub slides out of wheel bearing. Do not pry with screw driver it may crack or break the face of the hub assembly.<O</O
4) Remove inner snap ring on axle shaft.<O</O
5) Next follow the ABS line to the top of the wheel hub/bearing assembly. It will be slightly covered by the rotor heat sheild. Just bend the head shield up enough to get to the screw head. IIRC it is held in place by a 6mm allen head screw. Remove screw and abs sensor. Now would be a good time to place an EAR foamie or paper towel in the hole to avoid debris getting inside.<O</O
6) The Wheel Hub/bearing in mounted to the spindle via 4 21mm nuts on the inside of the spindle around the 4wd shaft. They are not hard however you may need to rotate the shaft and or turn the steering wheel slightly to aid in easier access. I have done it just by rotating shaft. Once the 4 nuts are off try to pull wheel bearing off. If it does not come out try using a mallet hitting from the sides to loosen. If this does not work using a long crow bar you can go behind the bearing to the inner U-Joint and pry against the inner Yolk and axle opening forcing 4wd shaft outward. This will push on the bearing.<O</O
7) Remove dust shield paying attention to how it is installed.<O</O
8) Now all that remains is the axle shaft. It may not pull straight out due to the knuckle seal. Using the crowbar method mentioned in step 6 pry on axle shaft outward switching from front and back until shaft and seal release from spindle.<O</O
9) At this point you are ready to replace the U joint on the axle shaft. If you have never replaced a U joint here is a link to a Youtube Video.
<O</O
10) At times the inner retaining clip is corroded/dirty and difficult to come out. If you put the ujoint n a vise and press the cap inward with a socket against its face it should move just enough to release some pressure on the retaining clip.<O</O
11) This is a good video showing the various types of u joints. the most important thing to remember during reassembly is to ensure no needles fall from their position to the face of the cap. It will prevent you from installing retaining clips during final reassembly. If you find you cannot get the clips in you may need to dissasseble and insp for a misplaced needle bearing.<O</O
12) (Highly Recommended to minimize 4wd hub leak. if not go to 13) With the u joint done you will need to replace the axle shaft seal. If you have access to a hydraulic press this is best. If not the seal is pressed onto the shaft and can be worked off with a mallet and punch. It will not be easy. For reinstall with or without a press it is important you work the seal on evenly untill it seats. Here is another video of a DIY seal install
.<O></O>
13) Prior to reinstalling shaft into axle clean the seal surfaces on the inside of the spindle assembly where the axle shaft seal and the wheel bearing seal contact the spindle with 200 grit sand paper or emery cloth. Once done wipe clean and apply a liberal amount of axle grease.
14) Install grease to axle shaft seal and slide/install into axle assembly. Push in as far as it will go. May take a little force but will go in.
15) Prior to installing wheel bearing ensure you replace the oring on the backside. If you elect not to replace it make sure it is clean and free of debris. You can purchase the O-Ring on Ebay. I have not had any luck finding the O-ring at local parts stores without having to buy the entire bearing.
16) Install heat shield onto heat shield per video and place back onto spindle. Pay attention to the ABS sensor postion. It must face up.
17) Reinstall ABS line through heat shield (Clean the magnetic tip) and reinstall into hub assembly. Do not overtighten mount screw. Snug is good enough
18) Install 4 21mm nut and torque to appropriate specifications per manual.
19) Install C-Clip with snap ring pliers on axle shaft inside of wheel bearing
20) Install 4WD locking hub
21) Install Rotor
22) Install break caliper and mount bracket. Now is a good time to replace the break pads if needed. In either case you may need to press the caliper open slightly or all the way with a C-clamp in order to clear the rotor during install.
23) Reinstall tire
24) At this point I would start truck and place your heater controls to forward vents and turn on fan. verify air blows through the vents. Next place 4wd swith to 4wd. Does the light on the dash illuminate. Also did the airflow from your vents change from front to defrost. If not your are good to go
25) If the vents did change then you have a vaccum leak. In order to rule out if it is the side you just worked on disconnect the rubber vaccum line at the top of the spindle drivers side and plug the line. Try again. If your vents move to defrost again with 4wd selected then reconnect the drivers side and disconnect/plug the passenger side. Repeat test. If your vents go to defrost again then you have a leak from the Vaccum solenoid passenger firewall down to your wheels where you plugged them.
I am sure others may have some different techniques but this will get the job done. I hope this helps. Good luck
></O>1) Starting with the tire off, remove the caliper and caliper mount bracket as one assembly. Place securely and tie off to the side to ensure caliper hose does not kink nor get tugged on.<O
</O2) Remove rotor and inspect for abnormal wear/grooves. (Replace during install if required)<O
</O3) Next remove locking hub by removing 3 ea mount screws. Slightly wiggle up and down until hub slides out of wheel bearing. Do not pry with screw driver it may crack or break the face of the hub assembly.<O
</O4) Remove inner snap ring on axle shaft.<O
</O5) Next follow the ABS line to the top of the wheel hub/bearing assembly. It will be slightly covered by the rotor heat sheild. Just bend the head shield up enough to get to the screw head. IIRC it is held in place by a 6mm allen head screw. Remove screw and abs sensor. Now would be a good time to place an EAR foamie or paper towel in the hole to avoid debris getting inside.<O
</O6) The Wheel Hub/bearing in mounted to the spindle via 4 21mm nuts on the inside of the spindle around the 4wd shaft. They are not hard however you may need to rotate the shaft and or turn the steering wheel slightly to aid in easier access. I have done it just by rotating shaft. Once the 4 nuts are off try to pull wheel bearing off. If it does not come out try using a mallet hitting from the sides to loosen. If this does not work using a long crow bar you can go behind the bearing to the inner U-Joint and pry against the inner Yolk and axle opening forcing 4wd shaft outward. This will push on the bearing.<O
</O7) Remove dust shield paying attention to how it is installed.<O
</O8) Now all that remains is the axle shaft. It may not pull straight out due to the knuckle seal. Using the crowbar method mentioned in step 6 pry on axle shaft outward switching from front and back until shaft and seal release from spindle.<O
</O9) At this point you are ready to replace the U joint on the axle shaft. If you have never replaced a U joint here is a link to a Youtube Video.
</O10) At times the inner retaining clip is corroded/dirty and difficult to come out. If you put the ujoint n a vise and press the cap inward with a socket against its face it should move just enough to release some pressure on the retaining clip.<O
</O11) This is a good video showing the various types of u joints. the most important thing to remember during reassembly is to ensure no needles fall from their position to the face of the cap. It will prevent you from installing retaining clips during final reassembly. If you find you cannot get the clips in you may need to dissasseble and insp for a misplaced needle bearing.<O
</O12) (Highly Recommended to minimize 4wd hub leak. if not go to 13) With the u joint done you will need to replace the axle shaft seal. If you have access to a hydraulic press this is best. If not the seal is pressed onto the shaft and can be worked off with a mallet and punch. It will not be easy. For reinstall with or without a press it is important you work the seal on evenly untill it seats. Here is another video of a DIY seal install
></O>13) Prior to reinstalling shaft into axle clean the seal surfaces on the inside of the spindle assembly where the axle shaft seal and the wheel bearing seal contact the spindle with 200 grit sand paper or emery cloth. Once done wipe clean and apply a liberal amount of axle grease.
14) Install grease to axle shaft seal and slide/install into axle assembly. Push in as far as it will go. May take a little force but will go in.
15) Prior to installing wheel bearing ensure you replace the oring on the backside. If you elect not to replace it make sure it is clean and free of debris. You can purchase the O-Ring on Ebay. I have not had any luck finding the O-ring at local parts stores without having to buy the entire bearing.
16) Install heat shield onto heat shield per video and place back onto spindle. Pay attention to the ABS sensor postion. It must face up.
17) Reinstall ABS line through heat shield (Clean the magnetic tip) and reinstall into hub assembly. Do not overtighten mount screw. Snug is good enough
18) Install 4 21mm nut and torque to appropriate specifications per manual.
19) Install C-Clip with snap ring pliers on axle shaft inside of wheel bearing
20) Install 4WD locking hub
21) Install Rotor
22) Install break caliper and mount bracket. Now is a good time to replace the break pads if needed. In either case you may need to press the caliper open slightly or all the way with a C-clamp in order to clear the rotor during install.
23) Reinstall tire
24) At this point I would start truck and place your heater controls to forward vents and turn on fan. verify air blows through the vents. Next place 4wd swith to 4wd. Does the light on the dash illuminate. Also did the airflow from your vents change from front to defrost. If not your are good to go
25) If the vents did change then you have a vaccum leak. In order to rule out if it is the side you just worked on disconnect the rubber vaccum line at the top of the spindle drivers side and plug the line. Try again. If your vents move to defrost again with 4wd selected then reconnect the drivers side and disconnect/plug the passenger side. Repeat test. If your vents go to defrost again then you have a leak from the Vaccum solenoid passenger firewall down to your wheels where you plugged them.
I am sure others may have some different techniques but this will get the job done. I hope this helps. Good luck

Senior User
Joined: Dec 2013
Posts: 215
Likes: 1
From: Buffalo NY
Get a good quality pair of long nose snap ring pliers. They are not easy to remove with pliers that flex or are weak. You'll be swearing if you don't. I speak from profanitical experience.
Trending Topics
Mountain Pass
Joined: Apr 2010
Posts: 170
Likes: 1

FTE Stories
Ford Trucks for Ford Truck Enthusiasts

Top 6 Best Deals Available on New Fords & Lincolns Right Now
Brett Foote
This Hennessey Takes the Expedition Tremor's Off-Roading Capability to the Next Level
Verdad Gallardo
Top 10 Fords at 2026 Carlisle Ford Nationals
Joe Kucinski
3 Best / 3 Worst Parts of Modern Ford Ownership
Brett Foote
10 Amazing Upgrades That Solve Common Ford Truck Owner Headaches
Pouria Savadkouei
Every 2026 Ford Engine Explained
Brett Foote
10 Ugly Ford Trucks That We Still Kinda Love
Joe Kucinski
10 Things Every Truck Owner NEEDS (2026 Edition)
Michael S. Palmer
Rezvani's Latest Post-Apocalyptic Monster Is a Ford F-150 Raptor Underneath
Verdad Gallardo


Fleet Mechanic
Joined: Aug 2012
Posts: 1,760
Likes: 21

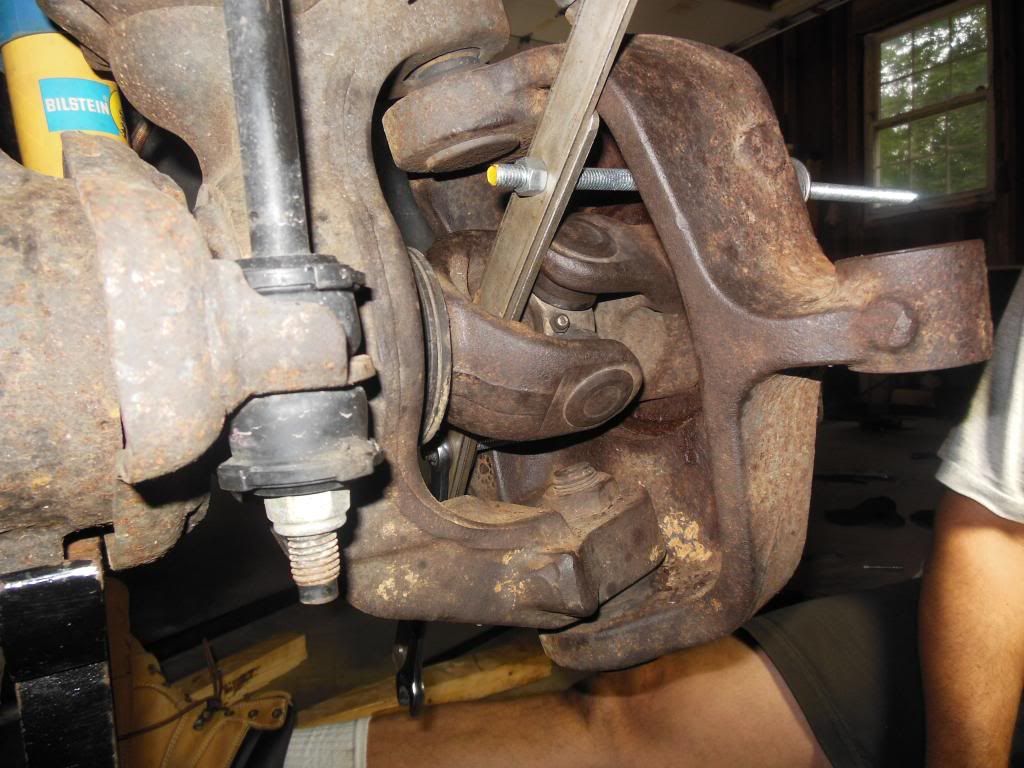
This is the method I used to remove the knuckle seal.


.
Thread Starter
|
New User
Joined: Feb 2013
Posts: 24
Likes: 0
OTC 6697 Wheel Knuckle Vacuum Oil Seal Installer for Ford 2006 To Current F-250/350 : Amazon.com : Automotive
This is the method I used to remove the knuckle seal.

.
This is the method I used to remove the knuckle seal.
.
Using That pry method will the axle come out as well or will it just pop the seal out? I am a little confused I apologized
Thread Starter
|
New User
Joined: Feb 2013
Posts: 24
Likes: 0
My main concern is getting the knuckle seal and axle out with proper process. Will I need to remove dust seal prior to removing axle or will it all come out at once? Thanks for all the advice very much appreciated
Mountain Pass
Joined: Apr 2010
Posts: 170
Likes: 1
If you are gentle it will not hurt the seal however I have never seen your method. I really like it. Nice post I will save this one. Next tool going in the box.
I wonder how you can adapt that for install. Did you need too?
I wonder how you can adapt that for install. Did you need too?
Fleet Mechanic
Joined: Aug 2012
Posts: 1,760
Likes: 21
Your using the axle to remove the knuckle seal. The outer axle has a flange that pushes against the seal to push it out. Use a piece of flat stock in the U joint and two lengths of all thread and work it out. Others use two big crow bars ( and two people ) and pry it out. I found this was more controlled and could be done by one person. It does take some force that's why I doubled up on the flat stock, and the seal will give some before it starts to move.
Not sure this is the proper process, but it was the only way I found.
The dust seal is pressed in the axle housing tube. It can't be removed until the axle is out. So it will be the first thing to be installed. My original ones failed and where just flopping around the axle.
.
Not sure this is the proper process, but it was the only way I found.
The dust seal is pressed in the axle housing tube. It can't be removed until the axle is out. So it will be the first thing to be installed. My original ones failed and where just flopping around the axle.
.
