


Repairing Firewall Rust Damage

Thread Starter
|
Tuned

Joined: Mar 2013
Posts: 399
Likes: 3
From: Grand Rapids, MI
Repairing Firewall Rust Damage
I'd like to start this thread to document my work on the '88 B2 and hopefully get some advice along the way. No doubt I'll run into a few roadblocks that will require your expertise. I was replacing the body mounts last weekend and, while the carpet was pulled back, I decided to find out where some moisture has been coming in. Well, I found a few nasty rust holes in the firewall so they'll get some attention during the truck's winter hibernation. A few questions to start:
1. It's about time I get a MIG welder and learn to weld. I have a very limited power supply in my garage but an experienced modyman told me I should be alright as long as I stay with the smallest '100 series' welders. Could anybody recommend a good gas MIG? I like buying right the first time but at the same time I don't need anything 'top of the line' for the limited work it'll be subjected to.
2. How difficult would it be to remove the dash? It would sure make accessing the firewall a lot more convenient. I have had the gauge cluster, radio, trim, etc. out a few times but never the whole dash.
3. If the ECM comes out will I need to do anything special when plugging it back in? There are a few things like this 'mystical to me' that I've avoided doing anything with, but it's time to unplug.
Thanks guys, pictures to follow once I dig a little deeper.
1. It's about time I get a MIG welder and learn to weld. I have a very limited power supply in my garage but an experienced modyman told me I should be alright as long as I stay with the smallest '100 series' welders. Could anybody recommend a good gas MIG? I like buying right the first time but at the same time I don't need anything 'top of the line' for the limited work it'll be subjected to.
2. How difficult would it be to remove the dash? It would sure make accessing the firewall a lot more convenient. I have had the gauge cluster, radio, trim, etc. out a few times but never the whole dash.
3. If the ECM comes out will I need to do anything special when plugging it back in? There are a few things like this 'mystical to me' that I've avoided doing anything with, but it's time to unplug.
Thanks guys, pictures to follow once I dig a little deeper.
Thread Starter
|
Tuned
Joined: Mar 2013
Posts: 399
Likes: 3
From: Grand Rapids, MI
These are the rust spots basically as found. Passenger side:

Passenger side behind ECM:

Driver side around parking brake cable:

Driver side (same place) from engine side:

Today I'll finish reinstalling the fuel tank, guard, & bumper left over from the body mount project then I'm looking forward to start really digging into the firewall tomorrow.
I had been hoping to get a few more insights though. If there are no responses to this post maybe a moderator would be kind enough to move this thread into the paint & bodywork section? I try to keep most posts within our little RBV community but can't do this one on my own.
Thanks guys

Passenger side behind ECM:

Driver side around parking brake cable:

Driver side (same place) from engine side:

Today I'll finish reinstalling the fuel tank, guard, & bumper left over from the body mount project then I'm looking forward to start really digging into the firewall tomorrow.
I had been hoping to get a few more insights though. If there are no responses to this post maybe a moderator would be kind enough to move this thread into the paint & bodywork section? I try to keep most posts within our little RBV community but can't do this one on my own.
Thanks guys
Thread Starter
|
Tuned
Joined: Mar 2013
Posts: 399
Likes: 3
From: Grand Rapids, MI
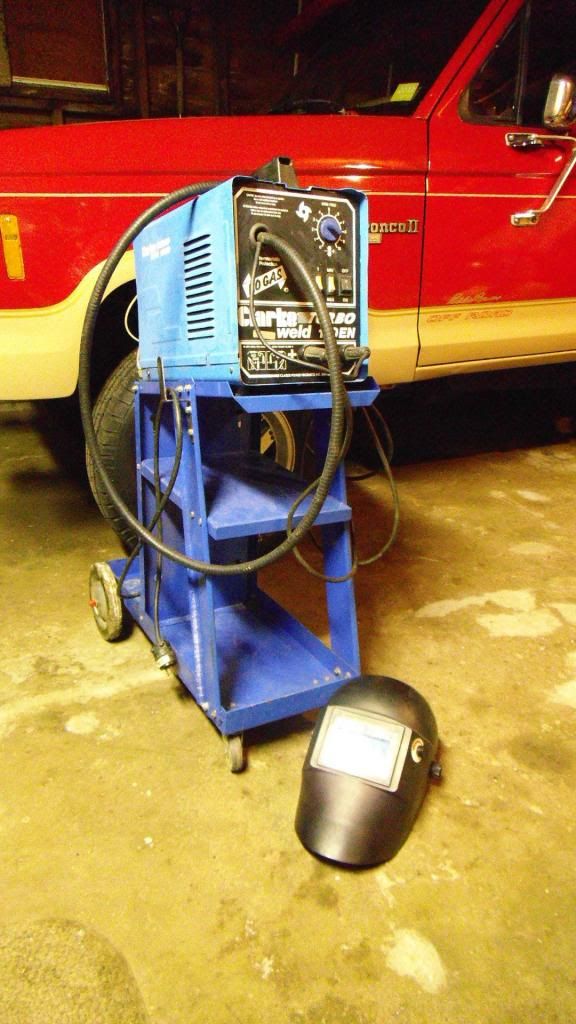
I picked up a new toy today. It's a Clarke 100EN gas/no-gas. Big thanks to Pete here for the recommendation. Now it's practice practice practice.
I'd still like to hear if anybody has experience removing the dash and how big of a job that might be.
It's a Clarke 100EN gas/no-gas. Big thanks to Pete here for the recommendation. Now it's practice practice practice.
I'd still like to hear if anybody has experience removing the dash and how big of a job that might be.

More Turbo


Joined: Jan 2000
Posts: 507
Likes: 2
From: Pasadena US
Well have fun practicing. Give me some feedback and I'm sure I can help. When I was teaching MIG welding, I could tell what the students were doing wrong from across the room, just by sound. It's not difficult. You definitely are at a disadvantage with flux cure wire only. But it's OK to start with. Just realize, the weld will be 99.9% better when you get hooked up to gas. Start by running some beads on a clean piece of sheet metal. No joint, just a bead. You want proper penetration and correct bead width. It will take some practice. Set the heat on the second to lowest setting and set the wire feed on 4. Thats a good starting point. You will have to adjust from there.

Logistics Pro

Joined: Jan 2002
Posts: 4,907
Likes: 39
From: suburban atlanta
I started to respond the other day, but photobucket no longer works on my browser, so I could not look at the pictures. I have rust on the underside of the plenum, and used a 'stop rust' compound that I brushed on the rusty spots.
I have removed the dash pad & upper panel from my Ranger in the past. I think there are some screws in/near the defrost vents, and a one underneath at each end of the dash. It has been some time ago.
The ECM will not be damaged by removal as long as you de-power it before removal and store it where it will not get damaged. It will re-learn idle after re-installation.
I had a badly sealed joint from the factory that left some rust on the underside near where the antenna wire comes in. It was 'fixed' by the dealer, but the windshield still got condensation when it was cold out. I finally found the joint, two panels under the rear edge of the plenum cover that needed some sealant on the top where they met. That kept the floor padding dry, but it took several days to dry out in the sun. It was soaked. The symptom was the windshield, and water tracks running down the firewall, though not very visible.
tom
I have removed the dash pad & upper panel from my Ranger in the past. I think there are some screws in/near the defrost vents, and a one underneath at each end of the dash. It has been some time ago.
The ECM will not be damaged by removal as long as you de-power it before removal and store it where it will not get damaged. It will re-learn idle after re-installation.
I had a badly sealed joint from the factory that left some rust on the underside near where the antenna wire comes in. It was 'fixed' by the dealer, but the windshield still got condensation when it was cold out. I finally found the joint, two panels under the rear edge of the plenum cover that needed some sealant on the top where they met. That kept the floor padding dry, but it took several days to dry out in the sun. It was soaked. The symptom was the windshield, and water tracks running down the firewall, though not very visible.
tom
Thread Starter
|
Tuned
Joined: Mar 2013
Posts: 399
Likes: 3
From: Grand Rapids, MI
Thanks Tom for the good comments as always. Sounds like it would be good to start tearing into the dash tonight and see where it goes. I'd rather take off more than needed and be sure rather than miss something that needs attention. I'll check the plenum area too.
Interestingly the horizontal flange on the passenger side that caught all the rust does not exist on my '94 Ranger. The brake booster mounting changed too. Ford must have realized they were problem areas for rust.
Interestingly the horizontal flange on the passenger side that caught all the rust does not exist on my '94 Ranger. The brake booster mounting changed too. Ford must have realized they were problem areas for rust.
Thread Starter
|
Tuned
Joined: Mar 2013
Posts: 399
Likes: 3
From: Grand Rapids, MI
This is where it's at as of this morning. I had to stop because my toes were starting to go numb. We're getting into what could be the coldest week of the season here in SE Michigan.


Driver's side looking from the wheelwell

I found some more rust. It's just up and right of the brake booster mounting point.


Driver's side looking from the wheelwell

I found some more rust. It's just up and right of the brake booster mounting point.

Trending Topics
Thread Starter
|
Tuned
Joined: Mar 2013
Posts: 399
Likes: 3
From: Grand Rapids, MI
I had a horrible nightmare last night. I was working on the firewall rust when I accidentally bumped the door bottom and the tool went through. I tapped on it some more and the hole got bigger. The more I tapped the more rust I found, untill the whole bottoms of both doors were all holes! It's ok my wife laughed at me too. In reality I worked on the firewall until midnight last night... and the door bottoms are ok. I do keep finding more rust in the firewall though the deeper I dig into the dash. If somebody knows if the HVAC system comes out with the dash that would help. I assume I'll need to at least remove the heater core first? The driver side rust I pictured earlier has all been cut out. I'll follow up with the media blaster then it's time for new metal!
Josh
It's ok my wife laughed at me too. In reality I worked on the firewall until midnight last night... and the door bottoms are ok. I do keep finding more rust in the firewall though the deeper I dig into the dash. If somebody knows if the HVAC system comes out with the dash that would help. I assume I'll need to at least remove the heater core first? The driver side rust I pictured earlier has all been cut out. I'll follow up with the media blaster then it's time for new metal! Josh
FTE Stories
Ford Trucks for Ford Truck Enthusiasts

Top 6 Best Deals Available on New Fords & Lincolns Right Now
Brett Foote
This Hennessey Takes the Expedition Tremor's Off-Roading Capability to the Next Level
Verdad Gallardo
Top 10 Fords at 2026 Carlisle Ford Nationals
Joe Kucinski
3 Best / 3 Worst Parts of Modern Ford Ownership
Brett Foote
10 Amazing Upgrades That Solve Common Ford Truck Owner Headaches
Pouria Savadkouei
Every 2026 Ford Engine Explained
Brett Foote
10 Ugly Ford Trucks That We Still Kinda Love
Joe Kucinski
10 Things Every Truck Owner NEEDS (2026 Edition)
Michael S. Palmer
Rezvani's Latest Post-Apocalyptic Monster Is a Ford F-150 Raptor Underneath
Verdad Gallardo
Logistics Pro
Joined: Jan 2002
Posts: 4,907
Likes: 39
From: suburban atlanta
The heater plenum stays if you remove the upper dash. The A/C is out under the hood, so can be left alone, I think. To remove the heater core, there's an access panel up and behind the glove box that can be removed. With the hoses disconnected, the heater core can be pulled out of the plenum.
Have you pulled the three access panels, well two & the wiper motor, for access to clean under the air intake? Many times you will find some compost there that would be good for the garden, and underneath, flaking sealer that covers, what else, RUST...
There are two 'flap' style drain covers, one at each end. The should 'flap' out of the way to let water out, but many times leaves can remain behind. With the three access holes, a wood scraper, and some compressed air with a 'blow gun', you can clean it up pretty well and it should be good for several years... Be careful when removing any wiper linkage as I don't think you can get some of the plastic bushings any more, and likely they are brittle. I had one come off at Zero Dark Thirty on a two-lane with heavy oncoming traffic and heavy rain, leaving the drivers wiper inactive. Same trip the battery seemed to go dead.
Any way, if you don't have A/C, the underhood plenum can be removed also for access to the firewall sheetmetal. Well, if you do have A/C, it can be removed, but the system must be evacuated first.
tom
Have you pulled the three access panels, well two & the wiper motor, for access to clean under the air intake? Many times you will find some compost there that would be good for the garden, and underneath, flaking sealer that covers, what else, RUST...
There are two 'flap' style drain covers, one at each end. The should 'flap' out of the way to let water out, but many times leaves can remain behind. With the three access holes, a wood scraper, and some compressed air with a 'blow gun', you can clean it up pretty well and it should be good for several years... Be careful when removing any wiper linkage as I don't think you can get some of the plastic bushings any more, and likely they are brittle. I had one come off at Zero Dark Thirty on a two-lane with heavy oncoming traffic and heavy rain, leaving the drivers wiper inactive. Same trip the battery seemed to go dead.
Any way, if you don't have A/C, the underhood plenum can be removed also for access to the firewall sheetmetal. Well, if you do have A/C, it can be removed, but the system must be evacuated first.
tom
Thread Starter
|
Tuned
Joined: Mar 2013
Posts: 399
Likes: 3
From: Grand Rapids, MI
The heater plenum stays if you remove the upper dash. The A/C is out under the hood, so can be left alone, I think. To remove the heater core, there's an access panel up and behind the glove box that can be removed. With the hoses disconnected, the heater core can be pulled out of the plenum.
Not yet for this project but I will now. Sounds like you had a rough night a while back. When it rains it pours right?
If you ever get in that situation again and need a wiper linkage let me know, I'm sure I have spares.
Josh
Logistics Pro
Joined: Jan 2002
Posts: 4,907
Likes: 39
From: suburban atlanta
Where is the evaporator? Mine was underhood, outside the cabin{even though it was a non-factory add on model}. I don't think they 'came inside' until later models. That means the inside plenum and works should be able to be removed separately if desired.
If you have not done so already, remove the instrument cluster, and then the dash pad. The pad will expose a LOT of sheet metal. You will have to 'spring' the pad past the supporting sheet metal, but can do so without damage if you are careful. It will also have to be spread a bit to put it back in place. If memory still works, I think the cubby above the glove box was the thing that had me wondering 'is this a good thing to do?', as it had to fit past some metal... but it's been ~20 years, and the dash is still back where it was put, in one piece, so I must not have done too much damage...
tom
If you have not done so already, remove the instrument cluster, and then the dash pad. The pad will expose a LOT of sheet metal. You will have to 'spring' the pad past the supporting sheet metal, but can do so without damage if you are careful. It will also have to be spread a bit to put it back in place. If memory still works, I think the cubby above the glove box was the thing that had me wondering 'is this a good thing to do?', as it had to fit past some metal... but it's been ~20 years, and the dash is still back where it was put, in one piece, so I must not have done too much damage...
tom
Thread Starter
|
Tuned
Joined: Mar 2013
Posts: 399
Likes: 3
From: Grand Rapids, MI
Yes the evaporator is out in the engine compartment so I will keep digging... for now. All the dash trim is off including the pad and black top that held the speakers in place. The plan tonight is to remove the gauges, radio, glove box, and HVAC controls. I'm worried about the heater linkage cables and being able to get them connected correctly again later. I keep meaning to take some more pictures of the current status but will post some up soon. That (module?) above the glove box had me worried but it came out ok with some working back and forth. Still have no idea what it is. (Edit: 4x4 Electric Transmission Shift Control Module, which monitors and controls the electronic transfer case.)
Thanks.
(Edit: 4x4 Electric Transmission Shift Control Module, which monitors and controls the electronic transfer case.)Thanks.
Thread Starter
|
Tuned
Joined: Mar 2013
Posts: 399
Likes: 3
From: Grand Rapids, MI
Ok a lot of progress in the past few days.
These were the first driver side holes I posted that have now been cut out and are ready for new metal after some media blasting.


The dash is getting lighter.

Dropping the subdash was extremely intimidating to say the least. There was a virtual explosion of wires, ducts, and modules that seemed to fall everywhere. It stayed like this for a few days while I labeled everything I could. I'm gonna need all the hints I can get putting this thing back together.


Here's where I'm at now:

All the driver side rust is exposed. It's got nowhere to hide now.

Unfortunately I can see quite a bit of rust behind the plenum (far right side) so that really needs to come out.

View from the engine bay. Notice the black sealant a previous owner globbed just above the blower motor. I'm definately expecting to find a hole once the plenum comes off.

This diagram seems to confirm the plenum can come off without disrupting the A/C system. I'm hopeful anyway. I'll try to tackle that tomorrow.

These were the first driver side holes I posted that have now been cut out and are ready for new metal after some media blasting.


The dash is getting lighter.

Dropping the subdash was extremely intimidating to say the least. There was a virtual explosion of wires, ducts, and modules that seemed to fall everywhere. It stayed like this for a few days while I labeled everything I could. I'm gonna need all the hints I can get putting this thing back together.


Here's where I'm at now:

All the driver side rust is exposed. It's got nowhere to hide now.

Unfortunately I can see quite a bit of rust behind the plenum (far right side) so that really needs to come out.

View from the engine bay. Notice the black sealant a previous owner globbed just above the blower motor. I'm definately expecting to find a hole once the plenum comes off.

This diagram seems to confirm the plenum can come off without disrupting the A/C system. I'm hopeful anyway. I'll try to tackle that tomorrow.

Logistics Pro
Joined: Jan 2002
Posts: 4,907
Likes: 39
From: suburban atlanta
I don't think the underhood plenum can come off w/o evacuating the A/C system. The evaporator is inside, and will come with the plenum unless you are able to disassemble the plenum {split it along the joint} and let the evap sit there wobbling in the breeze.
The shop manual picture just doesn't mention removing the high and low side lines from the evaporator. If there is enough flex in the two lines, you might be able to pull it back to expose the firewall sheet metal.
Are you using sheet metal and bending to fit or getting stuff from a catalog like LMCtruck.com? Or are you going to cut out parts from a donor boneyard vehicle? You are way more ambitious than I in doing bodywork.
tom
The shop manual picture just doesn't mention removing the high and low side lines from the evaporator. If there is enough flex in the two lines, you might be able to pull it back to expose the firewall sheet metal.
Are you using sheet metal and bending to fit or getting stuff from a catalog like LMCtruck.com? Or are you going to cut out parts from a donor boneyard vehicle? You are way more ambitious than I in doing bodywork.
tom
Thread Starter
|
Tuned
Joined: Mar 2013
Posts: 399
Likes: 3
From: Grand Rapids, MI
Unfortunately I have not been able to find anyone who makes firewall patch panels. I will be welding in my own sheet metal and some of the harder to get to spots might get fiberglass and/or fiber reinforced filler. I'll know more once the rust comes off.