


alt dead?
Thread Starter
|
Posting Guru
Joined: Feb 2013
Posts: 1,555
Likes: 1
alt dead?
well drove the truck (92 f150 4.9) last night and everything worked good, open the door start it up this morning come back 5 minutes or so later, jump in start down the driveway and notice my amp guage is a little above o on normal, crap, reverse back up the driveway trying to decide what to do, knowing that normally it charges on L or a little lower on normal and also knowing that in between n and o is 12 volts and knowing i am a little above 12 volts i decide to head out, get a little ways down the road, drops below n, so now it isnt charging at all, turned off all un-needed accessories before i left so i decide i can make it, i only have about 7 miles to go anyway. so my 2g alternator isnt charging anymore, it just kind of let the ghost go, luckily i didnt go out like some do in a fiery blaze of smoke and flame, i havent tested it with a multimeter but i dont have to either, headlights were dimmed way down this morning and the blower was moving slower, also turn signals blinked about 1 time every 30 seconds so obviously not getting the voltage it needs, question is now what do i do? put another 2g in there, or upgrade to a 3g, i have no clue about the 3g swap at all, this is my daily driver so i need it as fast as possible, and if i do do the 3g conversion, how does a person do that and what do they need ( and if i do the swap i wont be using junkyard parts, all new) thanks guys
Logistics Pro


Joined: Mar 2012
Posts: 3,507
Likes: 121
From: Oregon
To go 3G you need a 8.25" ear spacing 3G alternator. They can be found on some 90, all 91-92 and all 93-95 3.8 Taurus. Then you will need the plug from a junkyard car. Any car with a 3G will have what you need. Lastly you will need some 2 gauge cable, about 3-4 ft, a 175A mega fuse and holder and the lugs for the cable. The cable, fuse and holder can be found at Napa. The fuse and holder part numbers are BK 7821139 (fuse), BK 7821143 (holder). Lugs can be found at Napa as well I believe. Once you have everything, here is how you go about the swap:
Mount the alternator first to see if the clocking is correct. If it is, awesome. If it isn't:
"Onto the reclocking process - you need to first pull the voltage regulator out, 4 torx bolts for this, and you do it just so the thing gets out of the way. Then you put a large screwdriver or a small prybar between the rear cover of the alternator and the rectifier chassis (the big black center ring with the vent holes) - you need to pry the rear cover off the rectifier chassis, do so very carefully as the alternator's rear bearing is pressed into the rear cover and will need some persuading to make it pop out. When the cover comes off, the bearing stays on the shaft. And now comes the fun part - making the stator coils armature let loose of the alternator case. While it is tempting to pry between the rectifier chassis and the main case of the alt, do NOT do that - the rectifier is riveted on its chassis and is attached to the stator coils with 6 solder joint, by trying to pry the rectifier chassis off the alt case you're essentially trying to pull the whole stator armature by applying force on these 6 solder joints, and it is very likely that you will damage them in the process. What you can do instead is what Sassyrel suggested - take a hammer and tap on the case. In my experience a plastic hammer will not be enough, you need a metal hammer for that, albeit a small one - just don't smack it very hard and there will be no damage to the internals. If you're lucky the armature should let loose after a few hammer taps, then you can turn it how you want it - I prefer 1/3 turn clockwise if you're looking at it from the back of the alt, this positions all the wire connectors right on top of the alt. If you're SOL tho, the armature may not come loose even after some good smacks with the hammer - this is when you have to take a long but thin drift punch and reach through the cooling vents in the front of the case and drive the armature out, but this is a very delicate job as that's also right where the stator coil windings are and it is very possible that you damage some of them in the process - if you've never done this before, I suggest you practice on your old alternator first, and if you still don't feel confident in it just run the alternator as is and install a slightly longer belt to keep the electrical connections away from the thermostat water neck and the upper radiator hose." - LCAM-01XA over @ Oilburners.net.
First start with the regulator plug. It should look like this:

Run the green wire to this green wire in the truck:
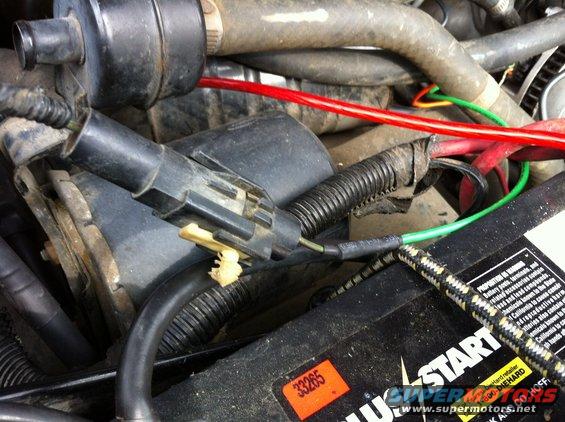
Connect the harness like shown here:
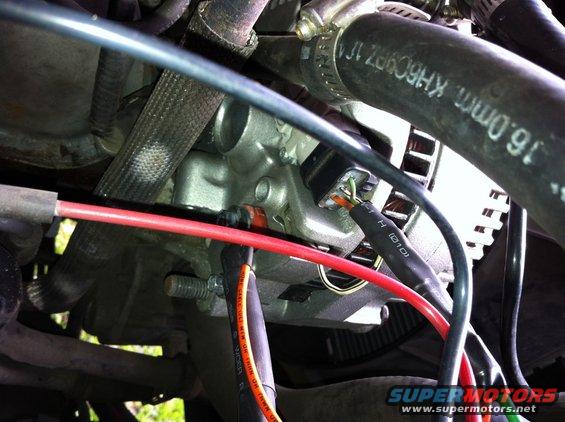
Last is to cut the cable down to length. Here is how the run should go:
From the lug on the back of the alternator:
To the fuse holder:
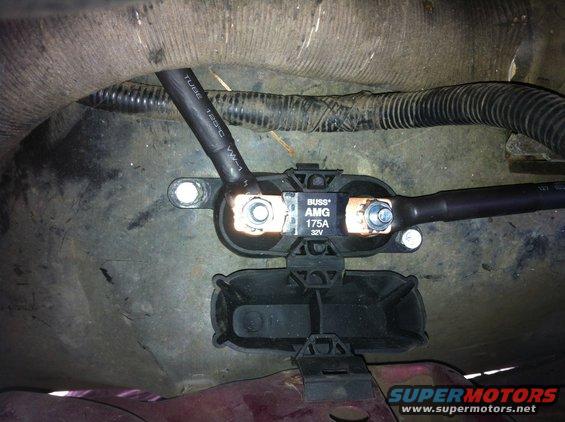
The to the starter relay on the fender:

If you have any more questions, fire away. Also see here if you would like. Lots of info, just a little jumbled.
https://www.ford-trucks.com/forums/1...ing-one-4.html
Mount the alternator first to see if the clocking is correct. If it is, awesome. If it isn't:
"Onto the reclocking process - you need to first pull the voltage regulator out, 4 torx bolts for this, and you do it just so the thing gets out of the way. Then you put a large screwdriver or a small prybar between the rear cover of the alternator and the rectifier chassis (the big black center ring with the vent holes) - you need to pry the rear cover off the rectifier chassis, do so very carefully as the alternator's rear bearing is pressed into the rear cover and will need some persuading to make it pop out. When the cover comes off, the bearing stays on the shaft. And now comes the fun part - making the stator coils armature let loose of the alternator case. While it is tempting to pry between the rectifier chassis and the main case of the alt, do NOT do that - the rectifier is riveted on its chassis and is attached to the stator coils with 6 solder joint, by trying to pry the rectifier chassis off the alt case you're essentially trying to pull the whole stator armature by applying force on these 6 solder joints, and it is very likely that you will damage them in the process. What you can do instead is what Sassyrel suggested - take a hammer and tap on the case. In my experience a plastic hammer will not be enough, you need a metal hammer for that, albeit a small one - just don't smack it very hard and there will be no damage to the internals. If you're lucky the armature should let loose after a few hammer taps, then you can turn it how you want it - I prefer 1/3 turn clockwise if you're looking at it from the back of the alt, this positions all the wire connectors right on top of the alt. If you're SOL tho, the armature may not come loose even after some good smacks with the hammer - this is when you have to take a long but thin drift punch and reach through the cooling vents in the front of the case and drive the armature out, but this is a very delicate job as that's also right where the stator coil windings are and it is very possible that you damage some of them in the process - if you've never done this before, I suggest you practice on your old alternator first, and if you still don't feel confident in it just run the alternator as is and install a slightly longer belt to keep the electrical connections away from the thermostat water neck and the upper radiator hose." - LCAM-01XA over @ Oilburners.net.
First start with the regulator plug. It should look like this:
Run the green wire to this green wire in the truck:
Connect the harness like shown here:
Last is to cut the cable down to length. Here is how the run should go:
From the lug on the back of the alternator:
To the fuse holder:
The to the starter relay on the fender:
If you have any more questions, fire away. Also see here if you would like. Lots of info, just a little jumbled.
https://www.ford-trucks.com/forums/1...ing-one-4.html
Thread Starter
|
Posting Guru
Joined: Feb 2013
Posts: 1,555
Likes: 1
i was thinking about getting this one RJM Injection Tech — 8.25
what are your thoughts on that?
what are your thoughts on that?
Logistics Pro
Joined: Mar 2012
Posts: 3,507
Likes: 121
From: Oregon
From what I have heard, RJM alternators are good. That one should work. Just make sure you order it with the right clocking. As for power, a 6 rib with a good tensioner and no glazing or cracks can support up to 180 amps I believe. And yes, putting another 2G in is pointless and possibly dangerous if it goes up in smoke.
Thread Starter
|
Posting Guru
Joined: Feb 2013
Posts: 1,555
Likes: 1
yeah, thats what i figured, i knew i was lucky when this one didnt go up in flames, it was wet out this morning and i was all paranoid looking into the mirror thinking was that mist, or smoke lol finally popped the hood to check and saw no burnt wires
Thread Starter
|
Posting Guru
Joined: Feb 2013
Posts: 1,555
Likes: 1
well ran my battery dead, died just as i was pulling on to the driveway so it got put on the cahrger, noticed it wasnt taking a charge so decided to try a new battery first, no one was open though so it will have to wait for a little while
Trending Topics

pedant
Joined: Jan 2008
Posts: 23,576
Likes: 40
From: EXTREME southwest CT

If you notice squeal or chirp on startup try changing to a 'load response control' regulator.
These are white instead of gray and ramp up the output over a few seconds instead of all at once.
Various models are available with different set points and delays.
These are white instead of gray and ramp up the output over a few seconds instead of all at once.
Various models are available with different set points and delays.
FTE Stories
Ford Trucks for Ford Truck Enthusiasts

3 Best / 3 Worst Parts of Modern Ford Ownership
Brett Foote
10 Amazing Upgrades That Solve Common Ford Truck Owner Headaches
Pouria Savadkouei
Every 2026 Ford Engine Explained
Brett Foote
10 Ugly Ford Trucks That We Still Kinda Love
Joe Kucinski
10 Things Every Truck Owner NEEDS (2026 Edition)
Michael S. Palmer
Rezvani's Latest Post-Apocalyptic Monster Is a Ford F-150 Raptor Underneath
Verdad Gallardo
Top 10 Most Expensive Ford Trucks Ever Sold on Bring a Trailer
Joe Kucinski
2027 Ford Super Duty Buyer's Guide (Every Model, Engine, & Package)
Brett Foote
Top 10 Ford Truck Tragedies
Joe Kucinski
Thread
Thread Starter
Forum
Replies
Last Post
cman1120
1987 - 1996 F150 & Larger F-Series Trucks
27
Jan 26, 2016 05:21 AM
2500ak
1987 - 1996 F150 & Larger F-Series Trucks
4
Jul 3, 2013 07:51 AM
F250racer
1957 - 1960 F100 & Larger F-Series Trucks
28
Jan 11, 2013 06:44 PM
jaspirr
1973 - 1979 F-100 & Larger F-Series Trucks
19
Nov 7, 2009 02:02 PM