
3G Swap: Should I think about doing one?
#46
 04-06-2012, 08:25 PM

Elder User
Join Date: Jan 2011
Location: Over the hump in Pahrump
Posts: 784
Likes: 0
Received 0 Likes
on
0 Posts
Jim, I did one with PB, it was really cruddy and would have used contact cleaner, but the slip rings were bad and I found a some burnt wires inside so, It got tossed !!! On the one I used after I had it tested I found a broken brush, so I replaced the reg with one from O'Rilleys it only cost $7.99 +tax ... that one is running just fine.
Jim, thanks for the link you put up earlier from FSB, I think the info is correct as far as I can tell ... Thanks Dave
Jim, thanks for the link you put up earlier from FSB, I think the info is correct as far as I can tell ... Thanks Dave
#47
04-06-2012, 09:07 PM
Ok so I got the alternator re-clocked with no problems. found a tutorial on how to do it:
"Onto the reclocking process - you need to first pull the voltage regulator out, 4 torx bolts for this, and you do it just so the thing gets out of the way. Then you put a large screwdriver or a small prybar between the rear cover of the alternator and the rectifier chassis (the big black center ring with the vent holes) - you need to pry the rear cover off the rectifier chassis, do so very carefully as the alternator's rear bearing is pressed into the rear cover and will need some persuading to make it pop out. When the cover comes off, the bearing stays on the shaft. And now comes the fun part - making the stator coils armature let loose of the alternator case. While it is tempting to pry between the rectifier chassis and the main case of the alt, do NOT do that - the rectifier is riveted on its chassis and is attached to the stator coils with 6 solder joint, by trying to pry the rectifier chassis off the alt case you're essentially trying to pull the whole stator armature by applying force on these 6 solder joints, and it is very likely that you will damage them in the process. What you can do instead is what Sassyrel suggested - take a hammer and tap on the case. In my experience a plastic hammer will not be enough, you need a metal hammer for that, albeit a small one - just don't smack it very hard and there will be no damage to the internals. If you're lucky the armature should let loose after a few hammer taps, then you can turn it how you want it - I prefer 1/3 turn clockwise if you're looking at it from the back of the alt, this positions all the wire connectors right on top of the alt. If you're SOL tho, the armature may not come loose even after some good smacks with the hammer - this is when you have to take a long but thin drift punch and reach through the cooling vents in the front of the case and drive the armature out, but this is a very delicate job as that's also right where the stator coil windings are and it is very possible that you damage some of them in the process - if you've never done this before, I suggest you practice on your old alternator first, and if you still don't feel confident in it just run the alternator as is and install a slightly longer belt to keep the electrical connections away from the thermostat water neck and the upper radiator hose." - LCAM-01XA over @ Oilburners.net.
Here are the pictures:
Wire harness: Is this correct wiring?

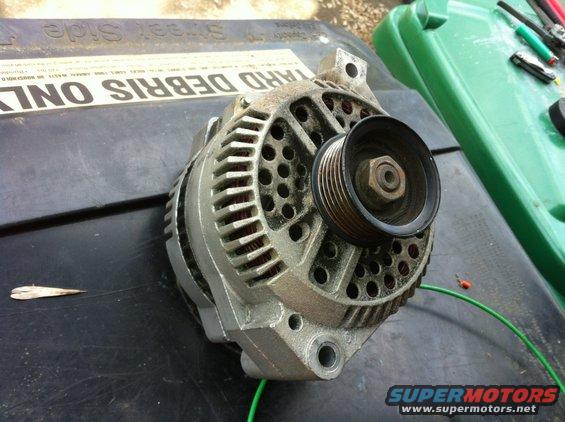
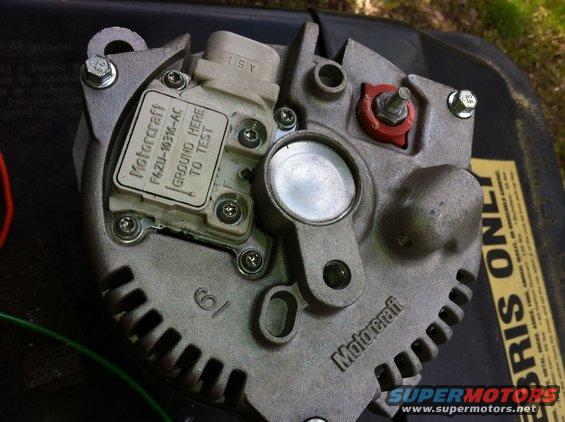
Alternator is from Taurus:
I had it tested at NAPA and it passed.
Here is all of the spoils from today's run to Pick-n-Pull:
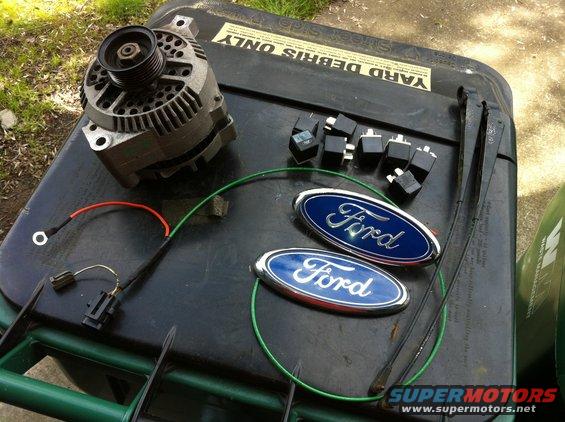
All for ~$55
Here is the Pick-n-Pull:

I took the alternator and plugs from the white Taurus to the right(the door you see)
And there was no getting to most of the trucks:

"Onto the reclocking process - you need to first pull the voltage regulator out, 4 torx bolts for this, and you do it just so the thing gets out of the way. Then you put a large screwdriver or a small prybar between the rear cover of the alternator and the rectifier chassis (the big black center ring with the vent holes) - you need to pry the rear cover off the rectifier chassis, do so very carefully as the alternator's rear bearing is pressed into the rear cover and will need some persuading to make it pop out. When the cover comes off, the bearing stays on the shaft. And now comes the fun part - making the stator coils armature let loose of the alternator case. While it is tempting to pry between the rectifier chassis and the main case of the alt, do NOT do that - the rectifier is riveted on its chassis and is attached to the stator coils with 6 solder joint, by trying to pry the rectifier chassis off the alt case you're essentially trying to pull the whole stator armature by applying force on these 6 solder joints, and it is very likely that you will damage them in the process. What you can do instead is what Sassyrel suggested - take a hammer and tap on the case. In my experience a plastic hammer will not be enough, you need a metal hammer for that, albeit a small one - just don't smack it very hard and there will be no damage to the internals. If you're lucky the armature should let loose after a few hammer taps, then you can turn it how you want it - I prefer 1/3 turn clockwise if you're looking at it from the back of the alt, this positions all the wire connectors right on top of the alt. If you're SOL tho, the armature may not come loose even after some good smacks with the hammer - this is when you have to take a long but thin drift punch and reach through the cooling vents in the front of the case and drive the armature out, but this is a very delicate job as that's also right where the stator coil windings are and it is very possible that you damage some of them in the process - if you've never done this before, I suggest you practice on your old alternator first, and if you still don't feel confident in it just run the alternator as is and install a slightly longer belt to keep the electrical connections away from the thermostat water neck and the upper radiator hose." - LCAM-01XA over @ Oilburners.net.
Here are the pictures:
Wire harness: Is this correct wiring?
Alternator is from Taurus:
I had it tested at NAPA and it passed.
Here is all of the spoils from today's run to Pick-n-Pull:
All for ~$55
Here is the Pick-n-Pull:
I took the alternator and plugs from the white Taurus to the right(the door you see)
And there was no getting to most of the trucks:
#48
04-06-2012, 09:09 PM


You can get one for a 4.9, 7.5L new (no core) to your door for $89.00 with a one year warranty.
DB Electrical - ALTERNATOR FORD F SERIES TRUCK 4.9L 94 95 96 / 7.5L 95 96 97
Or $40 used. http://www.ebay.com/itm/ALTERNATOR-7...-/230762849938
Parts are cheap enough..
Chinese stuff is what it is...
Choose wisely.
DB Electrical - ALTERNATOR FORD F SERIES TRUCK 4.9L 94 95 96 / 7.5L 95 96 97
Or $40 used. http://www.ebay.com/itm/ALTERNATOR-7...-/230762849938
Parts are cheap enough..
Chinese stuff is what it is...
Choose wisely.
#50
04-06-2012, 09:33 PM
#53
04-06-2012, 11:11 PM
#56
04-07-2012, 12:03 AM
#57
04-07-2012, 12:08 AM
#58
04-07-2012, 05:55 PM
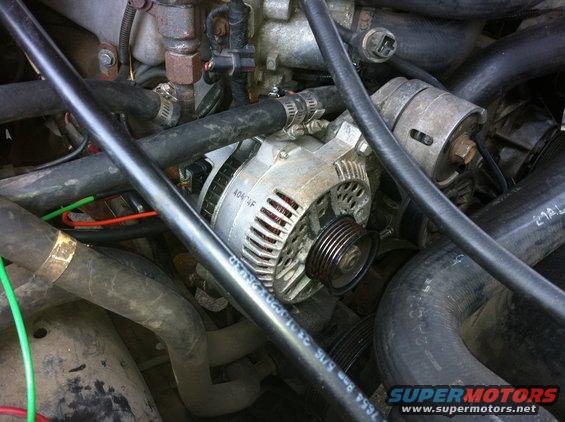
Finished the 3G swap today. BIG improvement. Truck used to produce ~12.8v at idle. Now it is up to ~14.4v at idle. After trimming the bracket it went right in. Glad I didnt order the wiring from RJM. It would have cost me ~$115 including the alternator. making the wiring got me down to ~$70 including the alternator.
New alternator in:
Had to replace the starter solenoid because one of the terminals on the old one snapped when I tried to remove the nut. No motorcraft ones in stock so I got a BWD one for now.

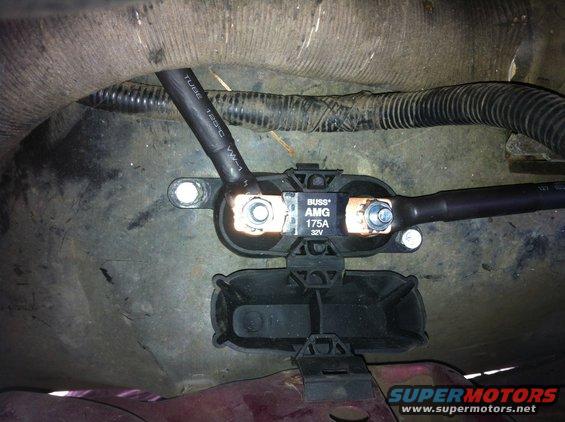
Got the fuse and holder from NAPA for $14.
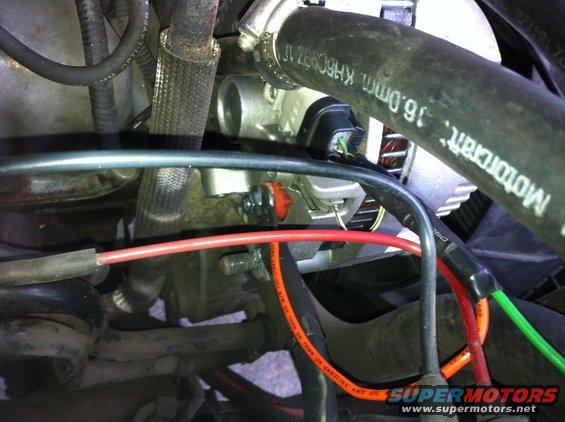
New alternator wiring. Im pleased with the result. That 2 gauge wire is a pain in the @$$ to work with...
Much better output:

New alternator in:
Had to replace the starter solenoid because one of the terminals on the old one snapped when I tried to remove the nut. No motorcraft ones in stock so I got a BWD one for now.
Got the fuse and holder from NAPA for $14.
New alternator wiring. Im pleased with the result. That 2 gauge wire is a pain in the @$$ to work with...
Much better output:

