


Easy cheap quick fix for Ford defrost/vent problems

Thread Starter
|
New User
Joined: Oct 2013
Posts: 6
Likes: 0
Easy cheap quick fix for Ford defrost/vent problems
Hi Everyone,
Thought I'd share my easy, cheap, quick fix for the defrost/vent problem.
The Problem:
Although the selector switch is set to vent, the blower blows out the defrost, and or the floor. I noticed this was happening when I was going uphill, and when I went down hill, the air blew back to the vents. Crazy!
After a little research, I saw that this is a common problem with Fords, dating back to the 1990's. Not just Ford vans, but also pickup trucks, and some cars.
The Cause:
What I found was that the problem is caused by a lack of vacuum. The way the controls are designed is to be operated by engine vacuum. When you lose that vacuum, the switching reverts to the setting that doesn't need any vacuum: the defrost setting.
Here is a diagram of one of the vacuum routings. There are different numbers of and color of hoses on different years, but the systems all work the same way. AND the black hose is always the vacuum source.
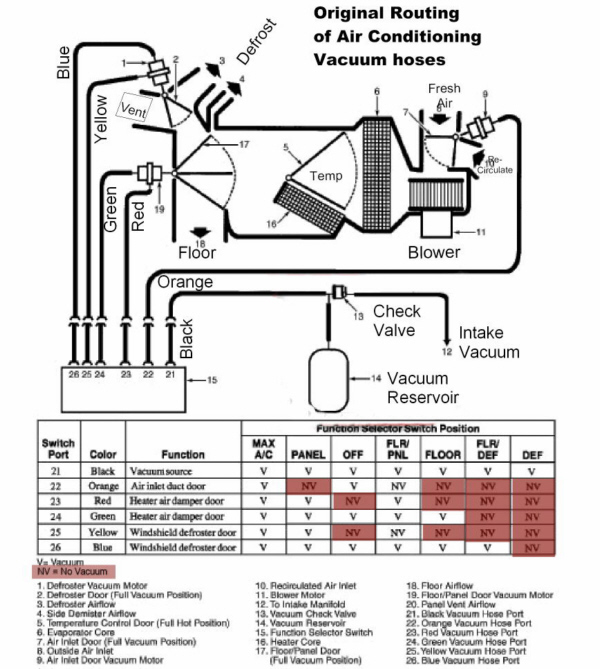
There is also chart, showing which cabin air setting gets vacuum.
Most technicians suggest that the first thing to check, and the most likely causes of the problem are check valve failure, reservoir failure, or cracked /broken /disconnected vacuum line.
The Bad News:
Unfortunately, when Ford designed the system, they must have thought that there would never be a failure of the check valve, reservoir, or vacuum lines. To have the dealership fix any of these, they have to remove the dash, heater core, and evaporator core to get to them.
I've heard of estimates of $900 labor, $30 parts. Ridiculous! Outrageous!
The Good News:
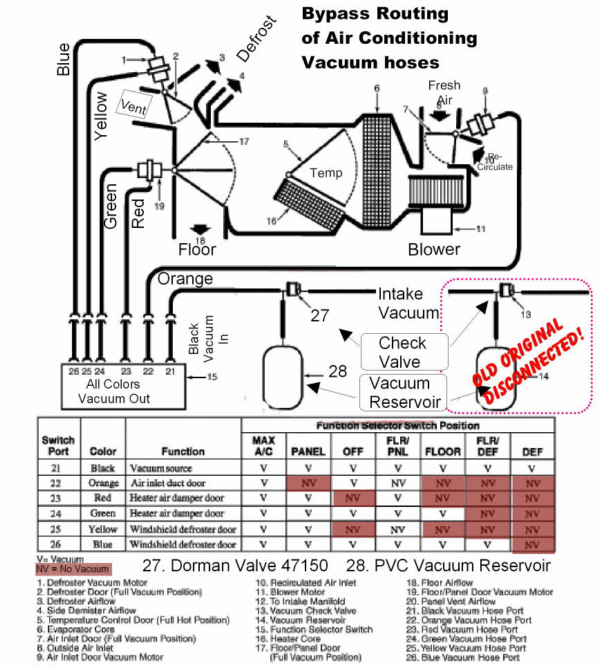
For under $20, and a little handy man work, one can make and install a bypass system to do the same job as the original check valve/reservoir.
I did have to take the glove box off to access the hoses.
I cut the black hose, and connected it to the bypass system. I knew one end or the other would be going to the switch. Luckily, I picked the right one the first time. If it didn't work, I would just try the other end of the black hose.
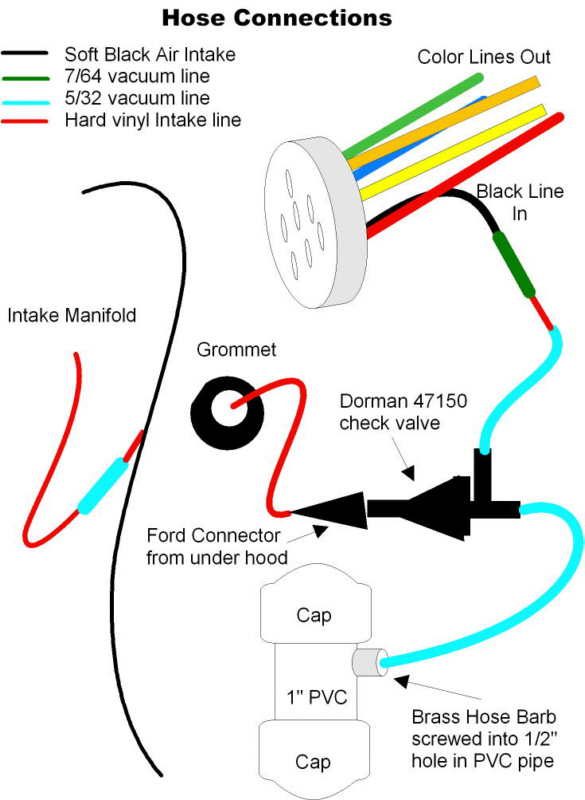
The Dorman 47150 was bought at Autozone. It is a check valve with one "IN" and two "Out", so you don't have to buy a "T" when connecting the reservoir.
The PVC pipe I used was about a foot long and capped on both ends, using regular PVC cleaner and adhesive. A 1/2" hole was drilled into the pipe, and the brass hose connector was threaded in with teflon tape.
The PVC pipe is tucked behind a panel to the right of the passenger foot area, but can be anywhere under the dash. I used wire ties to secure it.
As a side note, I tried using an old carburetor cleaner spray can for the reservoir first. I drilled out the cap area and JB Welded a hose fitting in.
It worked great, but after a couple of minutes, the vacuum caused it to crush into itself. It still worked while crushed, but made a crackling noise when the engine first started up hehehe.
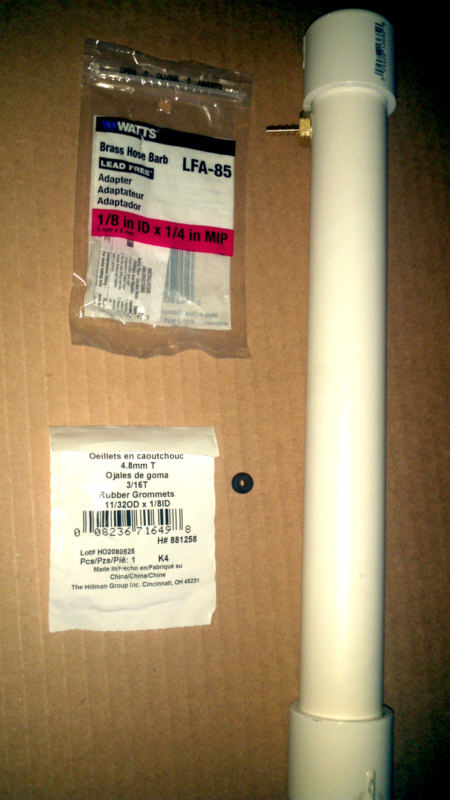
The Brass hose connecter was bought at Lowes and is a Watts Brass Hose Barb LFA-85. The grommet was also bought at Lowes. It used a 1/4" hole drilled in the firewall. The grommet is a Hillman H#881258 11/32" OD and 1/8" inside diameter. The hard engine vacuum hose was a tight fit.
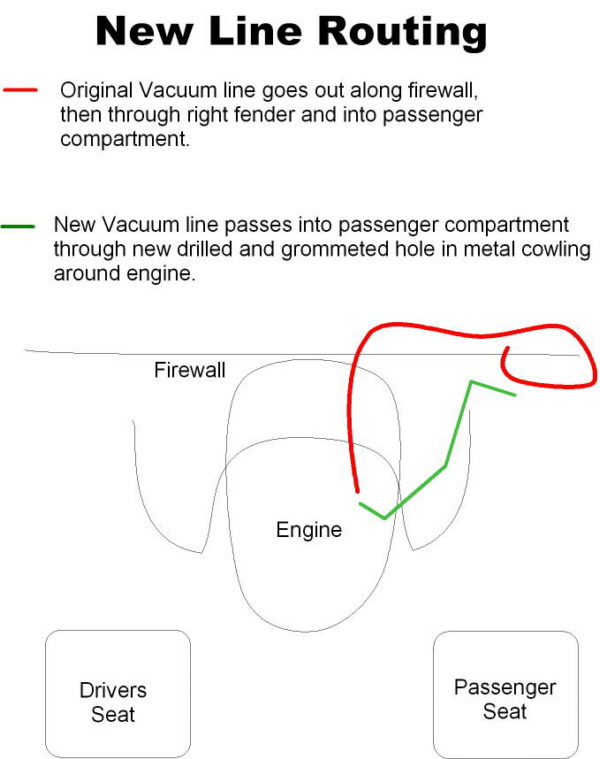
Here is a diagram of the routing I used for my Ford van.
Good Luck to You!!
I'll try to post some actual pictures soon.
Thought I'd share my easy, cheap, quick fix for the defrost/vent problem.
The Problem:
Although the selector switch is set to vent, the blower blows out the defrost, and or the floor. I noticed this was happening when I was going uphill, and when I went down hill, the air blew back to the vents. Crazy!
After a little research, I saw that this is a common problem with Fords, dating back to the 1990's. Not just Ford vans, but also pickup trucks, and some cars.
The Cause:
What I found was that the problem is caused by a lack of vacuum. The way the controls are designed is to be operated by engine vacuum. When you lose that vacuum, the switching reverts to the setting that doesn't need any vacuum: the defrost setting.
Here is a diagram of one of the vacuum routings. There are different numbers of and color of hoses on different years, but the systems all work the same way. AND the black hose is always the vacuum source.
There is also chart, showing which cabin air setting gets vacuum.
Most technicians suggest that the first thing to check, and the most likely causes of the problem are check valve failure, reservoir failure, or cracked /broken /disconnected vacuum line.
The Bad News:
Unfortunately, when Ford designed the system, they must have thought that there would never be a failure of the check valve, reservoir, or vacuum lines. To have the dealership fix any of these, they have to remove the dash, heater core, and evaporator core to get to them.
I've heard of estimates of $900 labor, $30 parts. Ridiculous! Outrageous!
The Good News:
For under $20, and a little handy man work, one can make and install a bypass system to do the same job as the original check valve/reservoir.
I did have to take the glove box off to access the hoses.
I cut the black hose, and connected it to the bypass system. I knew one end or the other would be going to the switch. Luckily, I picked the right one the first time. If it didn't work, I would just try the other end of the black hose.
The Dorman 47150 was bought at Autozone. It is a check valve with one "IN" and two "Out", so you don't have to buy a "T" when connecting the reservoir.
The PVC pipe I used was about a foot long and capped on both ends, using regular PVC cleaner and adhesive. A 1/2" hole was drilled into the pipe, and the brass hose connector was threaded in with teflon tape.
The PVC pipe is tucked behind a panel to the right of the passenger foot area, but can be anywhere under the dash. I used wire ties to secure it.
As a side note, I tried using an old carburetor cleaner spray can for the reservoir first. I drilled out the cap area and JB Welded a hose fitting in.
It worked great, but after a couple of minutes, the vacuum caused it to crush into itself. It still worked while crushed, but made a crackling noise when the engine first started up hehehe.
The Brass hose connecter was bought at Lowes and is a Watts Brass Hose Barb LFA-85. The grommet was also bought at Lowes. It used a 1/4" hole drilled in the firewall. The grommet is a Hillman H#881258 11/32" OD and 1/8" inside diameter. The hard engine vacuum hose was a tight fit.
Here is a diagram of the routing I used for my Ford van.
Good Luck to You!!
I'll try to post some actual pictures soon.
Post Fiend
Joined: Jan 2003
Posts: 9,748
Likes: 16
From: Connecticut
Nice write-up. That's a neat idea the way you made your own vacuum reservoir tank. Never heard of that before.
On my '98 Ranger, the check valve is integral to the reservoir tank. Fortunately, the tank is fairly easy to access (remove front passenger tire and splash guard), so it can tested with a vacuum pump and replaced, if necessary.
Air flow defaults to the DEFROST vents when vacuum is lost due to safety concerns.
The air-handling system is designed to provide defrost when no vacuum is applied to any of the three air door vacuum motors. This is done to prevent a situation where defrost cannot be obtained due to a system vacuum leak. Instead, a leak in the vacuum control circuit will send all airflow to the defroster outlets. This condition may occur during acceleration (slow leak), may exist at all times (large leak) and may happen only when certain specific functions are selected, indicating a leak in that portion of the circuit.
Thread Starter
|
New User
Joined: Oct 2013
Posts: 6
Likes: 0
Thanks for your kind words & compliments!
Rockledge, glad to hear your reservoir is accessible. I didn't know that some reservoirs have built in check valves. Thanks for the info!
Pictures coming soon, just making some notes and making adjustments to fit parameters of the forum.
If you have comments, or suggestions, please feel free to post 'em!
Fleet Owner


Joined: Aug 2010
Posts: 21,255
Likes: 1,657
From: Reynoldsburg, Ohio
Definitely a great post---plenty of illustrated info to help even the newest DIY's here! 
Here's an additional part reference, hopefully enhancing all this:
Reps sent BTW!
Here's an additional part reference, hopefully enhancing all this:
I had the same problem last year. I found the vacuum line from the engine on the firewall, just above the evaporator and blower motor housing. I couldn't find it underneath the truck, so I found where it entered the cabin and began pulling. As everyone has stated the rubber hose that connects to the vacuum reservoir was crumbling apart. Rather than try to replace the hose, I simply ordered a new vacuum reservoir from Amazon for about $20 and ran a new hose to the vacuum line that comes off the engine. I tucked the new vacuum reservoir up under the dash (as best I could) in the passenger footwell. I secured it with double-sided tape. The new reservoir is triangular, so it fit well. It is an AC Delco #10403762.
Thread Starter
|
New User
Joined: Oct 2013
Posts: 6
Likes: 0
Hi Everyone,
Here are the pictures . . .
This is under the hood of my 2009 Ford E-350 Van
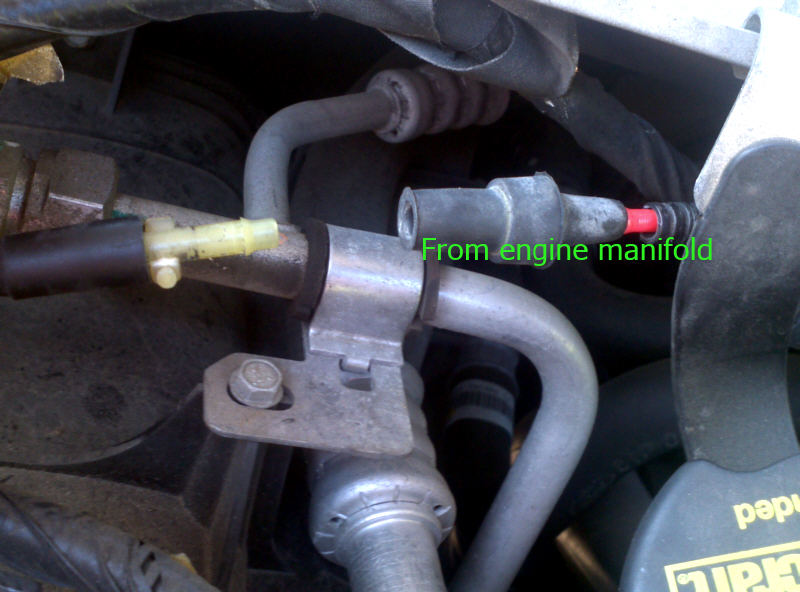
The engine vacuum connection was just to the left of the oil fill, above the AC on the firewall
Here is where I cut the black vacuum line, just past the connector. This was behind the glove box and up to the left.
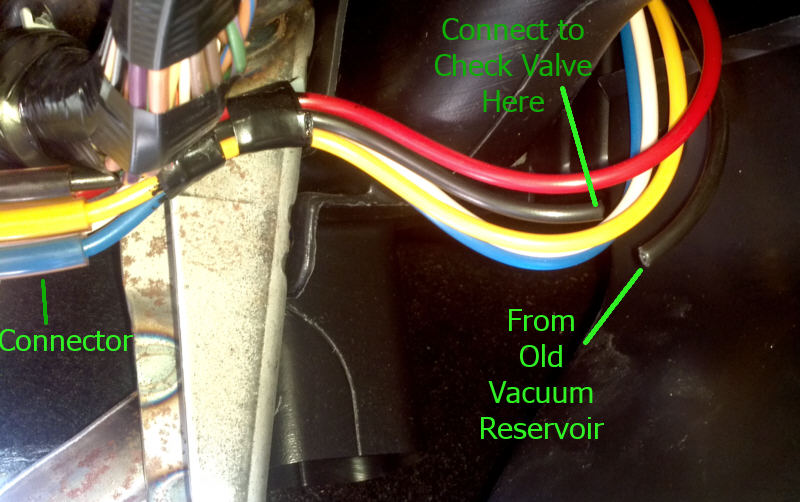
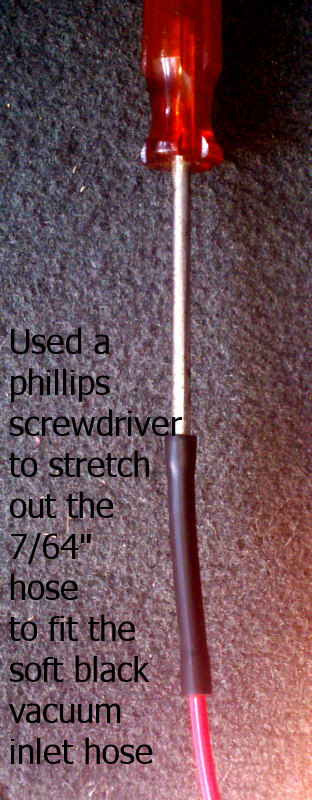
Here is the check valve plumbed in. I drew a thin red line to make seeing where the connection to the black soft hose went, and a thin green line for where the connection to the reservoir went. The white diagonal lines show the length of the 7/64" hose where connected to the soft black selector switch hose.
You can see the loose end of the black soft hose that leads to the disconnected reservoir.

The 7/64" hose had some trouble going over the soft black hose,
so here is how I made it fit
And here is a picture of the reservoir
Hope this makes it simple to understand,
if you decide to do this.
Good Luck to You!
Here are the pictures . . .
This is under the hood of my 2009 Ford E-350 Van
The engine vacuum connection was just to the left of the oil fill, above the AC on the firewall
Here is where I cut the black vacuum line, just past the connector. This was behind the glove box and up to the left.
Here is the check valve plumbed in. I drew a thin red line to make seeing where the connection to the black soft hose went, and a thin green line for where the connection to the reservoir went. The white diagonal lines show the length of the 7/64" hose where connected to the soft black selector switch hose.
You can see the loose end of the black soft hose that leads to the disconnected reservoir.
The 7/64" hose had some trouble going over the soft black hose,
so here is how I made it fit
And here is a picture of the reservoir
Hope this makes it simple to understand,
if you decide to do this.
Good Luck to You!
Trending Topics
Fleet Owner
Joined: Aug 2010
Posts: 21,255
Likes: 1,657
From: Reynoldsburg, Ohio
This is a great write up---with your permission I'll lobby my native forums moderators for inclusion in the vans tech folder.
I will offer that a few weeks ago I was bound and determined to remove as much as needed to find the stock reservoir/check valve in the '92 and later E-Series vans. Well its NOT inside the cabin behind anything I removed there!
It seems that booger is on the firewall below the evaporator case/blower motor mess---IOW pretty much inaccessible by the mortal man.
Great thread, thanks once again for your time and effort here!
FTE Stories
Ford Trucks for Ford Truck Enthusiasts

3 Best / Worst Features Of The 2025+ Ford Expedition
Brett Foote
10 Ways Ford is LOSING to the Competition
Joe Kucinski
Top 6 Best Deals Available on New Fords & Lincolns Right Now
Brett Foote
This Hennessey Takes the Expedition Tremor's Off-Roading Capability to the Next Level
Verdad Gallardo
Top 10 Fords at 2026 Carlisle Ford Nationals
Joe Kucinski
3 Best / 3 Worst Parts of Modern Ford Ownership
Brett Foote
10 Amazing Upgrades That Solve Common Ford Truck Owner Headaches
Pouria Savadkouei
Every 2026 Ford Engine Explained
Brett Foote
10 Ugly Ford Trucks That We Still Kinda Love
Joe Kucinski
Thread Starter
|
New User
Joined: Oct 2013
Posts: 6
Likes: 0
JWA,
I appreciate your thanks!
Feel free to lobby and share the information with anyone / everyone who may have a similar problem.
Yep, yep, yep the stuff you need to get to is impossible to reach. This method will save big bucks compared to taking the vehicle to the dealer. I already had the PVC pipe, so my out of pocket expense was about $12. It took longer for me to get the pictures the way I wanted, and do the diagrams, than it took to put together the PVC reservoir and connect everything.
It's great to have a forum like this to share information.
Thanks Ford Truck Enthusiasts!
Fleet Owner
Joined: Aug 2010
Posts: 21,255
Likes: 1,657
From: Reynoldsburg, Ohio

Logistics Pro


Joined: Jul 2003
Posts: 3,595
Likes: 52
From: Lawton, Oklahoma
Ive been doing a bypass for this at the dealership for years. I dont pull the dash or evaporator etc, I just let the customer know up front that I am going to save them hundreds of dollars on the repair unless they just WANT to spend that kind of green.
I use a factory vacuum reservoir and check valve and mount it under the battery box and run the vacuum lines to it. Ive posted that fix on this forum a couple times in the past.
Nice pics and write up
Your friendly not so greedy Factory Ford Technician
I use a factory vacuum reservoir and check valve and mount it under the battery box and run the vacuum lines to it. Ive posted that fix on this forum a couple times in the past.
Nice pics and write up
Your friendly not so greedy Factory Ford Technician
Fleet Owner
Joined: Aug 2010
Posts: 21,255
Likes: 1,657
From: Reynoldsburg, Ohio
Ive been doing a bypass for this at the dealership for years. I dont pull the dash or evaporator etc, I just let the customer know up front that I am going to save them hundreds of dollars on the repair unless they just WANT to spend that kind of green.
I use a factory vacuum reservoir and check valve and mount it under the battery box and run the vacuum lines to it. Ive posted that fix on this forum a couple times in the past.
Nice pics and write up
Your friendly not so greedy Factory Ford Technician
I use a factory vacuum reservoir and check valve and mount it under the battery box and run the vacuum lines to it. Ive posted that fix on this forum a couple times in the past.
Nice pics and write up
Your friendly not so greedy Factory Ford Technician


Logistics Pro
Joined: Sep 2007
Posts: 3,739
Likes: 181
From: Western Mass
The picture he drew up shows 1" pvc.
It could be shorter if it was bigger pvc.
On my diesel '88 F250 the original vac reservoir was a coffee can. I'm not kidding, the OEM Ford part was a metal coffee can. It had a metal bracket clipped on to bolt it to the driverside fender well, and fittings for the hoses stuck on one end.
Pretty much any container that can stand up to the vacuum pressure would work. A sturdy water bottle like a Nalgene should work fine as well. A larger container would take longer to 'fill' when you start the vehicle up, but would hold vacuum longer under those situations that have low intake vacuum.