


Hydra How-To... in Pictures
Thread Starter
|
Hotshot


Joined: Jan 2011
Posts: 18,849
Likes: 179
From: Puget Sound
Hydra How-To... in Pictures
I've gone through all the gyrations of ordering the Hydra, received it, installed the Hydraflash software, practiced loading stock programs, and received my activation code for my custom tunes... but it's still sitting in a box next to the computer desk. I haven't had the time to pull the PCM and officially "install" the Hydra chip. The questions on Hydra have been flowing, so I thought it was time to share all the screenshots I made while I was configuring my Hydra. I can show you how to get as far as accessing and loading from the stock library of tunes (huge, by the way), but the custom stuff will come later.
First, get your carputer... the one you're going to use for interfacing with the Hydra chip while it's in the truck. Remember, there will be times when the computer has to be on the internet while plugged into the Hydra chip, so I don't recommend using a desktop as your carputer. If you have the Hydra USB, cool... but you don't need it. I'll show you what's on the USB: Links.

Go to the PHP website and install Hydraflash from there.

Just click install
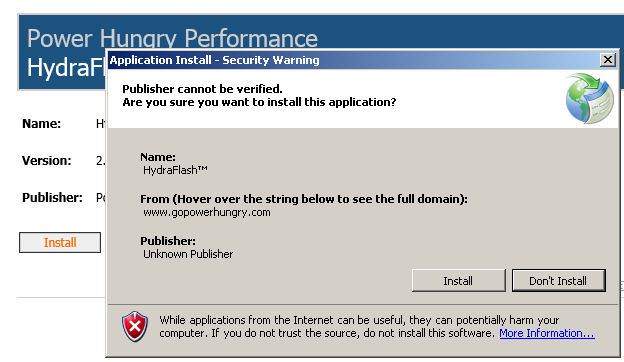
Yes


OK already... just let me get to the tunes.

Get your PCM code ready.


First, get your carputer... the one you're going to use for interfacing with the Hydra chip while it's in the truck. Remember, there will be times when the computer has to be on the internet while plugged into the Hydra chip, so I don't recommend using a desktop as your carputer. If you have the Hydra USB, cool... but you don't need it. I'll show you what's on the USB: Links.
Go to the PHP website and install Hydraflash from there.
Just click install
Yes
OK already... just let me get to the tunes.
Get your PCM code ready.
Butt-Head
Joined: Apr 2004
Posts: 9,405
Likes: 2,894
From: Reed Point, MT
The option exists to download a calibration from the computer's hard drive...that's why tunes are emailed to customers from other vendors.
If you're worried about piracy (as if anybody has found any "secret tables" lately
 ), don't be. PHP can't "see" what anybody else has put on the chip. That's why each chip is individually serial numbered to an encryption strategy.
Junior User
Joined: Jun 2013
Posts: 52
Likes: 0
I installed my Hydra/PHP chip today and I thought I'd post my experience/thoughts in an effort to add to this thread. I was frustrated at times with the PHP written directions and video, but I'll try to minimize the ranting.
Keep in mind that I'm not a motorhead, and some of the things I had trouble with might seem laughable to a good wrench, but maybe it will help somebody like me in the future.
First, read the chip install directions on the website and watch the video. Each of them has stuff the other doesn't and both together still didn't answer all my questions or ease my confusion, but without them I'd have been lost.
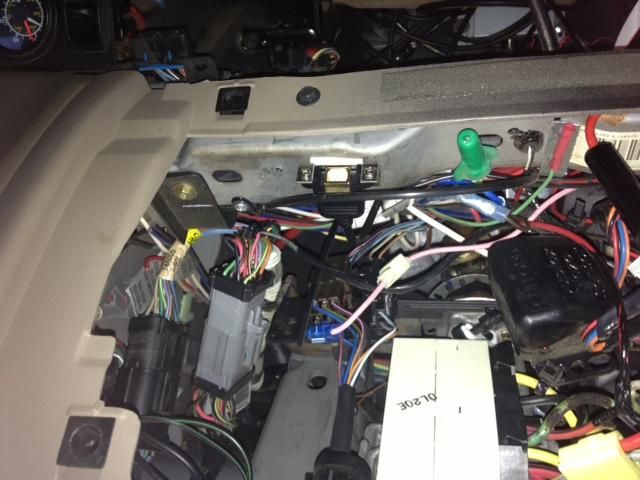
The PCM harness connector is never shown in the video, although the written directions give a good description on how to find it, and a picture would have helped. Here's a picture of my 10mm socket on the retaining bolt:
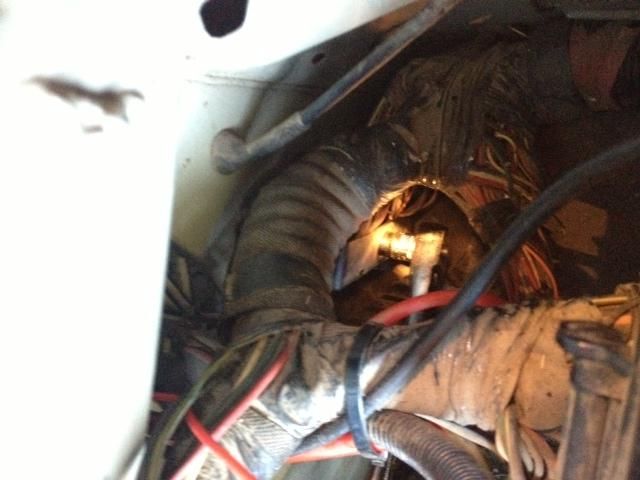
The bolt is retained by the connector, and the connector is connecting a bunch of wires, so nothing comes out of the engine compartment - you loosen the bolt, pry off the connector, and leave everything dangling. (The video would be better if it showed the connector, but it doesn't.)
The video doesn't show the PCM in place either, but it does show him yanking it out, and that was good enough for me to find it.
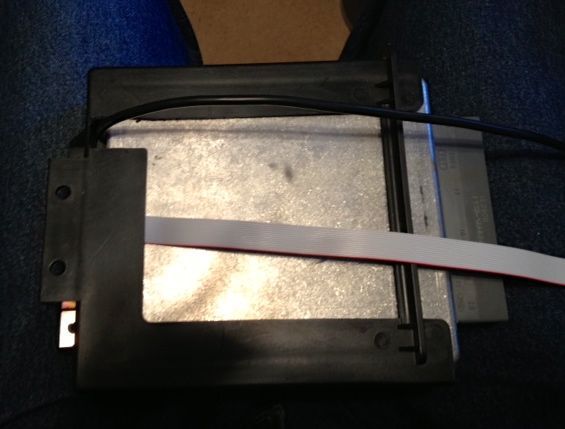
Taking the case out of the mount was no trouble, but I didn't know what they meant by "gold colored ground tab" (mentioned in text but not video). Here it is:
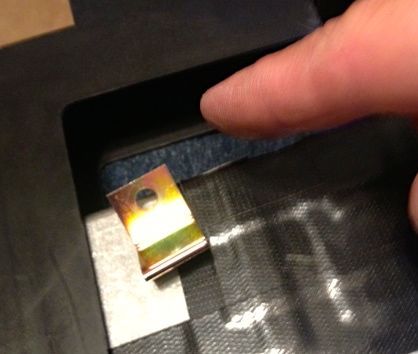
I didn't even see it until it fell out of the mounting bracket. The text said to save it in case you wanted to use it later, but it seemed to me that the grounding tab was there for a reason, so I put it back when I reinstalled the computer into the bracket. There is a thin slot for the grounding tab to go through to receive the screw with the mounting foot.
The text warned about static electricity in handling chips, but the video did not. I wore an anti-static band clipped to the computer chassis when fiddling with the computer and the chip.
I used the included Scotch Brite pad to clean the contacts, but I could see how it would be easy to be too aggressive and take it down to copper. After using the pad I checked the contacts with a 10X loupe and saw a hint of copper in the deeper scratches. At that point I used a jeweler's screwdriver flat blade to carefully scrape each contact of remaining silicon while using the 10X. That got the rest of the goo without losing any more metal, and I wish I'd tried that from the start.
I used Q-tips and nail polish remover (acetone) and the 10X loupe to remove every last bit of tiny rolled up "pills" of silicone from the contacts.
Reassembly: The text and video are really weak here, and they even directly contradict each other.
First, the text instructions say "DO NOT attempt to reinstall the PCM case bolts.....", while in the video the guy does exactly that. Which is it? It looked to me like the video was made more recently, so I put the case bolts back in.
Second, the video shows you attaching the Hydra chip (the "module" in the instructions) after placing the computer back in the mounting bracket, but that only works if you cut out the back of the bracket first, which the video says earlier is "optional". So, yes, following the video step by step, I got it all back together without having actually put the new chip in!
Without cutting the back of the bracket out it looked like my USB connection cable (an optional extra) would be a little strained making a 180 degree turn in a tight space, so I cut out a relief slot:
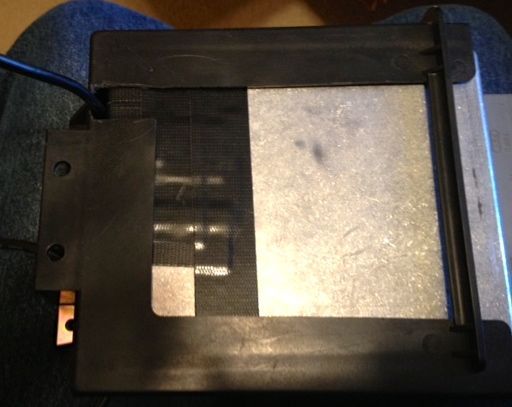
It may not have been necessary.
Ready to go back in:
Putting everything back in wasn't bad at all, because now I'd seen everything.
I mounted the USB connector port behind the big panel below the steering wheel. I figured there was no need to have it out in the open because I won't be changing the tunes that often, and I can easily pull that panel to plug the cable in:
I agree with others how have posted about where the flat ribbon cable enters the control unit - it makes it very difficult to make a clean-looking install. I ran the cable out of the gap between the big removable panel and then mounted the control right at the gap. That minimizes the amount of ugly cable showing.
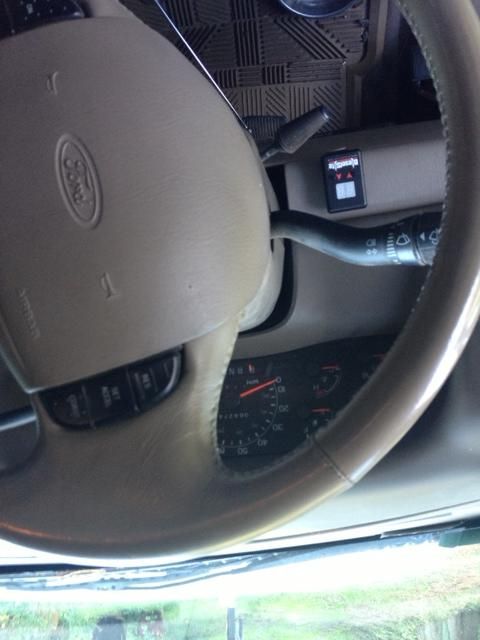
It's not as ugly as I expected, the cable is mostly out of sight from the driver's position, but I just mounted it with double-sticky tape so I can move it later if I have a brainstorm for a cleaner looking install.
Then, miracle of miracles, the truck started!!
And....I've been so busy putting out fires for the rest of the day that I still haven't managed to find the time to drive the truck with the new tunes....
I hope this helps someone like me who basically doesn't know what they're doing.
Keep in mind that I'm not a motorhead, and some of the things I had trouble with might seem laughable to a good wrench, but maybe it will help somebody like me in the future.
First, read the chip install directions on the website and watch the video. Each of them has stuff the other doesn't and both together still didn't answer all my questions or ease my confusion, but without them I'd have been lost.
The PCM harness connector is never shown in the video, although the written directions give a good description on how to find it, and a picture would have helped. Here's a picture of my 10mm socket on the retaining bolt:

The bolt is retained by the connector, and the connector is connecting a bunch of wires, so nothing comes out of the engine compartment - you loosen the bolt, pry off the connector, and leave everything dangling. (The video would be better if it showed the connector, but it doesn't.)
The video doesn't show the PCM in place either, but it does show him yanking it out, and that was good enough for me to find it.
Taking the case out of the mount was no trouble, but I didn't know what they meant by "gold colored ground tab" (mentioned in text but not video). Here it is:

I didn't even see it until it fell out of the mounting bracket. The text said to save it in case you wanted to use it later, but it seemed to me that the grounding tab was there for a reason, so I put it back when I reinstalled the computer into the bracket. There is a thin slot for the grounding tab to go through to receive the screw with the mounting foot.
The text warned about static electricity in handling chips, but the video did not. I wore an anti-static band clipped to the computer chassis when fiddling with the computer and the chip.
I used the included Scotch Brite pad to clean the contacts, but I could see how it would be easy to be too aggressive and take it down to copper. After using the pad I checked the contacts with a 10X loupe and saw a hint of copper in the deeper scratches. At that point I used a jeweler's screwdriver flat blade to carefully scrape each contact of remaining silicon while using the 10X. That got the rest of the goo without losing any more metal, and I wish I'd tried that from the start.
I used Q-tips and nail polish remover (acetone) and the 10X loupe to remove every last bit of tiny rolled up "pills" of silicone from the contacts.
Reassembly: The text and video are really weak here, and they even directly contradict each other.
First, the text instructions say "DO NOT attempt to reinstall the PCM case bolts.....", while in the video the guy does exactly that. Which is it?
It looked to me like the video was made more recently, so I put the case bolts back in.Second, the video shows you attaching the Hydra chip (the "module" in the instructions) after placing the computer back in the mounting bracket, but that only works if you cut out the back of the bracket first, which the video says earlier is "optional". So, yes, following the video step by step, I got it all back together without having actually put the new chip in!
Without cutting the back of the bracket out it looked like my USB connection cable (an optional extra) would be a little strained making a 180 degree turn in a tight space, so I cut out a relief slot:

It may not have been necessary.
Ready to go back in:

Putting everything back in wasn't bad at all, because now I'd seen everything.
I mounted the USB connector port behind the big panel below the steering wheel. I figured there was no need to have it out in the open because I won't be changing the tunes that often, and I can easily pull that panel to plug the cable in:

I agree with others how have posted about where the flat ribbon cable enters the control unit - it makes it very difficult to make a clean-looking install. I ran the cable out of the gap between the big removable panel and then mounted the control right at the gap. That minimizes the amount of ugly cable showing.

It's not as ugly as I expected, the cable is mostly out of sight from the driver's position, but I just mounted it with double-sticky tape so I can move it later if I have a brainstorm for a cleaner looking install.
Then, miracle of miracles, the truck started!!
And....I've been so busy putting out fires for the rest of the day that I still haven't managed to find the time to drive the truck with the new tunes....
I hope this helps someone like me who basically doesn't know what they're doing.

Posting Guru
Joined: Apr 2010
Posts: 1,164
Likes: 0
From: Canberra Australia
AlienB, thanks for the post. That will help me lots. My PHP Hydra order is in, I now know what to focus on when doing my install.
So, could you have completed it OK on the Friday morning before your trip?
So, could you have completed it OK on the Friday morning before your trip?
Thread Starter
|
Hotshot
Joined: Jan 2011
Posts: 18,849
Likes: 179
From: Puget Sound
This is fantastic! That's a great write-up on installing, and thank you for taking the time to document the whole affair with pictures. Couple that with the software instructions, and this is the Hydra front-to-back... with the back in the front.
Reps, alienbogey.
Reps, alienbogey.
Trending Topics
Posting Guru
Joined: May 2013
Posts: 1,199
Likes: 2
From: Oklahoma
You are one strong man to keep "putting out fires" and not drive your truck with the new tunes... I can't wait to hear your thoughts on how it runs now. I really want to get a chip for my truck, looking at the Hydra very closely because of the abilty to have custom tunes added.
Report back the anticipation is killing me and it isn't even my truck!
Report back the anticipation is killing me and it isn't even my truck!
FTE Stories
Ford Trucks for Ford Truck Enthusiasts

10 Best Ford Truck Engines We Miss the Most!
Joe Kucinski
2026 Shelby F-150 Off-Road: Better Than a Raptor R?
Brett Foote
2027 Super Duty Carhartt Package First Look: 12 Things You NEED to Know!
Michael S. Palmer
10 Most Surprising 2026 Ford Truck Features!
Joe Kucinski
Top 10 Ford Trucks Coming to Mecum Indy 2026
Brett Foote
5 Best / 5 Worst Ford Truck Wheels of All Time
Joe Kucinski
Ford Super Duty: 5 Things Owners LOVE, 5 Things They LOATHE!
Joe Kucinski
Every 2026 Ford Truck Engine RANKED from WORST to FIRST!
Michael S. Palmer
The Best F-150 Deal of Every Trim Level (XL through Raptor)
Joe KucinskiPostmaster
Joined: Jun 2010
Posts: 2,555
Likes: 8
From: Longview, TX
I'll go ahead and mention my issue when I got mine in a couple weeks ago. I was not able to get the computer to recognize the chip. It ended up being a bad USB cable, but it was throwing me for a serious loop because I thought I had installed something wrong.
I found it somewhat annoying that I couldn't search for calibrations or narrow down the list at all. Being able to narrow the list down by hex code would be an awesome addition, but how often am I really going to go in and make adjustments?
It's also important to note that you shouldn't mix strategies.
Now there is one more feature that hasn't been brought up yet, and that's the "Read ECM" button. From what I gather, this simply reads the hex code off of the PCM when the chip is installed and the key is on. Maybe Cody can confirm this?
The only other thing I would have liked to see is the ability to read codes. I'm not even so much worried about viewing live data and being able to make adjustments, and really not even clear them, just read them. That's not why I bought it though.
I would have preferred a dash green display, but from what I've read, Cody said they tried Green during testing but it wasn't visible during the day. Switcher mounting options would be nice as well, I don't like Velcro. I've seen several threads with mounting options, but none that I really like so far. I'd like to see any creative mounting options you guys come up with.
I also haven't seen a good explanation of how to use the no-start feature. From what I've figured out, simply switch all the way up to nS and turn the key off. When you turn the key back on, take it out of nS then key off and back on, then crank.
Butt-Head
Joined: Apr 2004
Posts: 9,405
Likes: 2,894
From: Reed Point, MT
You are one strong man to keep "putting out fires" and not drive your truck with the new tunes... I can't wait to hear your thoughts on how it runs now. I really want to get a chip for my truck, looking at the Hydra very closely because of the abilty to have custom tunes added.
Report back the anticipation is killing me and it isn't even my truck!
Report back the anticipation is killing me and it isn't even my truck!
It won't run any differently. The hardware from which the calibrations are read does not matter. Some people just don't like ***** - they prefer buttons and seven-segment LED displays.
Butt-Head
Joined: Apr 2004
Posts: 9,405
Likes: 2,894
From: Reed Point, MT
It's also important to note that you shouldn't mix strategies.
Now there is one more feature that hasn't been brought up yet, and that's the "Read ECM" button. From what I gather, this simply reads the hex code off of the PCM when the chip is installed and the key is on. Maybe Cody can confirm this?
The only other thing I would have liked to see is the ability to read codes. I'm not even so much worried about viewing live data and being able to make adjustments, and really not even clear them, just read them. That's not why I bought it though.
I would have preferred a dash green display, but from what I've read, Cody said they tried Green during testing but it wasn't visible during the day. Switcher mounting options would be nice as well, I don't like Velcro. I've seen several threads with mounting options, but none that I really like so far. I'd like to see any creative mounting options you guys come up with.
I also haven't seen a good explanation of how to use the no-start feature. From what I've figured out, simply switch all the way up to nS and turn the key off. When you turn the key back on, take it out of nS then key off and back on, then crank.
Also, given the way the Hydra operates, the switch can be removed from the cable in any chip position and the chip will remain in that position. Say for example your teenager wants to take the truck out on the town with his buddies. Go out and put on the 45 MPH "valet" calibration, take off the switch, and hide it in your closet. The chip will remain in that calibration. Your son won't want to borrow the truck again and his friends will think that your truck is a POS.
Junior User
Joined: Jun 2013
Posts: 52
Likes: 0
Well, as it turns out I could have completed it Friday morning before my trip, but I felt like I would have been rolling the bones, because if I screwed or broke something up a long-awaited trip would have gone down the toilet. I'd have been sweating every step wondering if it was going to be running again by our planned departure time.
[Which is why I'm not even going to try the FRx and HPx installs before our big Yellowstone trip in six days.]
Somewhere I've seen it mentioned that it's a 30 minute install. Well, with my dithering, being triple-careful, and having to backtrack a couple of times it took me a little over 2 hours.
As of this writing I STILL haven't driven the truck anywhere - it's still sitting there where I did the install and confirmed that it started. Today was another day of meeting myself coming and going, and I just now found the time to check this thread.
I'm going to run a few errands with it tomorrow, with the camper on, and we'll see how it goes.
Thread Starter
|
Hotshot
Joined: Jan 2011
Posts: 18,849
Likes: 179
From: Puget Sound
Like Cody said, I have my tunes. I would like to make a tweak here and there. Don't get me wrong, the live-tuning got Stinky as smooth as we could make him at the time... but new hardware has led to the need for an adjustment.