
FRONT DIFFERENTIAL PART II

Thread Starter
|
Junior User
Joined: Jul 2007
Posts: 86
Likes: 0
From: St Louis, MO USA
FRONT DIFFERENTIAL PART II
Here we go again. This is following my previous post. I have replaced the front differential pinion seal last week,( back of the differential ) front of the truck.
Last year I did the the passenger side seal , same differential , now it is time to do the driver's side ....
Below is a shot from the bottom showing how oil was leaking prior to do this job

Let me start by saying, I believe you do not need to remove the spring suspenstion, but since it is easy to remove it will make the job 100% easier.
Below are the torque specs . You might need to get a torque wrench at
Harbor freight tools.

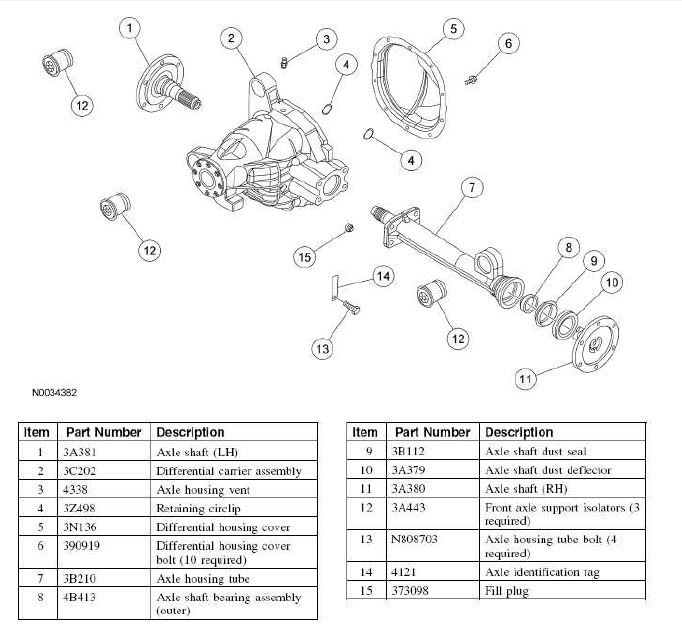
Also below is an exploded view of the front differential.
When you do this job, borrow a slide hammer from your local Autozone/ Oreilleys , do not forget the bottom attachment for the slide hammer.
You will need new seals, the driver's side and passenger's side seals are the same. Make sure you get a new circlip, it goes on the tip of the axle shaft and it needs to be replaced once the axle shaft if removed.
Below is the location of the circlip

Part Numbers are as follows:

Seal package below

Start by removing the wheel, then the brakes, the brake rotor, ensure you get a wire to hang the caliper from the supention, do not let it hang from it's hose.
Remove the ball joint nut, the control arm nut , and the upper ball joint nut, also remove the nut from the torsion bar. You must use an air wrench to do this job, take my word for it, my wrench has 1000 lbs of torque , so it is very helpful.
Remove the three bolts on the back of the arm, it holds some sort of sensor, connercted to a hose, also remove the speed sensor on top of the hub. It takes a small allen wrench.
Pull the whole thing aside. Now is time to remove the 12mm 12 pts bolts holding the half shaft to the axle shaft.
Wiggle it out. You will be able to remove with the spring/shock in place. I decided to remove the spring /shock , all it talkes is the three 15 mm nuts on top of the tower, and the big 24 mm nut on the bottom.
Picture below show the whole suspention pretty much out of the truck, note the spring and the half shaft are still in place.

Once the spring is out of the way, it will look like the picture below. Note the axle shaft still in the differential , it has a little white X on it.
Now all you have to do is attach the shoe from the slide hammer to the axle shaft, use two of its own bolts. One firm slide stroke and it is out.
Picture below shows close up, axle shaft out , exposing the old seal.

Next picture shows some of the parts removed in order to do this job.

Removing the old seal can be a PITA, I used a small screw driver and a small hammer , I bangged in the edges of the seal, be very careful not to scrape the housing. See how it looks after I removed and cleaned the housing.

Good luck on your endeavour , feel free to ask any questions.
Put everything together on reverse order.
I hope this write up helps someone out there.
I am thanking you folks for providing much needed help when I needed.
Last year I did the the passenger side seal , same differential , now it is time to do the driver's side ....
Below is a shot from the bottom showing how oil was leaking prior to do this job
Let me start by saying, I believe you do not need to remove the spring suspenstion, but since it is easy to remove it will make the job 100% easier.
Below are the torque specs . You might need to get a torque wrench at
Harbor freight tools.
Also below is an exploded view of the front differential.
When you do this job, borrow a slide hammer from your local Autozone/ Oreilleys , do not forget the bottom attachment for the slide hammer.
You will need new seals, the driver's side and passenger's side seals are the same. Make sure you get a new circlip, it goes on the tip of the axle shaft and it needs to be replaced once the axle shaft if removed.
Below is the location of the circlip
Part Numbers are as follows:
Seal package below
Start by removing the wheel, then the brakes, the brake rotor, ensure you get a wire to hang the caliper from the supention, do not let it hang from it's hose.
Remove the ball joint nut, the control arm nut , and the upper ball joint nut, also remove the nut from the torsion bar. You must use an air wrench to do this job, take my word for it, my wrench has 1000 lbs of torque , so it is very helpful.
Remove the three bolts on the back of the arm, it holds some sort of sensor, connercted to a hose, also remove the speed sensor on top of the hub. It takes a small allen wrench.
Pull the whole thing aside. Now is time to remove the 12mm 12 pts bolts holding the half shaft to the axle shaft.
Wiggle it out. You will be able to remove with the spring/shock in place. I decided to remove the spring /shock , all it talkes is the three 15 mm nuts on top of the tower, and the big 24 mm nut on the bottom.
Picture below show the whole suspention pretty much out of the truck, note the spring and the half shaft are still in place.
Once the spring is out of the way, it will look like the picture below. Note the axle shaft still in the differential , it has a little white X on it.
Now all you have to do is attach the shoe from the slide hammer to the axle shaft, use two of its own bolts. One firm slide stroke and it is out.
Picture below shows close up, axle shaft out , exposing the old seal.
Next picture shows some of the parts removed in order to do this job.
Removing the old seal can be a PITA, I used a small screw driver and a small hammer , I bangged in the edges of the seal, be very careful not to scrape the housing. See how it looks after I removed and cleaned the housing.
Good luck on your endeavour , feel free to ask any questions.
Put everything together on reverse order.
I hope this write up helps someone out there.
I am thanking you folks for providing much needed help when I needed.

Thread
Thread Starter
Forum
Replies
Last Post
ifrythings
Pre-Power Stroke Diesel (7.3L IDI & 6.9L)
3
Apr 3, 2015 11:21 PM
sammie0126
Excursion - King of SUVs
29
Aug 20, 2014 06:06 PM
EffoneHunded
Clutch, Transmission, Differential, Axle & Transfer Case
3
Oct 21, 2012 03:42 PM


