
Adjustable Track Bar for dummies w/pictures - updated
#1
 05-27-2013, 06:02 PM

Adjustable Track Bar for dummies w/pictures - updated
Install of an adjustable track bar on a 2000 Ford Excursion V10 4x4
Parts - Off Zone Adjustable track bar #F5251
Tools Used
13/16" Socket
7/8" Socket
1/2" and 3/8" Ratchets
300 Ft Lb Torque wrench (still not big enough though)
Breaker Bar
Cheaper pipes
3/16" Offset Socket
Floor Jack
BFH
Pry Bar
Dremel & KBS Paint
First task is breaking loose the bolts on the track bar. These are torqued to 405 ft lbs. Was no way I was going to break them loose even with a cheater bar so I used a floor jack to do the work.

Once broken loose I used a 13/16" socket (bolt) and 7/8" socket (nut) to remove the nut from the mounting bolt. I had to use a punch and hammer to tap the bolt all the way out after removing the nut.

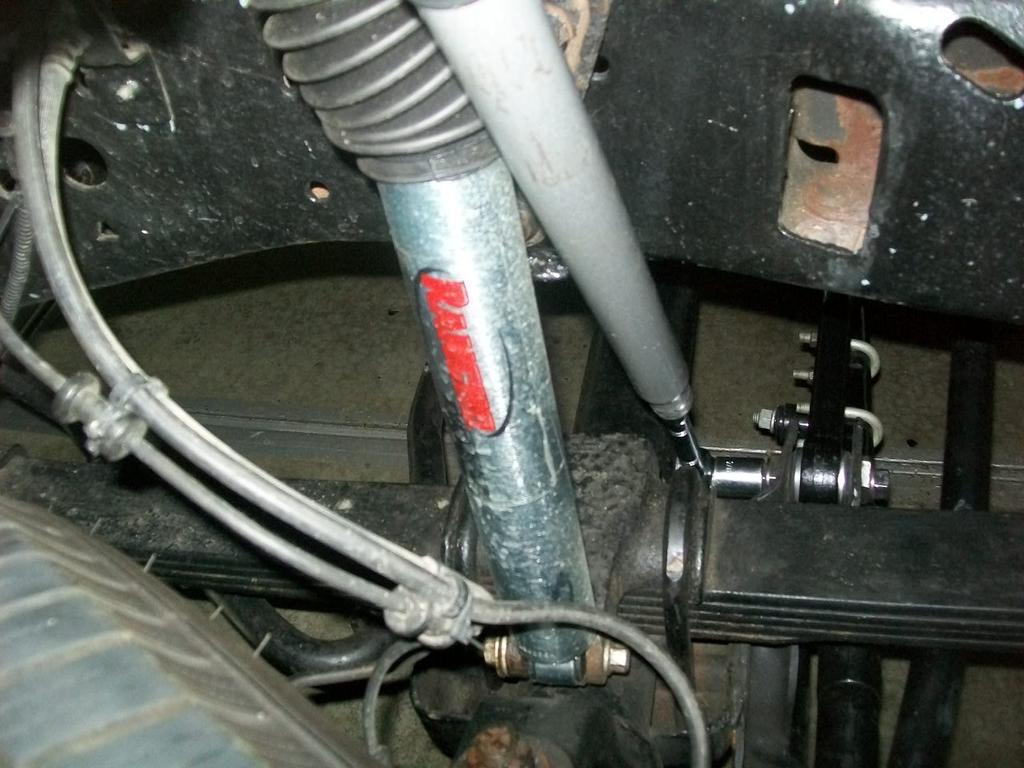
Each side has a bolt, washer, sleeve on the front side, then a sleeve, washer and bolt also on the back side. The sleeves are deeper on the driver's side than the passenger side due to thickness of the frame bracket. Hardware as it was removed.
Passenger Side

Drivers Side - notice the thicker sleeves

Same hardware after some dremel work

Track bar new and old side by side. The metal bushing in the middle needed to come out of the old one and into the new one. Used an old 5/8 socket and it tapped out pretty easily with a BFH.

Then insert it into the new track bar. Same BFH used.

Then I attacked the brackets with my dremel and gave them a coating of kbs.

Measure your bars and get the length set as close you an can before installing. Mine was too short and was pressed really hard against the bushings. You can see in the photo below how far stretched it was.

I set the new bar to my best guess then wedged the passenger side into the bracket. Then installed the bolt, washer, sleeve. Took some smacks with the BFH and a pry bar to get it into the bracket.

Had to use an offset wrench to get it started on this side due to clearance issues. Then on the backside goes sleeve, washer, nut. I just fingered tightened at this point.

Lift up the drivers side and do the same thing. Mine was still off by about 1/8" so had three 20 year olds who happen to be here jump, yank and pull on my truck to get the axle to recenter, got close but still not perfect enough to thread the bolt, took a floor jack against the front frame positioned so it would pull out slightly as it went up to get it just right. You have to get the sleeves into the brackets and to do that you have to have the bolt centered.

Once both sides were installed and finger tight. I backed my truck forward and back several times and then took some measurements. Before install I was 5/8" too far out on one side, after install I was less than 1/8" off so I called it good and moved onto getting them torqued down.
First I tightened up the adjusting sleeve bolts to make sure nothing would move. Don't remember the size on these but I think it was 18mm

Then I turned the wheel all the way to the right, got the driver's side as tight as I could with my big ratchet. Then got out my torque wrench and got it to 300 ft lbs. Then switched back to my 1/2 breaker bar with a couple of cheaper pipes attached and gave it everything else I had. Don't know if it's 405 lbs but its close.

Repeat on passenger side by turning the wheel the opposite direction less clearance on this side so took more but smaller rotations, torque wrench to 300ft lbs, followed by several more turns with the breaker bar and cheaper pipe.
Take it for a drive an make sure nothing clunks. Mine made a huge difference in the turning, bump steer much better and now returns to center with ease.
My steering wheel did end up 1/4 turn off center. So when I was done I put it up in the front, and adjusted my sleeve to recenter the steering wheel.
Parts - Off Zone Adjustable track bar #F5251
Tools Used
13/16" Socket
7/8" Socket
1/2" and 3/8" Ratchets
300 Ft Lb Torque wrench (still not big enough though)
Breaker Bar
Cheaper pipes
3/16" Offset Socket
Floor Jack
BFH
Pry Bar
Dremel & KBS Paint
First task is breaking loose the bolts on the track bar. These are torqued to 405 ft lbs. Was no way I was going to break them loose even with a cheater bar so I used a floor jack to do the work.
Once broken loose I used a 13/16" socket (bolt) and 7/8" socket (nut) to remove the nut from the mounting bolt. I had to use a punch and hammer to tap the bolt all the way out after removing the nut.
Each side has a bolt, washer, sleeve on the front side, then a sleeve, washer and bolt also on the back side. The sleeves are deeper on the driver's side than the passenger side due to thickness of the frame bracket. Hardware as it was removed.
Passenger Side
Drivers Side - notice the thicker sleeves
Same hardware after some dremel work
Track bar new and old side by side. The metal bushing in the middle needed to come out of the old one and into the new one. Used an old 5/8 socket and it tapped out pretty easily with a BFH.
Then insert it into the new track bar. Same BFH used.
Then I attacked the brackets with my dremel and gave them a coating of kbs.
Measure your bars and get the length set as close you an can before installing. Mine was too short and was pressed really hard against the bushings. You can see in the photo below how far stretched it was.
I set the new bar to my best guess then wedged the passenger side into the bracket. Then installed the bolt, washer, sleeve. Took some smacks with the BFH and a pry bar to get it into the bracket.
Had to use an offset wrench to get it started on this side due to clearance issues. Then on the backside goes sleeve, washer, nut. I just fingered tightened at this point.
Lift up the drivers side and do the same thing. Mine was still off by about 1/8" so had three 20 year olds who happen to be here jump, yank and pull on my truck to get the axle to recenter, got close but still not perfect enough to thread the bolt, took a floor jack against the front frame positioned so it would pull out slightly as it went up to get it just right. You have to get the sleeves into the brackets and to do that you have to have the bolt centered.
Once both sides were installed and finger tight. I backed my truck forward and back several times and then took some measurements. Before install I was 5/8" too far out on one side, after install I was less than 1/8" off so I called it good and moved onto getting them torqued down.
First I tightened up the adjusting sleeve bolts to make sure nothing would move. Don't remember the size on these but I think it was 18mm
Then I turned the wheel all the way to the right, got the driver's side as tight as I could with my big ratchet. Then got out my torque wrench and got it to 300 ft lbs. Then switched back to my 1/2 breaker bar with a couple of cheaper pipes attached and gave it everything else I had. Don't know if it's 405 lbs but its close.
Repeat on passenger side by turning the wheel the opposite direction less clearance on this side so took more but smaller rotations, torque wrench to 300ft lbs, followed by several more turns with the breaker bar and cheaper pipe.
Take it for a drive an make sure nothing clunks. Mine made a huge difference in the turning, bump steer much better and now returns to center with ease.
My steering wheel did end up 1/4 turn off center. So when I was done I put it up in the front, and adjusted my sleeve to recenter the steering wheel.
#2
05-27-2013, 06:35 PM

Interesting....didnt know the excursions had different track bar hardware. I had to use a 1 3/16" socket for my track bar bolts, and i only needed a socket because the nut on the back has a tab attached to it which sits in a little groove so it cant spin at all. Same size bolts on both ends
Good writeup though
Good writeup though
#3
05-27-2013, 06:46 PM
Interesting....didnt know the excursions had different track bar hardware. I had to use a 1 3/16" socket for my track bar bolts, and i only needed a socket because the nut on the back has a tab attached to it which sits in a little groove so it cant spin at all. Same size bolts on both ends
Good writeup though
Good writeup though
#4
05-27-2013, 06:47 PM
Also i am not sure if you put those in or not, but those odd little offset bushing spacer things come with some leveling kits...it apparently "offsets" the track bar enough to reach for a leveling kit
#5
05-27-2013, 07:11 PM
The offset sleeves fill the gap in the hole through the bracket, without them the bolt could wallow around in the bracket. Driver's side is thicker bracket than the passenger side, so they are different thickness. If you didn't insert the metal sleeves inside the track bar bushing, could get the same thing since the bolt is sitting through an opening larger than the itself and that can't be good. I was kind of annoyed that I had to move that metal sleeve, think the new ones should have come with them, but it took me about 10 minutes, to my surprise they actually came right out - cleaned up and tapped into the new ones.
#6
05-27-2013, 07:12 PM

#7
05-27-2013, 07:51 PM

That OEM mounting hardware had "cam bushings" in it which were adjustable and they made the bushings look worse than they were in the original pictures. Also; don't worry about the nut torque, there are specs for everything but they rarely are carved in stone. Good thing those guys were around.....or did you kinda' plan it like that? lol.
Trending Topics
#8
05-27-2013, 07:58 PM
That OEM mounting hardware had "cam bushings" in it which were adjustable and they made the bushings look worse than they were in the original pictures. Also; don't worry about the nut torque, there are specs for everything but they rarely are carved in stone. Good thing those guys were around.....or did you kinda' plan it like that? lol.
#10
05-27-2013, 08:11 PM
Really don't know, but my bar didn't come with them and its supposed to be for F250, F350 and Excursions 99+, but my truck sure had them and installing a bar without them didn't seem like a good idea. If your truck didn't have the center metal bushings and it had larger bolts then I'm guessing you are fine. As long as the bolt fit tight in the bushing and through your bracket holes I think you are fine.
#11
06-02-2013, 04:32 PM

 . I have the new track bar, but it didn't come with the metal offset sleeves. Does anyone know the bolt size if I take them out completely?
#12
06-02-2013, 06:53 PM
I don't know what size they are and since they are that odd offset drilled, I am guessing the only place you are going to find them is from Ford.
#13
06-02-2013, 09:29 PM
I couldn't find the part on the Ford website...if anyone knows the part number or has a resource I could look them up under it would be very helpful. Even if I knew what they were acutally called instead of offset metal bushing things.
Stew
Stew
#14
06-02-2013, 11:20 PM

It looks like they used the bracket and bolts setup for a pre- 3/1/99 Superduty and installed bushings to allow it to work with a post 3/1/99 Track bar.
The pre-3/1/99 Super Duties used a smaller bolt and the trackbar had a smaller diameter shaft.
This might shed some light:
https://www.ford-trucks.com/forums/9...-bushings.html
If you have the bracket for the small bolt, you might consider changing it out the bracket and bolts with ones from a boneyard. The larger ones are stronger.
From The instructions for the Zome adjustable trackbar:
"
Early Model Trucks: This track bar is designed to work on vehicles manufactured
after 3/1/99. Earlier models used smaller track bar bolts that will not fit
properly in the provided track bar ends. Newer model trucks will have a track
bar bolt that has a hex head measuring 1-3/16 across the flats.""
#15
06-03-2013, 05:49 AM
It looks like they used the bracket and bolts setup for a pre- 3/1/99 Superduty and installed bushings to allow it to work with a post 3/1/99 Track bar.
The pre-3/1/99 Super Duties used a smaller bolt and the trackbar had a smaller diameter shaft.
This might shed some light:
https://www.ford-trucks.com/forums/9...-bushings.html
If you have the bracket for the small bolt, you might consider changing it out the bracket and bolts with ones from a boneyard. The larger ones are stronger.
From The instructions for the Zome adjustable trackbar:
"
Early Model Trucks: This track bar is designed to work on vehicles manufactured
after 3/1/99. Earlier models used smaller track bar bolts that will not fit
properly in the provided track bar ends. Newer model trucks will have a track
bar bolt that has a hex head measuring 1-3/16 across the flats.""
The pre-3/1/99 Super Duties used a smaller bolt and the trackbar had a smaller diameter shaft.
This might shed some light:
https://www.ford-trucks.com/forums/9...-bushings.html
If you have the bracket for the small bolt, you might consider changing it out the bracket and bolts with ones from a boneyard. The larger ones are stronger.
From The instructions for the Zome adjustable trackbar:
"
Early Model Trucks: This track bar is designed to work on vehicles manufactured
after 3/1/99. Earlier models used smaller track bar bolts that will not fit
properly in the provided track bar ends. Newer model trucks will have a track
bar bolt that has a hex head measuring 1-3/16 across the flats.""