


manual hub install
Thread Starter
|
Mod Specialist ;)
Joined: Jan 2006
Posts: 4,130
Likes: 0
From: Hanover,PA

manual hub install
Just Got Mile Marker manual hubs this week and installed the today. This was one of the easiest mod's I have done.
<table id="ncode_imageresizer_warning_1" class="ncode_imageresizer_warning" width="400"><tbody><tr><td class="td1" width="20"> </td><td class="td2">Click this bar to view the full image.</td></tr></tbody></table>
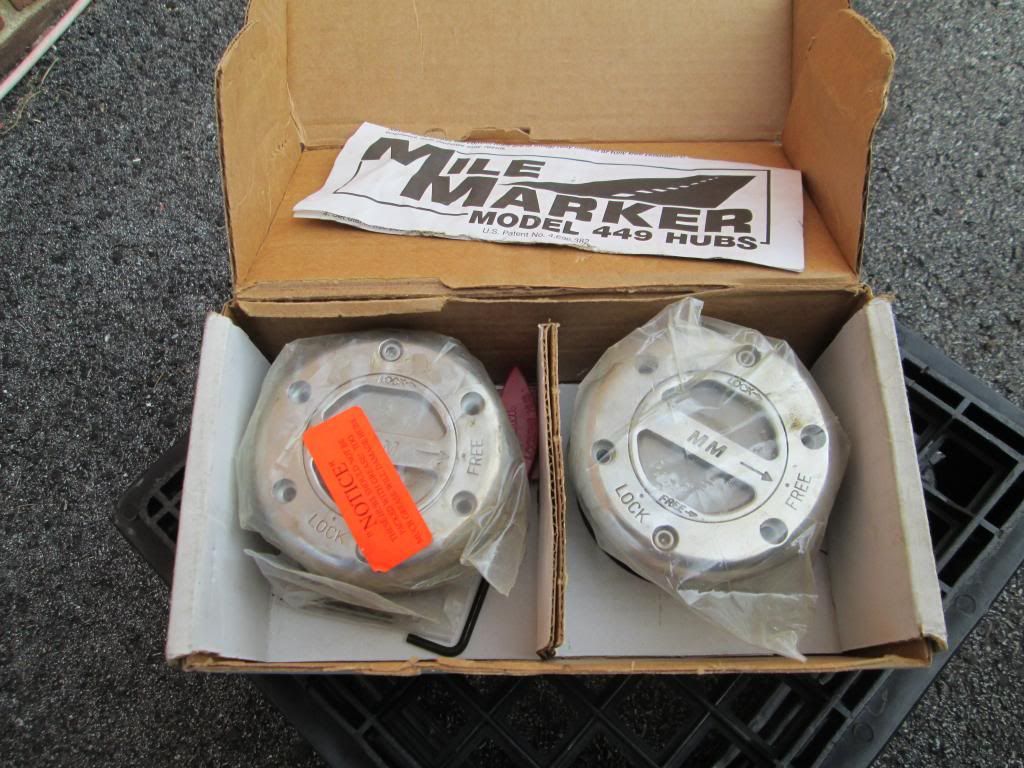
First remove the center cap.
Then remove the snap ring that holds the factory hub on.
<table id="ncode_imageresizer_warning_2" class="ncode_imageresizer_warning" width="400"><tbody><tr><td class="td1" width="20"></td><td class="td2">Click this bar to view the full image.</td></tr></tbody></table>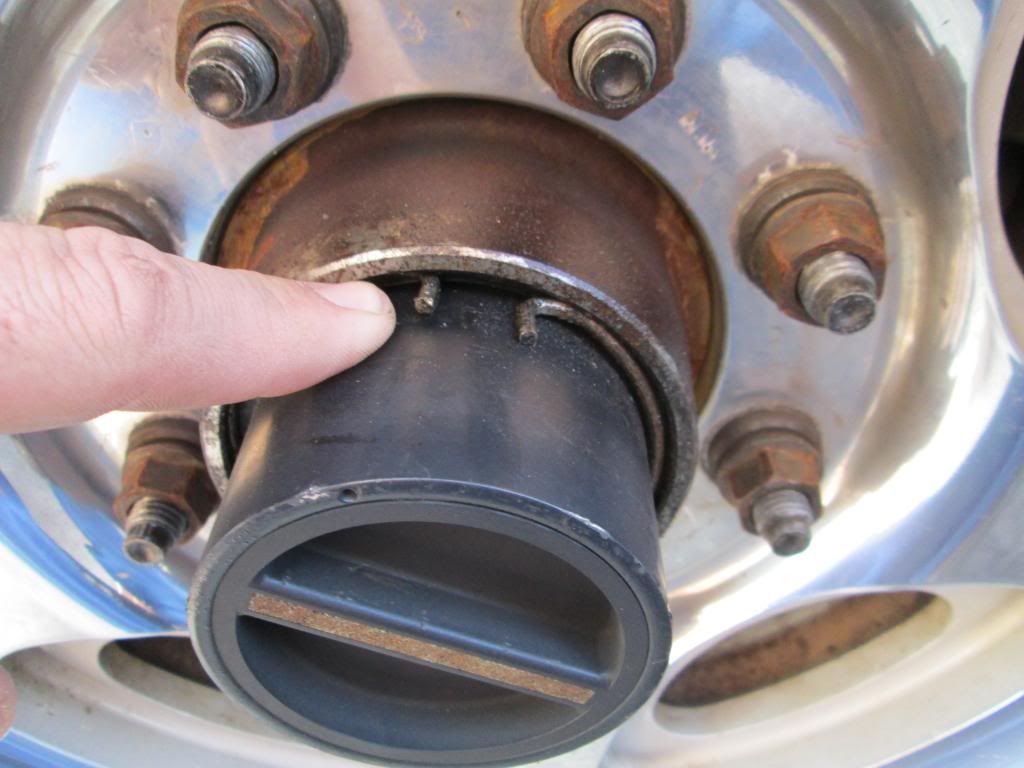
Next pull the factory hub out. Mine came out pretty easy. Some you may have to help out.
<table id="ncode_imageresizer_warning_3" class="ncode_imageresizer_warning" width="400"><tbody><tr><td class="td1" width="20"></td><td class="td2">Click this bar to view the full image.</td></tr></tbody></table>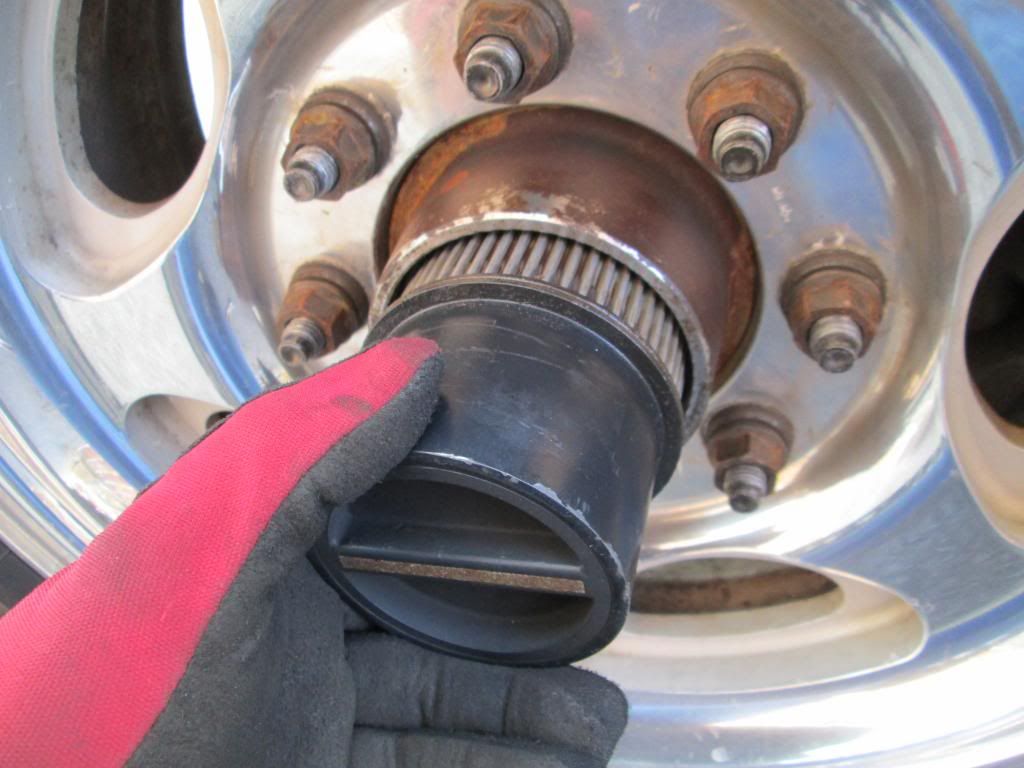
Then remove the 2 screws that hold outside hub housing on and sit it aside.
<table id="ncode_imageresizer_warning_9" class="ncode_imageresizer_warning" width="400"><tbody><tr><td class="td1" width="20"></td><td class="td2">Click this bar to view the full image.</td></tr></tbody></table>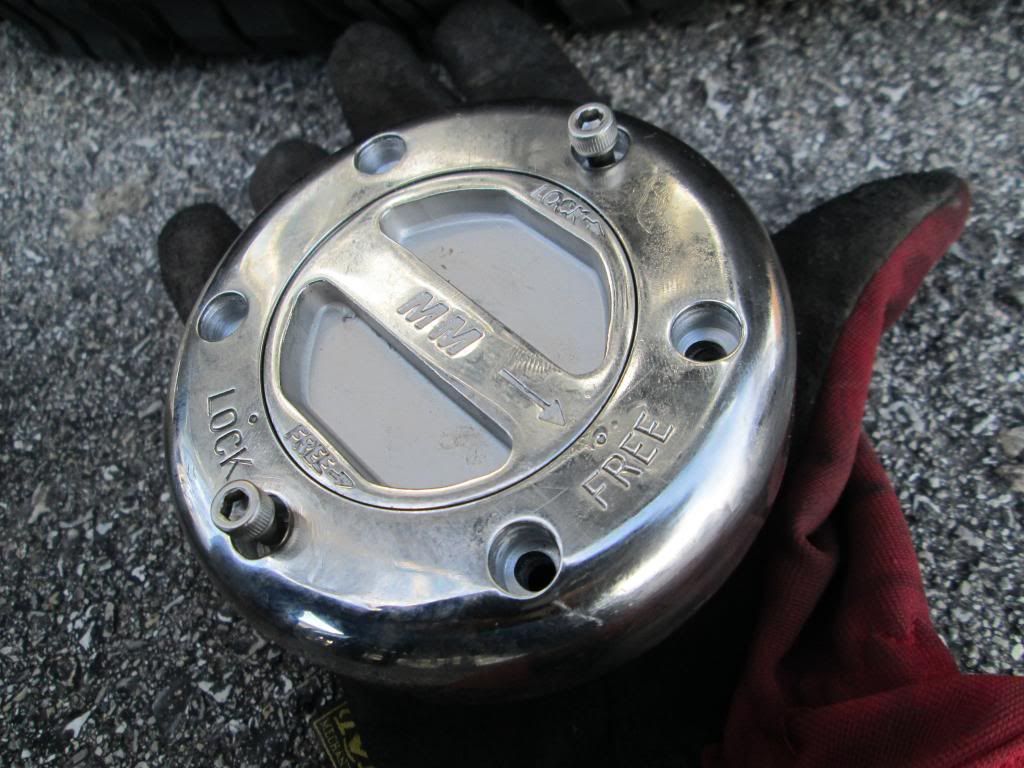
<table id="ncode_imageresizer_warning_4" class="ncode_imageresizer_warning" width="400"><tbody><tr><td class="td1" width="20"></td><td class="td2">Click this bar to view the full image.</td></tr></tbody></table>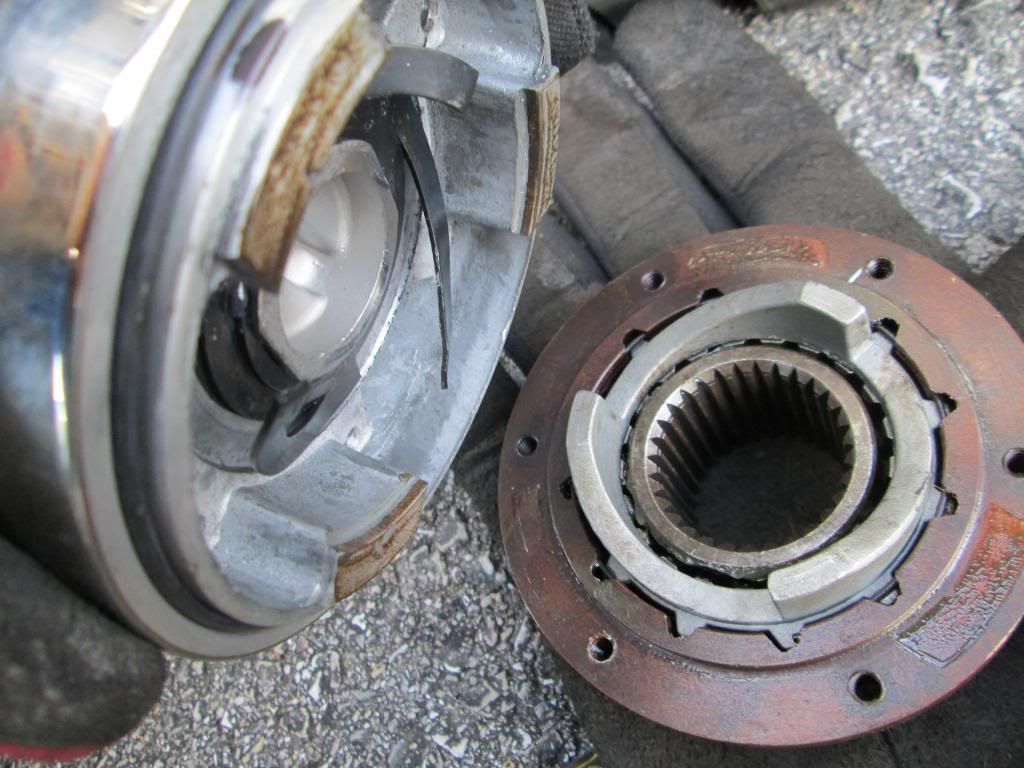
Install the Mile Marker hub into the axle. You'll have to wiggle some to get the splines to line up.
<table id="ncode_imageresizer_warning_5" class="ncode_imageresizer_warning" width="400"><tbody><tr><td class="td1" width="20"></td><td class="td2">Click this bar to view the full image.</td></tr></tbody></table>
Push it in as far as it will go. Then install the retaining ring. Put in the open end first.
<table id="ncode_imageresizer_warning_10" class="ncode_imageresizer_warning" width="400"><tbody><tr><td class="td1" width="20"></td><td class="td2">Click this bar to view the full image.</td></tr></tbody></table>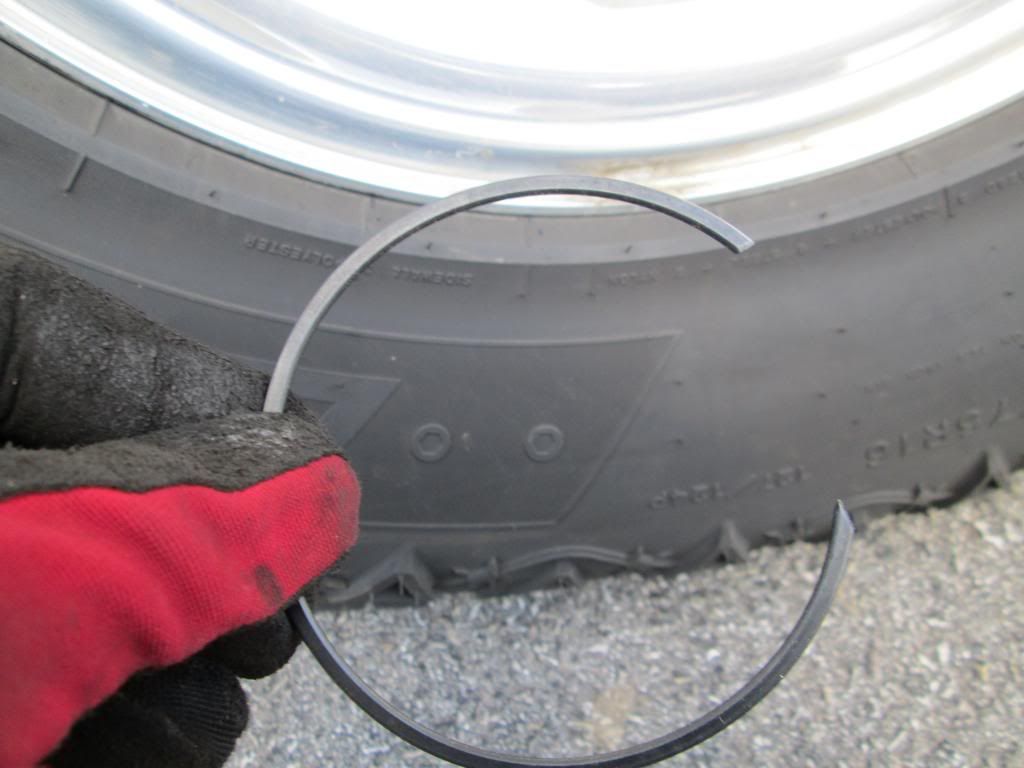
<table id="ncode_imageresizer_warning_6" class="ncode_imageresizer_warning" width="400"><tbody><tr><td class="td1" width="20"></td><td class="td2">Click this bar to view the full image.</td></tr></tbody></table>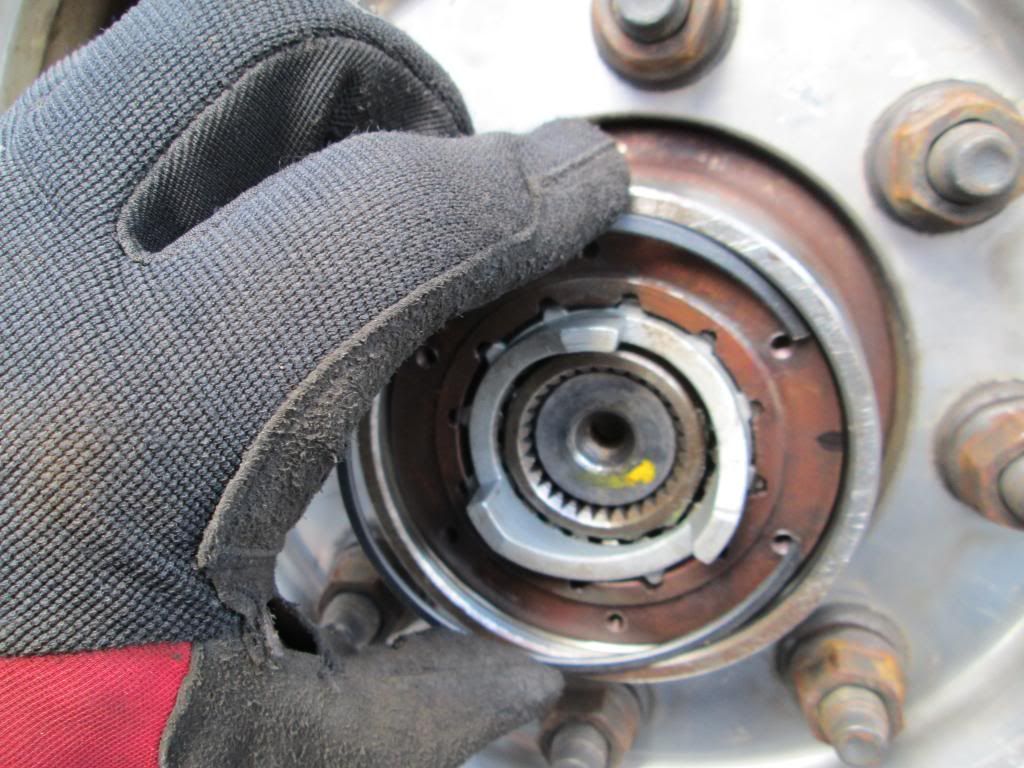
<table id="ncode_imageresizer_warning_7" class="ncode_imageresizer_warning" width="400"><tbody><tr><td class="td1" width="20"></td><td class="td2">Click this bar to view the full image.</td></tr></tbody></table>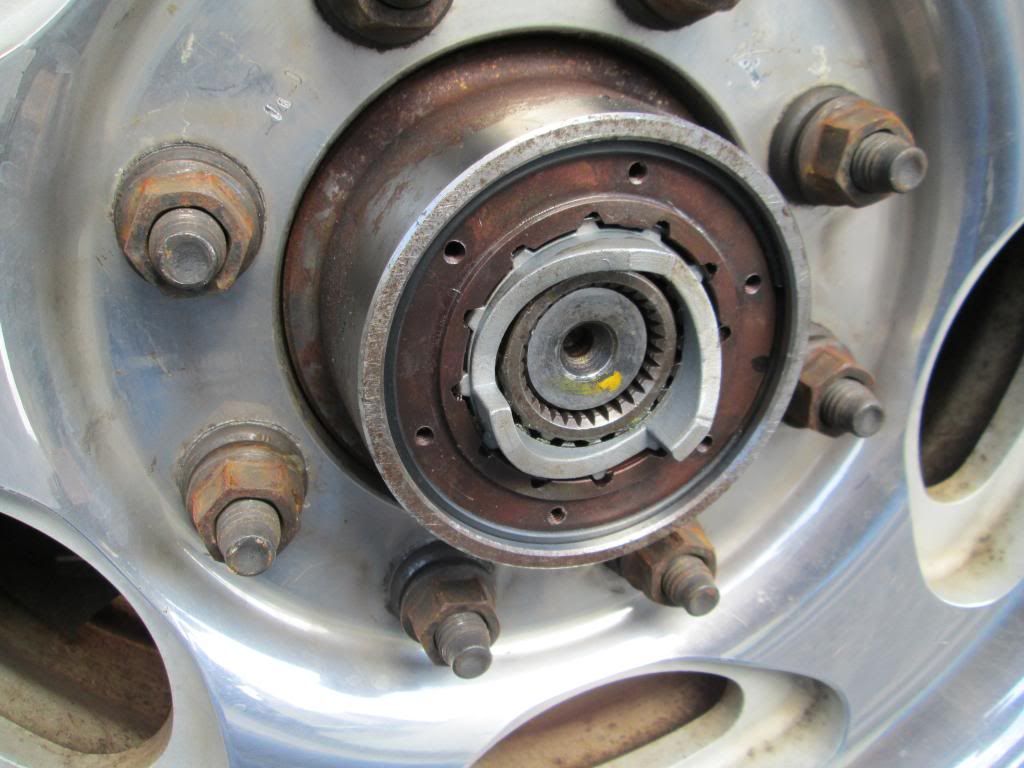
And finally reinstall outside hub housing.
<table id="ncode_imageresizer_warning_8" class="ncode_imageresizer_warning" width="400"><tbody><tr><td class="td1" width="20"></td><td class="td2">Click this bar to view the full image.</td></tr></tbody></table>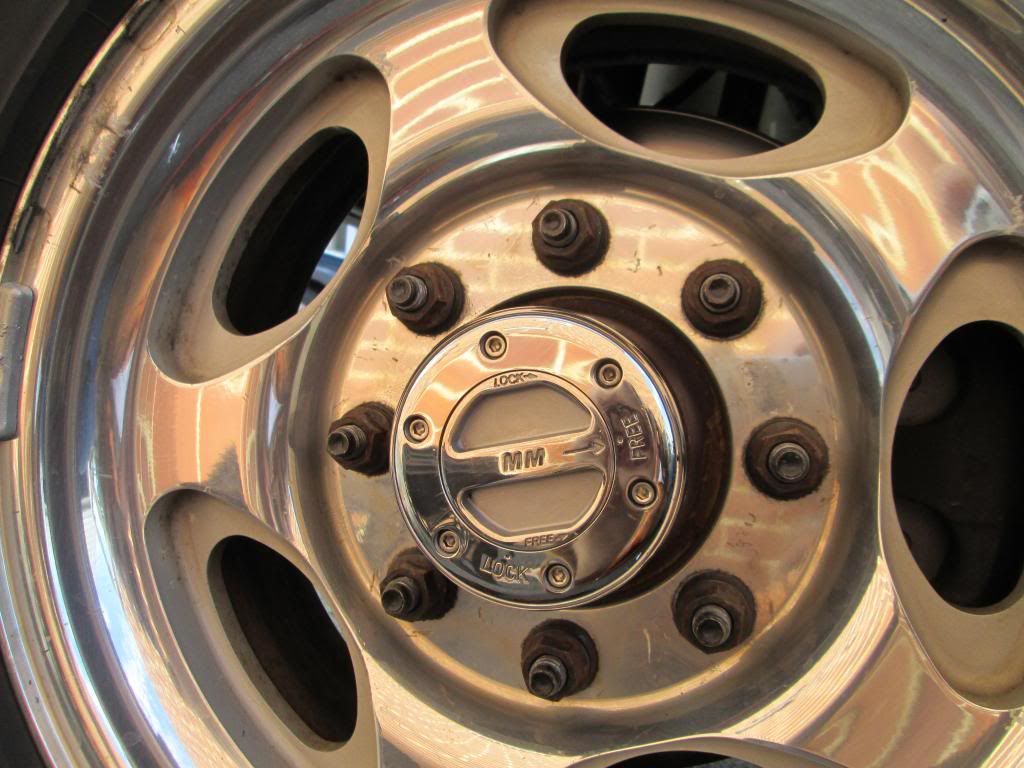
The total job took about a half an hour. That includes set up and clean up. If you have the vaccum line still you should cap them off so you won't have a vaccum leak. <!-- / message -->
<!-- sig --> __________________
<table id="ncode_imageresizer_warning_1" class="ncode_imageresizer_warning" width="400"><tbody><tr><td class="td1" width="20">
</td><td class="td2">Click this bar to view the full image.</td></tr></tbody></table>First remove the center cap.
Then remove the snap ring that holds the factory hub on.
<table id="ncode_imageresizer_warning_2" class="ncode_imageresizer_warning" width="400"><tbody><tr><td class="td1" width="20">
</td><td class="td2">Click this bar to view the full image.</td></tr></tbody></table>Next pull the factory hub out. Mine came out pretty easy. Some you may have to help out.
<table id="ncode_imageresizer_warning_3" class="ncode_imageresizer_warning" width="400"><tbody><tr><td class="td1" width="20">
</td><td class="td2">Click this bar to view the full image.</td></tr></tbody></table>Then remove the 2 screws that hold outside hub housing on and sit it aside.
<table id="ncode_imageresizer_warning_9" class="ncode_imageresizer_warning" width="400"><tbody><tr><td class="td1" width="20">
</td><td class="td2">Click this bar to view the full image.</td></tr></tbody></table><table id="ncode_imageresizer_warning_4" class="ncode_imageresizer_warning" width="400"><tbody><tr><td class="td1" width="20">
</td><td class="td2">Click this bar to view the full image.</td></tr></tbody></table>Install the Mile Marker hub into the axle. You'll have to wiggle some to get the splines to line up.
<table id="ncode_imageresizer_warning_5" class="ncode_imageresizer_warning" width="400"><tbody><tr><td class="td1" width="20">
</td><td class="td2">Click this bar to view the full image.</td></tr></tbody></table>Push it in as far as it will go. Then install the retaining ring. Put in the open end first.
<table id="ncode_imageresizer_warning_10" class="ncode_imageresizer_warning" width="400"><tbody><tr><td class="td1" width="20">
</td><td class="td2">Click this bar to view the full image.</td></tr></tbody></table><table id="ncode_imageresizer_warning_6" class="ncode_imageresizer_warning" width="400"><tbody><tr><td class="td1" width="20">
</td><td class="td2">Click this bar to view the full image.</td></tr></tbody></table><table id="ncode_imageresizer_warning_7" class="ncode_imageresizer_warning" width="400"><tbody><tr><td class="td1" width="20">
</td><td class="td2">Click this bar to view the full image.</td></tr></tbody></table>And finally reinstall outside hub housing.
<table id="ncode_imageresizer_warning_8" class="ncode_imageresizer_warning" width="400"><tbody><tr><td class="td1" width="20">
</td><td class="td2">Click this bar to view the full image.</td></tr></tbody></table>The total job took about a half an hour. That includes set up and clean up. If you have the vaccum line still you should cap them off so you won't have a vaccum leak. <!-- / message -->
<!-- sig --> __________________
Thread Starter
|
Mod Specialist ;)
Joined: Jan 2006
Posts: 4,130
Likes: 0
From: Hanover,PA
Trending Topics
Senior User
Joined: Dec 2009
Posts: 261
Likes: 0
Just Got Mile Marker manual hubs this week and installed the today. This was one of the easiest mod's I have done.
<table id="ncode_imageresizer_warning_1" class="ncode_imageresizer_warning" width="400"><tbody><tr><td class="td1" width="20"></td><td class="td2">Click this bar to view the full image.</td></tr></tbody></table>
First remove the center cap.
Then remove the snap ring that holds the factory hub on.
<table id="ncode_imageresizer_warning_2" class="ncode_imageresizer_warning" width="400"><tbody><tr><td class="td1" width="20"></td><td class="td2">Click this bar to view the full image.</td></tr></tbody></table>
Next pull the factory hub out. Mine came out pretty easy. Some you may have to help out.
<table id="ncode_imageresizer_warning_3" class="ncode_imageresizer_warning" width="400"><tbody><tr><td class="td1" width="20"></td><td class="td2">Click this bar to view the full image.</td></tr></tbody></table>
Then remove the 2 screws that hold outside hub housing on and sit it aside.
<table id="ncode_imageresizer_warning_9" class="ncode_imageresizer_warning" width="400"><tbody><tr><td class="td1" width="20"></td><td class="td2">Click this bar to view the full image.</td></tr></tbody></table>
<table id="ncode_imageresizer_warning_4" class="ncode_imageresizer_warning" width="400"><tbody><tr><td class="td1" width="20"></td><td class="td2">Click this bar to view the full image.</td></tr></tbody></table>
Install the Mile Marker hub into the axle. You'll have to wiggle some to get the splines to line up.
<table id="ncode_imageresizer_warning_5" class="ncode_imageresizer_warning" width="400"><tbody><tr><td class="td1" width="20"></td><td class="td2">Click this bar to view the full image.</td></tr></tbody></table>
Push it in as far as it will go. Then install the retaining ring. Put in the open end first.
<table id="ncode_imageresizer_warning_10" class="ncode_imageresizer_warning" width="400"><tbody><tr><td class="td1" width="20"></td><td class="td2">Click this bar to view the full image.</td></tr></tbody></table>
<table id="ncode_imageresizer_warning_6" class="ncode_imageresizer_warning" width="400"><tbody><tr><td class="td1" width="20"></td><td class="td2">Click this bar to view the full image.</td></tr></tbody></table>
<table id="ncode_imageresizer_warning_7" class="ncode_imageresizer_warning" width="400"><tbody><tr><td class="td1" width="20"></td><td class="td2">Click this bar to view the full image.</td></tr></tbody></table>
And finally reinstall outside hub housing.
<table id="ncode_imageresizer_warning_8" class="ncode_imageresizer_warning" width="400"><tbody><tr><td class="td1" width="20"></td><td class="td2">Click this bar to view the full image.</td></tr></tbody></table>
The total job took about a half an hour. That includes set up and clean up. If you have the vaccum line still you should cap them off so you won't have a vaccum leak. <!-- / message -->
<!-- sig --> __________________
<table id="ncode_imageresizer_warning_1" class="ncode_imageresizer_warning" width="400"><tbody><tr><td class="td1" width="20">
</td><td class="td2">Click this bar to view the full image.</td></tr></tbody></table>First remove the center cap.
Then remove the snap ring that holds the factory hub on.
<table id="ncode_imageresizer_warning_2" class="ncode_imageresizer_warning" width="400"><tbody><tr><td class="td1" width="20">
</td><td class="td2">Click this bar to view the full image.</td></tr></tbody></table>Next pull the factory hub out. Mine came out pretty easy. Some you may have to help out.
<table id="ncode_imageresizer_warning_3" class="ncode_imageresizer_warning" width="400"><tbody><tr><td class="td1" width="20">
</td><td class="td2">Click this bar to view the full image.</td></tr></tbody></table>Then remove the 2 screws that hold outside hub housing on and sit it aside.
<table id="ncode_imageresizer_warning_9" class="ncode_imageresizer_warning" width="400"><tbody><tr><td class="td1" width="20">
</td><td class="td2">Click this bar to view the full image.</td></tr></tbody></table><table id="ncode_imageresizer_warning_4" class="ncode_imageresizer_warning" width="400"><tbody><tr><td class="td1" width="20">
</td><td class="td2">Click this bar to view the full image.</td></tr></tbody></table>Install the Mile Marker hub into the axle. You'll have to wiggle some to get the splines to line up.
<table id="ncode_imageresizer_warning_5" class="ncode_imageresizer_warning" width="400"><tbody><tr><td class="td1" width="20">
</td><td class="td2">Click this bar to view the full image.</td></tr></tbody></table>Push it in as far as it will go. Then install the retaining ring. Put in the open end first.
<table id="ncode_imageresizer_warning_10" class="ncode_imageresizer_warning" width="400"><tbody><tr><td class="td1" width="20">
</td><td class="td2">Click this bar to view the full image.</td></tr></tbody></table><table id="ncode_imageresizer_warning_6" class="ncode_imageresizer_warning" width="400"><tbody><tr><td class="td1" width="20">
</td><td class="td2">Click this bar to view the full image.</td></tr></tbody></table><table id="ncode_imageresizer_warning_7" class="ncode_imageresizer_warning" width="400"><tbody><tr><td class="td1" width="20">
</td><td class="td2">Click this bar to view the full image.</td></tr></tbody></table>And finally reinstall outside hub housing.
<table id="ncode_imageresizer_warning_8" class="ncode_imageresizer_warning" width="400"><tbody><tr><td class="td1" width="20">
</td><td class="td2">Click this bar to view the full image.</td></tr></tbody></table>The total job took about a half an hour. That includes set up and clean up. If you have the vaccum line still you should cap them off so you won't have a vaccum leak. <!-- / message -->
<!-- sig --> __________________
Do I have to greace it up or just install it as is , And is the given snap rings is enough or I have to use other ring type .
FTE Stories
Ford Trucks for Ford Truck Enthusiasts

Top 6 Best Deals Available on New Fords & Lincolns Right Now
Brett Foote
This Hennessey Takes the Expedition Tremor's Off-Roading Capability to the Next Level
Verdad Gallardo
Top 10 Fords at 2026 Carlisle Ford Nationals
Joe Kucinski
3 Best / 3 Worst Parts of Modern Ford Ownership
Brett Foote
10 Amazing Upgrades That Solve Common Ford Truck Owner Headaches
Pouria Savadkouei
Every 2026 Ford Engine Explained
Brett Foote
10 Ugly Ford Trucks That We Still Kinda Love
Joe Kucinski
10 Things Every Truck Owner NEEDS (2026 Edition)
Michael S. Palmer
Rezvani's Latest Post-Apocalyptic Monster Is a Ford F-150 Raptor Underneath
Verdad GallardoThread Starter
|
Mod Specialist ;)
Joined: Jan 2006
Posts: 4,130
Likes: 0
From: Hanover,PA
Your welcome and glad you like the pic's. I installed as is. I think the snap ring that came with the hub is strong enough to hold the hub in. On a update/side note. Had to lock in 4 wheel drive Friday and it was a GREAT feeling to have the hubs actually work.
Senior User
Joined: Dec 2009
Posts: 261
Likes: 0
I ask about the rings because some guys have rattling issue in bumpy road , and they changed the rings with the old ones and some of them orders a advance rings kit from mile marker to stops the rattling .
Senior User
Joined: Dec 2009
Posts: 261
Likes: 0
 now am going to do it I prepared the tools , wish me luck .
Thanks

Thread
Thread Starter
Forum
Replies
Last Post
ROBBINthaHOOD
6.0L Power Stroke Diesel
7
Aug 20, 2012 07:17 PM