1970 F250 4x4 Cummins Conversion Build Thread - Lots of Pics!
#46
 05-18-2012, 03:05 PM

Elder User
Join Date: Feb 2006
Location: Cascade, ID
Posts: 788
Likes: 0
Received 0 Likes
on
0 Posts
#48
05-28-2012, 10:26 AM

I wish I knew about the Suburban tank before, I just scrapped an 85 Suburban diesel a few months ago. Oh well, I built a 67gallon tank that sits at the front of the bed.
The GM sending unit works the opposite of the Ford I believe. It may work if you remember that the empty and full sides are reversed, or you can just run off mileage. Maybe start out with an idea of your low-end mileage vs tank capacity, put a post-it on the dash to get gas at xxx miles, and refine it from there.
The GM sending unit works the opposite of the Ford I believe. It may work if you remember that the empty and full sides are reversed, or you can just run off mileage. Maybe start out with an idea of your low-end mileage vs tank capacity, put a post-it on the dash to get gas at xxx miles, and refine it from there.
#49
05-28-2012, 10:55 AM
Join Date: Oct 2011
Location: Willard
Posts: 207
Likes: 0
Received 0 Likes
on
0 Posts
You are correct on the fuel gauge situation. Unfortunately I already bought a Ford/Dodge aftermarket fuel gauge. I am going to have to buy a aftermarket Chevy one now and save the one I already bought for something else or sell it.
I will likely use the 31 gallon tank. I want the extra capacity because I live in a remote area with long stretches between fuel stations. If I head out in the desert for the weekend, I don't want to have to worry about running out of fuel. I definitely will need to build a skid plate to protect the fuel tank from taking hits.
I will likely use the 31 gallon tank. I want the extra capacity because I live in a remote area with long stretches between fuel stations. If I head out in the desert for the weekend, I don't want to have to worry about running out of fuel. I definitely will need to build a skid plate to protect the fuel tank from taking hits.
#50
06-08-2012, 08:55 AM
Join Date: Oct 2011
Location: Willard
Posts: 207
Likes: 0
Received 0 Likes
on
0 Posts
I looked into the 40 gallon suburban gas tank. There are two part numbers listed.
Dorman part number 576-348
Dorman part number 576-349
Unfortunately, these tanks measure 35" x 28-3/4" x 13-1/8"
They don't really hang much lower than the 31 gallon, but that is because they are a larger dimension to start with. From what I can see, they are not going to fit a 67-72 Highboy. They are 3/4" too wide
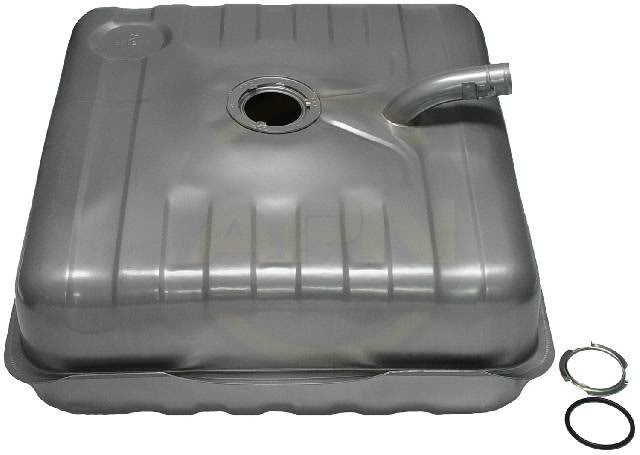
The 31 gallon 28" X 28" X 13" Suburban gas tank is going to be the way to go.
Dorman part number 576-348
Dorman part number 576-349
Unfortunately, these tanks measure 35" x 28-3/4" x 13-1/8"
They don't really hang much lower than the 31 gallon, but that is because they are a larger dimension to start with. From what I can see, they are not going to fit a 67-72 Highboy. They are 3/4" too wide
The 31 gallon 28" X 28" X 13" Suburban gas tank is going to be the way to go.
#51
06-08-2012, 06:56 PM
Join Date: Oct 2011
Location: Willard
Posts: 207
Likes: 0
Received 0 Likes
on
0 Posts
Went over to my buddies house again today to look at his Suburban tank. He has two 40 gallon tanks and they both measure 28 X 35 X 13  What is up with that? Maybe the Dorman replacement tank is a slightly larger dimension?
  His tanks are definitely a stock chevrolet tanks and would definitely fit between the 67-72 Ford frame rails.
What is up with that? Maybe the Dorman replacement tank is a slightly larger dimension? His tanks are definitely a stock chevrolet tanks and would definitely fit between the 67-72 Ford frame rails.
#52
06-11-2012, 11:09 PM
Join Date: Oct 2011
Location: Willard
Posts: 207
Likes: 0
Received 0 Likes
on
0 Posts
Spent the last couple of weeks working on the grocery getters  Fuel pump, timing belt, motor mount, etc... Enough said - back to the fun stuff.
I have successfully assembled all the parts needed to rebuild the 14 bolt axle and do a disk brake conversion. Here are the parts I am using for the disk brake conversion:
Bolt on caliper brackets from Ruff Stuff Specialties (they came with bolts) - $50 pair
1977 3/4 Ton K20 Chevy truck stuff:
Rotors - $60 pair
Calipers - $70 pair (had to eat the core charge you know)
Brake Pads - $35
Hardware Kit - $4
Wheel Studs - $45
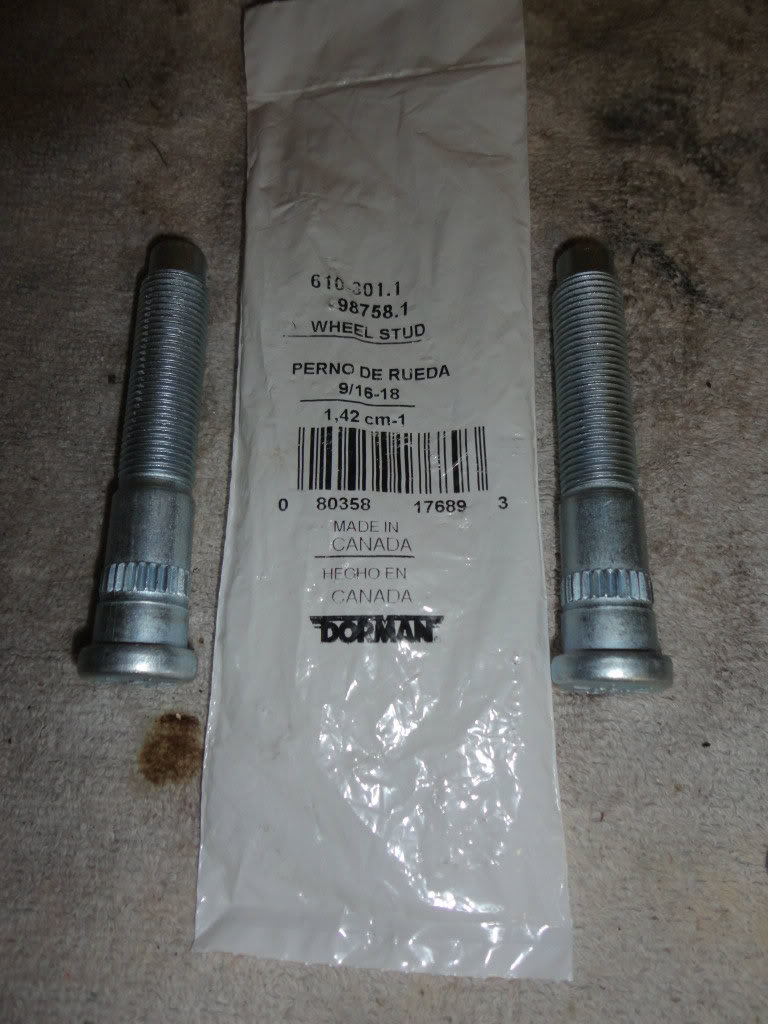
Here are the wheel studs that I decided to go with. Dorman Part #610-301.1 There is no perfect wheel stud for this conversion, but this is as close as it gets. They are about $2.60 at Auto Zone.
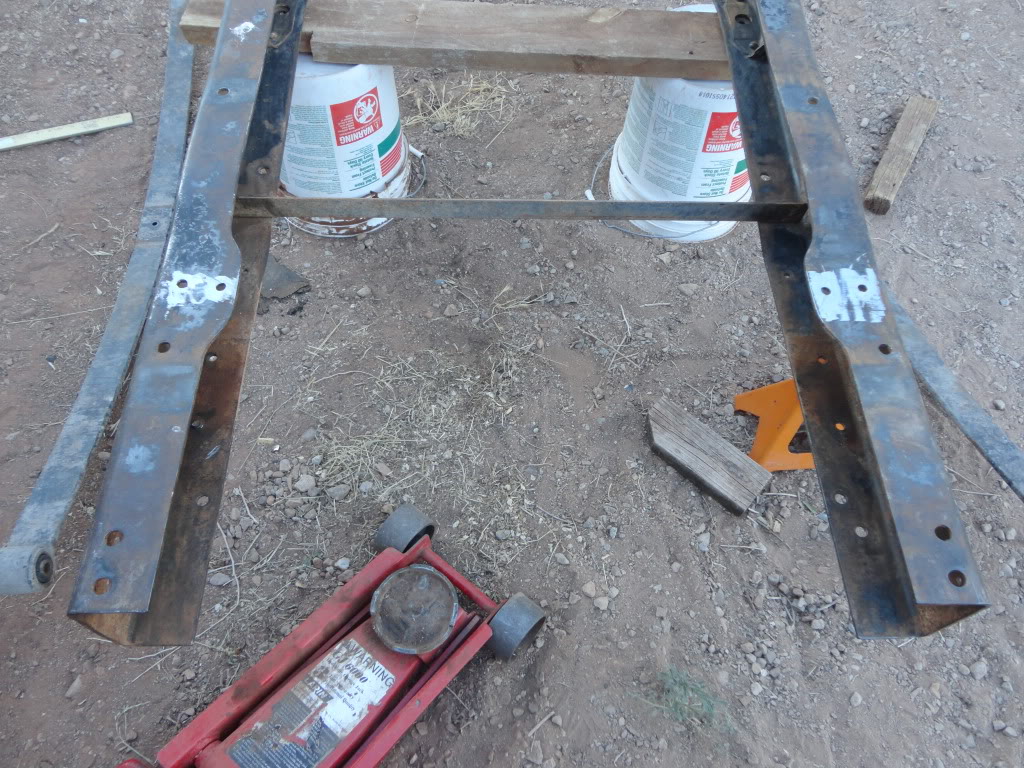
Also removed the rear cross member and getting ready to mount it in the rear. I am headed to the Pick and Pull tomorrow. Maybe I will find a nice Suburban tank waiting for me
Axle Rebuild is scheduled for Friday. I will make sure and document it for you guys.
Fuel pump, timing belt, motor mount, etc... Enough said - back to the fun stuff.I have successfully assembled all the parts needed to rebuild the 14 bolt axle and do a disk brake conversion. Here are the parts I am using for the disk brake conversion:
Bolt on caliper brackets from Ruff Stuff Specialties (they came with bolts) - $50 pair
1977 3/4 Ton K20 Chevy truck stuff:
Rotors - $60 pair
Calipers - $70 pair (had to eat the core charge you know)
Brake Pads - $35
Hardware Kit - $4
Wheel Studs - $45
Here are the wheel studs that I decided to go with. Dorman Part #610-301.1
There is no perfect wheel stud for this conversion, but this is as close as it gets. They are about $2.60 at Auto Zone.Also removed the rear cross member and getting ready to mount it in the rear. I am headed to the Pick and Pull tomorrow. Maybe I will find a nice Suburban tank waiting for me
Axle Rebuild is scheduled for Friday. I will make sure and document it for you guys.
#53
06-12-2012, 06:35 AM
Logistics Pro
why do you need different wheel studs? shouldn't the old ones be able to be knocked out and put back in? did you get the brake calipers with a e brake or not? i just put a 14 bolt in my 71 crew the other week and will be converting it to disc brakes when i get to the brakes on my truck. very interested in what you come up with for the gas tank i want more capacity then what the in cab tank holds and am searching for some ways to go about adding a tank ill be reading along to see what you come up with
#54
06-13-2012, 12:28 AM
Join Date: Oct 2011
Location: Willard
Posts: 207
Likes: 0
Received 0 Likes
on
0 Posts
why do you need different wheel studs? shouldn't the old ones be able to be knocked out and put back in? did you get the brake calipers with a e brake or not? i just put a 14 bolt in my 71 crew the other week and will be converting it to disc brakes when i get to the brakes on my truck. very interested in what you come up with for the gas tank i want more capacity then what the in cab tank holds and am searching for some ways to go about adding a tank ill be reading along to see what you come up with
No, I didn't get the calipers with the mechanical e-brake option. I am planning on line locking the brake system instead. It won't be a big deal because I am running a manual transmission anyway and can leave the truck in gear.
I tried to find a Suburban gas tank at the pick and pull today. They had three Suburbans. The problem - they drill holes in the gas tank to drain the fuel when the vehicle arrives. I am going to check with a few other wrecking yards for a gas tank. If that doesn't work out, I am going to buy a new 31 gallon tank. All the tanks I saw on the Suburbans at Pick and Pull were 40 gallon.
On the bright side - I scored a divorced NP205 transfer case at Pick and Pull
#55
06-13-2012, 06:50 AM
Logistics Pro
thanks for the info good to know when i get my brakes i'm gonna go with eldorado calipers i want to have a e brake because i have a stick shift wish the nv4500 had a e brake on the back of the trans like the zf5 i got has ill be getting to my rear fuel tank as soon as i find a bed to replace mine ill pull it off and figure out the gas tank situation since its right there nice find on the np205 im still looking for one hoping to get that in the next couple weeks with a dana 60
#56
06-15-2012, 12:38 AM
Join Date: Oct 2011
Location: Willard
Posts: 207
Likes: 0
Received 0 Likes
on
0 Posts
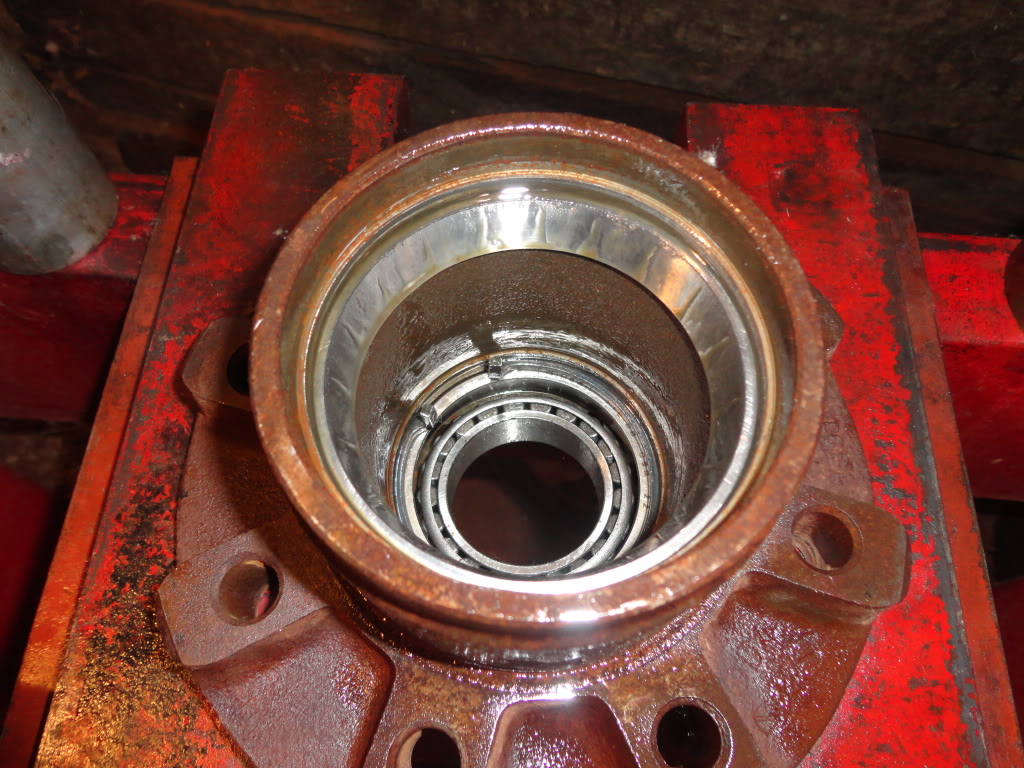
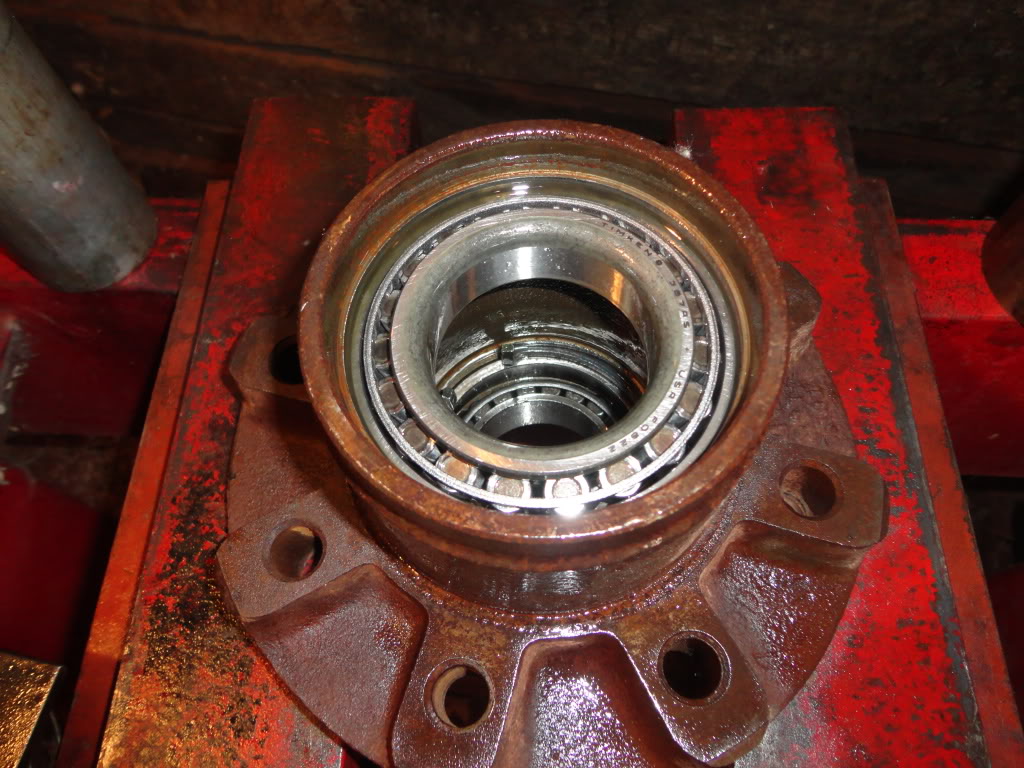
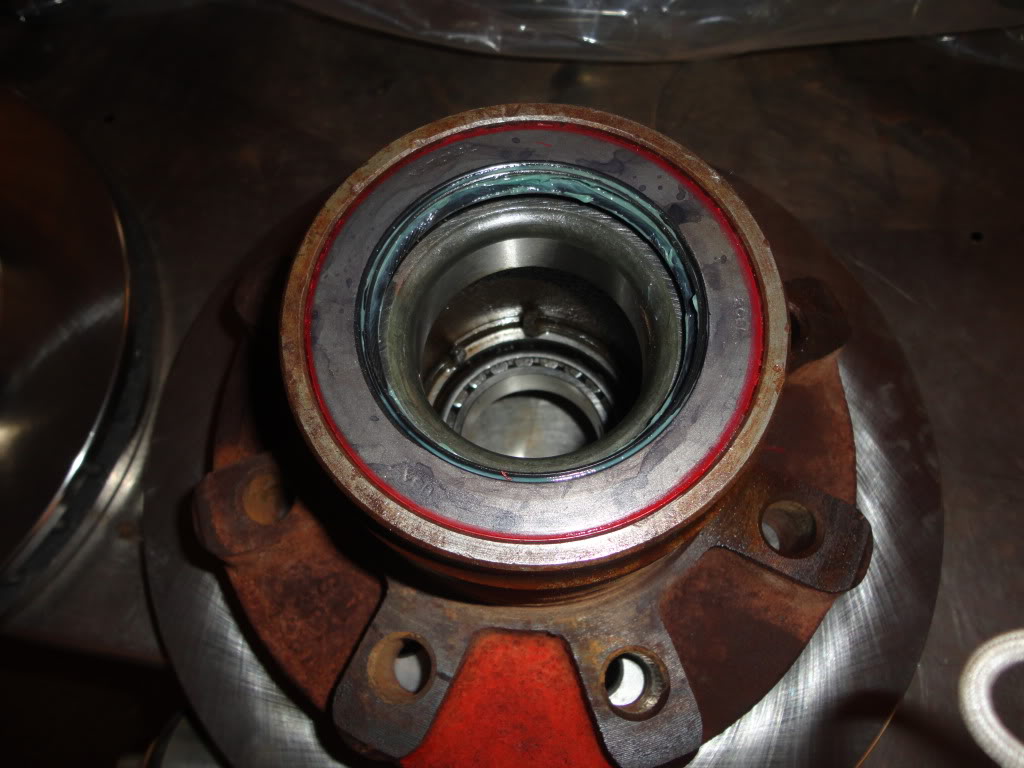
Began the axle rebuild tonight by pressing the bearings into the hubs  Here are the steps to rebuild the 14 Bolt Axle - Part 1:
Insert the bearing and race from the backside of the hub with the bearing cone facing toward the inside of the hub. Press the bearing race into place. I like to spray a little WD-40 on the hub surface before inserting the race and pressing things into place so that everything slides in smoothly.
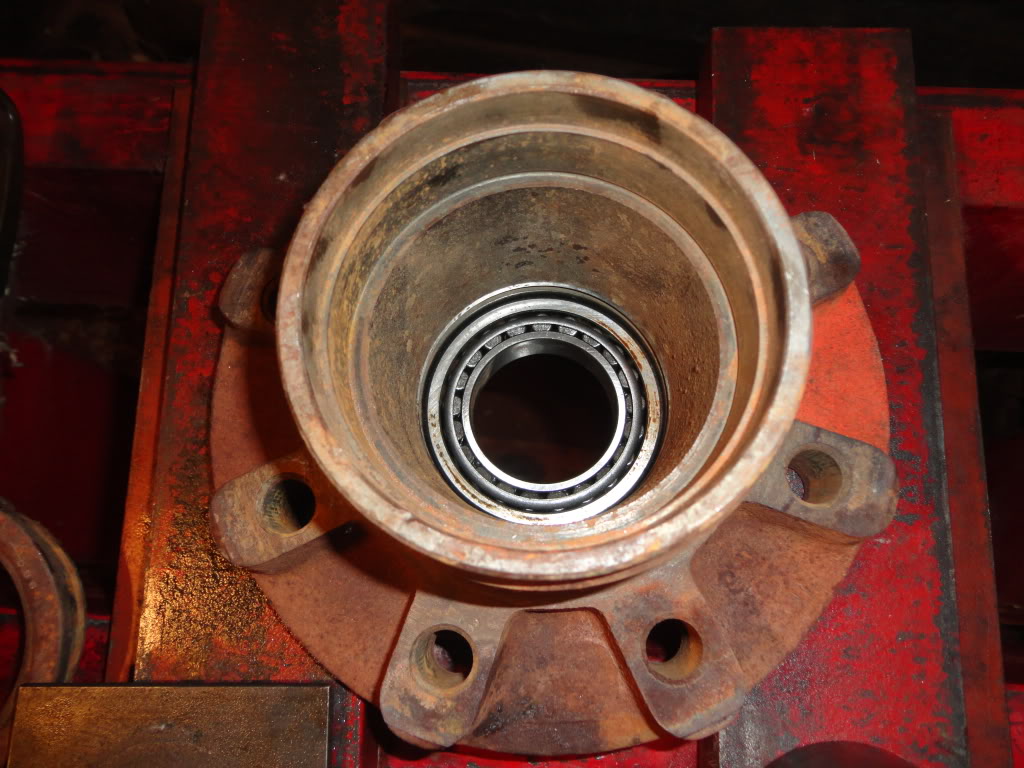
Insert the lock ring retainer over the race after pressing it. There will likely be some slop between the race and the retainer. After the lock ring retainer is seated, flip the hub over and press the bearing and race back a small distance so that it seats against the lock ring.
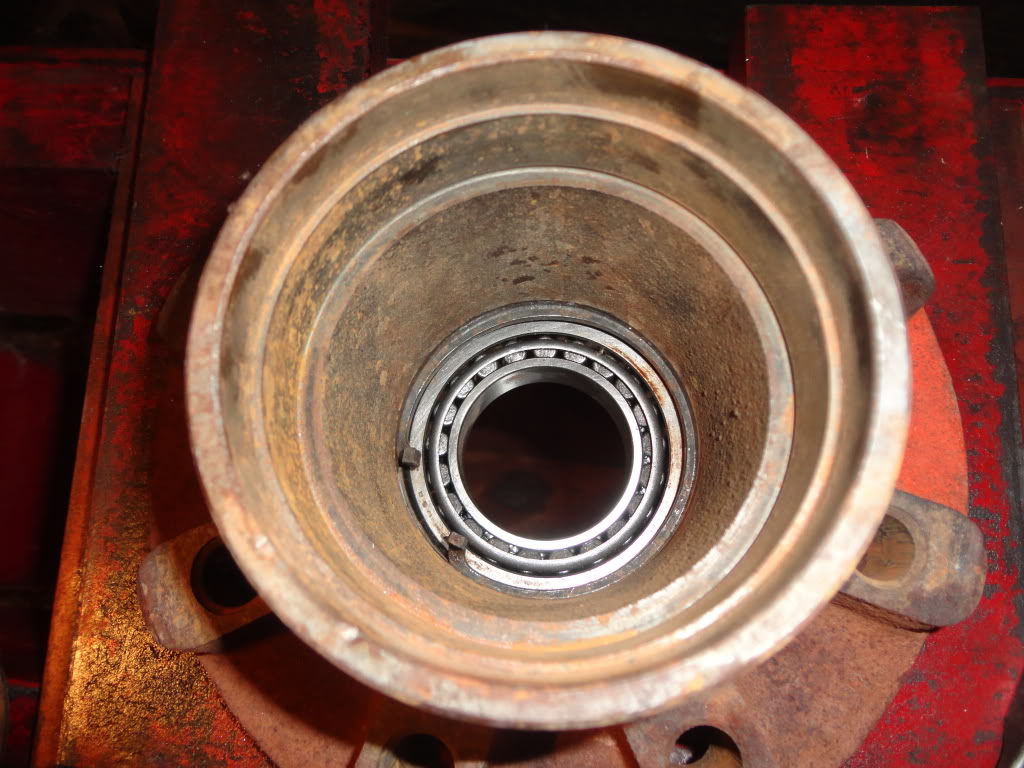
Press the upper bearing race into place so that the bearing cone faces the center of the hub (bearings should have the cones pointing at each other). Insert the bearing into the race once it is seated and press the seal in. Lube the seal with a little axle grease.
Here are the steps to rebuild the 14 Bolt Axle - Part 1:Insert the bearing and race from the backside of the hub with the bearing cone facing toward the inside of the hub. Press the bearing race into place. I like to spray a little WD-40 on the hub surface before inserting the race and pressing things into place so that everything slides in smoothly.
Insert the lock ring retainer over the race after pressing it. There will likely be some slop between the race and the retainer. After the lock ring retainer is seated, flip the hub over and press the bearing and race back a small distance so that it seats against the lock ring.
Press the upper bearing race into place so that the bearing cone faces the center of the hub (bearings should have the cones pointing at each other). Insert the bearing into the race once it is seated and press the seal in. Lube the seal with a little axle grease.
#57
06-15-2012, 09:01 PM
Join Date: Oct 2011
Location: Willard
Posts: 207
Likes: 0
Received 0 Likes
on
0 Posts
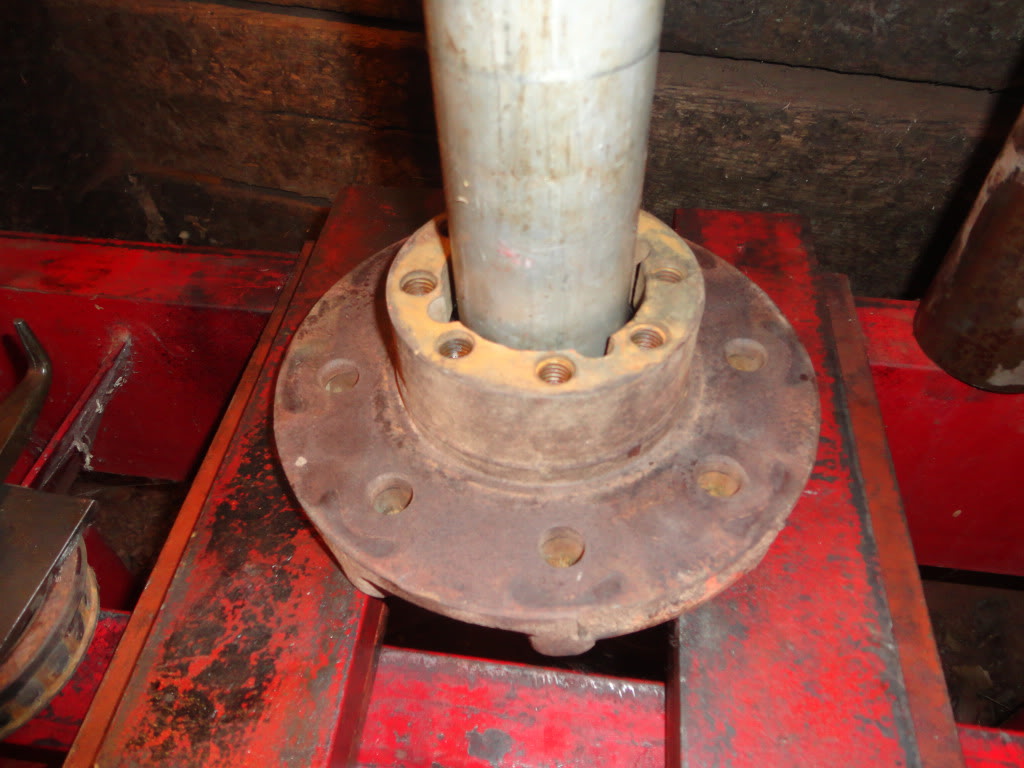
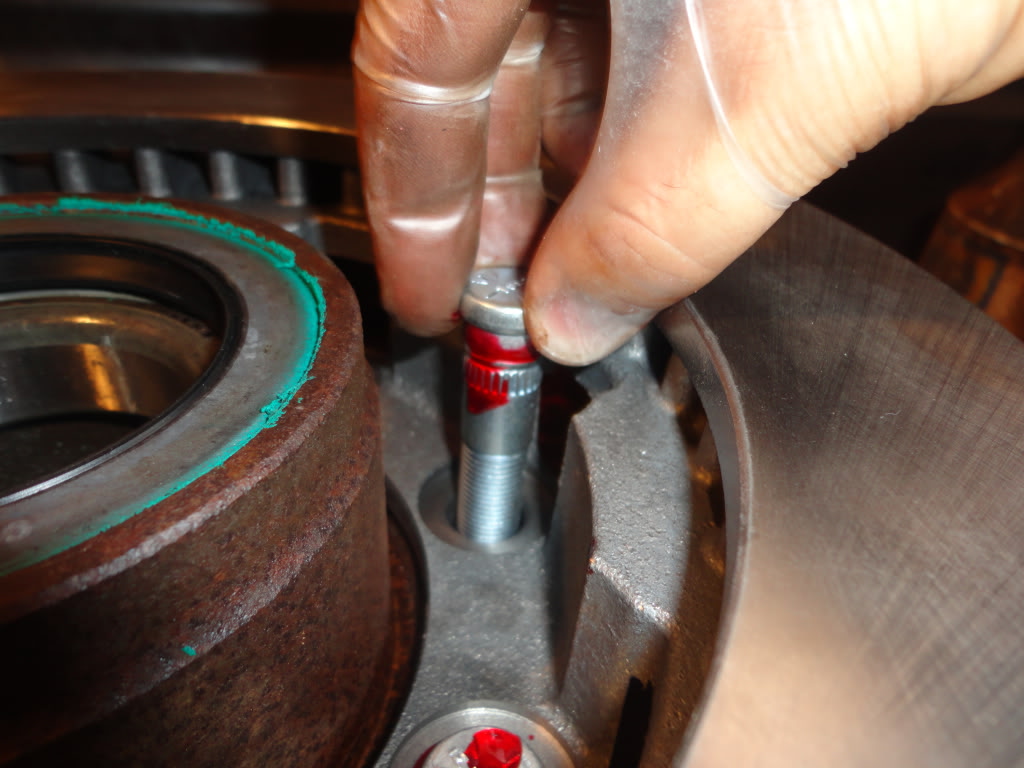
14 Bolt Axle Rebuild Part 2:
Inserted the wheel studs (610-301) into the Rotor / Hub assembly. I applied Loctite to the studs before I pressed them through. While these studs worked nicely, there wasn't a lot of bite when I pressed them in.
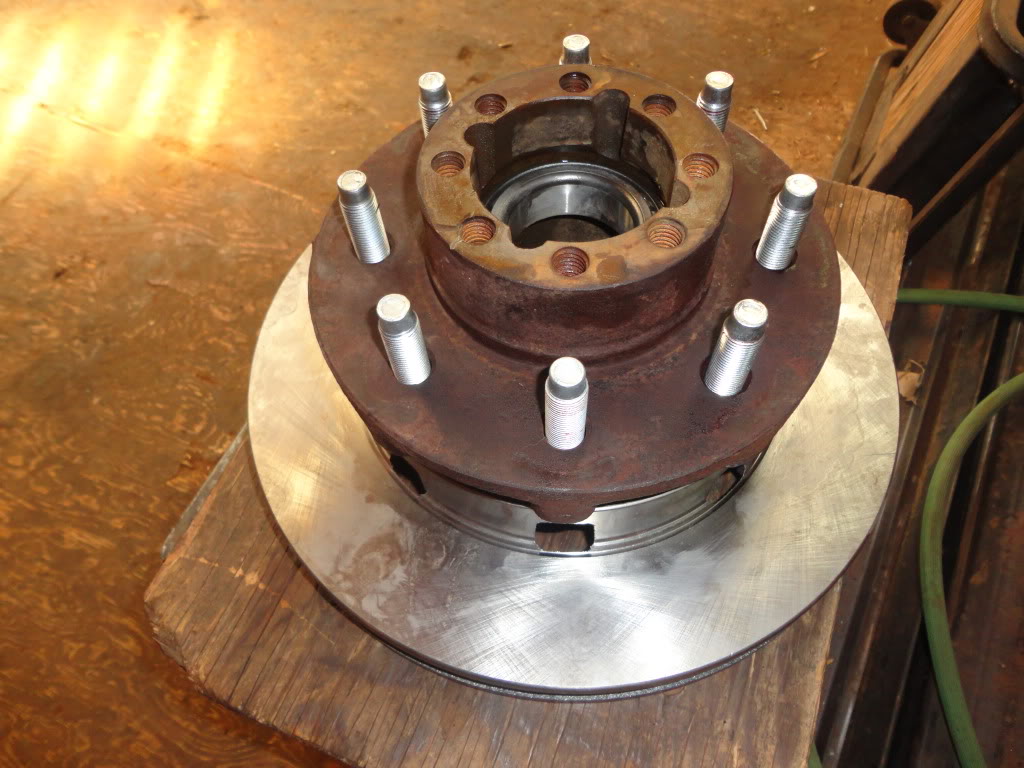
Complete Rotor / Hub assembly with wheel studs
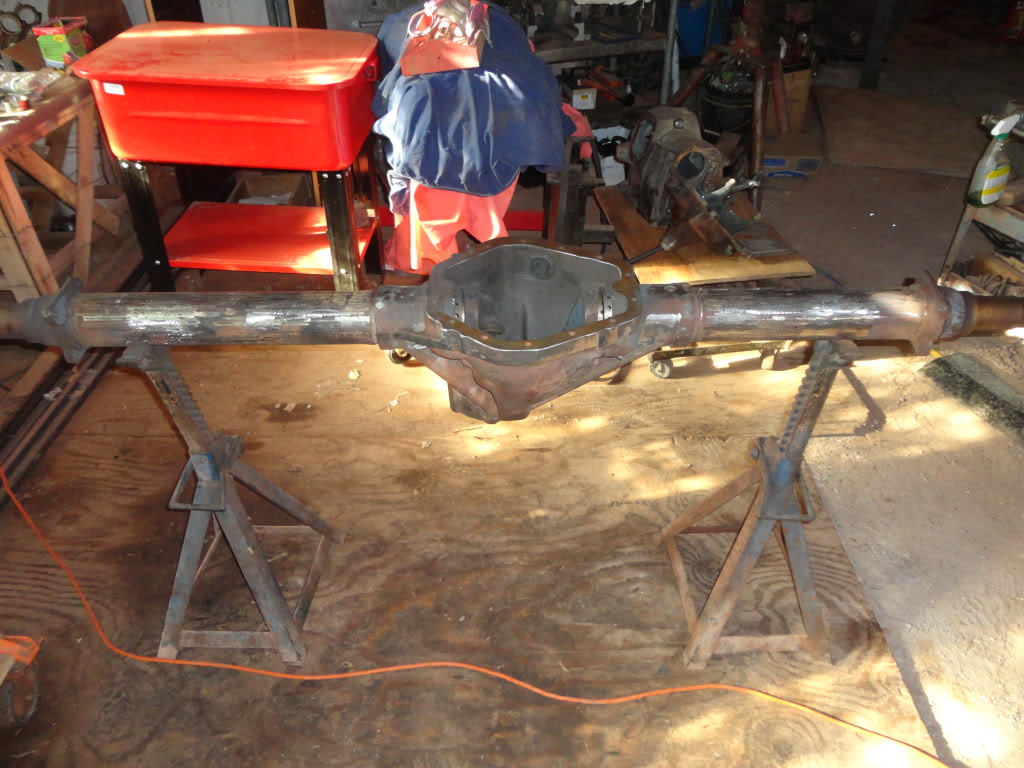
I spent the rest of the day torching off the spring & shock perches and shaving the housing. This was considerably more time consuming than I expected. Here she is so far
Inserted the wheel studs (610-301) into the Rotor / Hub assembly. I applied Loctite to the studs before I pressed them through. While these studs worked nicely, there wasn't a lot of bite when I pressed them in.
Complete Rotor / Hub assembly with wheel studs
I spent the rest of the day torching off the spring & shock perches and shaving the housing. This was considerably more time consuming than I expected. Here she is so far


#59
06-16-2012, 09:57 PM
Logistics Pro
I looked into the 40 gallon suburban gas tank.
Unfortunately, these tanks measure 35" x 28-3/4" x 13-1/8"
They don't really hang much lower than the 31 gallon, but that is because they are a larger dimension to start with. From what I can see, they are not going to fit a 67-72 Highboy. They are 3/4" too wide
Unfortunately, these tanks measure 35" x 28-3/4" x 13-1/8"
They don't really hang much lower than the 31 gallon, but that is because they are a larger dimension to start with. From what I can see, they are not going to fit a 67-72 Highboy. They are 3/4" too wide
#60
06-16-2012, 11:30 PM
Join Date: Oct 2011
Location: Willard
Posts: 207
Likes: 0
Received 0 Likes
on
0 Posts
I agree with you, the OEM 40 gallon will definitely fit. My friend has two of them and they measure 28" wide including the flanges.