


another 68 coming home
Thread Starter
|
Senior User
Joined: Sep 2009
Posts: 474
Likes: 3
From: Central Wisconsin
another 68 coming home
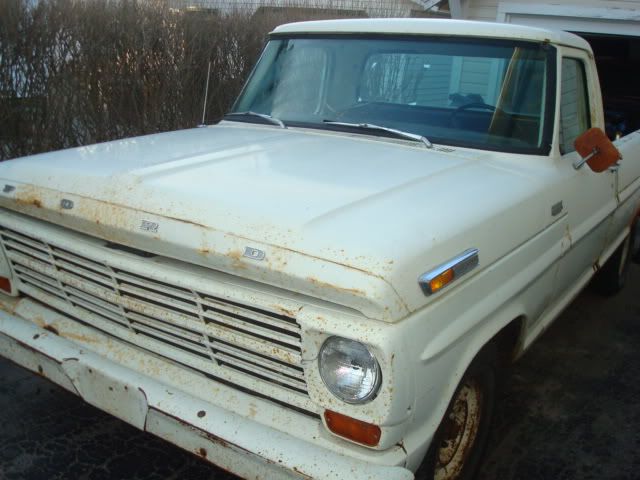
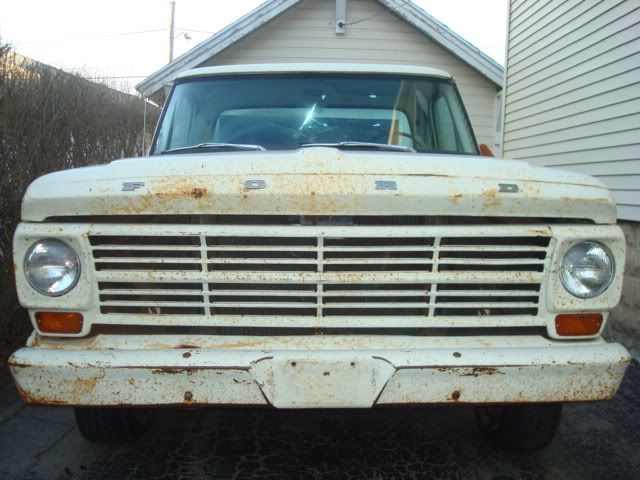
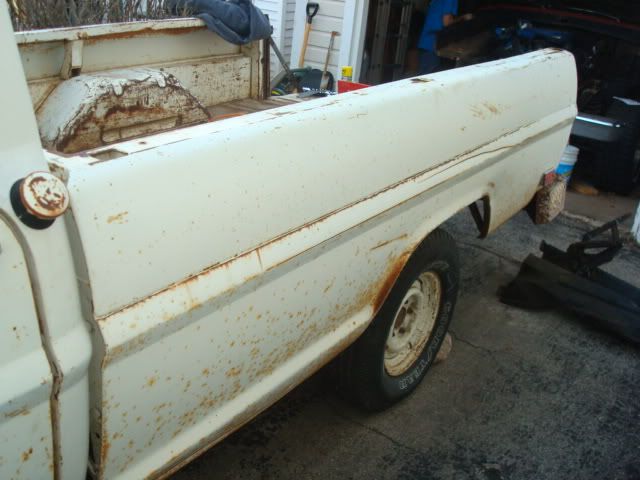
Couple years back I bought a 68 f100 4WD FE360 4 spd. When we started tearing it down we found the cab too far gone to save.
Working nights 2 weeks ago and I think I see a truck for sale out in the middle of nowhere. Go gack the next day and find a 68 2WD FE 360 4spd from North Dakota. Cab is solid, box is pretty good but with some dents and dings. A complete truck minus the carb for $500. Bringing it home today.
Debated just rebuilding the 2WD, but I really like the stance of the 4WD so I am going to swap bodies.
Thread Starter
|
Senior User
Joined: Sep 2009
Posts: 474
Likes: 3
From: Central Wisconsin
Couple of questions
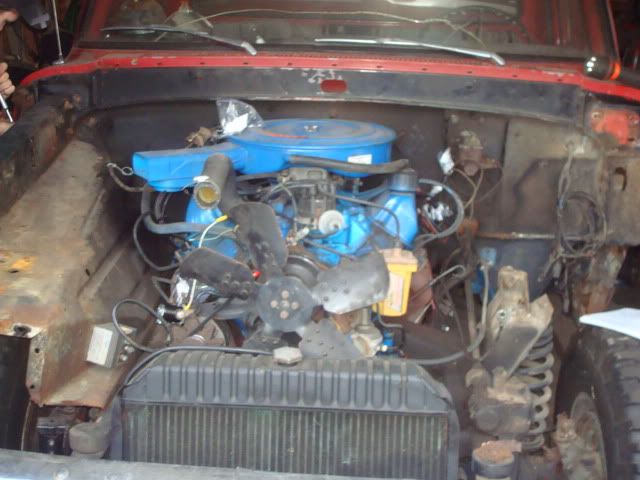
On the 4x4 there are two lines coming from the heater core. One goes to the water pump and the other goes to the what looks like the back of the base of the carb out the front of the base of the carb and back into the top of the block. The heater control cable is not hooked up. What is the purpose of that?
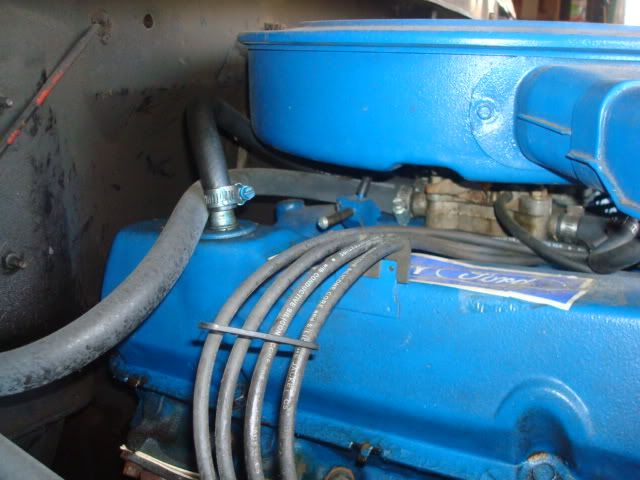
The 2WD has two lines coming out of the heater core with one running to the water pump and the other has a T by the firewall, the heater control and one line from the T runs to the top of the block through a fitting and back to the T.
Keeping the motor as in the above picture (4x4 set up) and wanting to connect the heater control cable, can I use the set up on the 2WD and just connect one line from the T to the point just below the carb to the top of the block and back to the T?
What is the weight of a long bed box?
What is the weight of just the cab with no front end connected?
On the 4x4 there are two lines coming from the heater core. One goes to the water pump and the other goes to the what looks like the back of the base of the carb out the front of the base of the carb and back into the top of the block. The heater control cable is not hooked up. What is the purpose of that?
The 2WD has two lines coming out of the heater core with one running to the water pump and the other has a T by the firewall, the heater control and one line from the T runs to the top of the block through a fitting and back to the T.
Keeping the motor as in the above picture (4x4 set up) and wanting to connect the heater control cable, can I use the set up on the 2WD and just connect one line from the T to the point just below the carb to the top of the block and back to the T?
What is the weight of a long bed box?
What is the weight of just the cab with no front end connected?
Fleet Owner

Joined: Jun 1999
Posts: 24,552
Likes: 74
From: Creedmoor, North Carolina

D&D, The heater core is in a closed loop. Ford ran that loop through a alum spacer under the carb years ago. I have seen different configurations & don't know if they were factory or added later. There are 2 nipples on the front of the engine, as long as you connected the two (in & out) you don't have to have any more. I didn't use the carb heater after my engine build so the hoses run over to the fender well to the heater core, because the old man like a little heat in the winter time.
Now you have something to chew on, hope I didn't fuse you too much.
John
Now you have something to chew on, hope I didn't fuse you too much.
John

Posting Guru
Joined: Jun 1999
Posts: 1,083
Likes: 1
As Joe says, it's up to you whether you connct/plumb the carb spacer. It helps the carb warm up faster and insulates it from engine heat later. Without it, the carb can get hot enough to boil the gas out of the bowl after extended running. I'll look at mine after sunup and post back where the T/Y is in the carb line...mine has a Y splitter in it.
Thread Starter
|
Senior User
Joined: Sep 2009
Posts: 474
Likes: 3
From: Central Wisconsin
So without the heater control cable and controller in line I would have heat all the time? The inline controller is to shut off or limit the heat?
I think I am going to run it through the spacer, and add a either a 90 elbow or T(if I use the in line controller) to make it a little neater run.
I think I am going to run it through the spacer, and add a either a 90 elbow or T(if I use the in line controller) to make it a little neater run.
Trending Topics
Fleet Owner
Joined: Jun 1999
Posts: 24,552
Likes: 74
From: Creedmoor, North Carolina
So without the heater control cable and controller in line I would have heat all the time? The inline controller is to shut off or limit the heat?
I think I am going to run it through the spacer, and add a either a 90 elbow or T(if I use the in line controller) to make it a little neater run.
I think I am going to run it through the spacer, and add a either a 90 elbow or T(if I use the in line controller) to make it a little neater run.
John
FTE Stories
Ford Trucks for Ford Truck Enthusiasts

10 Things Every Truck Owner NEEDS (2026 Edition)
Michael S. Palmer
Rezvani's Latest Post-Apocalytic Monster Is a Ford F-150 Raptor Underneath
Verdad Gallardo
Top 10 Most Expensive Ford Trucks Ever Sold on Bring a Trailer
Joe Kucinski
2027 Ford Super Duty Buyer's Guide (Every Model, Engine, & Package)
Brett Foote
Top 10 Ford Truck Tragedies
Joe Kucinski
AEV FXL Super Duty - the Super Duty Raptor Ford Doesn't Make
Brett Foote
Lobo Vs Lobo: Proof the F-150 Lobo Should Be Even Lower!
Michael S. Palmer
Ford's 2001 Explorer Sportsman Concept Looks For a New Home
Verdad Gallardo
10 Best Ford Truck Engines We Miss the Most!
Joe KucinskiThread Starter
|
Senior User
Joined: Sep 2009
Posts: 474
Likes: 3
From: Central Wisconsin
D, You can go to the big box store plumbing dept, buy a 1/2" in line ball valve, & install it with a couple clamps in the pump line. You will have to raise the hood to turn it on & off, but is pretty easy. Adding the cable control valve to be controlled from the inside of the cab is easy to do also.
John
John
Removing the cabling harness and am stumped on a few things.
1. How to remove the head light switch?
2. How to remove the wiper switch?
I see they both have a center piece that I turned with a spanner wrench but once they are unthreaded all the way they don't pull apart.
3. What is this to the left of the light switch?
4. What is the red button to the right of the steering column? Spring loaded but it didn't have any wires connected to it.

Thread Starter
|
Senior User
Joined: Sep 2009
Posts: 474
Likes: 3
From: Central Wisconsin
Next items to complete:
1. Remove heater core and controls (that should complete the wiring harness removal)
2. Remove the doors and part out.
3. Spray all cab mount and bed mount bolts again on both trucks with break free
1. Remove heater core and controls (that should complete the wiring harness removal)
2. Remove the doors and part out.
3. Spray all cab mount and bed mount bolts again on both trucks with break free
Posting Guru
Joined: Jun 1999
Posts: 1,083
Likes: 1
feedback
Didn't think of that and will keep it in mind if my control valve can't be salvaged.
Removing the cabling harness and am stumped on a few things.
1. How to remove the head light switch?
2. How to remove the wiper switch?
I see they both have a center piece that I turned with a spanner wrench but once they are unthreaded all the way they don't pull apart.
3. What is this to the left of the light switch?
4. What is the red button to the right of the steering column? Spring loaded but it didn't have any wires connected to it.
There should be a small set screw that holds the wiper **** on the shaft...small allen screw.
The little light just left of the headlight switch is the brake system dummy light..."hey dummy, you're low on brake fluid or something else is messed up, check it soon." **** on a boar in my opinion...not necessary for state inspections, so if it's worn out and not working no big loss.
The other little red switch is definitely aftermarket from a previous owner...not stock equipment. May have been a horn button as the horn rings/contacts in these old trucks often fail...easiest fix is to add on a cheap horn button. Might be something else though...one of those old Ford mysteries.
Oh yeah, you can probably free up your heater hose valve by soaking it in lube/penetrating oil for awhile. They're pretty simple, but the ball valve fix John suggested also works well in a pinch.
Laughing Gas

Joined: Aug 2011
Posts: 1,116
Likes: 0
Didn't think of that and will keep it in mind if my control valve can't be salvaged.
Removing the cabling harness and am stumped on a few things.
1. How to remove the head light switch?
2. How to remove the wiper switch?
I see they both have a center piece that I turned with a spanner wrench but once they are unthreaded all the way they don't pull apart.
3. What is this to the left of the light switch?
4. What is the red button to the right of the steering column? Spring loaded but it didn't have any wires connected to it.
Removing the cabling harness and am stumped on a few things.
1. How to remove the head light switch?
2. How to remove the wiper switch?
I see they both have a center piece that I turned with a spanner wrench but once they are unthreaded all the way they don't pull apart.
3. What is this to the left of the light switch?
4. What is the red button to the right of the steering column? Spring loaded but it didn't have any wires connected to it.
Senior User
Joined: Apr 2010
Posts: 162
Likes: 0
From: Portland, OR
tmcalavy is correct about the brake idiot light. "The little light just left of the headlight switch is the brake system dummy light..."hey dummy, you're low on brake fluid or something else is messed up, check it soon." **** on a boar in my opinion...not necessary for state inspections, so if it's worn out and not working no big loss."
Most of the time, if the bulb is good the light is on all the time. There is a switch on the proportioning valve that goes out all the time can causes the light to stay on. Sometimes it's an easy fix to just replace it and sometimes it takes a quart of brake fluid and lots of bleeding to make it work. I'm sure there is a thread about this.
The emergency brake light was an option and is pretty rare.
This is a great tool to remove switch nuts:Custom Machine Components Shopping Cart - Ford Truck

Junior User
Joined: Nov 2009
Posts: 52
Likes: 0
From: Spring branch
If you or someone bled the brakes lately that positioning valve needs to be bled also. The first side you bled pushed the valve inside in the opposite direction due to pressue differences and the light came on. When you bled the other side, the valve remained in the same position Go back to the original side you bled first open the line a bit and have someone engage the brake until the light goes out then tighten the fitting. This will have re centered the valve again. The light should NOT be on all the time
Thread Starter
|
Senior User
Joined: Sep 2009
Posts: 474
Likes: 3
From: Central Wisconsin
tmcalavy
Thanks on the tip for the two switches. Last week it took about 5 minutes max to get them out. Most of that time was finding the correct size allen wrench.
Today, I was going to work on removing the rest of the wiring harness but decided to remove the driver door. Piece of cake right?
Removed the arm rest, inside handle and door panel. 6 bolts to remove the door from the hinge and 6 bolts to remove the hinge from the jamb.
Broke off the head of one of the bolts holding the hinge to the door. No biggy I will just remove the hinge from the jamb. 5 of the 6 bolts come out easy and one I strip the head. As the firewall was pretty rusted out, I can see the bolt is not connected to any good metal so I can leave it. The top hinge slides right out, but the bottom will not budge. Since the inside jamb/firewall was bad, someone welded in a gusset and welded the bottom hinge to it. Out comes the cutting wheel and finally 2 hours later, the door is off, 1 bent hinge with some grinding work to be done to it.
I did get the heater core out. No wonder my seat is lumpy. There is enought cushion batting stuffed in the core and fan for a whole subdivision of mice.