

 im looking for a more long term solution including all other areas, not just the bed.

operation "rust be gone"

Lead Driver
Joined: Jan 2006
Posts: 6,267
Likes: 5
I assume oil made it to the bottom of my doors without taking anything apart, the bottom holes where the weatherstripping attaches is all oily, perfect. All i did was take those rubber plugs out and squirted it in with a gatorade bottle.
With the doors open, there was also rubber plugs on the bottom panels, which also got oil.
I think the wheel wells are the hardest, cause their shape makes anything run off of them.
I want to get an air gun that has a liquid pickup, and pressure spray clean the underside with an air / oil mix.
The more i get into this, the more I can't understand why more people don't try oiling their vehicles to keep rust away....
The only downside i see is that dust might stick on surfaces more, but IMHO thats a small price to pay for the rustproofing qualities of oil....
Fleet Owner


Joined: May 2009
Posts: 21,437
Likes: 76
From: Gilbert, PA
In order to keep the wheel wells rust free, you need to CUT OUT the outer wheel well support. There are spot welds that need to be cut out then the panel can be removed.
Once it is out you need to take care of the rust that is there(trust me, no matter how clean you think it is, there is rust). Then after you take care of the rust, you need to paint it(I use POR15). I also tape off the lip where the wheel well support was attached with spots welds,so it stays bare metal(Explained later) and also the spot weld area on the inner wheel well.
You also need to clean and paint the support as well. I take a 1" hole saw and drill 6-7 holes where the support comes to the bed side. See pic below. This allows dirt/salt to get out and YOU to get in there to CLEAN.
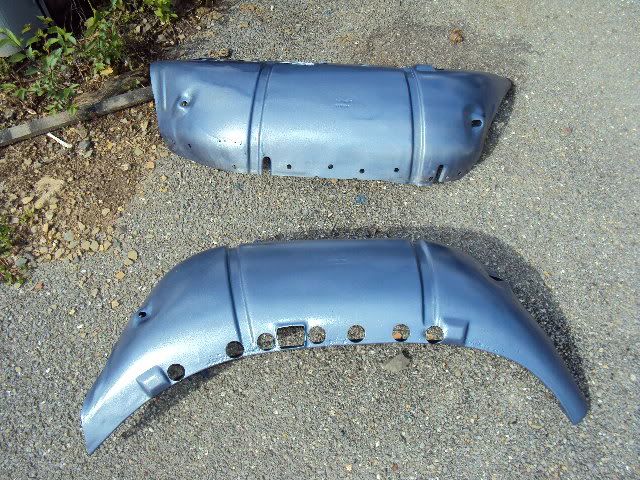
(The top panel, you can see the drilled out spot welds. The bottom panel you can see the 1" holes cut in for access)
I do NOT weld these panels back in. I BOND them with panel adhesive. Welding just created rust where the panel is welded and burning off the paint/ protective coating. The adhesive only sticks to Bare metal. This is why I tape off the areas where the welds were(the areas to be bonded)
I clamp the support to the bed side and I use self tapping screws to attach it to the inner wheel well while the adhesive sets up. Once the adhesive is set up I unclamp and remove the self taping screws and fill the screw holes with the adhesive.
Now there is NO BARE METAL. The bedside and support is painted. And where they meet is completely sealed with the adhesive. NOW there are access holes to clean and also inspect the hidden cavity.
All this work takes about a total of 4 hours over a weekend, to allow the paint to dry and the adhesive to setup.
I have been doing this process for over 15 years and have yet to have a bedside rot out. Even in the salt belt and on plow and salt trucks that typically lasted about 3-4 years
Once it is out you need to take care of the rust that is there(trust me, no matter how clean you think it is, there is rust). Then after you take care of the rust, you need to paint it(I use POR15). I also tape off the lip where the wheel well support was attached with spots welds,so it stays bare metal(Explained later) and also the spot weld area on the inner wheel well.
You also need to clean and paint the support as well. I take a 1" hole saw and drill 6-7 holes where the support comes to the bed side. See pic below. This allows dirt/salt to get out and YOU to get in there to CLEAN.
(The top panel, you can see the drilled out spot welds. The bottom panel you can see the 1" holes cut in for access)
I do NOT weld these panels back in. I BOND them with panel adhesive. Welding just created rust where the panel is welded and burning off the paint/ protective coating. The adhesive only sticks to Bare metal. This is why I tape off the areas where the welds were(the areas to be bonded)
I clamp the support to the bed side and I use self tapping screws to attach it to the inner wheel well while the adhesive sets up. Once the adhesive is set up I unclamp and remove the self taping screws and fill the screw holes with the adhesive.
Now there is NO BARE METAL. The bedside and support is painted. And where they meet is completely sealed with the adhesive. NOW there are access holes to clean and also inspect the hidden cavity.
All this work takes about a total of 4 hours over a weekend, to allow the paint to dry and the adhesive to setup.
I have been doing this process for over 15 years and have yet to have a bedside rot out. Even in the salt belt and on plow and salt trucks that typically lasted about 3-4 years
Thread Starter
|
i ain't rite
Joined: Mar 2005
Posts: 65,579
Likes: 5,610
From: Marlboro Mental Hospital.

superduty wheel wheel bedsides are not spotwelded on, they use an open cell foam seam sealer that acts like a sponge and retains moisture, rotting the wheel wells out.
Lead Driver
Joined: Jan 2006
Posts: 6,267
Likes: 5
maybe could it be dissolved out with diesel or solvent?
Thread Starter
|
i ain't rite
Joined: Mar 2005
Posts: 65,579
Likes: 5,610
From: Marlboro Mental Hospital.
well, it finally stopped raining enough to get the bed liner out, and clean up the inside for closer inspection. there are 2 small rot spots, about the size odf a quarter on the driver side and a 50 cent piece on the passenger side behind the wheel wells, and a little rust on the floor.
the holes will be cut out with the plasma cutter and new metal welded in.


plus, the center bed bolt holes are boogered up a bit, i will be fixing them with large body washers.


once the inside of the bed is done, it is getting scuffed real good with a wire wheel on a grinder, and 2 good coats of ospho before priming and a few coats of spray in bed liner.
then the bed is getting flipped over too see the condition of the bottom and the cross beams.
the holes will be cut out with the plasma cutter and new metal welded in.
plus, the center bed bolt holes are boogered up a bit, i will be fixing them with large body washers.
once the inside of the bed is done, it is getting scuffed real good with a wire wheel on a grinder, and 2 good coats of ospho before priming and a few coats of spray in bed liner.
then the bed is getting flipped over too see the condition of the bottom and the cross beams.
FTE Stories
Ford Trucks for Ford Truck Enthusiasts

Top 10 Fords at 2026 Carlisle Ford Nationals
Joe Kucinski
3 Best / 3 Worst Parts of Modern Ford Ownership
Brett Foote
10 Amazing Upgrades That Solve Common Ford Truck Owner Headaches
Pouria Savadkouei
Every 2026 Ford Engine Explained
Brett Foote
10 Ugly Ford Trucks That We Still Kinda Love
Joe Kucinski
10 Things Every Truck Owner NEEDS (2026 Edition)
Michael S. Palmer
Rezvani's Latest Post-Apocalyptic Monster Is a Ford F-150 Raptor Underneath
Verdad Gallardo
Top 10 Most Expensive Ford Trucks Ever Sold on Bring a Trailer
Joe Kucinski
2027 Ford Super Duty Buyer's Guide (Every Model, Engine, & Package)
Brett FooteThread Starter
|
i ain't rite
Joined: Mar 2005
Posts: 65,579
Likes: 5,610
From: Marlboro Mental Hospital.
me neither!! at the rate the weather is going, i figure it will be september before i get the damn thing on!
big problem is this is a freebie at the body shop, so it is being done outside.
big problem is this is a freebie at the body shop, so it is being done outside.
Logistics Pro
Joined: Nov 2010
Posts: 4,654
Likes: 20
From: Tewksbury, MA
Yeah, hope all goes well with it, my bed rotted out last year so I got it fixed and the guy did a crappy job so its happening again =/ he painted the whole truck and its all chipping now so not just the bed...the entire truck needs it lol, I found a good body guy tho that know what he's doing so I hope it all goes good this summer lol, I'm getting the quarters cut out and replaced with panels that have no foam padding in there so it won't rot again.
Thread Starter
|
i ain't rite
Joined: Mar 2005
Posts: 65,579
Likes: 5,610
From: Marlboro Mental Hospital.
years ago i was co owner of the shop, then sold out to my partner.
he is a perfectionist, and i could not take working with him. but he does fantastic work.
took 14 years to restore his 56 T-bird.
he is now on his 9th year doing my 65 falcon.
no plastic, all metal is worked flat, then finished with lead.
he is a perfectionist, and i could not take working with him. but he does fantastic work.
took 14 years to restore his 56 T-bird.
he is now on his 9th year doing my 65 falcon.
no plastic, all metal is worked flat, then finished with lead.
Thread Starter
|
i ain't rite
Joined: Mar 2005
Posts: 65,579
Likes: 5,610
From: Marlboro Mental Hospital.
it only needs minor repair to the front cross member, and one small spot about 1 inch wide by 3 inches long on the rear cross member.
i did not have the camera today when we pulled it off the trailer and took a peek at the bottom.
i did not have the camera today when we pulled it off the trailer and took a peek at the bottom.