


Remember the toe board patch panels?
Thread Starter
|
Logistics Pro


Joined: Jun 2010
Posts: 4,965
Likes: 261
From: East KY

Remember the toe board patch panels?
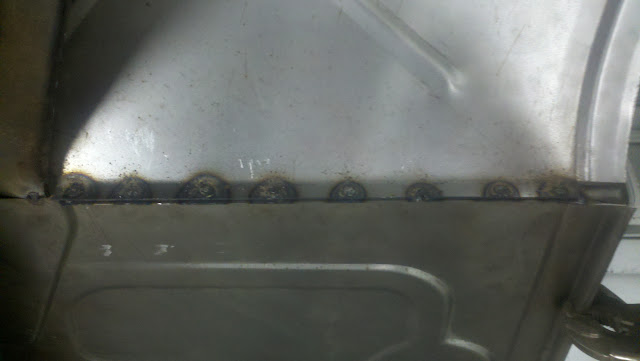
Well I FINALLY got brave enough (and off my lazy butt) to replace the floor pans in my project truck. I've just about got the passenger side done. Still have a lot of welding to go. These pics will show those toe board patches that Classic Haulers had fabbed up several several months ago. I ended up cutting pretty much the entire original toe board out on this side (I left a lip for welding). Thought you guys might want to see how it's working out. The driver's side will be another story because the original toe board has a reinforcement piece behind the pedal area, and it's a LOT more complicated with the various holes for the pedals, dimmer switch, etc. But I only need the lower 1 or 2 inches on that side (I might just use sheet metal instead). So here's my work so far. Don't laugh at my rookie welds. All I have is a second-hand flux core wire feed Lincoln (note the vice grips holding the ground clamp in place after the spring broke--quality first, LOL). I used self-tapping sheet metal screws to set up the welds. So far so good, but I am NOT even halfway done, so don't freak out when you see the areas I've missed or haven't cleaned up. Both the toe board and the floor pan have a nice flange that meets at the bottom like the originals. It helps a TON. I was able to get some pretty decent plug welds in there. I worked my butt off getting that toe board to match the floor pan perfectly in the transmission cover area. THEN, I glanced over at the driver's side and realized the factory boys missed it by seemingly 3/8" 62 years ago. LOL


I cut the corner out of it so that the original speedo cable hole remains open.

I cut the corner out of it so that the original speedo cable hole remains open.

New User
Joined: Jan 2010
Posts: 22
Likes: 0
From: Ontario Canada
Floor Replacement
Hey Doc, nice work on the floor panels. I am going to get up the nerve to do the same on my 51 f1, any tips you may have would help. I have to replace the front mount set as well as the cab corners, does anyone have tips for me before I start?
RRHD
RBR1951@gmail.com
Thanks
Ron
RRHD
RBR1951@gmail.com
Thanks
Ron
Logistics Pro

Joined: Apr 2010
Posts: 3,577
Likes: 29
From: Pekin, IL
Nice Job Doc! I have used sheetmetal screws to hold stuff together too, before welding. Works for me! Looks good!
Make sure the front cab mount holes stay where they are supposed to. when I welded patches in my floor, they wanted to pull in from heat. even welding a little at a time. Just a thought.
Make sure the front cab mount holes stay where they are supposed to. when I welded patches in my floor, they wanted to pull in from heat. even welding a little at a time. Just a thought.
Thread Starter
|
Logistics Pro
Joined: Jun 2010
Posts: 4,965
Likes: 261
From: East KY
Hey Doc, nice work on the floor panels. I am going to get up the nerve to do the same on my 51 f1, any tips you may have would help. I have to replace the front mount set as well as the cab corners, does anyone have tips for me before I start?
RRHD
RBR1951@gmail.com
Thanks
Ron
RRHD
RBR1951@gmail.com
Thanks
Ron
Nice Job Doc! I have used sheetmetal screws to hold stuff together too, before welding. Works for me! Looks good!
Make sure the front cab mount holes stay where they are supposed to. when I welded patches in my floor, they wanted to pull in from heat. even welding a little at a time. Just a thought.
Make sure the front cab mount holes stay where they are supposed to. when I welded patches in my floor, they wanted to pull in from heat. even welding a little at a time. Just a thought.
Logistics Pro
Joined: Apr 2010
Posts: 3,577
Likes: 29
From: Pekin, IL
Wow that's how I did it...you got a hidden camera somewhere in my garage?
 Seriously that's what I did on the '78 Bronco I (sort of) restored. and it was new floor pans also. Cool! I took out one and welded..skipped one, took out the next and welded...and repeat...works just fine!
Seriously that's what I did on the '78 Bronco I (sort of) restored. and it was new floor pans also. Cool! I took out one and welded..skipped one, took out the next and welded...and repeat...works just fine!
Elder User
Joined: Jan 2007
Posts: 789
Likes: 2
From: MI..."near" Dearborn...
-
...lookin' good DOC... ....nice job...
Mind if I ask what welder you are using?.... ...just curious...
Again...great work for such a complicated area... ...
...
-
...lookin' good DOC...
....nice job...Mind if I ask what welder you are using?....
...just curious...Again...great work for such a complicated area...
...-
Trending Topics
Thread Starter
|
Logistics Pro
Joined: Jun 2010
Posts: 4,965
Likes: 261
From: East KY
Thanks for the compliments. I'm using a cheap Lincoln flux core welder that I bought used 2 or 3 years ago. I forget exactly which one, but I can look tonight if anybody is interested. I'm a rookie with this type of welder. All I ever used before this was a stick welder on my farm equipment, lawnmowers, etc.
FTE Stories
Ford Trucks for Ford Truck Enthusiasts

3 Best / 3 Worst Parts of Modern Ford Ownership
Brett Foote
10 Amazing Upgrades That Solve Common Ford Truck Owner Headaches
Pouria Savadkouei
Every 2026 Ford Engine Explained
Brett Foote
10 Ugly Ford Trucks That We Still Kinda Love
Joe Kucinski
10 Things Every Truck Owner NEEDS (2026 Edition)
Michael S. Palmer
Rezvani's Latest Post-Apocalyptic Monster Is a Ford F-150 Raptor Underneath
Verdad Gallardo
Top 10 Most Expensive Ford Trucks Ever Sold on Bring a Trailer
Joe Kucinski
2027 Ford Super Duty Buyer's Guide (Every Model, Engine, & Package)
Brett Foote
Top 10 Ford Truck Tragedies
Joe KucinskiFleet Mechanic
Joined: Aug 2010
Posts: 1,994
Likes: 3
From: Morgan Hill, CA

Hey Doc,
I also have one of those Lincoln welders. I ended up upgrading it with the CO2/Argon gas setup and scrapped the flux core. It is a lot cleaner...I'm not planning to ever use the flux core again.
By the way...that looks really nice!
Dan
I also have one of those Lincoln welders. I ended up upgrading it with the CO2/Argon gas setup and scrapped the flux core. It is a lot cleaner...I'm not planning to ever use the flux core again.
By the way...that looks really nice!
Dan
 . Guess I need more practice!
 Believe Nothing

Joined: Jun 2004
Posts: 7,516
Likes: 401
From: W. Central FL.
Doc, IMO, your work looks good. If you really get into putting in these patch panels spend a couple three hundred dollars and upgrade to the gas attachment.......All the difference in the world. It took me a few 'burn throughs' till I made the upgrade.
Thread Starter
|
Logistics Pro
Joined: Jun 2010
Posts: 4,965
Likes: 261
From: East KY
I will. I've had 2 or 3 burn throughs, but not like I expected. It helps that the floor pans are a thicker gauge metal than things like the fenders, etc. Honestly, I have the driver's side floor pan and probably a two inch strip at the junction of the driver's side floor pan and toe board and I'm done. I could possibly never use that welder again after that.
I have several front and rear fenders in various states of rust/disrepair that I obtained in various parts purchases and horse trades. IF I get brave enough to attempt repairs on them, I will definitely upgrade to gas. But right now I'm leaning toward fiberglass.
I have several front and rear fenders in various states of rust/disrepair that I obtained in various parts purchases and horse trades. IF I get brave enough to attempt repairs on them, I will definitely upgrade to gas. But right now I'm leaning toward fiberglass.
 .
.


Cargo Master
Joined: Apr 2009
Posts: 3,038
Likes: 4
From: South west Idaho
I don't weld enough any more to keep in practice . But i use pop rivets to hold things in place then skip around and weld all of it. If it's an area thats going to be finished and painted,i grind out and weld in the rivet spots. But in the floor like that ,i weld all of it and just leave the rivets in place. Then i seal and paint both sides just to keep the rust out a little longer. I use a small Lincoln welder with argon gas,never took me long to get rid of the flux core that came with it. __ P.S.__Those welds look okay to me.
__ P.S.__Those welds look okay to me.