Input Needed: Inverter/Amp install
#16
And the head unit ground...so the factory adapter harness isn't a good ground? I have never grounded a head unit with anything other than the harness adapters. Never noticed any whine, but then again I guess I could have just been lucky?
If everything is grounded to good metal, what causes the whine?
If everything is grounded to good metal, what causes the whine?
The reasoning is tricky & technical, there IS a difference between grounds but it's subtle. Different components use different grounding schemes - floating, common etc. It's fine except the HU & amps are linked via the outer RCA terminals which are grounded in different systems and sometimes don't play well together.
A common mistake is the myth that the RCA's pickup interference when running next to power wires since the whine goes away when they're disconnected. It's really about the ground link between pieces.
#17
Good plan. You can make an easy cover with 1/8" acrylic from Lowes or HD. Heat it up in boiling water & mold it over the whole battery & wires.
#18
Yep, you got lucky before, you may get lucky here. Try it & see. If there's engine noise change the HU ground, it'll fix it 9x out of 10. Otherwise no reason to bother if it's already done.
...
A common mistake is the myth that the RCA's pickup interference when running next to power wires since the whine goes away when they're disconnected. It's really about the ground link between pieces.
...
A common mistake is the myth that the RCA's pickup interference when running next to power wires since the whine goes away when they're disconnected. It's really about the ground link between pieces.

#19
#20
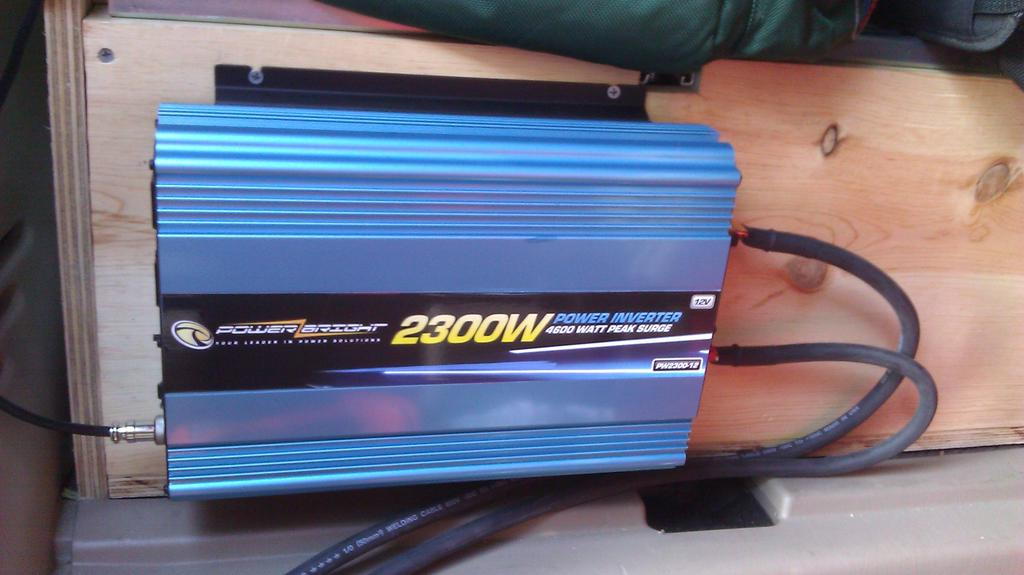
Got the inverter direct wired...
Didn't have time to run to the audio stores today - that's on tomorrows list. Figured I'd run the hot lead and get the terminals/grommets in place.

I'm debating putting a cover on the leads - not sure if I should leave them open to dissipate heat or covered to add protection. The leads run along the front fender down under the fan along the inner fender well then back. Grabbed some electrical solder, filled the terminal connectors about 1/3rd of the way with hot solder then dipped the leads in. A tiny bit of solder may leak out depending on how square you make your cut. One of mine leaked a tiny bit, the others stopped just short. Added some heat-shrink to keep the air out.
(Yes, tomorrow I'm getting new terminals for the grounds and heat shrinking them as well...prior owner did a hack job replacing the battery binders)

Had to make my own hard plastic grommets - couldn't find any rubber ones. Basically they are plastic 'feet' you find on the bottom of duffel bags and the like. Drill the center out (matched the outer size of the 1/0 perfectly), then cut the outer shell to give a lip. Going to add some plastic on the back side and glue them to keep them tight - I doubt I'll get any slip - the tension on the plastic has it in tight to the metal. I staggered the holes to get the right curve on the leads.

Once I find some fuse holders that will work for 1/0 gauge I'll add those in - hopefully tomorrow.


Runs great. I need to add a chassis ground to the housing. This thing fired up everything I could throw at it no problem - Rigid drill pulled about 160 on the gauge at startup then relaxed quite a bit. Even fired up my heat gun...that did dim the lights on the running boards a bit when the truck was idling.

With the extra lead wire I'll update the chassis ground...should still have enough left over for a 2nd battery under the passenger seat (the E350 dual battery box). Need to track down better wire for the alternator lead (better outer insulation) and a bigger alternator next.
I think I'm going to swap from the 2 Kenwood 100x2 amps to a 4 channel and mount it under the 2nd row driver seat (I have the 60/40 split). If I mount them on the box, if I had to take the box out I would have no stereo.
I'm debating putting a cover on the leads - not sure if I should leave them open to dissipate heat or covered to add protection. The leads run along the front fender down under the fan along the inner fender well then back. Grabbed some electrical solder, filled the terminal connectors about 1/3rd of the way with hot solder then dipped the leads in. A tiny bit of solder may leak out depending on how square you make your cut. One of mine leaked a tiny bit, the others stopped just short. Added some heat-shrink to keep the air out.
(Yes, tomorrow I'm getting new terminals for the grounds and heat shrinking them as well...prior owner did a hack job replacing the battery binders)
Had to make my own hard plastic grommets - couldn't find any rubber ones. Basically they are plastic 'feet' you find on the bottom of duffel bags and the like. Drill the center out (matched the outer size of the 1/0 perfectly), then cut the outer shell to give a lip. Going to add some plastic on the back side and glue them to keep them tight - I doubt I'll get any slip - the tension on the plastic has it in tight to the metal. I staggered the holes to get the right curve on the leads.
Once I find some fuse holders that will work for 1/0 gauge I'll add those in - hopefully tomorrow.
Runs great. I need to add a chassis ground to the housing. This thing fired up everything I could throw at it no problem - Rigid drill pulled about 160 on the gauge at startup then relaxed quite a bit. Even fired up my heat gun...that did dim the lights on the running boards a bit when the truck was idling.
With the extra lead wire I'll update the chassis ground...should still have enough left over for a 2nd battery under the passenger seat (the E350 dual battery box). Need to track down better wire for the alternator lead (better outer insulation) and a bigger alternator next.
I think I'm going to swap from the 2 Kenwood 100x2 amps to a 4 channel and mount it under the 2nd row driver seat (I have the 60/40 split). If I mount them on the box, if I had to take the box out I would have no stereo.
#21
Good fab work, very clean. Like the homemade grommets too. Simple plastic wire loom does an excellent job for protection when running outside the cab, also good for heat protection from alt to battery. There's no reason to have heat problem at the battery terminal, I wouldn't worry about that.
Circuit breaker on Amazon
If you're shopping for new 4 ch amps I'm a big fan of the Alpine PDX series & they fit nicely under the seat. About 30% off on Amazon usually. Really any of the newer full-range class D's are excellent - Alpine, JL, even Infinity. Check out the Arc Audio 4080.
Keep the updates coming!
#22
#23
#25
More Stuff!!!
Picked up a 1/0 fuse holder (for the B+ lead), and 4 cable ends. I already have a distro block with 4 fuses built in and a 4ga in line fuse holder...will use that off of the Kinetic to act as a fuse and the 4 way distro block with fuses for the amps and 12v power for a 40A RigRunner I have mounted in the back (provides 12v for charging flashlights, running a 2nd VHF/UHF, etc.).
Also picked up some copper cable ends to fix the hack job on the B- and some rolls of wire loom for the underside and for either the 2nd Batt or the Alternator lead (probably the Alternator lead). The Big Brown Truck dropped off my front hitch receiver, so I may or may not get all of this done tomorrow (who am I kiddingm it won't all get done).
Also picked up some copper cable ends to fix the hack job on the B- and some rolls of wire loom for the underside and for either the 2nd Batt or the Alternator lead (probably the Alternator lead). The Big Brown Truck dropped off my front hitch receiver, so I may or may not get all of this done tomorrow (who am I kiddingm it won't all get done).
#27
#28
Fuse is in
Added the B+ inverter line fuse. Had to scratch my head a bit to figure out placement. Just took a flat piece of aluminum and mounted it on one of the bolts on "that thing just inboard of the other thing that looks like a heater fan":

The fuse holder is pretty stout and the angle is pretty good so that the wire bend isn't too severe.
Also took a few minutes to fix the body to ground and chassis to ground. I didn't have enough daylight to actually upgrade the chassis to ground, so I just fixed the hack job the PO did.
Before:

After:

Note: When getting the copper cable ends, make sure the ends don't have holes...makes it easier to solder. As you can see in the pic, a little solder did drip out:

The fuse holder is pretty stout and the angle is pretty good so that the wire bend isn't too severe.
Also took a few minutes to fix the body to ground and chassis to ground. I didn't have enough daylight to actually upgrade the chassis to ground, so I just fixed the hack job the PO did.
Before:
After:
Note: When getting the copper cable ends, make sure the ends don't have holes...makes it easier to solder. As you can see in the pic, a little solder did drip out:
#29
#30


