
Adding Fog/Driving lights to a 2000

#47
 12-09-2011, 02:42 AM
Oooo...wouldn't THAT be nice!!! I have an inspection and presentation tomorrow so now work to the truck...then the team "holiday party" on Saturday, so MAYBE a feeble attempt at some work on Saturday or Sunday.


#49
12-11-2011, 09:12 PM
So with the help of CallMed who hooked me up with a set of Driving Lights, I decided to mount them today.
As I removed the bumper, I noticed the outside of the passenger side bumper mount was pushed back about 1/8" to 1/4". This will come up later.
Bumper removal was easy...if you take out the side support bolts, then remove both bottom bolts by the tow hooks, then loosen both top bolts (pushing them in as you loosen them until you hear the back 'bolt' fall away), you can take the bumper off yourself. I removed the grille so I could get my hands back in behind it and I just lifted it off:
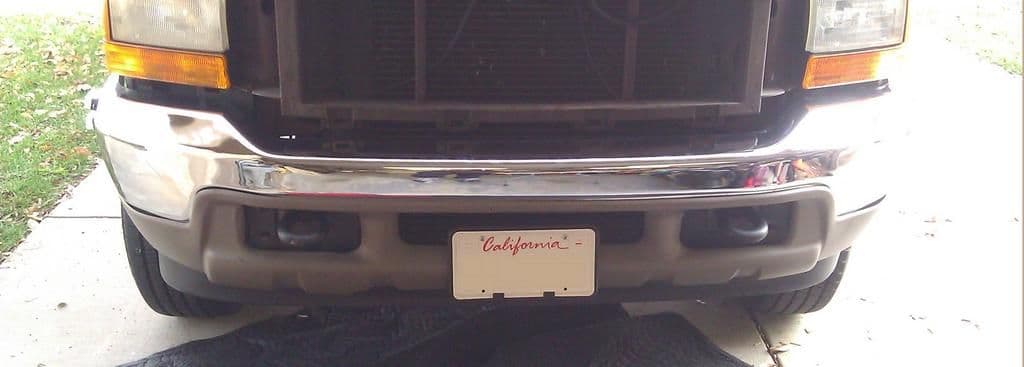
Now the interesting part. I set the driving lights in place and the issue was obvious:

...the lights are much too high to shine out of the hole, and the brackets are too far back.

I'm sure CallMed knows 100% the year of his truck, however after seeing that bent bumper mount on my truck, I'm almost wondering if the PO may have had an accident, then replaced the original bumper with one from another year.
I fiddled around a bit, trying them upside down, right side up, and found no way to get them aligned correctly. I decided at that point I should just make a different mount to get the lights up closer and at the right height. I had some spare junction box covers lying around (I'm guessing they are 5" x 5" maybe). They are a good weight and a 'blank canvas' to drill through.
If I lowered the bottom down a bit the 'back' of the mount would be flush with the back of the bumper at the top of the mount:

I removed the top two bolts from the light brackets and used small nuts and bolts to mount to the plates that I cut down and mounted to the bumper:


I trimmed the bottom of the mounting bracket to run flush with the bottom of the bumper. I drilled through the mount itself into the bumper (thin metal, easy to drill).
A shot of the finished (almost) product:

I did trim away some of the plastic shroud. The lights touched the shroud on the outer sides, top and bottom, so I trimmed it in case the lights ran so hot they would melt it.
Tomorrow I'll work out the relay and override switch. I'd like to have them come on with the key, run with no lights or the low beams and turn off with the high beams. I think if I relay the ground to disconnect when the high beams are on, then run a switch on the hot side, that should let me have control over no lights at all and on with the key (as if they were DRL lights), on with low beams (OEM) and off with the high beams (to stay legal).
As I removed the bumper, I noticed the outside of the passenger side bumper mount was pushed back about 1/8" to 1/4". This will come up later.
Bumper removal was easy...if you take out the side support bolts, then remove both bottom bolts by the tow hooks, then loosen both top bolts (pushing them in as you loosen them until you hear the back 'bolt' fall away), you can take the bumper off yourself. I removed the grille so I could get my hands back in behind it and I just lifted it off:
Now the interesting part. I set the driving lights in place and the issue was obvious:
...the lights are much too high to shine out of the hole, and the brackets are too far back.
I'm sure CallMed knows 100% the year of his truck, however after seeing that bent bumper mount on my truck, I'm almost wondering if the PO may have had an accident, then replaced the original bumper with one from another year.
I fiddled around a bit, trying them upside down, right side up, and found no way to get them aligned correctly. I decided at that point I should just make a different mount to get the lights up closer and at the right height. I had some spare junction box covers lying around (I'm guessing they are 5" x 5" maybe). They are a good weight and a 'blank canvas' to drill through.
If I lowered the bottom down a bit the 'back' of the mount would be flush with the back of the bumper at the top of the mount:
I removed the top two bolts from the light brackets and used small nuts and bolts to mount to the plates that I cut down and mounted to the bumper:
I trimmed the bottom of the mounting bracket to run flush with the bottom of the bumper. I drilled through the mount itself into the bumper (thin metal, easy to drill).
A shot of the finished (almost) product:
I did trim away some of the plastic shroud. The lights touched the shroud on the outer sides, top and bottom, so I trimmed it in case the lights ran so hot they would melt it.
Tomorrow I'll work out the relay and override switch. I'd like to have them come on with the key, run with no lights or the low beams and turn off with the high beams. I think if I relay the ground to disconnect when the high beams are on, then run a switch on the hot side, that should let me have control over no lights at all and on with the key (as if they were DRL lights), on with low beams (OEM) and off with the high beams (to stay legal).
#51
12-12-2011, 12:29 AM


I remember posting it was easy to remove the bumper (4 bolts and its off) but I don't remember hooking you up with driving lights. I mean, I have a bad memory and all, but I'm thinking I'd remember that one!
Maybe you have me mixed up with another debonair, handsome, manly-man who posts on FTE??
Stewart
#52
12-12-2011, 12:57 AM
I did?
I remember posting it was easy to remove the bumper (4 bolts and its off) but I don't remember hooking you up with driving lights. I mean, I have a bad memory and all, but I'm thinking I'd remember that one!
Maybe you have me mixed up with another debonair, handsome, manly-man who posts on FTE??
Stewart


#55
12-25-2011, 01:00 AM
Senior User
Join Date: Mar 2005
Location: Lake Havasu City, AZ
Posts: 177
Likes: 0
Received 0 Likes
on
0 Posts
#56
12-25-2011, 02:01 AM
Worst case is you get the same brackets that I did and you can just repeat how I did it.
Have a 2nd person help you put the bumper back on...it's very easy to scratch the fenders putting it back on.
#57
12-25-2011, 02:11 AM
Senior User
Join Date: Mar 2005
Location: Lake Havasu City, AZ
Posts: 177
Likes: 0
Received 0 Likes
on
0 Posts
I don't think if the bracket is right that you would need to do as much fabrication as I did. I think the black plastic brackets were for a different year than mine. I would imagine you may need to drill a few holes in the back of the bumper along the lip if you don't have them in the right spots, but the metal is very easy to drill through.
Worst case is you get the same brackets that I did and you can just repeat how I did it.
Have a 2nd person help you put the bumper back on...it's very easy to scratch the fenders putting it back on.
Worst case is you get the same brackets that I did and you can just repeat how I did it.
Have a 2nd person help you put the bumper back on...it's very easy to scratch the fenders putting it back on.
thanks for the response. I'll order these lamps and give it a try.
#58
12-25-2011, 02:13 AM
#59
12-25-2011, 02:22 AM
I had trouble finding the clear standard OEM fog lights but I finially found them on Amazon. You have to get a right and a left. You can get everything else at the local auto parts store including the H10 bulb connectors. I got mine at Napa. We have the same truck so it should go about the way it went on mine.
Amazon.com: Depo 330-2025R-AS Ford F-Series Super Duty/Excursion Passenger Side Replacement Fog Light Assembly: Automotive
Amazon.com: Depo 330-2025R-AS Ford F-Series Super Duty/Excursion Passenger Side Replacement Fog Light Assembly: Automotive

Thread
Thread Starter
Forum
Replies
Last Post
Dasvigo
1987 - 1996 F150 & Larger F-Series Trucks
3
05-05-2009 09:41 PM