Shrinking Curved Metal
#1
 07-05-2011, 08:01 AM

Shrinking Curved Metal
I'm attempting to restore my 53 F-100. (If I knew what I was doing, I wouldn't be posting this particular message.) The cab roof had a few small dents in it which I tried to hammer out. Unfortunately, I didn't know the difference between hammering "on dolly" and "off dolly". I have managed to stretch the metal, creating a slight bump. This is in a section of the roof which curves both ways. The bump isn't real bad, but it will show if I don't deal with it. So, I guess I have to shrink it back down. I have read up on shrinking, and I am thinking that heating and quenching is the best way to shrink here. I don't kbnow anything about shrinking hammers, but I am assuming that they are best used on flat surfaces. Anyway, before I make a bigger mess out of this than I have already, I figured that I'd ask the question here. What is my best option to get the roof back into its original shape? And, for a complete metal bumping novice, what is the best source for detailed instructions on working sheet metal? Thanks.
#2
07-05-2011, 06:22 PM
Remember, on dolly = stretching, off dolly = shrinking. I would say to try bumping it before resorting to heat. Heat can quickly get away from you and you may loose the crown in the roof panel and have a nice floppy mess (oil can). Is your "bump" sticking up in the air, in the form of a circle? I would say to get a dolly that best matches the perimeter of the bump, the circumference where the normal contour of the roof transitions upward into the bump. Measure this and try to find a PVC pipe coupling to use as a dolly. The reason I suggest this is that it will support the dent around the entire perimeter as you tap the high spot into the void, for a more effective shrinking process than moving a dolly around the roof in a circular pattern. Holding this snug against the bottom of the roof, use a low crown (flat as possible) body hammer and lightly tap the high spot of the bump from above. You may have to use a metal rule to lay across the roof to "read" where the high spot is. You may also need to change to a smaller size dolly once the bump starts to flatten back into the roof panel. If you keep the original (large) size, you'll risk another dent as it tries to push all the metal through. You're only trying to support the perimeter of the transition point of the dent. Once the dent is smaller, you need a smaller dolly circumference (PVC coupling).
Remember, light taps. Hit it too hard and you'll be back where you started. By supporting the outer perimeter from beneath and tapping from the top, the excess metal (stretch) should be forced back into itself. You're not trying to hit the excess metal to form a concave depression. So use the metal rule in between every couple taps to see where the high spot now resides, this is where you tap next time. The reason I suggest PVC over a steel dolly is that steel on steel will stretch. A softer compound as your dolly helps to negate any stretching, it has more of a tendancy to help gather the metal (shrink). You may need to put a flat steel dolly or plate of metal at the bottom of the PVC coupling to help give it some mass as you hold the coupling against the roof, to better "anchor" the bump's perimeter as you tap the metal from above (if it seems like it's just boucing around). Hope this makes sense, take your time, continually check with the ruler to read your progress.
Remember, light taps. Hit it too hard and you'll be back where you started. By supporting the outer perimeter from beneath and tapping from the top, the excess metal (stretch) should be forced back into itself. You're not trying to hit the excess metal to form a concave depression. So use the metal rule in between every couple taps to see where the high spot now resides, this is where you tap next time. The reason I suggest PVC over a steel dolly is that steel on steel will stretch. A softer compound as your dolly helps to negate any stretching, it has more of a tendancy to help gather the metal (shrink). You may need to put a flat steel dolly or plate of metal at the bottom of the PVC coupling to help give it some mass as you hold the coupling against the roof, to better "anchor" the bump's perimeter as you tap the metal from above (if it seems like it's just boucing around). Hope this makes sense, take your time, continually check with the ruler to read your progress.
#3
07-08-2011, 10:37 AM
Hi MP&C, Thanks for responding to my post. I plan to spend some quality time with my cab roof this weekend. If I understand what you described, I should have a dolly under the bulge that I created. And that dolly should be big enough so that it contacts the roof metal that hasn't been distorted by my hammer-on dolly work. And this dolly should be something softer than steel or iron. I have access to some very hard maple which I am considering using. And I attach a sketch showing where I think I'm supposed to strike with little hammer taps. Do I have this all right?

#4
07-08-2011, 05:38 PM
I think a round hollow object will serve you best in fixing this. Think of an outward bulging dent, if you can support the complete perimeter at one time with a specific purpose dolly, tapping the peak will force the excess metal (the stretch) into the hollow as the PVC coupling (or similar device) supports from beneath. If the dolly doesn't match the crown of the underside of the roof, use a sander to make it match. You'll have much better results if the complete perimeter makes contact. Then use your metal ruler to gauge where the next high spot is, and repeat. This will do the best job of capturing the stretched metal (without heat, anyhow) and shrinking it. If you don't have a dolly that supports only the perimeter, and chose to use your regular steel dolly, for example, your shrink is not as effective and you'll likely be chasing the dent all over the roof.
Looking at your diagram, with the dolly underneath shown in red?? I would tap lightly right in the center of the dolly, or down slightly from where you showed with the red arrow, more where the "bump" arrow is. Then, the bulge will start to bump down into the dolly just inside of the inner perimeter of the dolly. Now the outer perimeter of the "transition point" should have shrunk in diameter, where you'll want a smaller diameter dolly for the next step. If you keep going with the larger dolly you will likely have a valley form just inside the inner perimeter of the dolly. So keep track of what's going on with the straightedge/ruler, check both top and inside from the bottom if you can, to make sure you don't go too far, and drop down in size on the dolly as needed.
Sure there are other ways to accomplish this, a shrinking tip on a dent puller, O/A torch, shrinking disk, etc. But the PVC couplings will run you about $5, and work just as good as all that other stuff that will run about 10X more, and then some....
#5
07-18-2011, 11:36 AM
Hi MP&C, It looks like I may have a day or two to pay some attention to my truck roof. Regarding your advice on using a PVC coupling as a dolly, I attach a sketch which is my understanding of what you suggest. It occurs to me that when the bulge starts to "flatten out", the circle that defines where the bulge I made intersects the part of the roof that isn't bulged out may get smaller. And so, at this point, should I switch to a smaller diameter coupling?

#6
07-18-2011, 12:31 PM
Exactly, nice sketch to explain it better. 
On the same premise of watching closely what occurs, I may have missed that this was 3 to 4" in diameter. With that much span, tapping in the center only may have a tendancy to want to cave in just inside your circular dolly. If this appears to be the case (or it appears to be ineffective, not working well), then split the difference, or perhaps even use a combination. For example, on a 4" spread, come in 1" from the edge of the dolly (instead of two, being the center...) and tap around lightly in a circular pattern.
Kinda hard to explain all this stuff on a keyboard, without the luxury of an up close and personal. But looking at your sketches it looks like your getting the concept. Take it slow, and you should be able to see what works for you without getting too carried away, or to make adjustments midstream. Keep checking with the straight edge to see whats going on and where to go next.
#7
07-18-2011, 01:30 PM
Trending Topics
#8
07-20-2011, 07:54 AM
So, I spent almost an entire day trying to deal with the bump in my roof. I think I made some progress. At least I turned it from a smooth crowned bump to a flat-topped bump. I am considering two options, but maybe there are others that I am not aware of. The first option is to add filler to the sides of the bump and get a smooth and even surface that won't reflect highlights which betray the bump. The second option is to try heat to shrink it down. I have seen that if a small dot of heat is applied to a stretched surface and rapidly quenched with a very damp rag the stretched area will shrink. But, I do not know how this would work on a convex surface. I suspect that there is a strong potential to make an even bigger mess than I alerady have. And I anticipate that I would still have to use some filler to smooth things out. I wonder if the attempt to reduce the bulge size with heat is even worth that extra step. ffice ffice" /><O
 ></O>
></O>
<O></O>
Maybe there are still hammer and dolly options that I am unaware of. The PVC coupling did seem to work, though I noticed that I spend a lot of time sort of chasing the deformity around the roof. When I would get part of the bump lower, I saw that I had a slight bulge or depression in an adjacent area. The metal does not appear to want to shrink back down with hammering alone.<O></O>
<O></O>
<O></O>
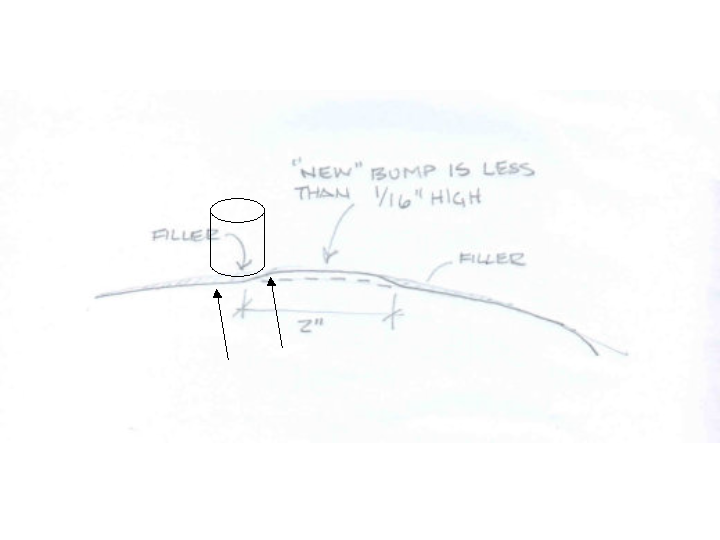
And, regarding fillers: Do you think a novice (me) could achieve a decent result with lead, or should I just stick to Bondo? I have the files for lead work, so the expense of doing lead wouldn't be an issue.The area that would need fill right now is about 1/16" maximum height. And it would probably have to feather out about six to eight inches to look the way it's supposed to.<O></O>
<O></O>
Just to complete the description of my trials and tribulations, using a straightedge I see that the bulge is "smooth" in the "fore and aft" direction. The attached sketch describes the bulge in the sideways (door to door) direction across the roof.<O></O>
<O></O>
Lastly, I appreciate all the advice you have given me regarding my roof problem. I do not know any body work people. And, I assume it is hard to find someone familiar with metal bumping techniques.<O></O>

ffice" /><O></O><O
></O>Maybe there are still hammer and dolly options that I am unaware of. The PVC coupling did seem to work, though I noticed that I spend a lot of time sort of chasing the deformity around the roof. When I would get part of the bump lower, I saw that I had a slight bulge or depression in an adjacent area. The metal does not appear to want to shrink back down with hammering alone.<O
></O><O
></O><O
></O>And, regarding fillers: Do you think a novice (me) could achieve a decent result with lead, or should I just stick to Bondo? I have the files for lead work, so the expense of doing lead wouldn't be an issue.The area that would need fill right now is about 1/16" maximum height. And it would probably have to feather out about six to eight inches to look the way it's supposed to.<O
></O><O
></O>Just to complete the description of my trials and tribulations, using a straightedge I see that the bulge is "smooth" in the "fore and aft" direction. The attached sketch describes the bulge in the sideways (door to door) direction across the roof.<O
></O><O
></O>Lastly, I appreciate all the advice you have given me regarding my roof problem. I do not know any body work people. And, I assume it is hard to find someone familiar with metal bumping techniques.<O
></O>
#9
07-21-2011, 12:07 AM
Elder User
Join Date: Apr 2008
Location: Saskatoon
Posts: 648
Likes: 0
Received 0 Likes
on
0 Posts
OMG! While I've 'known' MP&C for a while, from various forums, and have always respected his abilities and knowledge, I'm surprised he took you down this path. I see where he thought the dent was much smaller, which would explain a lot, but when you said you spent a day chasing it around with a PVC coupling (??) for a dolly...YIKES!
You could have used some heat (Oxy/Acet, or a propane torch would even work) and had this done in 30 minutes. Just heat a dime-sized spot in the centre of the raised dent for 4-5 secs, then with a (real!) dolly under it, tap towards the hot spot in concentric circles (quickly), then cool it with a wet rag. The tapping will "gather" the metal in on itself and the cooling will shrink it and srengthen it. You may need to do it 2-3 times and you'll be done. Remember - it's better to work it a bit lower and then use filler (hence the term), than to leave it higher (as in your drawing) and try to even it out with filler (it'll "walk" around on you as you sand).
As for lead - it takes more work and some practice - so if you have the tools, PRACTICE! Use some old parts or pieces of metal. You need tinning butter, lead, paddles and files. You also don't want to sand it with a pneumatic sander (lead dust). Plastic filler is better - which is why it's used.
What's ya think MP&C?
#10
07-21-2011, 06:26 AM
I'd say don't knock it until you try it, keep an open mind.
There are many ways of accomplishing what needs to be done here. This could have been done with heat, yes, but you have received some keen insight to heat shrinking working alongside some masters of the art. IMO an acetylene torch is needed to limit the size of the flame tip. A propane torch, where it can be used, does not concentrate the heat in a small enough pattern to be able to accurately control the shrinks, where inexperience in the process may quickly go from a stretched dent to a over-shrunk oil can effect. In my shop I would have likely used a heating tip on my dent puller. But for a novice looking to fix one dent in a roof, I'd rather not tell him to rush out and spend about $600+ on an acetylene torch and bottles or other such methods when a $5 coupling can do the trick. As it stands, I haven't seen any pictures of the damage to know how big or small the dent was, or any to show what happened along the way to offer more insight. I was merely offering a concept, that anyone should be able to accomplish, inexpensively.
In looking at metal bumping, if one were to use off dolly to work the "bulging dent", you would have to bring one side down, reposition to the other side, work that down, and continue to repostion around the perimeter. By using a hollow cylindrical object as a dolly, you support the dent around the entire perimeter, for a more effective operation of metal bumping off-dolly. Another point, on dolly, or metal on metal = stretching. So in the chance that you miss your off-dolly tap and it becomes on-dolly, you are stretching. Using a non-metallic dolly helps to limit the chance of stretching, and with a pronounced dent, obviously we have too much of that now. Turning a piece of UHMW in a lathe to make your own dolly would be ideal, but again would involve more resources and material, so for a one time shot a PVC pipe coupling will work....
I've been a bit too busy to go out in the shop and whip out a sample demo, but may be able to in the next couple days. In the meantime, here's a link to some research material to read up on the concept, please don't just take my word for it.
All MetalShaping
Post 4 links to a couple videos showing the process. Where in some cases the video shows using some rather aggressive shrinking in order to yield a certain shape, it does show the concept very well and gives you an idea of how much shrinking one can accomplish without heat. Fixing high spots found when blocking out primer is one area in particular where this process would be especially useful. Torches around primer do make a mess.....and more work.
jvmcc, can you post up some pictures of the area, so we can see where you're at now? Thanks
#11
07-21-2011, 08:05 PM
Hi all,
I do have access to an oxy/acetylene torch. I hope to try and re-address the bump on my roof this Saturday. I spread some lightweight "spackle" around the affected area so I could see whether or not the bump could be dealt with using filler. It looks like it would require more filler than I would like to use to make the roof appear smooth. I would like to avoid any filler if possible. I do not think the damage that I have done is irreversible. At least not in the hands of someone who knows what they are doing.
I'll post some photos that might better describe exactly what it is that I am dealing with. But, while the bulge that I have created would show as a reflected highlight in the "wrong" place on a shiny paint job, it is slight enough so that it may not photograph well. I'll do what I can.
I appreciate all advice that you guys are giving.
I registered on to the "All Metalshaping" forum. I can't access much on the site until I have been accepted by the site administrator. But from what I have seen, there is some amazing stuff there. It looks like its inhabitated by folks who, 1000 years ago, would have been armorers.
#12
07-22-2011, 11:42 AM
One of the guys over on the metal shaping web sites has a neat tool he sells called a donut dolly. It works more proficiently in off-dolly shrinking a crowned panel because it supports the bottom side in more than one spot (around the perimeter) as the panel is bumped from the top in the center of the donut dolly. This would seem to be useful in body repair, especially to address high spots found after blocking primer where heat would not be as feasible. ``
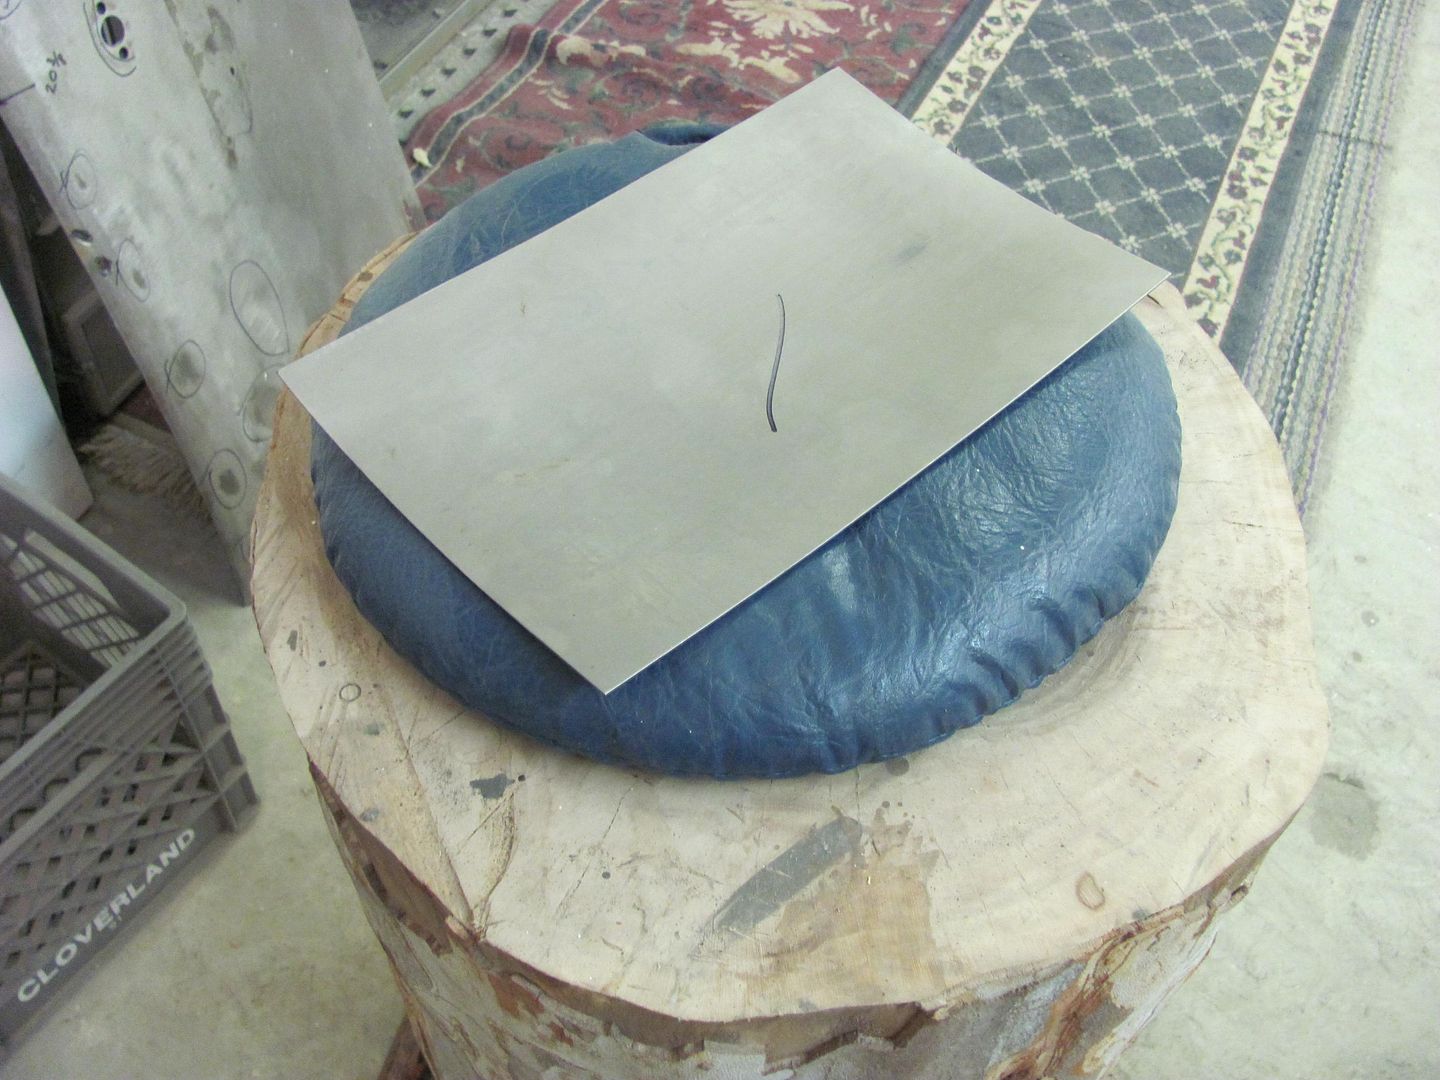
As a low-buck alternative, I suggested simply using a PVC pipe fitting. Where it may not work as aggressively as the donut dolly which has more mass, sometimes slower is better, especially when trying something new. I just today got around to trying this process in the shop, and rather than use the roof of something sitting here, we will use a piece of 18 ga CRS to simulate a roof.
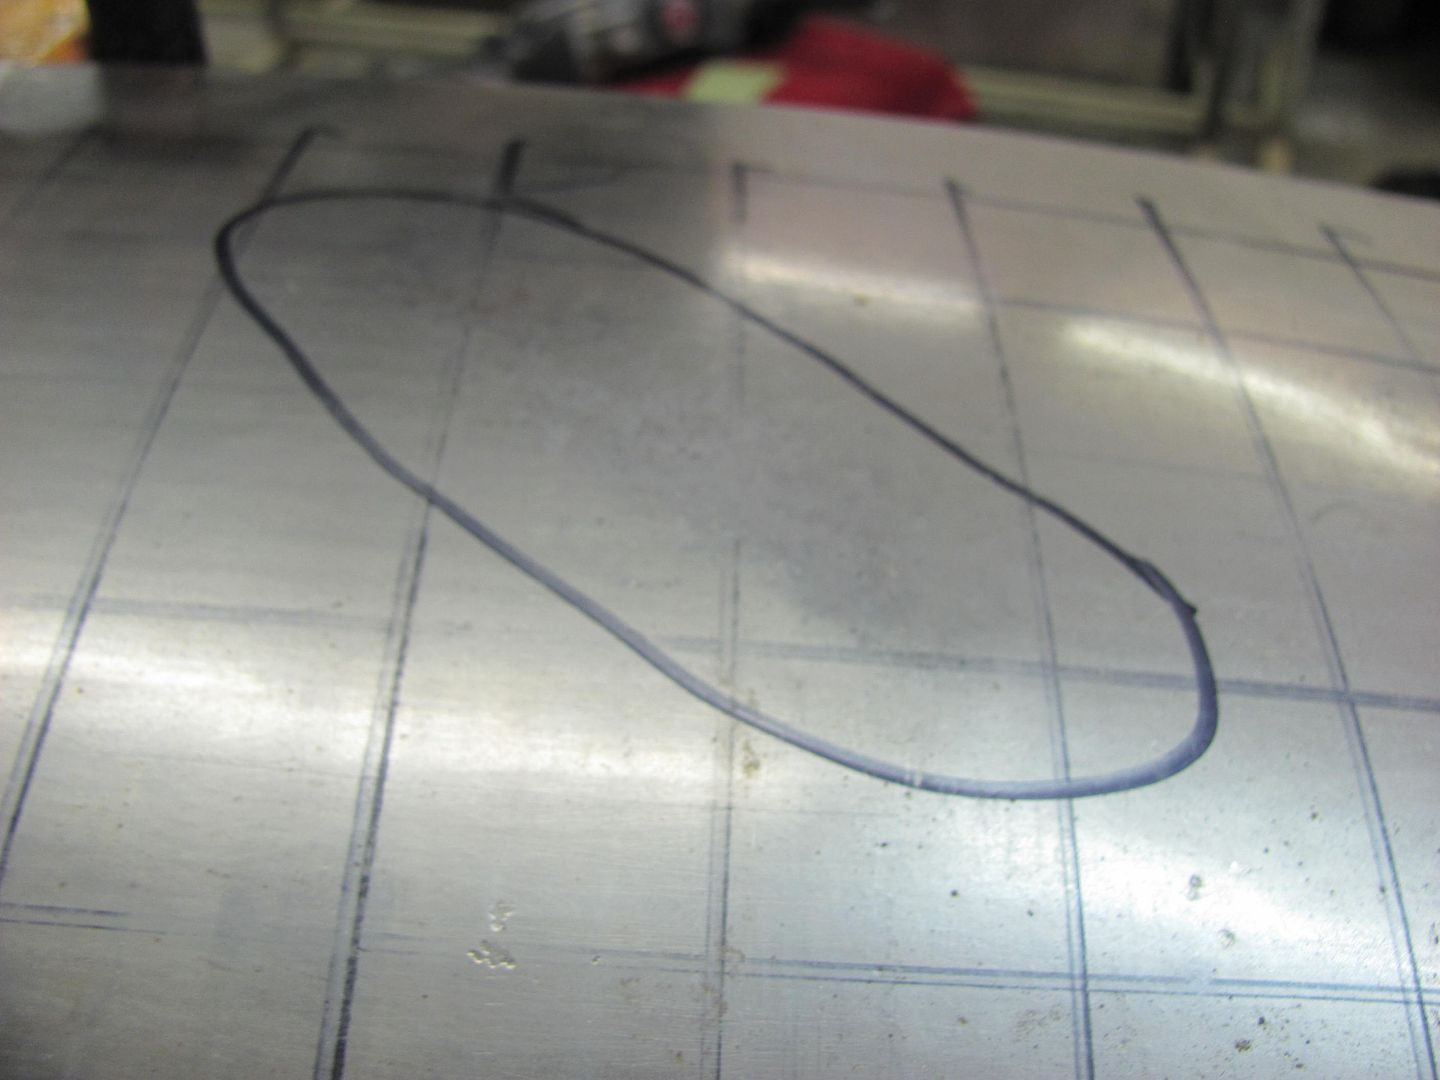
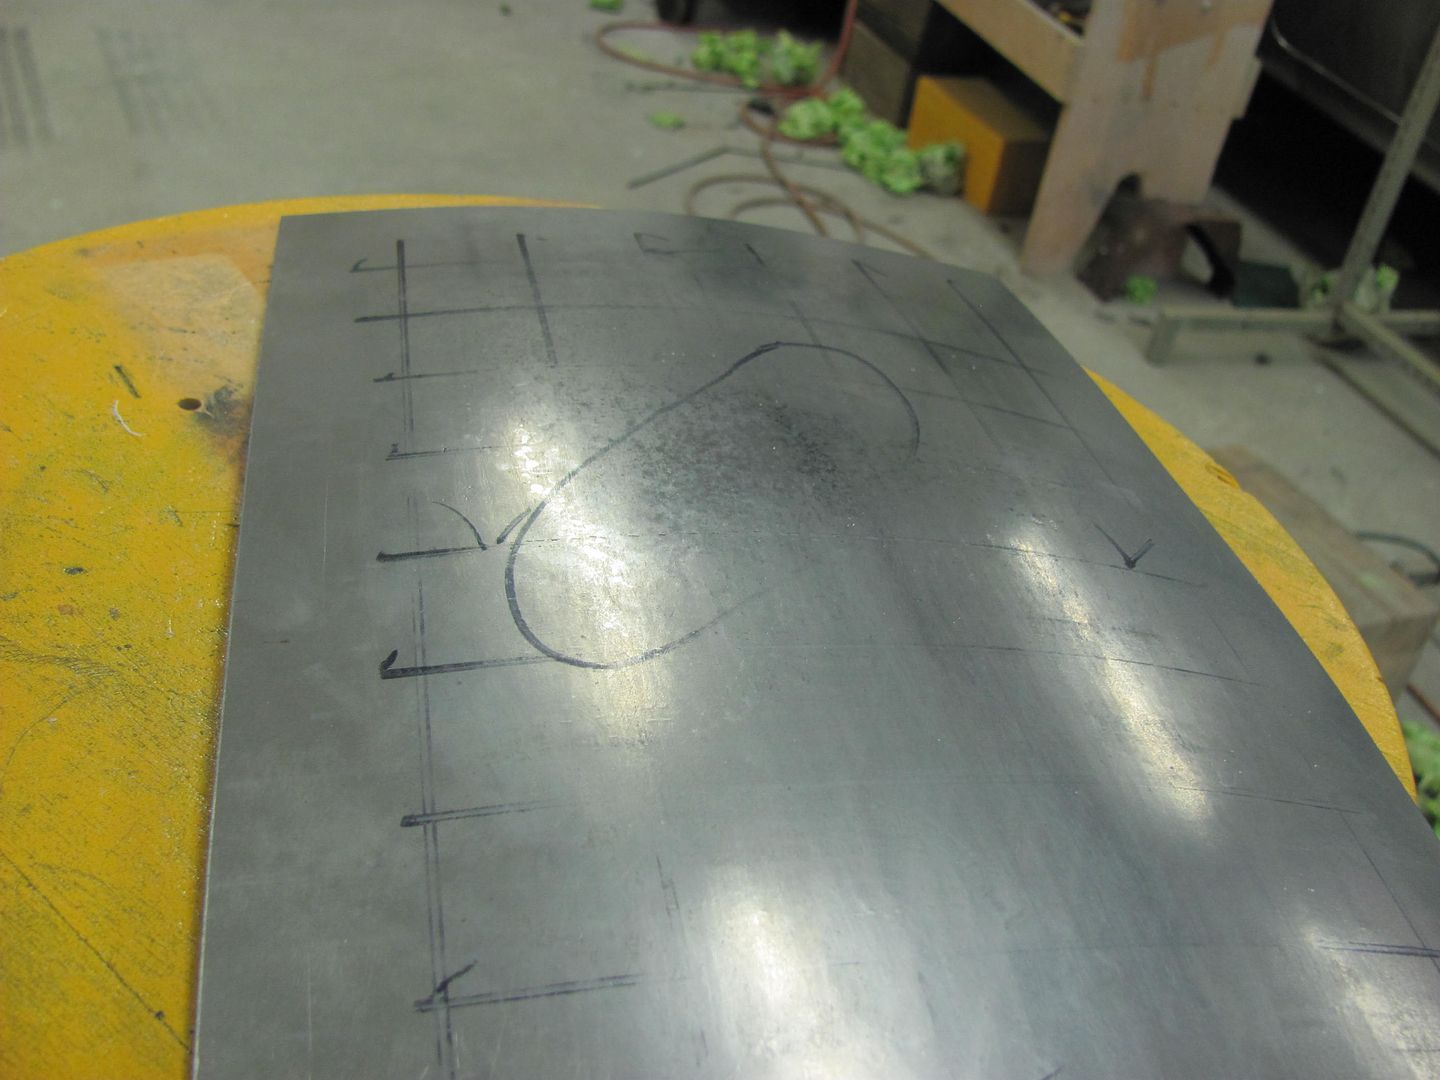
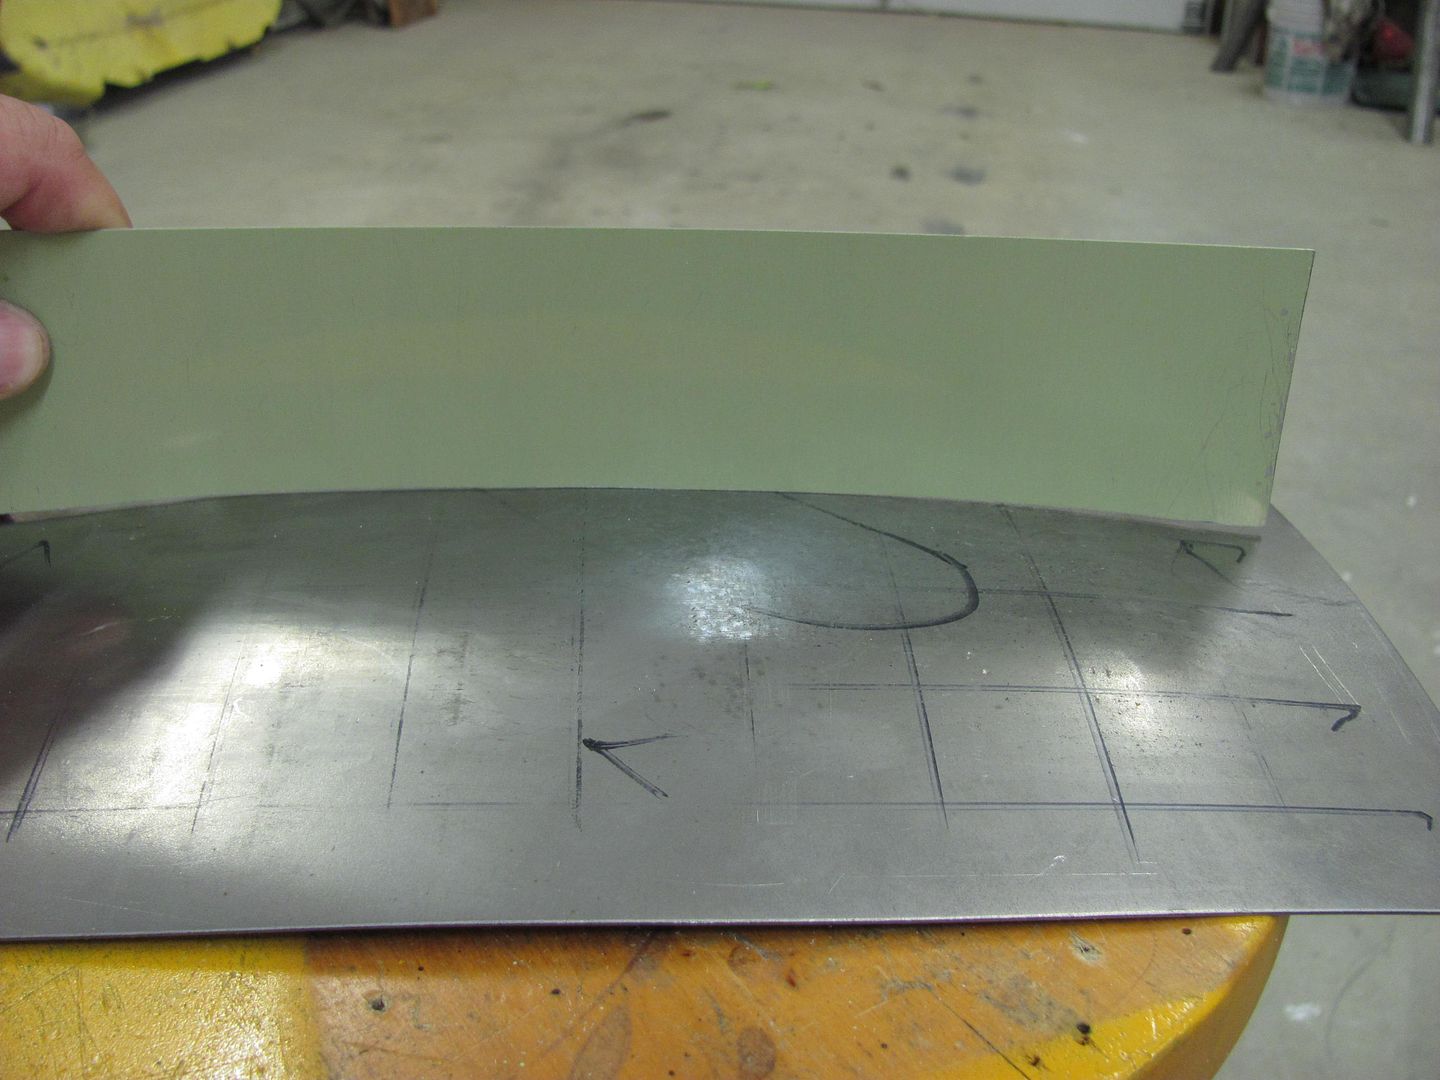
Grid layout for the Wheeling Machine, and completed "sample" roof...
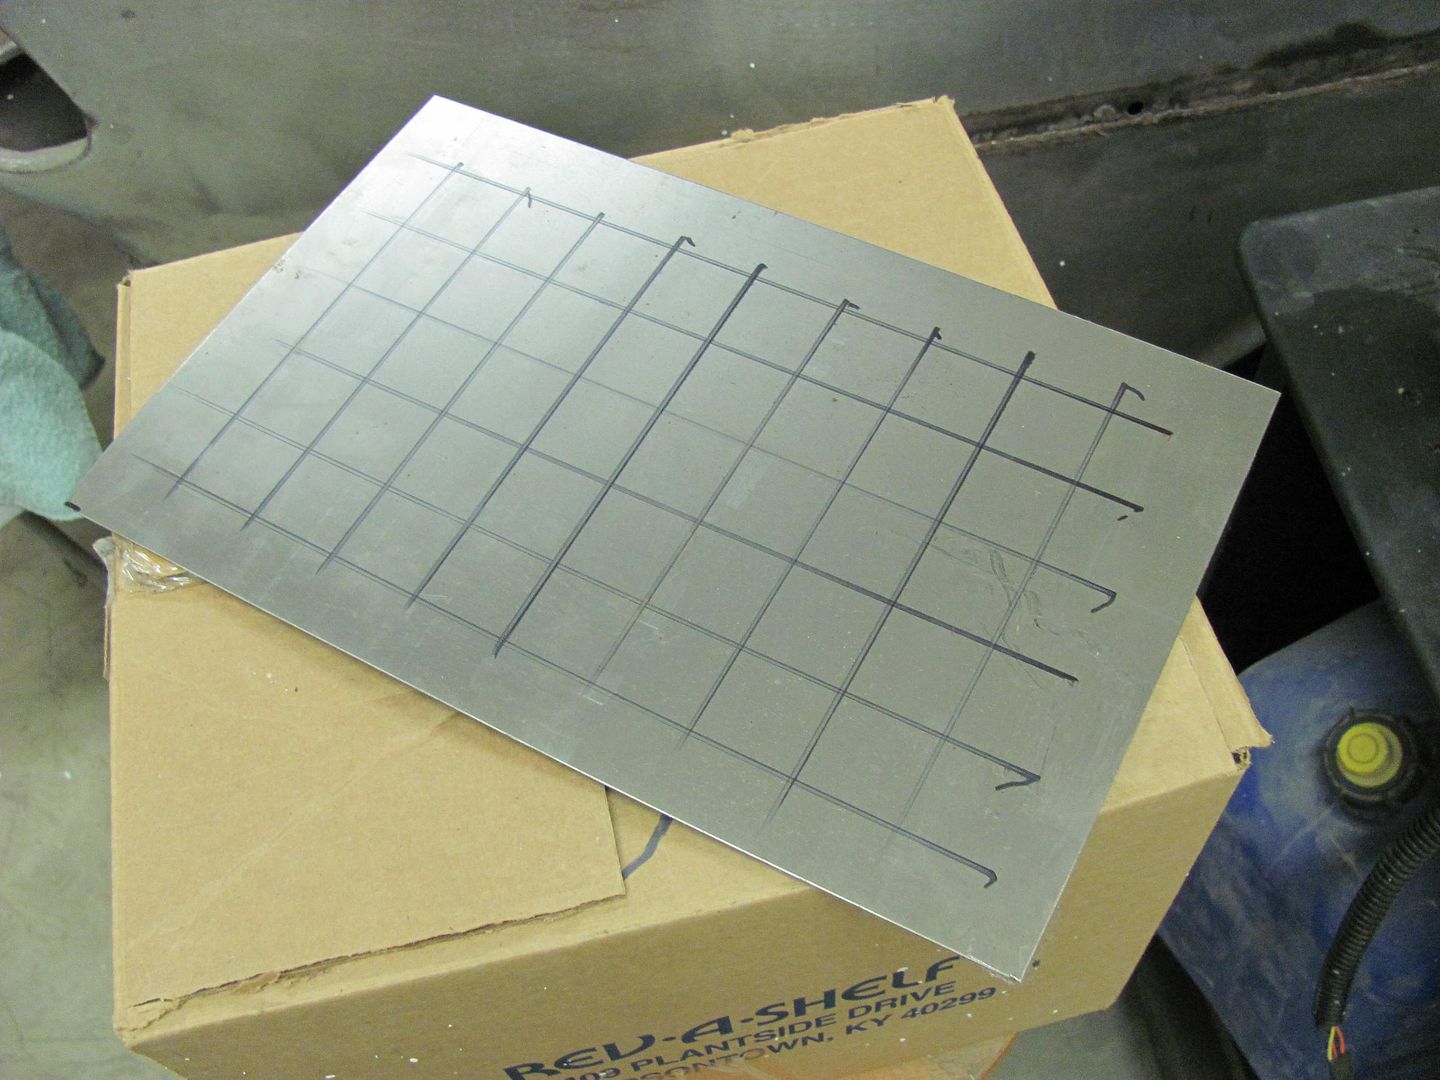
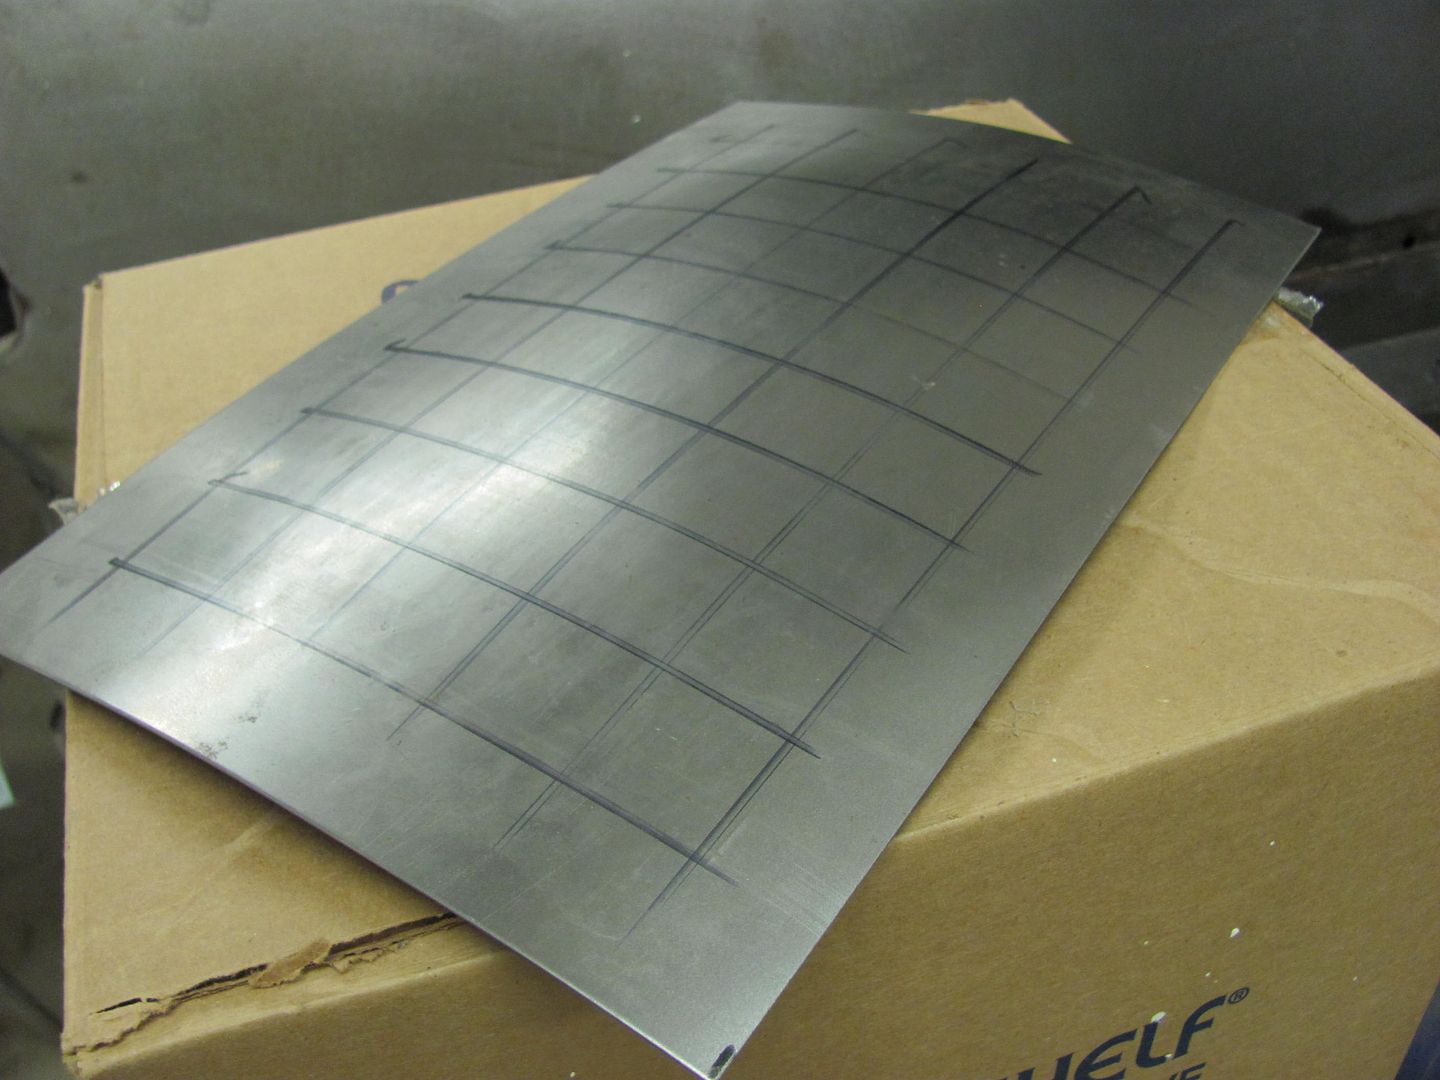
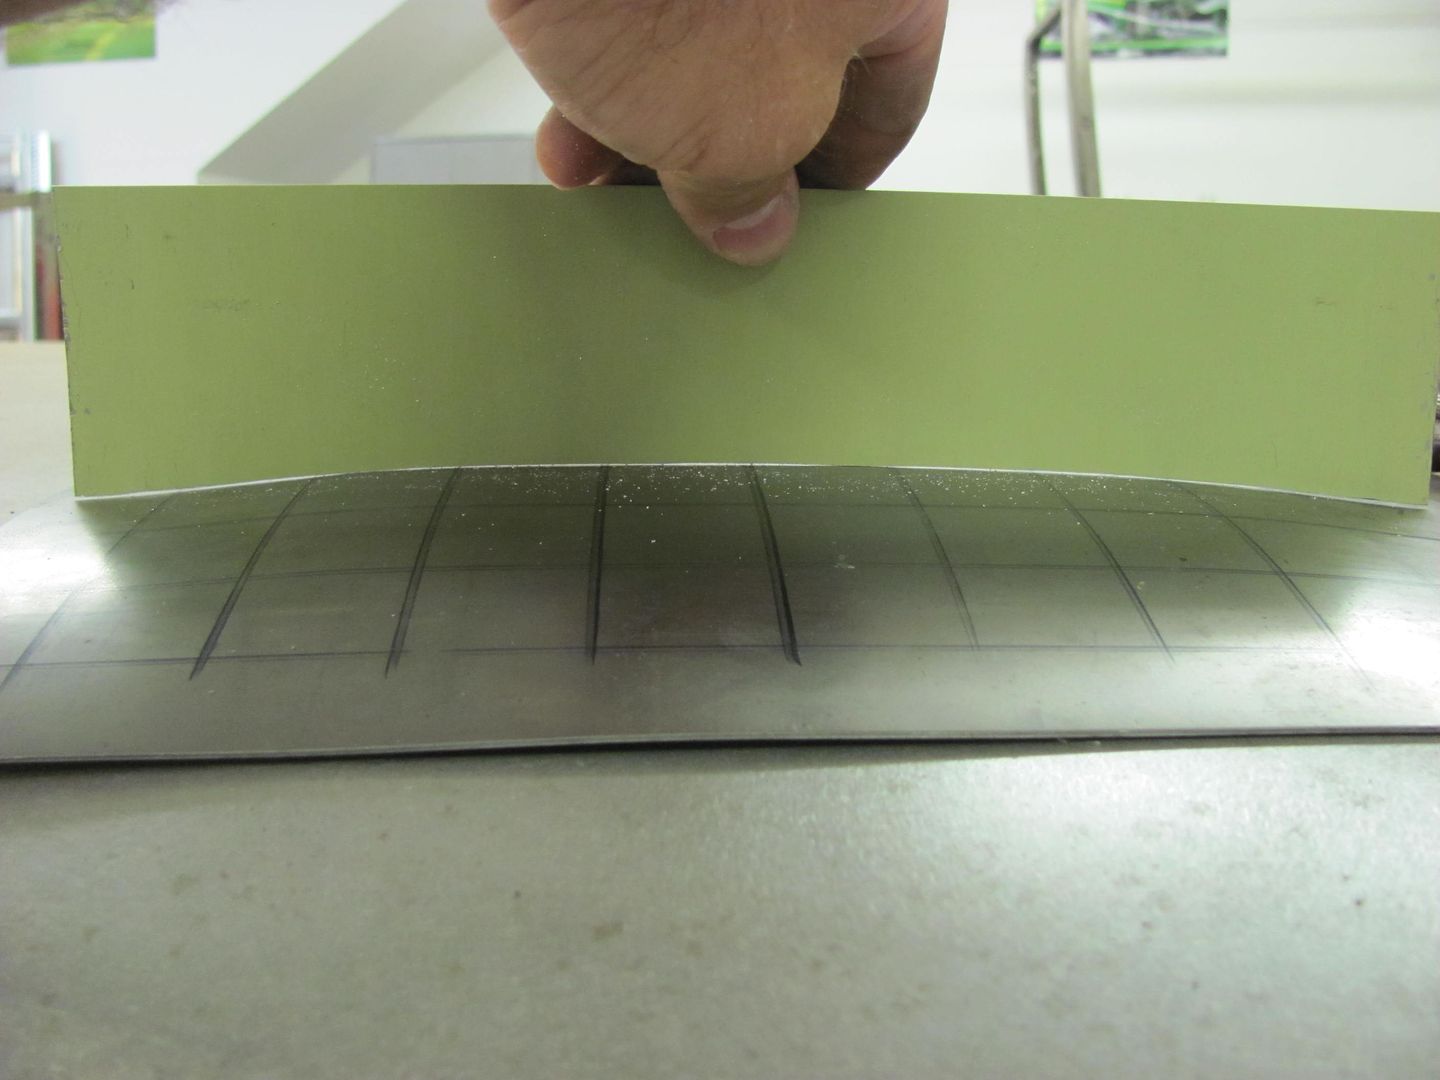
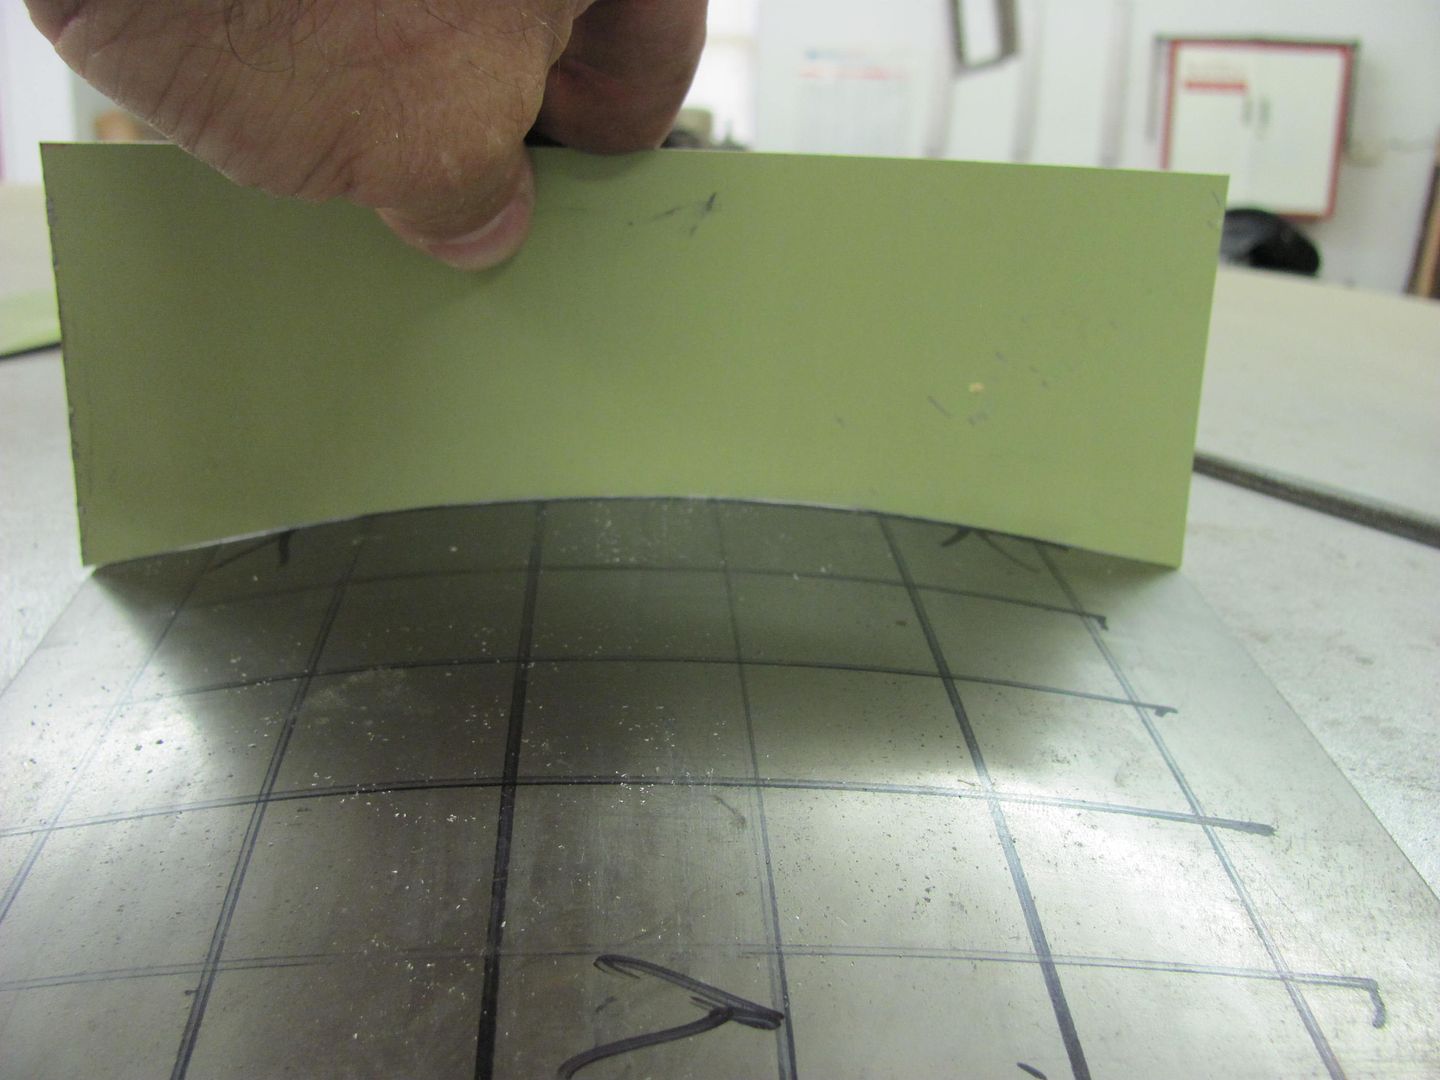
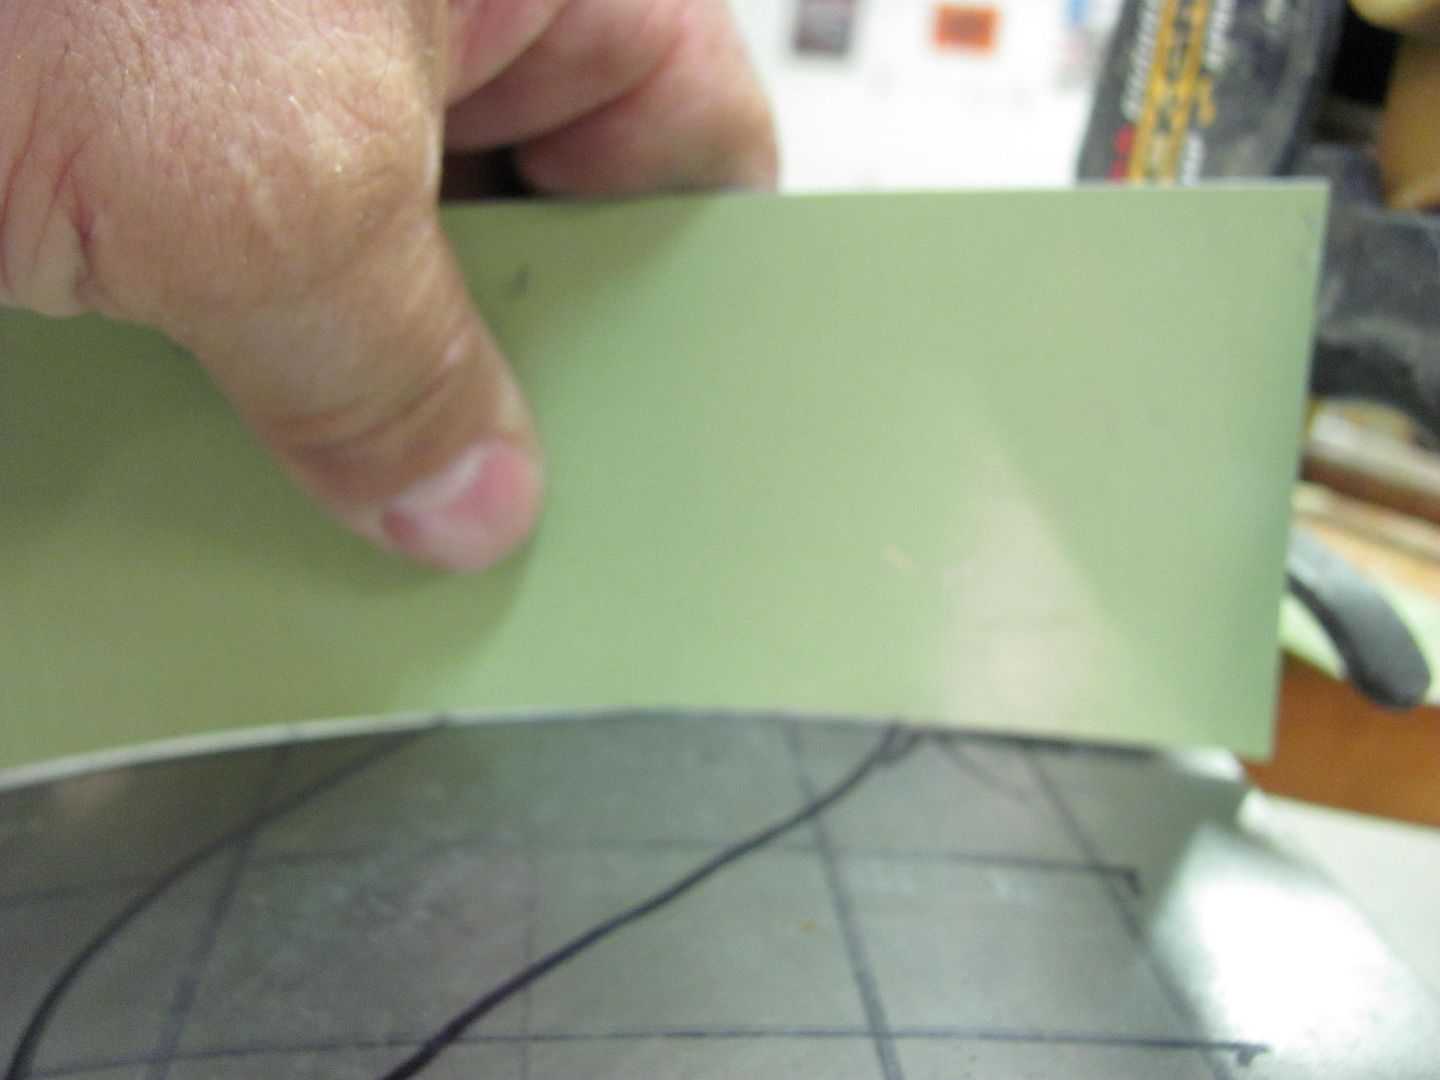
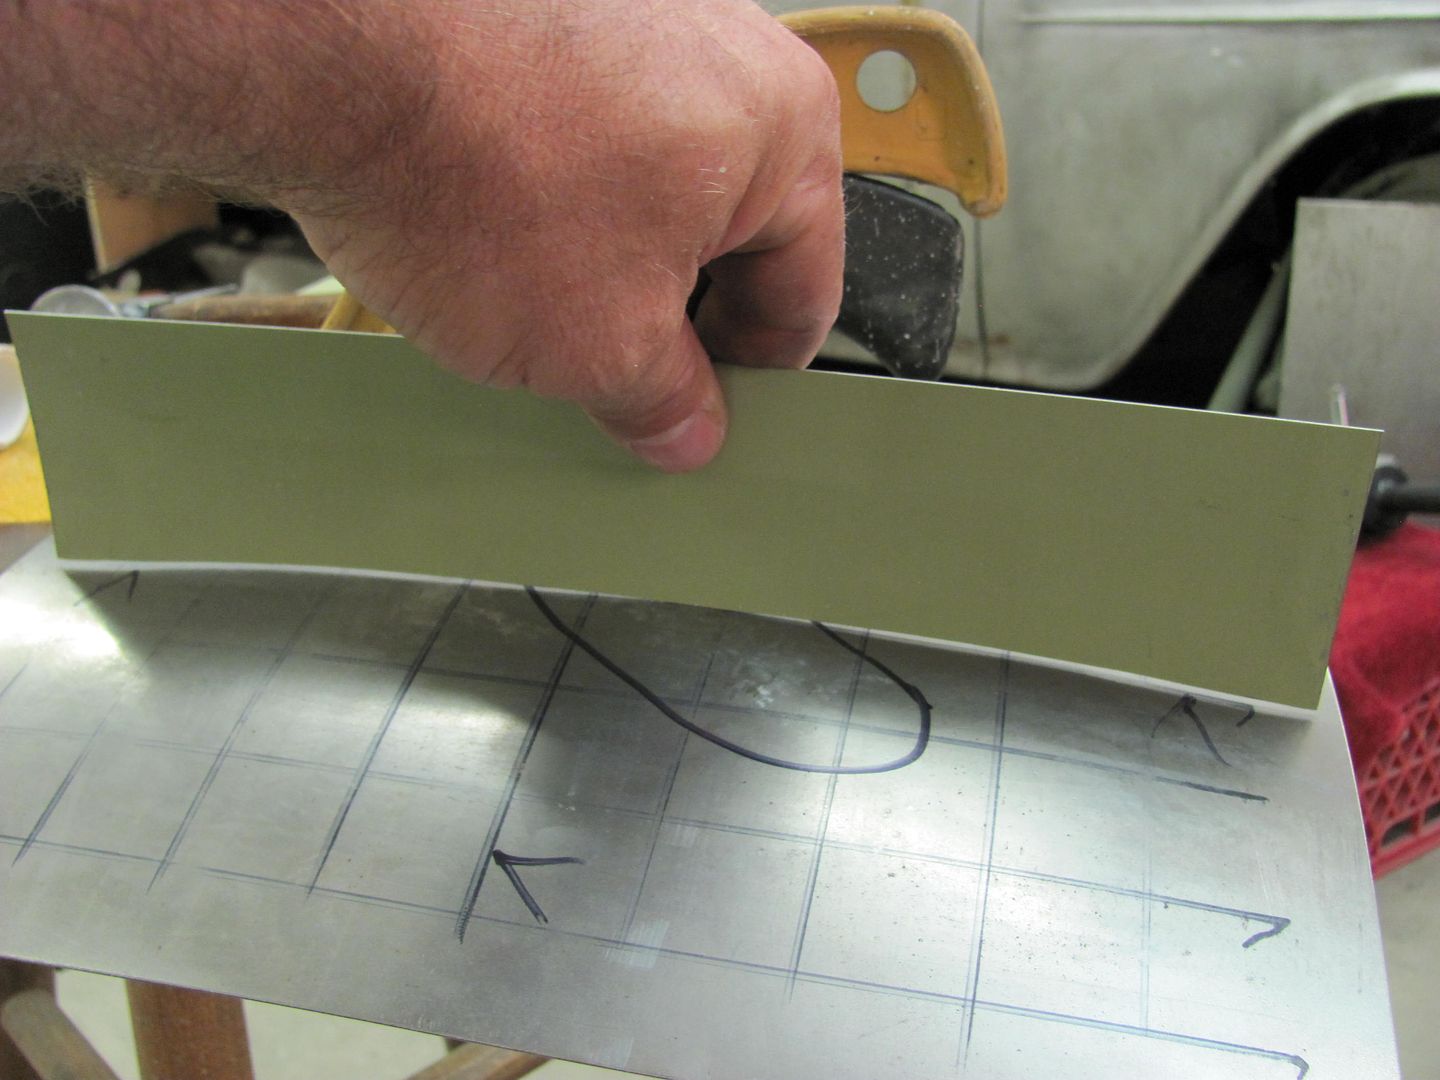
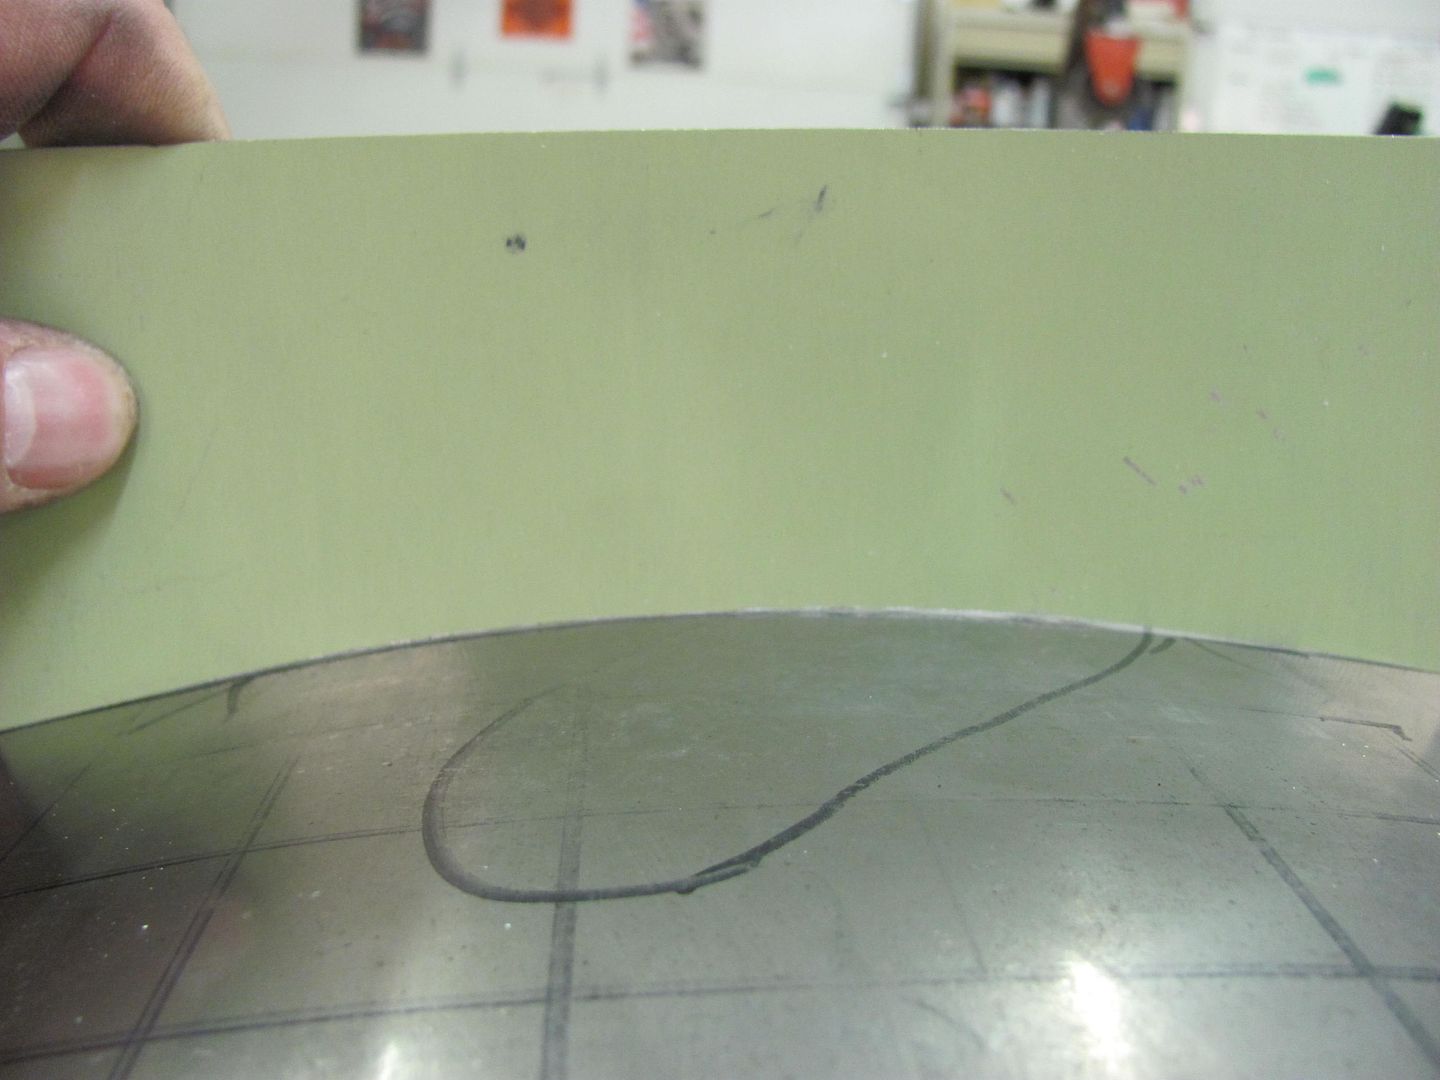
The first order of business should be to make some profile templates. In the case of an actual dented roof, use the opposite, undamaged side. This will allow you to check your progress as you go, and easily find the remaining high spots.
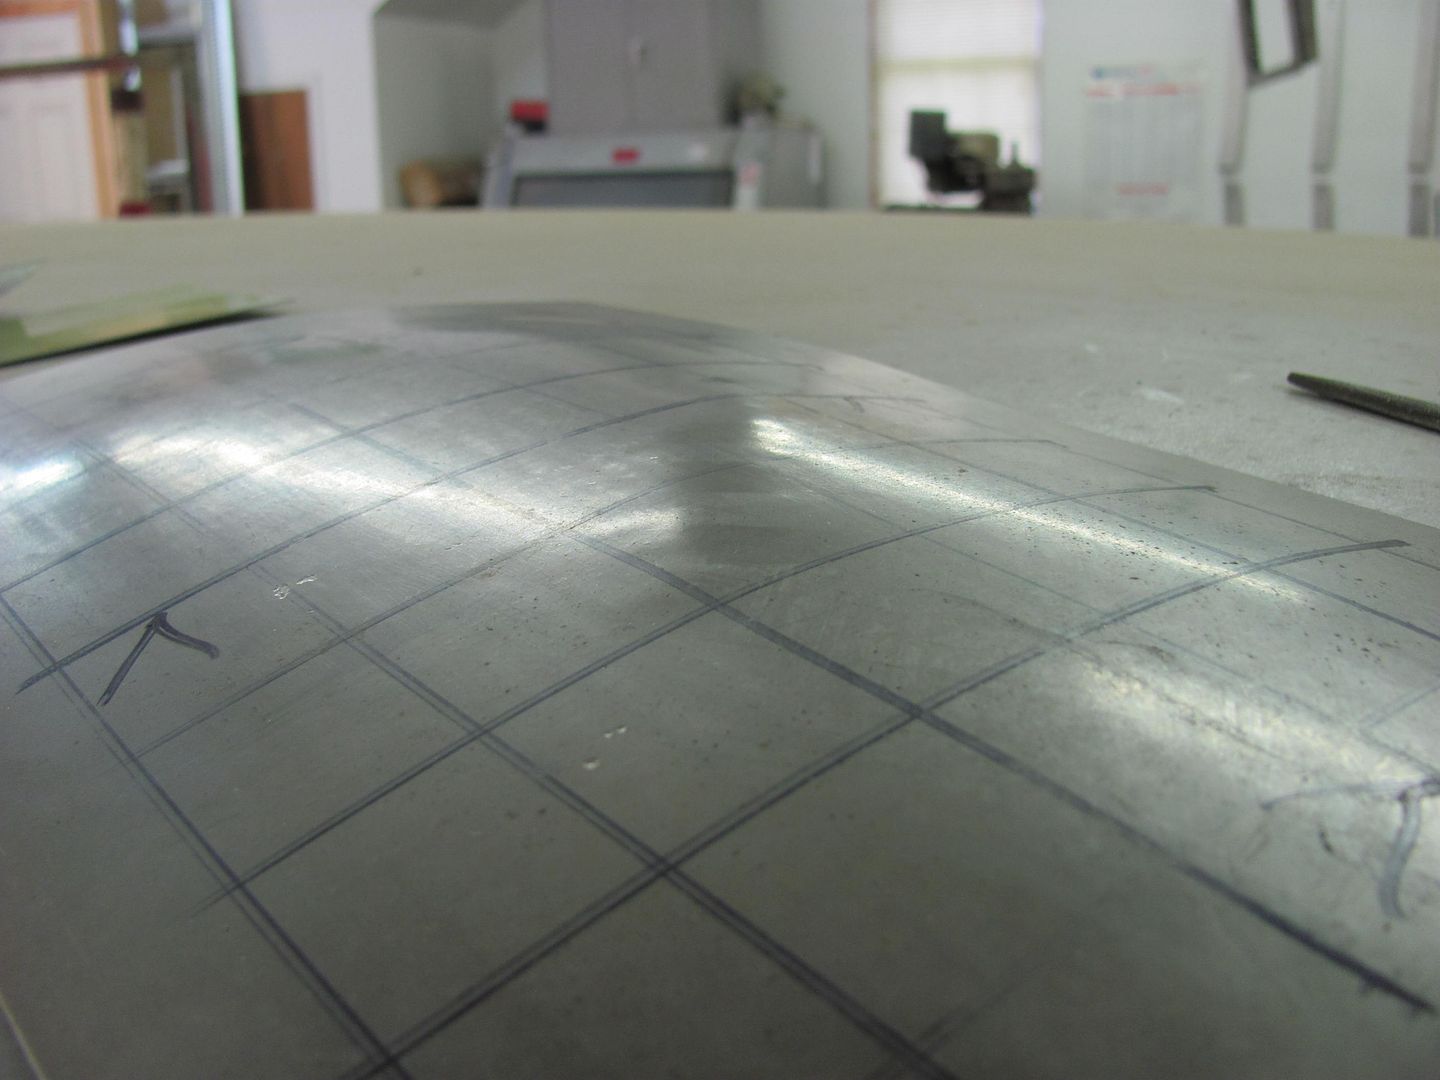
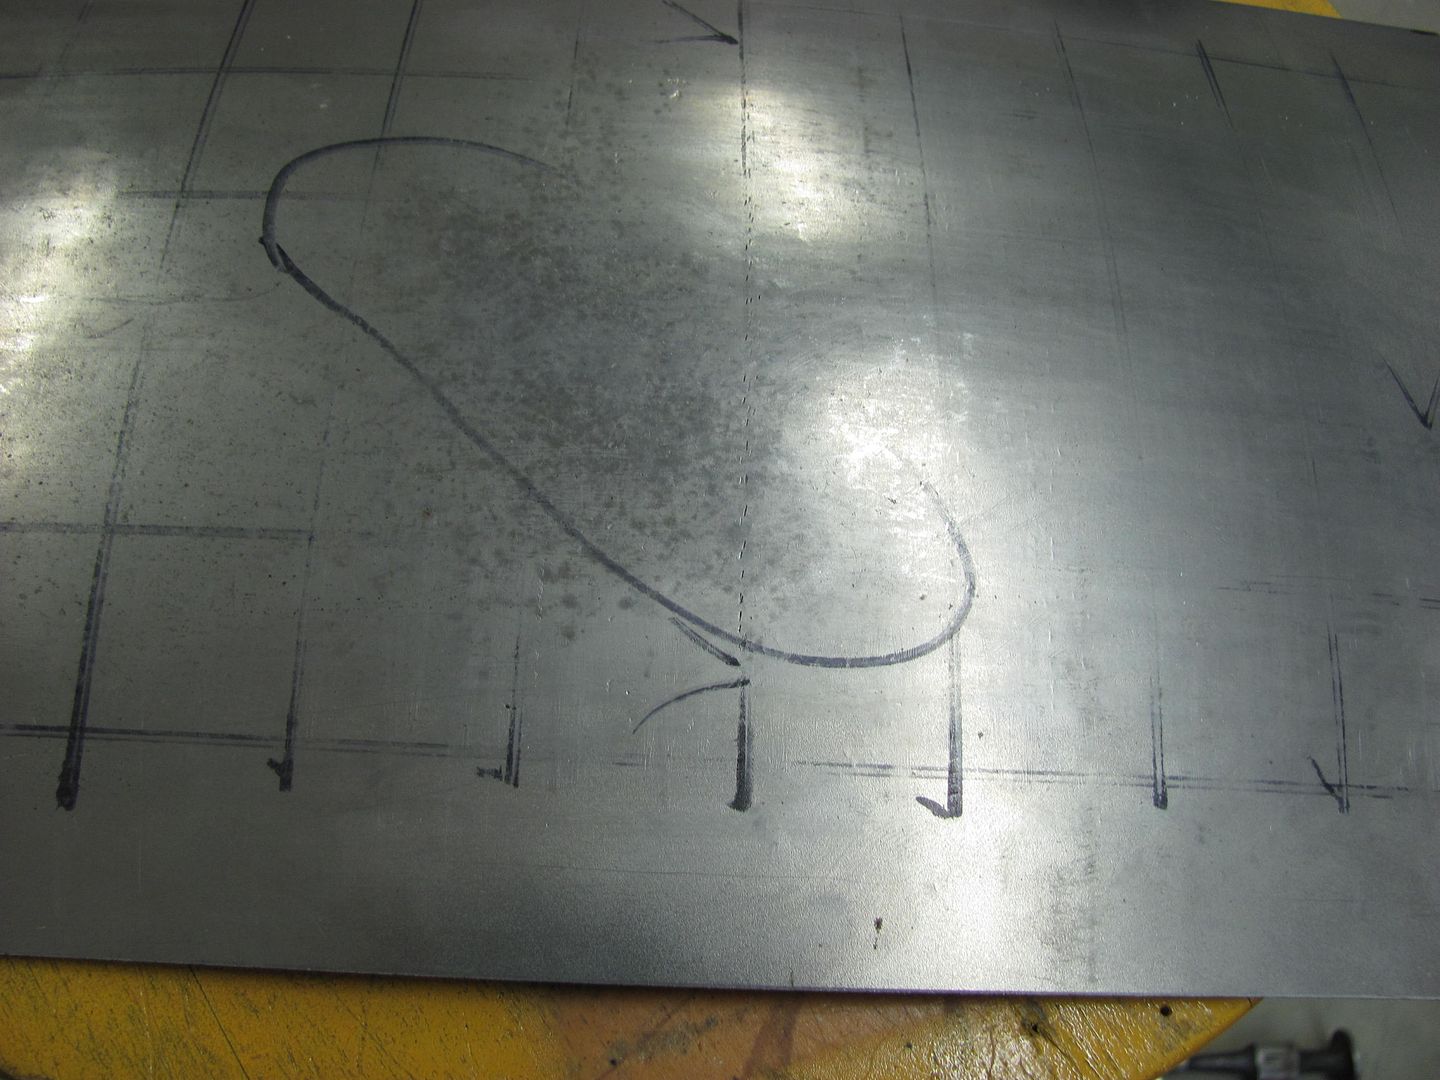
Using a crowned body hammer, a "dent" will be added from the back side, crossing both of our template areas.
With the dent added:
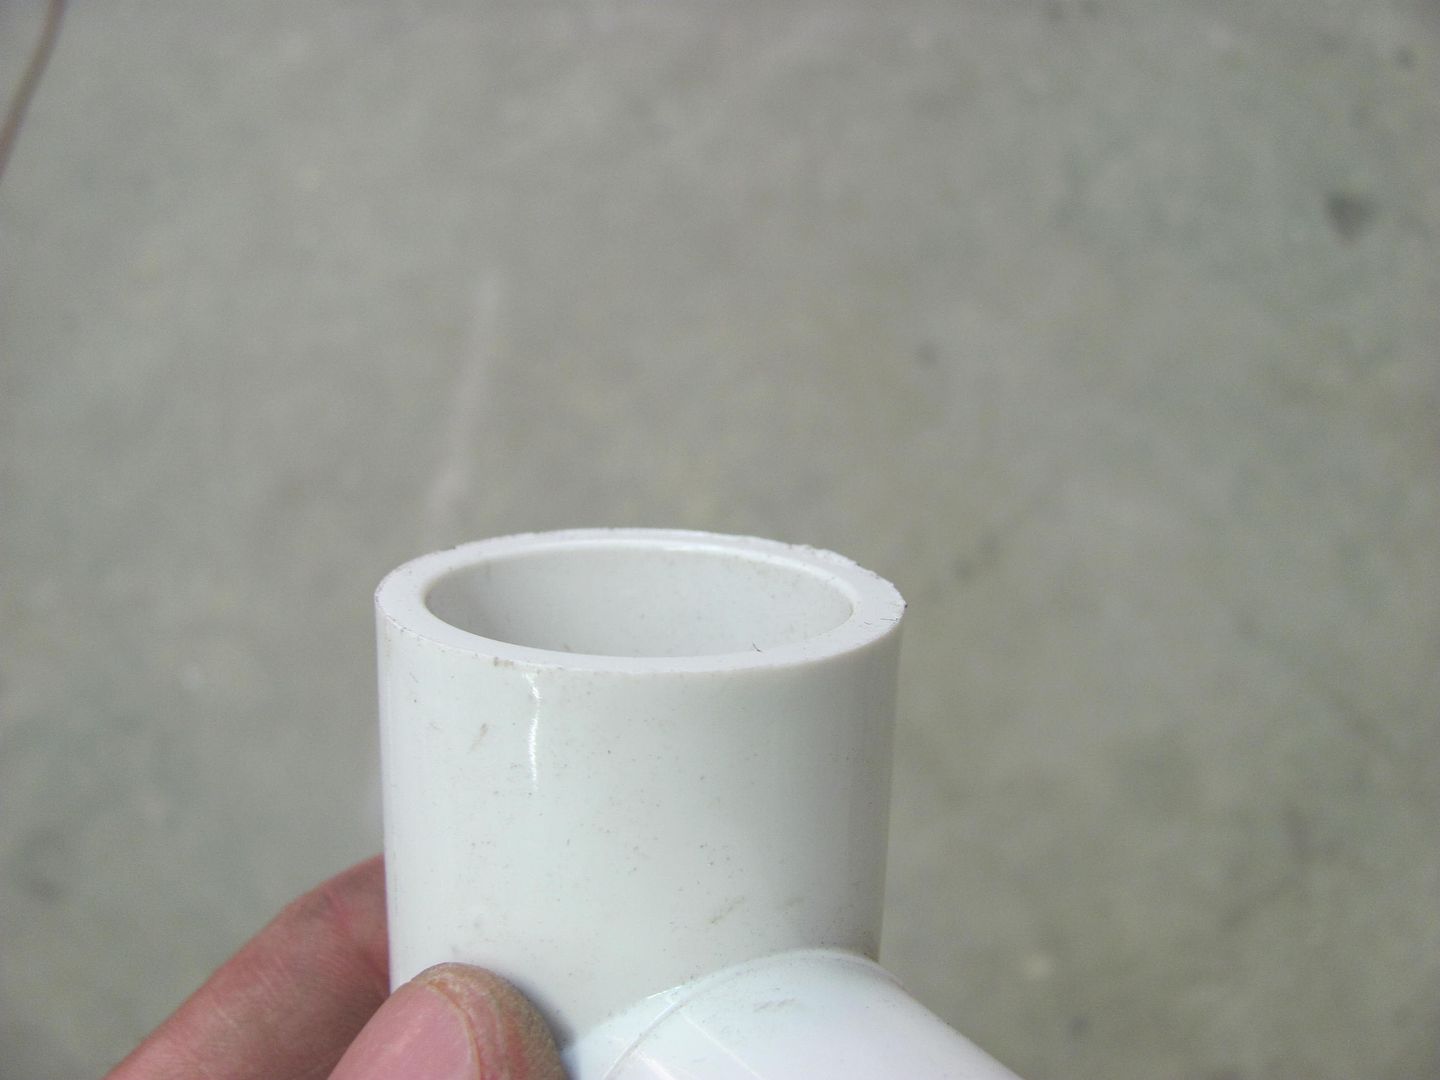
I chose to use a PVC elbow, it had two different sized ends for two tools in one. As with any body tool, they should be free of any burrs that may mar the metal surface. I also added a slight radius to the edges...

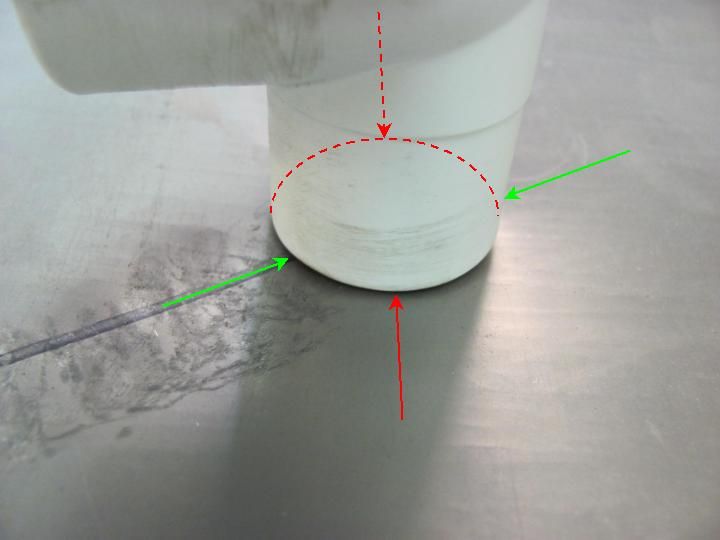
Holding the dolly against the bottom of the panel, you can see that due to the dents it only touches the panel at the red arrows. Based on off-dolly principle, the shrink would occur more prominently in the direction of the red arrows. If we needed to shrink in the direction of the green arrows, we would need to relieve two sides of the dolly to allow a contact pattern in the direction of the green arrows. This makes it especially important to check your progress with the templates, not only to find the high spots but more importantly to see which direction requires shrinking to insure the contact pattern will provide the neccessary shrink.
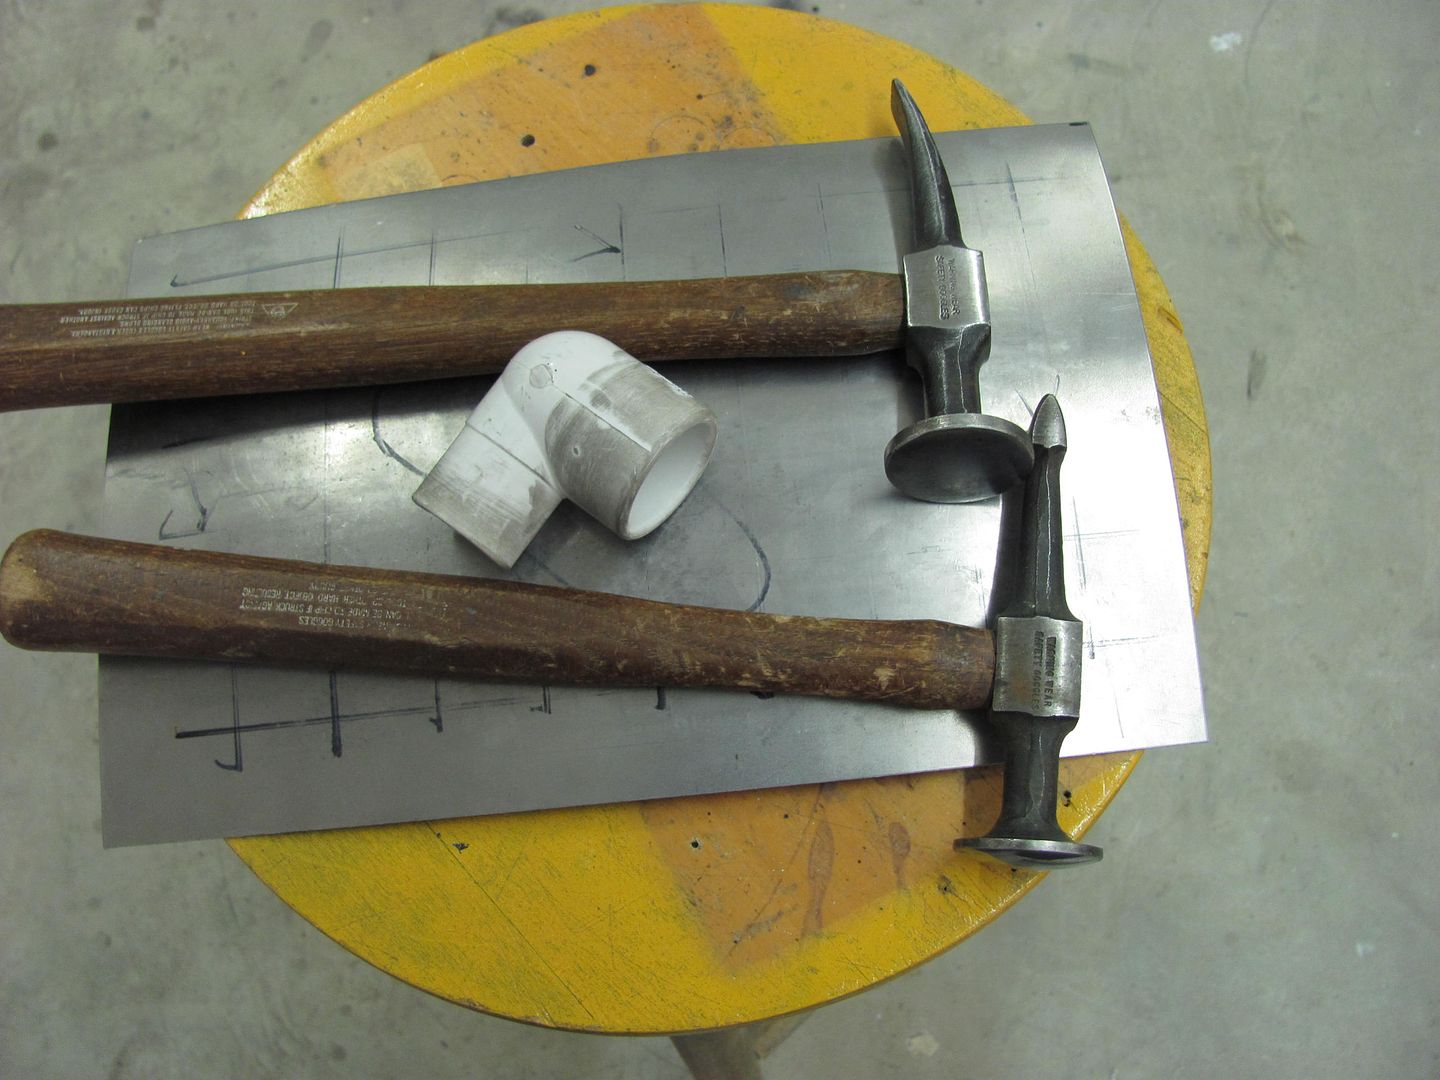
Here are the tools we will use today:
After some off-dolly bumping:
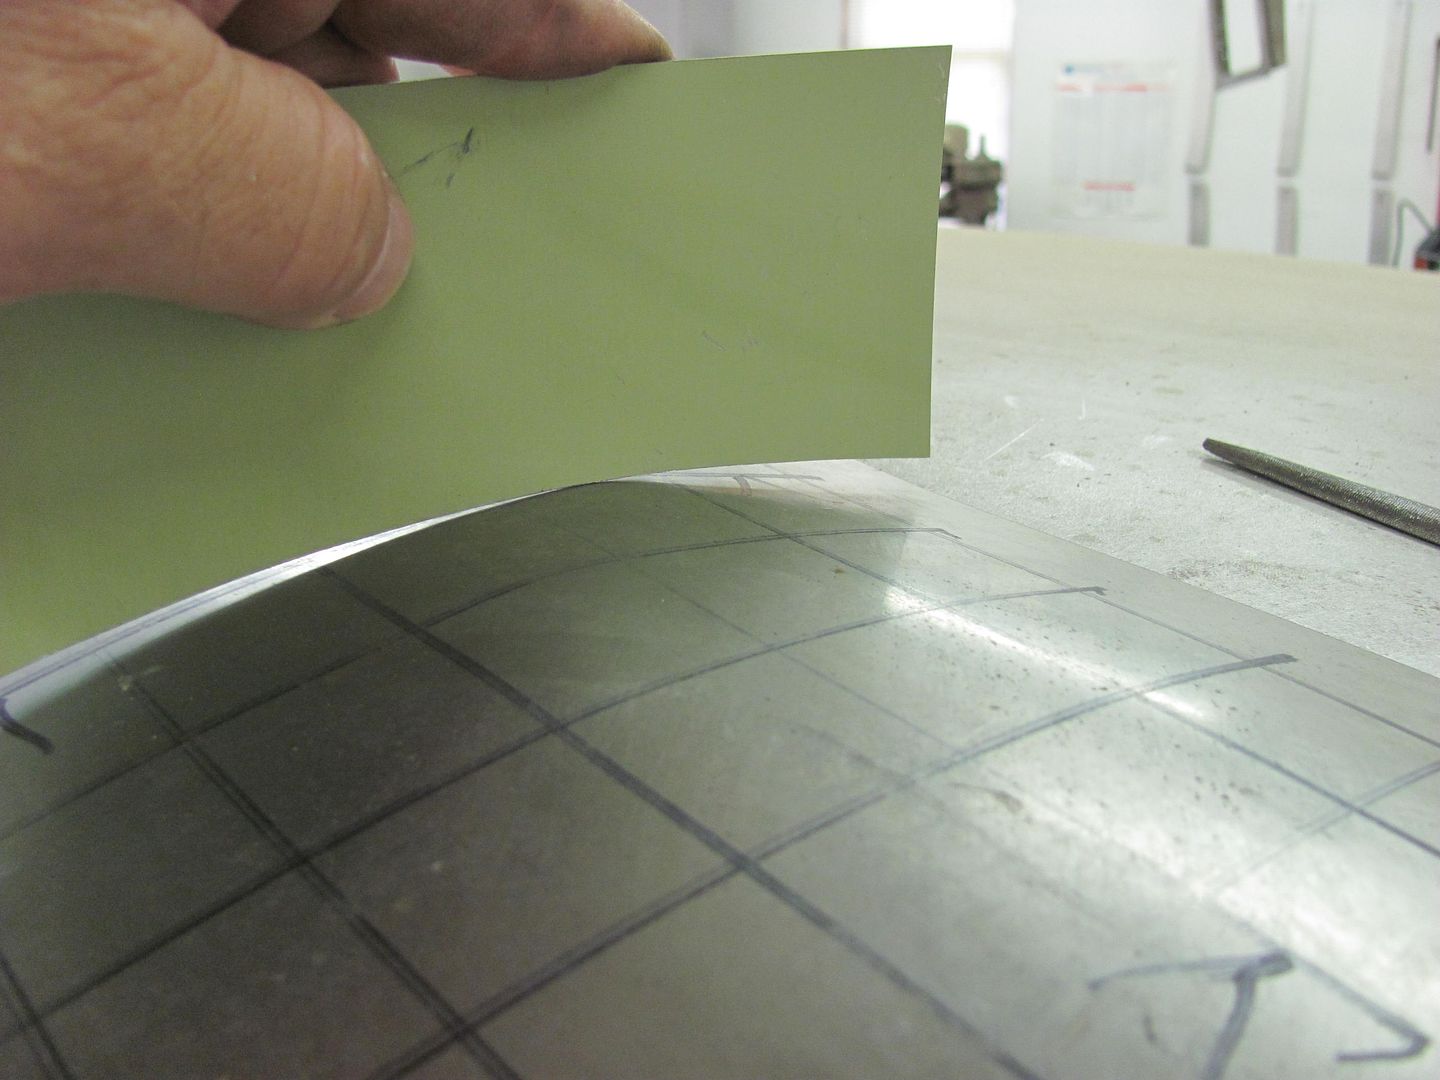
Check with the templates
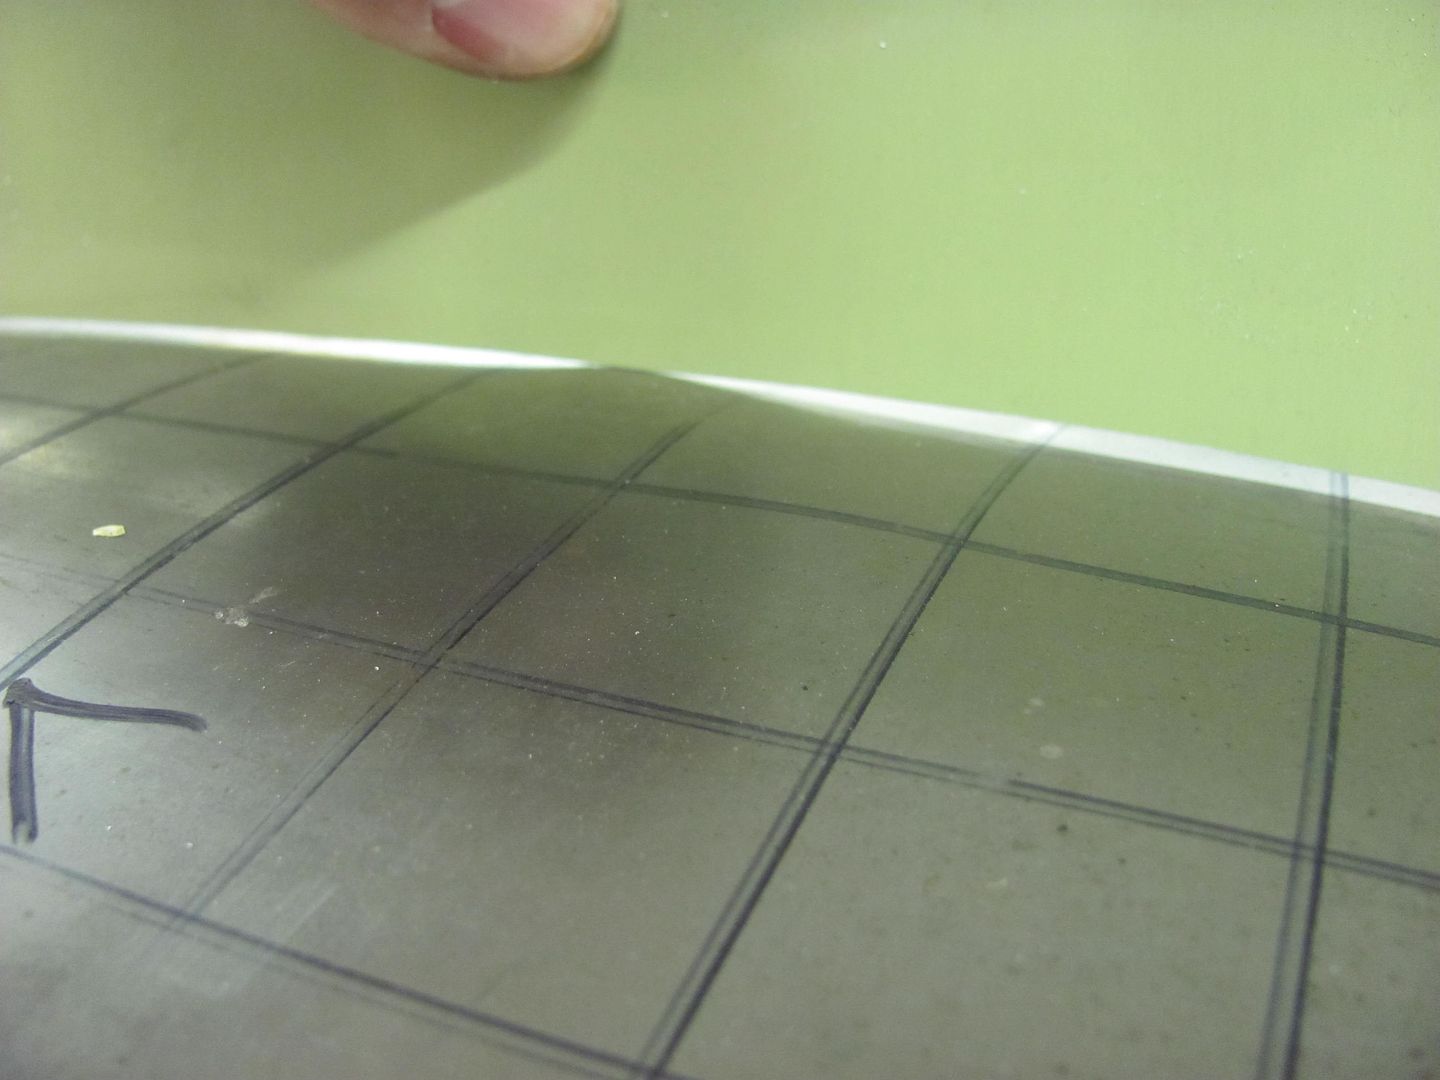
Progress....these are light taps only with the hammer. We just want to bring down the high spots, not create craters.
Here's where I finished up...
I have a little over an hour in making the panel, denting, and removing the dent. Where I still could have gone a bit more, it was about to a point where high build primer should have masked any remaining imperfections. This dent removal could also have been accomplished with heat shrinking using an O/A torch, etc, but for those times where you may not wish to use heat and want another option, this seems to work well. I think with using the donut dolly and it's heftier mass, one could shave some additional time off the repair.
As a low-buck alternative, I suggested simply using a PVC pipe fitting. Where it may not work as aggressively as the donut dolly which has more mass, sometimes slower is better, especially when trying something new. I just today got around to trying this process in the shop, and rather than use the roof of something sitting here, we will use a piece of 18 ga CRS to simulate a roof.
Grid layout for the Wheeling Machine, and completed "sample" roof...
The first order of business should be to make some profile templates. In the case of an actual dented roof, use the opposite, undamaged side. This will allow you to check your progress as you go, and easily find the remaining high spots.
Using a crowned body hammer, a "dent" will be added from the back side, crossing both of our template areas.
With the dent added:
I chose to use a PVC elbow, it had two different sized ends for two tools in one. As with any body tool, they should be free of any burrs that may mar the metal surface. I also added a slight radius to the edges...
Holding the dolly against the bottom of the panel, you can see that due to the dents it only touches the panel at the red arrows. Based on off-dolly principle, the shrink would occur more prominently in the direction of the red arrows. If we needed to shrink in the direction of the green arrows, we would need to relieve two sides of the dolly to allow a contact pattern in the direction of the green arrows. This makes it especially important to check your progress with the templates, not only to find the high spots but more importantly to see which direction requires shrinking to insure the contact pattern will provide the neccessary shrink.
Here are the tools we will use today:
After some off-dolly bumping:
Check with the templates
Progress....these are light taps only with the hammer. We just want to bring down the high spots, not create craters.
Here's where I finished up...
I have a little over an hour in making the panel, denting, and removing the dent. Where I still could have gone a bit more, it was about to a point where high build primer should have masked any remaining imperfections. This dent removal could also have been accomplished with heat shrinking using an O/A torch, etc, but for those times where you may not wish to use heat and want another option, this seems to work well. I think with using the donut dolly and it's heftier mass, one could shave some additional time off the repair.
#13
07-23-2011, 08:26 AM
WOW!!! MP&C...that's amazing! I cleaned up my own roof bump mess of primers and various applied substances. I intend to draw on to this roof section a grid, similar to what you show. It will be a handy reference system. I am going to draw a similarly sized and positioned grid on the passenger side of my roof (the unaffected roof section). I will make several templates on the good roof section with thin card stock. Then, I think that I can use them to accurately judge the degree of bulging that I have on the "damaged" roof section. This probably won't be done until this afternoon. Once done, I'll post photos.
#14
07-23-2011, 09:23 AM
Looking at your last pictorial, at this time you likely have a combination of a low spot around the perimeter (where the filler arrow points to) and the remaining high spots at the top of the "plateau". You may need to tackle this from both sides to bring up the lows and bring down the highs, but verify with your profile templates first that there are indeed lows.....
Placing the coupling on top, align one edge to the high spot and span the low, you can now tap from the bottom to bring up the lows. As you are now striking the bottom of a crowned panel (concave) you run more risk of the hammer edges hitting and leaving marks. If when tapping your flat body hammer touches on the edges of the hammer face and not the center, where it is leaving marks from the outside of the hammer face, switch to a crowned hammer. If it's not leaving marks, continue as you were. Again, as with earlier, these are light taps to move the metal. We want to go from an arc (the low) to a straight line, not an arc inverted the other direction (a stretch). In the middle of the dent in this following picture, you get an idea of how close the taps are together:
........where some of them in the center are only 1/16 or even less apart, but still very light taps. If you need to bring up lows, once complete then regroup back to the opposite side again and span the high spots and bring them down. If your dent is only 1/16 or less in height, you're almost there. The profile templates should help you to read the panel more accurately to make sure you're working the correct spots. At this point the size of your dolly should be about the same diameter or slightly larger than your hammer face. Limiting the size now may also make things a bit slower, but will also reduce any risk of creating a crater (stretching) the other direction. After this is done you'll have a much better understanding of metal bumping and should be able to tackle about anything.
Ed, OMG? Yikes? Where's the faith?
#15
07-24-2011, 11:30 AM
jvmcc, I posted the how-to section above on another thread and had some questions about the process. I felt the discussion would add some clarification for you....
First off, lets clarify the on and off dolly again. On-dolly:
As the hammer stikes the panel with the dolly held directly beneath, the forces come together (red arrows) and the panel is compressed between the two. With nowhere else to go, the metal is forced outward (blue arrows) in the form of a stretch.
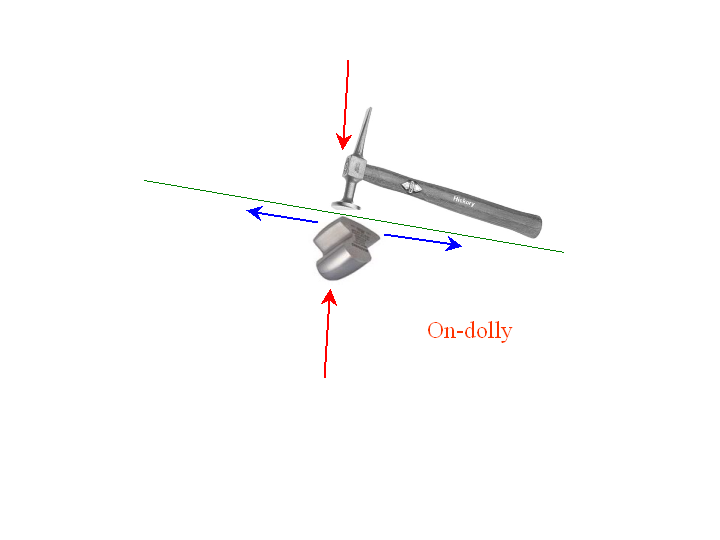
Off-Dolly:
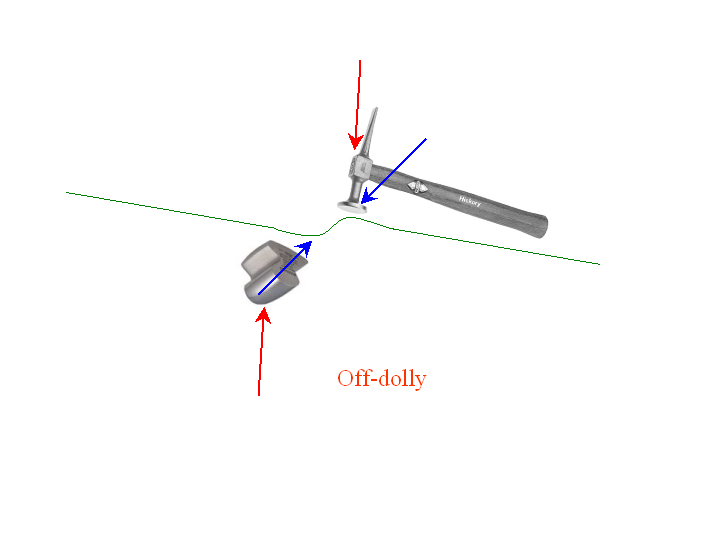
This time as the hammer strikes the apex of the dent from above, and the dolly rests against the one from below, their offsetting positions will cause the resulting forces in the direction of the blue arrows, forcing the metal back into itself, or causing a shrink.
Seldom is the case where we have a one-sided dent. Typically with an off-dolly scenario in fixing a dent, it is exactly as you describe, using off dolly and working around the perimeter of the dent to bring things back where they were.
As you surmised, spanning the two sides of the dent, we can off-dolly with more effectiveness, as the forces we are now introducing are more concentrated, or "Off-Dolly on steroids". But lets back up a second and look at the forces at work when a dent forms.
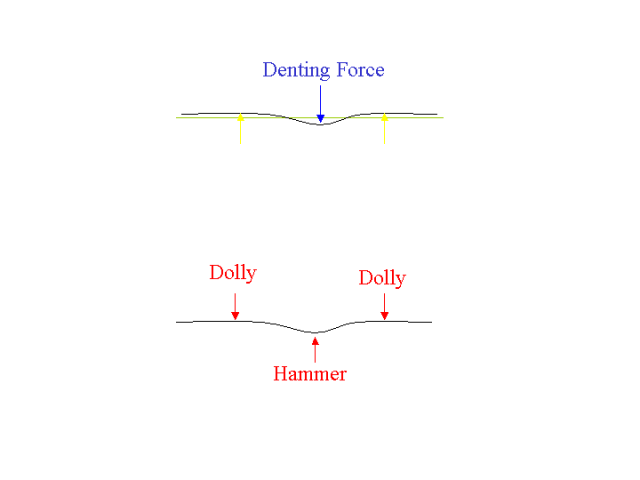
As an outside force is applied to the door of your new car (blue arrow), the direct reaction is a stretching of the metal, causing it to cave in. But we also have an indirect reaction in this stretching as the panel "springs back" slightly and you'll now notice a slight bulge or high spot around the perimeter of the dent (yellow arrows) This is why effective dent removal will include working both sides of the panel.
Moving down to the next view, we can see how an off-dolly scenario which supports both sides of the dent should prove to be more effective than the "one side at a time" method shown above in the second picture. Getting back to your suggestion of using a low crown dolly to span the dent, this would work up until the point the dolly made contact with the panel from the hammer striking the other side, as now we are stretching again. And just like the indirect forces in play when the dent was formed, there is also a small amount of springback when hammering out the dent. So to accomodate these forces, a hollow dolly would better fit the bill. Now on to the the problems associated with the hollow dolly:
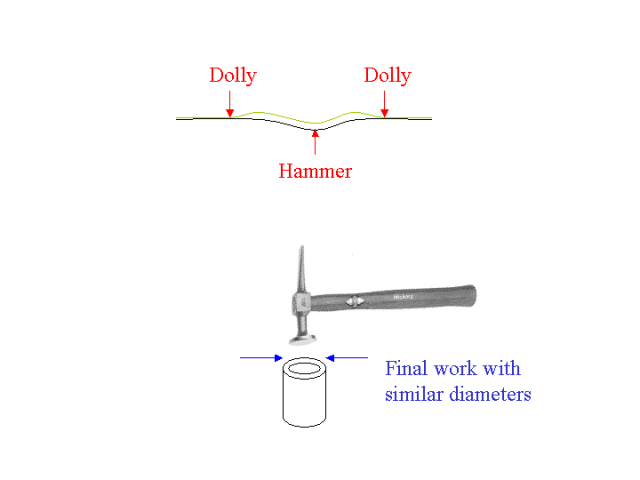
Once our process starts to move the dent, you'll get to a point the outer perimeter has reduced in size. If we don't stop here and regroup, you may end up with the scenario in the upper view, where the dent is now trying to "cave in" on our hollow dolly. This is where a variety of sizes would come in handy, to reduce dolly size as the dent removal progresses to better match the outer perimeter of the dent. When you get to the point where it is only minor movement needed, you'll want a hollow dolly sized the same diameter or only slightly larger than the head of the body hammer. Where a "flat" body hammer in most cases actually has a low crown, this works about perfect to counter the springback effect.
Looking at this another way, the dent has formed an arc (stretch) in an otherwise flat panel. We're trying to return the arc to a flat (flatter?) line. Having a dolly made of a non-metallic material also helps to grab or capture the surface of the panel moreso than a metal dolly would.
Originally Posted by 72novaproject
Help me understand this Robert.
Would the conventional method to remove that dent be to use something like a heel dolly and move it around the circumference of the dent while tapping the high spot in an off-dolly operation? I assume you would then need to heat shrink the remaining high crown.
Is the difference here that your method spans across two sides and still allows for an off-dolly operation? Why couldn’t you span the dent with a large low crown dolly or would that end up being an on-dolly operation?
About the time I think I understand this I get thrown a curve ball.
Steve
As the hammer stikes the panel with the dolly held directly beneath, the forces come together (red arrows) and the panel is compressed between the two. With nowhere else to go, the metal is forced outward (blue arrows) in the form of a stretch.
Off-Dolly:
This time as the hammer strikes the apex of the dent from above, and the dolly rests against the one from below, their offsetting positions will cause the resulting forces in the direction of the blue arrows, forcing the metal back into itself, or causing a shrink.
Seldom is the case where we have a one-sided dent. Typically with an off-dolly scenario in fixing a dent, it is exactly as you describe, using off dolly and working around the perimeter of the dent to bring things back where they were.
As you surmised, spanning the two sides of the dent, we can off-dolly with more effectiveness, as the forces we are now introducing are more concentrated, or "Off-Dolly on steroids". But lets back up a second and look at the forces at work when a dent forms.
As an outside force is applied to the door of your new car (blue arrow), the direct reaction is a stretching of the metal, causing it to cave in. But we also have an indirect reaction in this stretching as the panel "springs back" slightly and you'll now notice a slight bulge or high spot around the perimeter of the dent (yellow arrows) This is why effective dent removal will include working both sides of the panel.
Moving down to the next view, we can see how an off-dolly scenario which supports both sides of the dent should prove to be more effective than the "one side at a time" method shown above in the second picture. Getting back to your suggestion of using a low crown dolly to span the dent, this would work up until the point the dolly made contact with the panel from the hammer striking the other side, as now we are stretching again. And just like the indirect forces in play when the dent was formed, there is also a small amount of springback when hammering out the dent. So to accomodate these forces, a hollow dolly would better fit the bill. Now on to the the problems associated with the hollow dolly:
Once our process starts to move the dent, you'll get to a point the outer perimeter has reduced in size. If we don't stop here and regroup, you may end up with the scenario in the upper view, where the dent is now trying to "cave in" on our hollow dolly. This is where a variety of sizes would come in handy, to reduce dolly size as the dent removal progresses to better match the outer perimeter of the dent. When you get to the point where it is only minor movement needed, you'll want a hollow dolly sized the same diameter or only slightly larger than the head of the body hammer. Where a "flat" body hammer in most cases actually has a low crown, this works about perfect to counter the springback effect.
Looking at this another way, the dent has formed an arc (stretch) in an otherwise flat panel. We're trying to return the arc to a flat (flatter?) line. Having a dolly made of a non-metallic material also helps to grab or capture the surface of the panel moreso than a metal dolly would.