Ford F-250: How to Replace Your Power Window Motor
What are the symptoms of a dying power window motor and how can you replace it before it's completely shot? We have the answers for you right here.
This article applies to the Ford F-250 and F-350 Super Duty (2005-2014).
When your power window is getting ready to die, it will start moving the glass slower and slower, eventually it won't move the glass at all. If money allows, it is always suggested to replace the motor when symptoms start appearing. This task may seem challenging but is actually very simple with a little help and patience.

Materials and Tools Needed
- Flat head screwdriver or trim panel puller
- Duct tape
- 1/4" socket extension
- 1/4" ratchet
- Various sockets (in the 5-12mm range)
- Power drill
- Drill bits stepping up to 5/8"
- File or sand paper
- Telescoping magnet
Step 1 - Gaining access
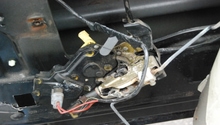
This step is pretty dependent on your truck's year and body style as the trim panel mounting points vary between them. Take your time while removing the trim panel. If you feel any resistance, stop and double check that you have it completely removed it from the door. You'll generally find mounting points in these spots:
- Under the a-pillar trim
- Along the bottom of the door panel
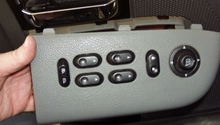
- Underneath the window controls (this will also need to be unplugged)
- On the door handle or underneath a little plastic square when you pull the handle towards you
- In the change pocket
Don't forget to disconnect the door light either so you don't rip the wires on it during removal. When you have everything disconnected simply slide the door panel up and it will come off easily. Once the door panel is off you'll also want to remove the door speaker and the moisture shield paper.

Pro Tip
If you're using a flat head screwdriver, wrap the end in painters or electrical tape to prevent it from damaging your door panel.
Step 2 - Remove motor
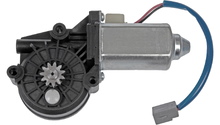
Remember to measure multiple times before drilling to be sure you are accurate. At this point, you'll need to locate the window regulator (see Figure 1). When you find it, you'll notice that the bolts on it aren't easily accessible. Depending on your truck's year, you may get lucky and the bolt locations will be marked will dimples or something similar. However, if they aren't, you'll need to use your best judgement to correctly mark the locations for them. Once you have the locations marked:
- Disconnect power wire from motor.
- Using a small drill bit, drill a pilot hole into each marking/dimple.
- Using your larger drill bits, slowly step up the size until the hole is large enough to fit your socket and extension through.
- Unbolt the three bolts holding on the motor and then remove it.

Pro Tip
It's very helpful to have a second person with you to hold the motor while you unbolt it so you don't drop any bolts down into the door.
Step 3 - Install the new motor
Installation is simply the reverse of removal, with a few added precautionary steps:
- Using your magnet, try to collect as many of the metal shavings in the bottom of the door as possible. This will help prevent any rattling noises.
- Install the new motor by securing it with the three bolts and reconnecting its power wire.

- At this point, I recommend reconnecting the window controls to test the motor before re-installing everything else.

- Re-install the door speaker.

- Finally, re-install the door panel. Make sure to connect all wires you disconnected earlier.
Featured Video: How to Replace Your Power Window Motor
Related Discussion
-
Power Window Motor - Ford-trucks.com