

 11-12-2014, 11:42 AM
Last edit by: IB Advertising
See related guides and technical advice from our community experts:
Browse all: Brake Guides
- How to Change Brake Rotor
Step by step instructions for do-it-yourself repairs
- How To Replace Emergency Brake
Step by step instructions for do-it-yourself repairs
Browse all: Brake Guides

Parking Brake Backing Plate Installation - WITH PICTURES
#1
04-13-2011, 05:30 PM

I am starting this thread to (hopefully) help other SD owners get their parking brakes to work again. I haven't been able to find a thread that takes you through this procedure in detail, so i will try to write one.
My parking brake never really worked right (wouldn't hold the truck, and once engaged it would not fully dis-engage), so i am going to take them apart and get them working again.
Since i bought my truck used in the north east, it has a fair bit of rust cancer. Consequently i am suffering from the common "dust shield rot".
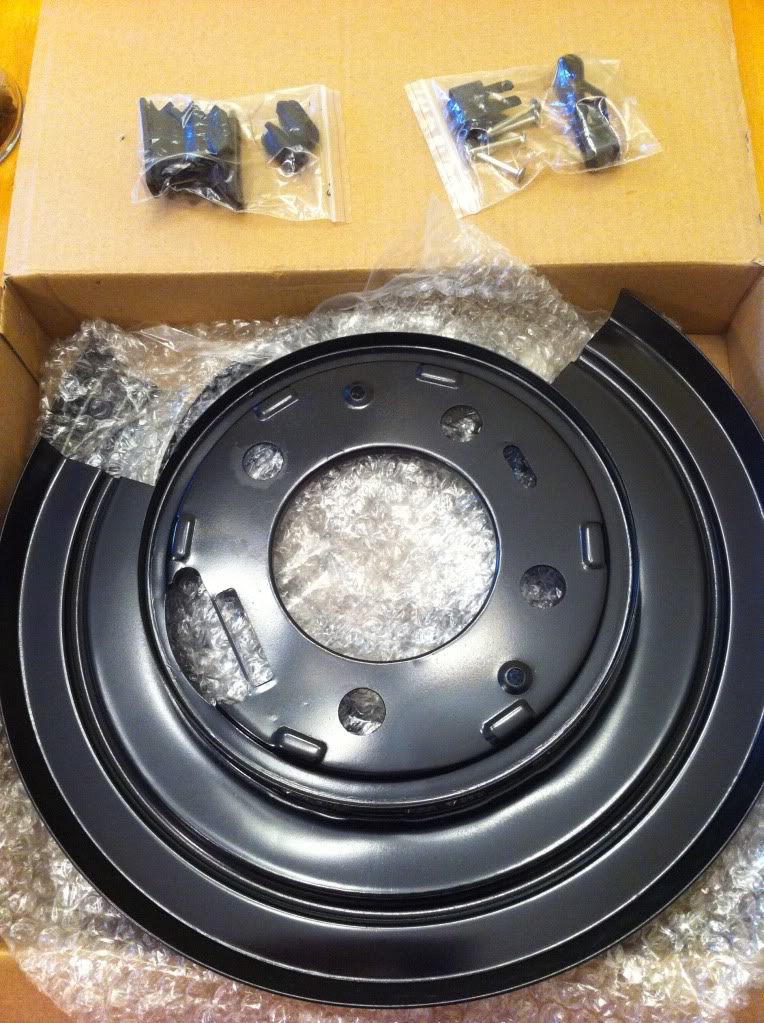
In preparation of digging into them this weekend, i ordered dorman 924-212 dust shields (for my 2003my SRW).
I ordered them from rock auto, and am so far impressed. They were only $50 shipped. Ordered them on tuesday morning and they were on my front porch when i got home from work today (thursday). This is actually a kit that includes both left and right dust shields, pins/clips, new adjustment hole dust plug and actuator boot. All in all, not a bad deal for $50 especially since the dealer only sells them as part of an "assembly" for upwards of $350 a side.
Anyway, here is a pic:
Stay tuned. The rest will follow this weekend.
My parking brake never really worked right (wouldn't hold the truck, and once engaged it would not fully dis-engage), so i am going to take them apart and get them working again.
Since i bought my truck used in the north east, it has a fair bit of rust cancer. Consequently i am suffering from the common "dust shield rot".
In preparation of digging into them this weekend, i ordered dorman 924-212 dust shields (for my 2003my SRW).
I ordered them from rock auto, and am so far impressed. They were only $50 shipped. Ordered them on tuesday morning and they were on my front porch when i got home from work today (thursday). This is actually a kit that includes both left and right dust shields, pins/clips, new adjustment hole dust plug and actuator boot. All in all, not a bad deal for $50 especially since the dealer only sells them as part of an "assembly" for upwards of $350 a side.
Anyway, here is a pic:
Stay tuned. The rest will follow this weekend.
Last edited by GUNNERDOG; 04-18-2011 at 02:16 PM. Reason: Title Clarification
The following users liked this post:
#2
04-17-2011, 09:23 PM
NOTE: Some parking brake shoes contain asbestos, take proper precautions.
Ok, finished installing the new backing plates and shoes today. Here is how i did it:
Step 1: Chock the wheels.
This is self explanatory, but make sure the parking brake is OFF.
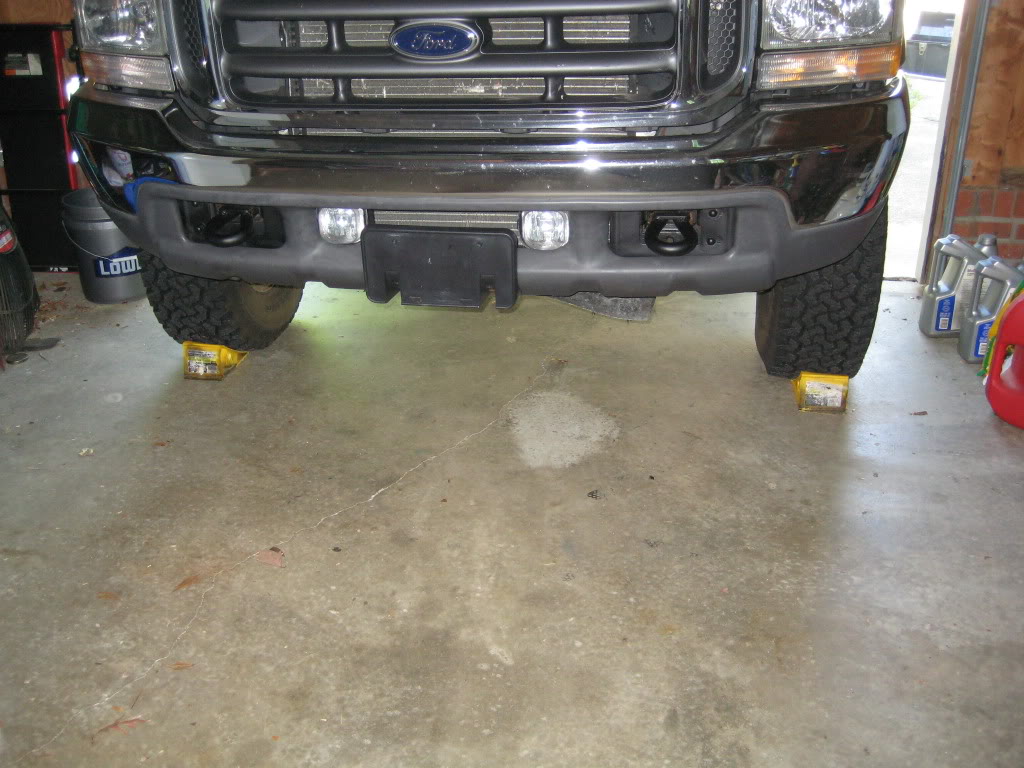
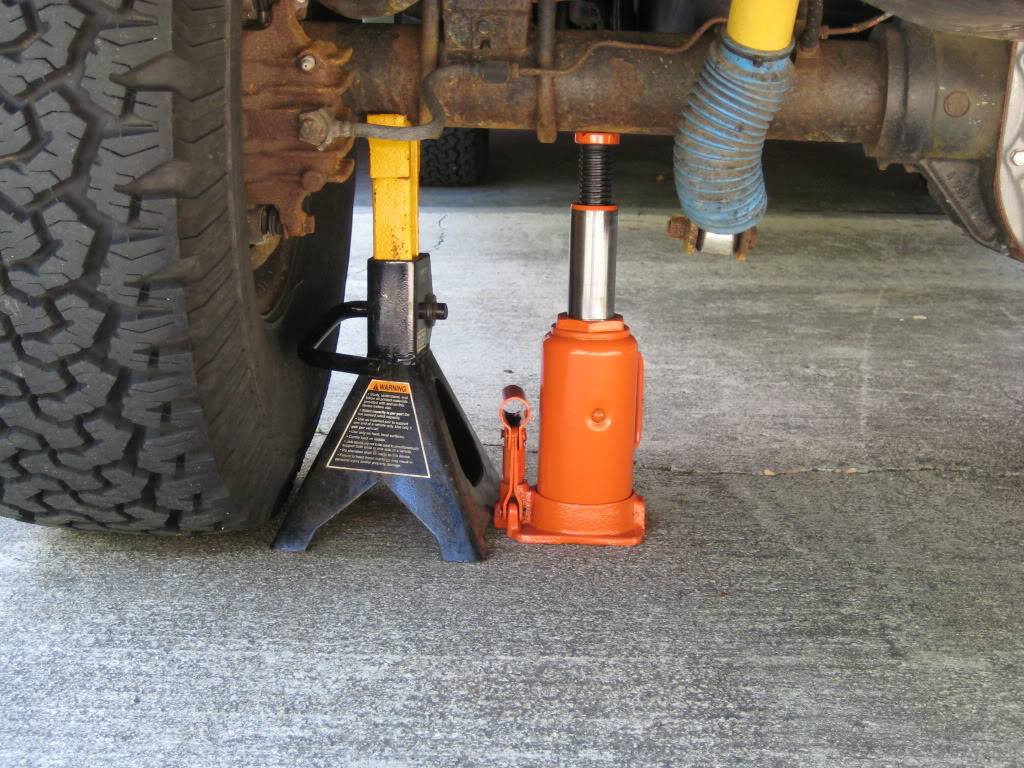
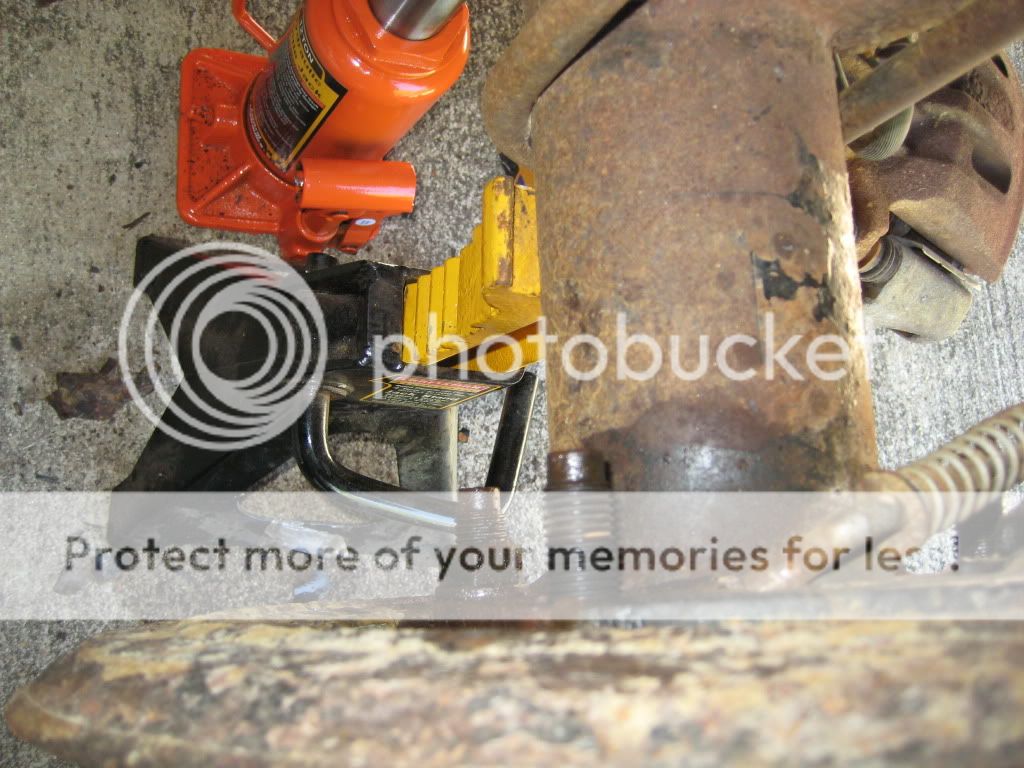
Step 2: Lift the wheel and set the axle on a jack stand. (never work on the jack)
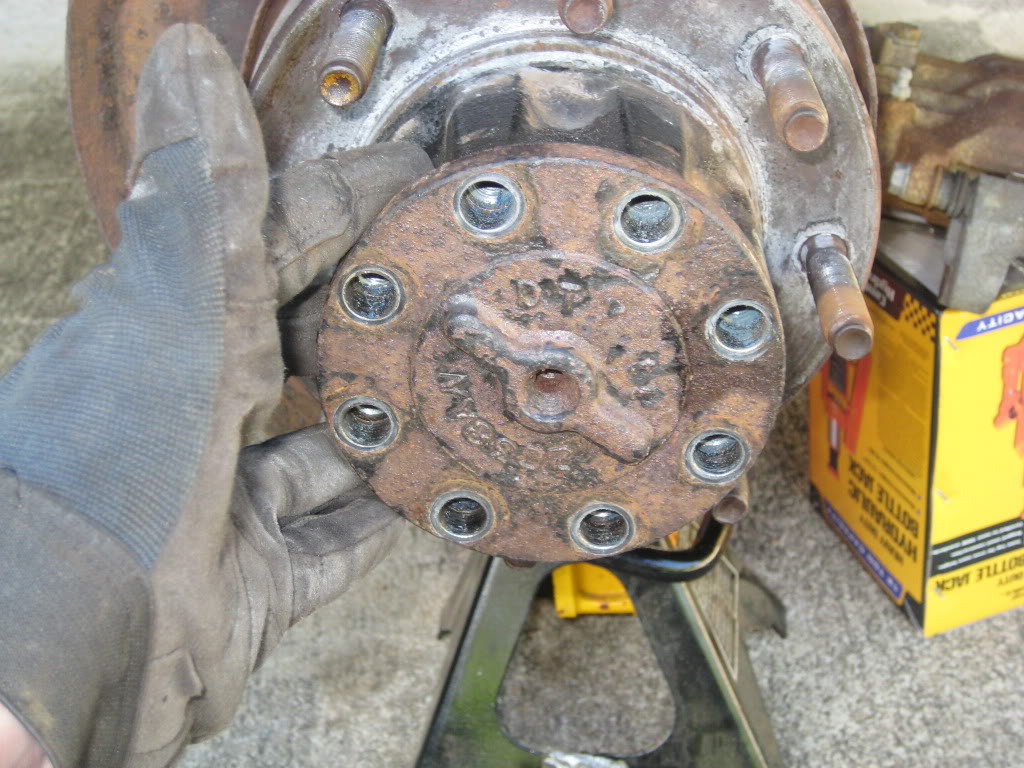
Step 3: Remove the wheel. 21mm socket
Step 4: Remove the brake caliper. 18mm socket
Either set it on something or use a ziptie or piece of wire to hang it from the leafspring. Do not let it dangle from the brake hose.

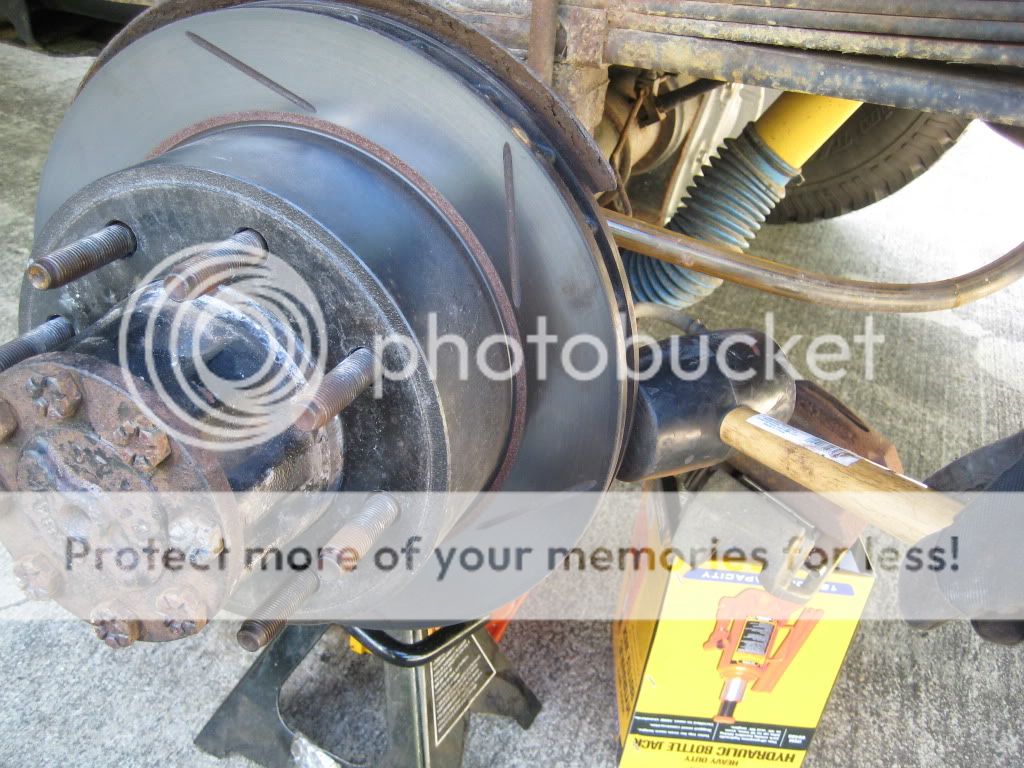
Step 5: Remove the rotor and set aside.
This might take some persuasion from a rubber mallet or dead blow hammer. If you use a steel hammer, make sure you protect the rotor with a piece of wood.

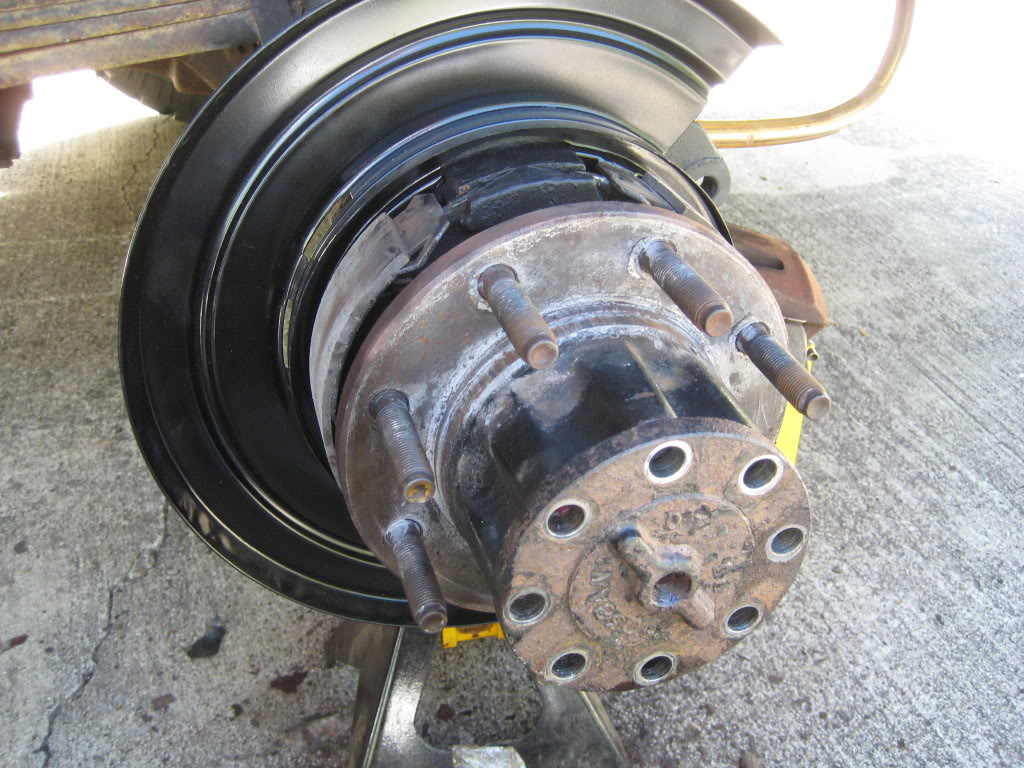
Step 6: Remove all 8 bolts holding the axle in. 18mm socket
Once the bolts are out, place a catch pan under the end of the axle because some oil will come out. Grab the plate at the end of the axle and pull the axle out. This might take a little effort to get past the o-ring, just be ready for it to let go.
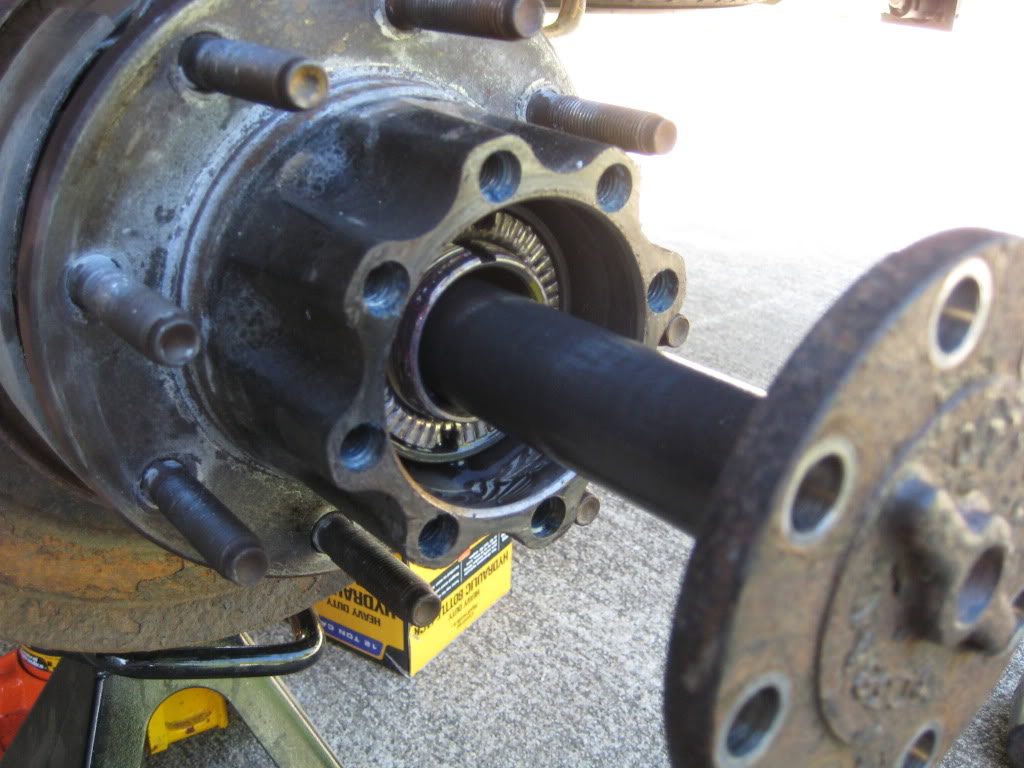
Step 7: Remove the spindle nut using a spindle nut socket. The 4 teeth on this socket engage the 4 notches in the nut. NOTE: the drivers side screws on/off backwards.
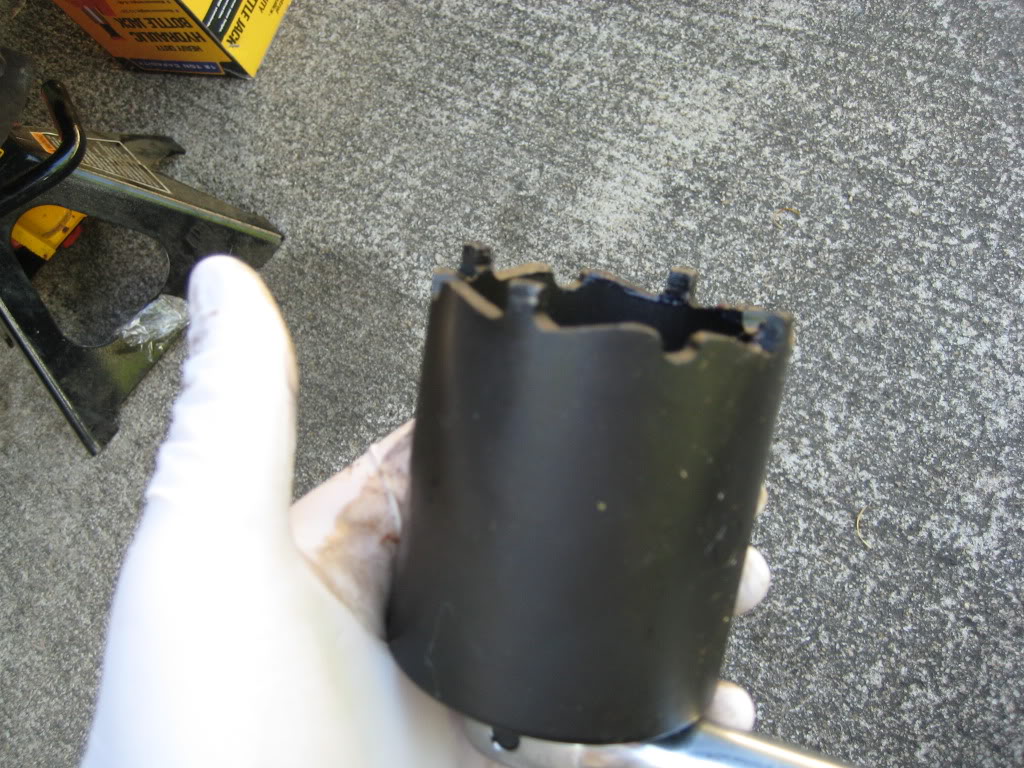
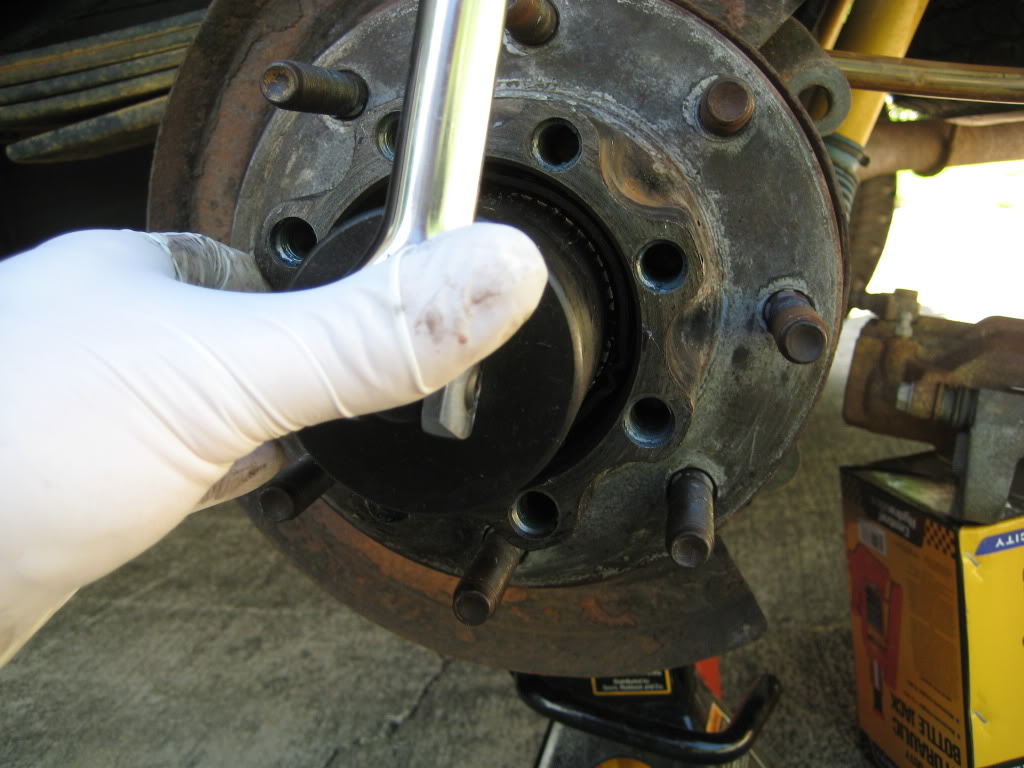
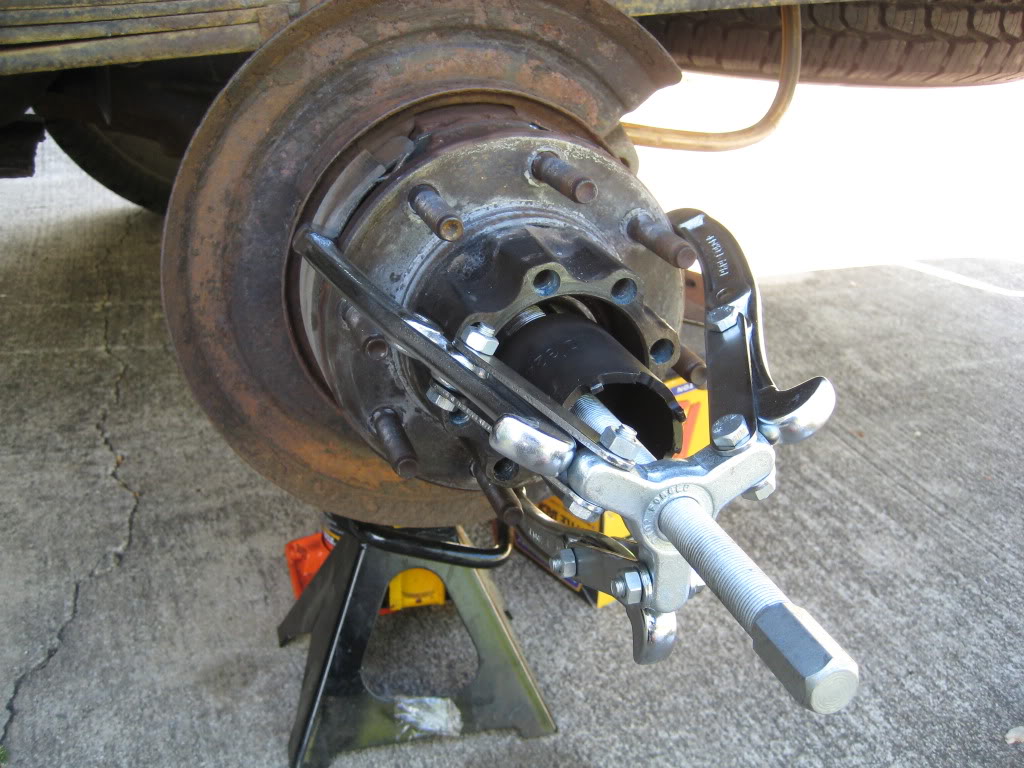
Step 8: Using a 3-jaw puller, remove the hub. You will need a step plate, but since i didn't have one, i used the spindle socket by turning it around and placing it over the axle tube end. Be careful not to let the hub fall on the ground when it comes off. There is a set of bearings behind the spindle nut, don't drop those either as they will fall out of the hub if you turn it face down.
EDIT(3/1/2012): Inspect the hub seals and replace if they have been damaged. Some people have noted that they can tear while pulling off the hub.
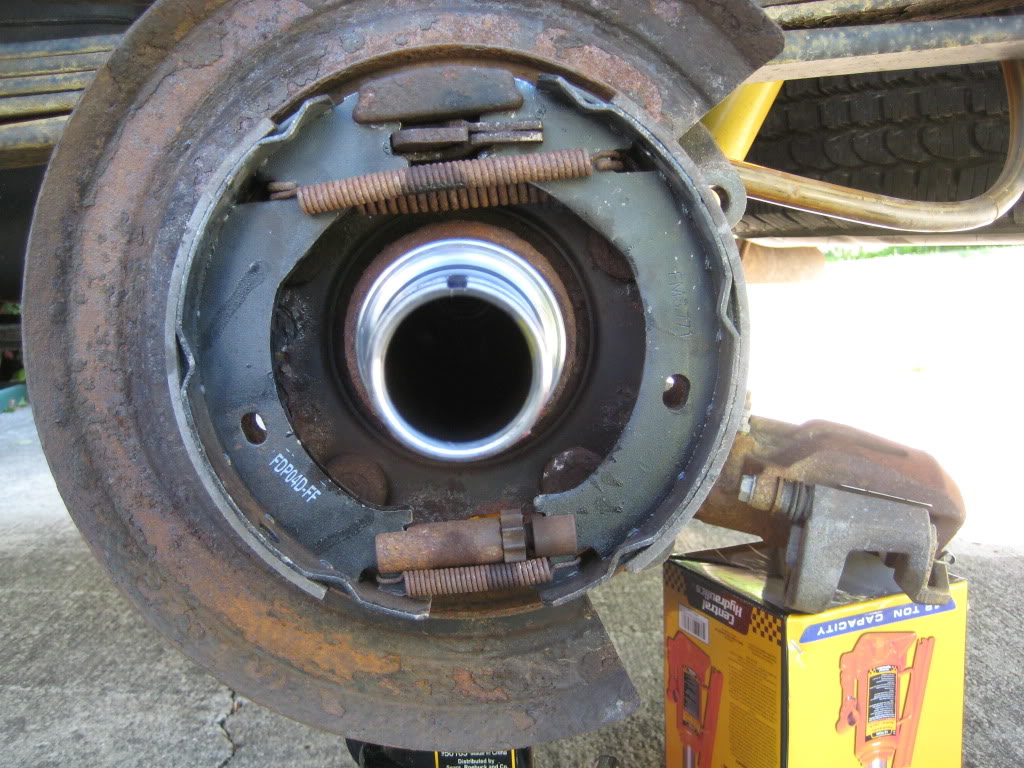
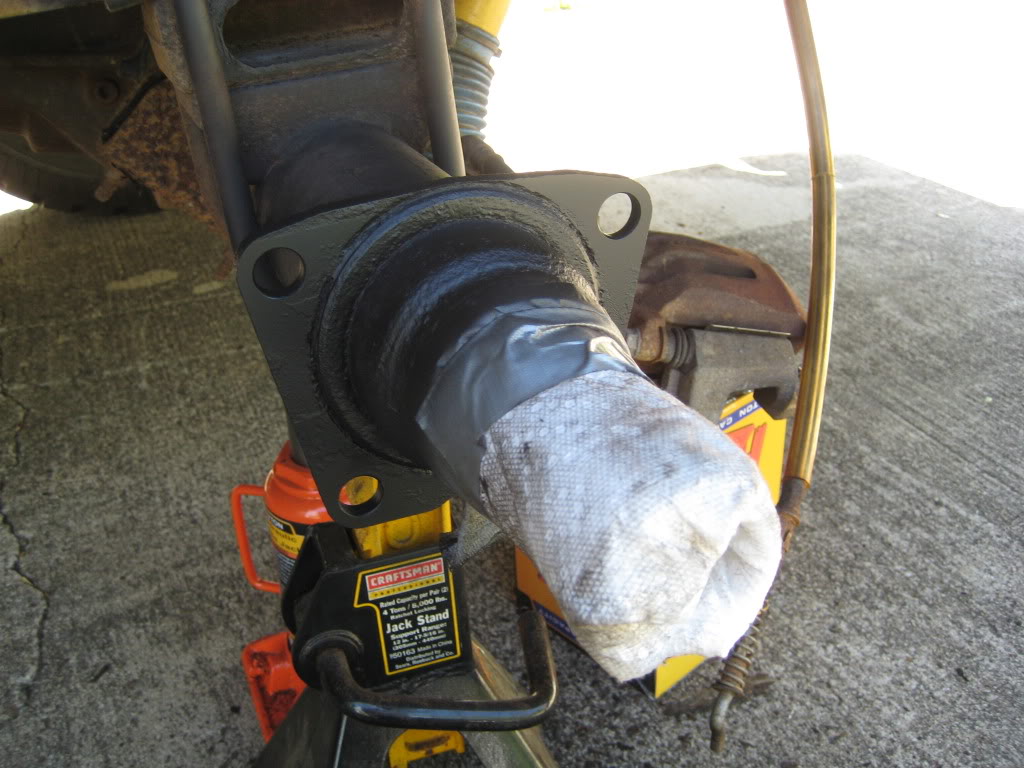
This will expose the parking brake. I like to wrap the shiny part of the axle end in paper towels and tape it on to protect it and minimize cleanup later, especially if you have the kind of rust problem i have.
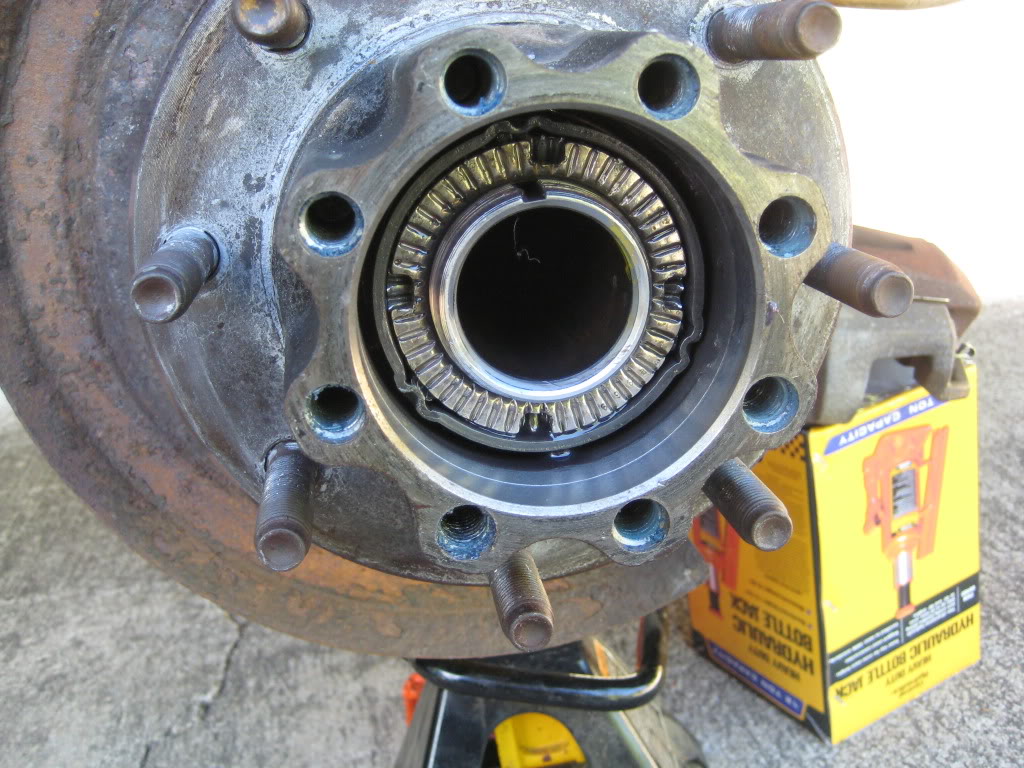
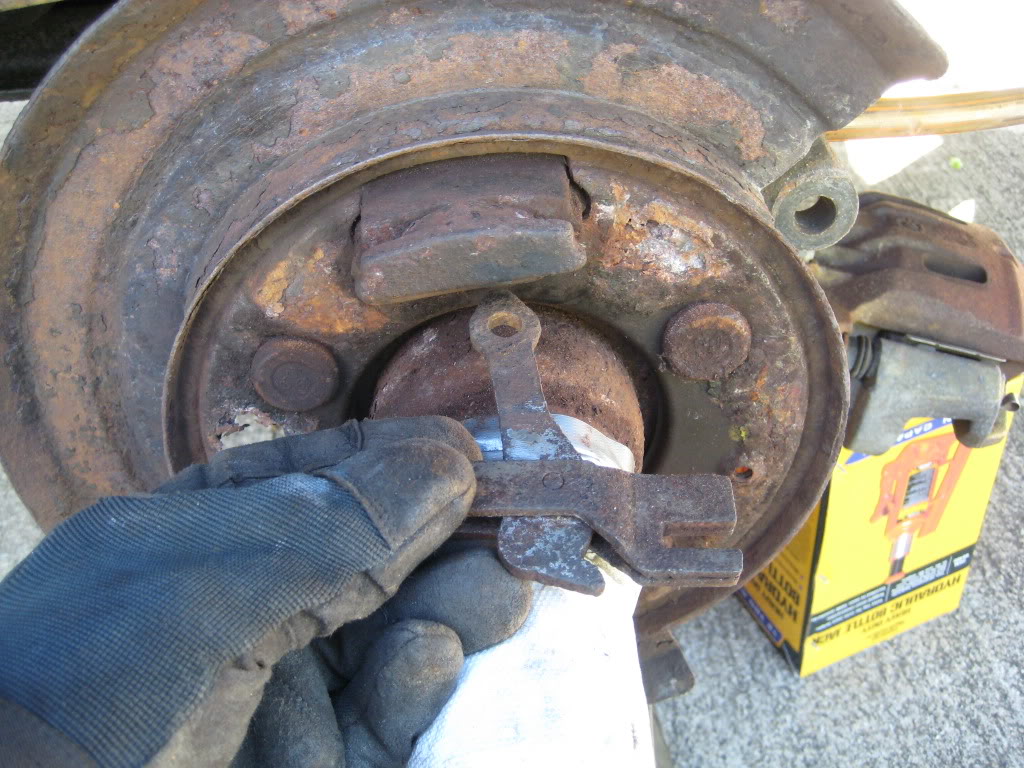
Step 9: Remove the parking brake shoes.
First remove the smaller-top spring. Then remove the bottom spring. Next remove the adjustment screw on the bottom... it just pulls away from the shoes when you pull them apart. Finally remove the left shoe by pulling it to the left (stretching the spring). Then work the right shoe free.
If you are just replacing shoes, then you can skip to the re-assembly section, otherwise continue.
Step 10: Remove the brake cable from the lever-thingy.
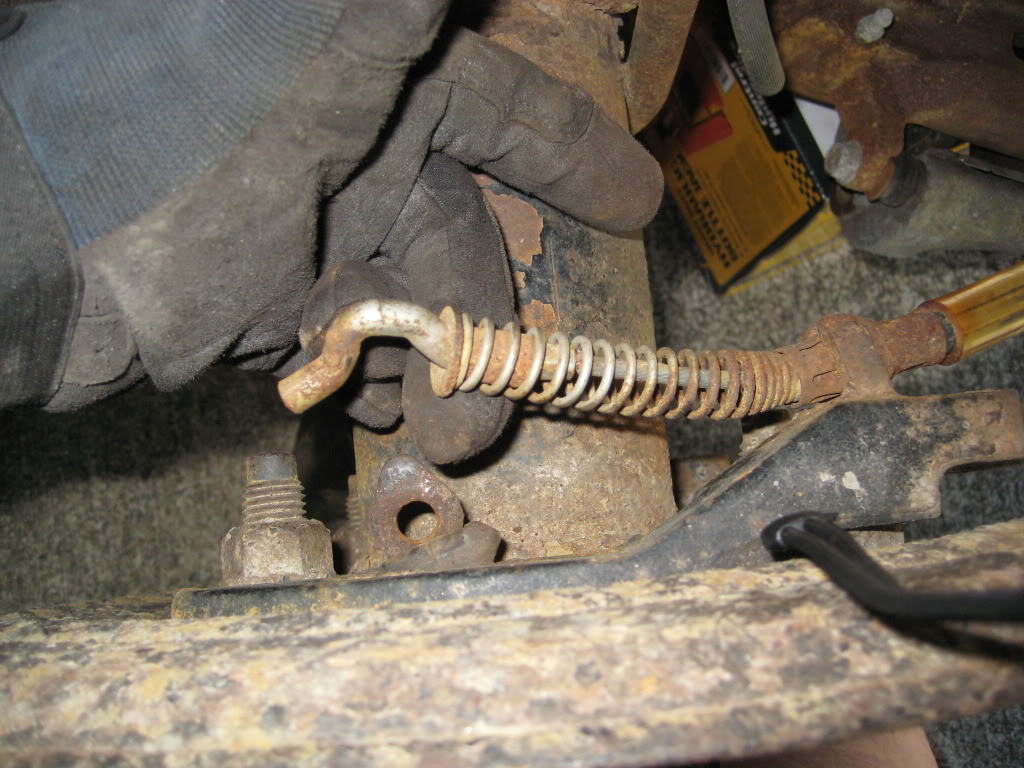
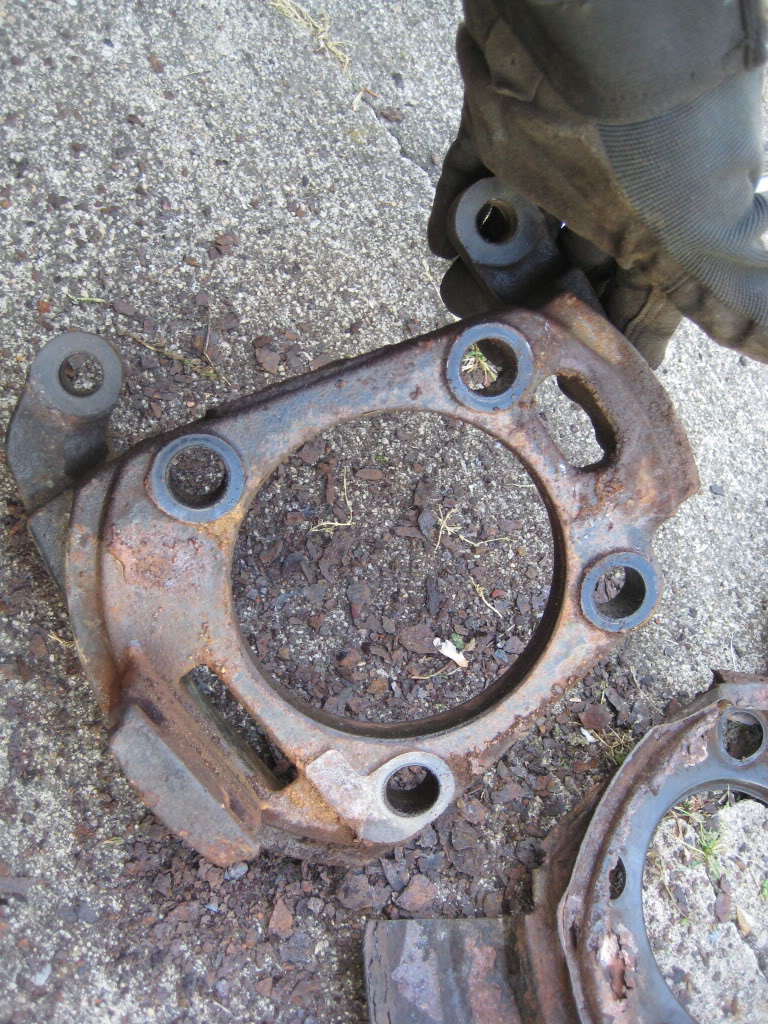
Step 11: Remove the backing plate. 24mm socket
Remove the 4 backing plate nuts. Some penitrating oil might help here. Tap on the bolts to break the backing plate assembly free of the axle. The bolts will stay stuck in the plate.
Step 12: Remove the bolts from the backing plate.
Use a hammer to tap the bolts free of the plate, this is relatively easy and shouldn't take much effort. Just be careful not to damage the threads on the bolts.
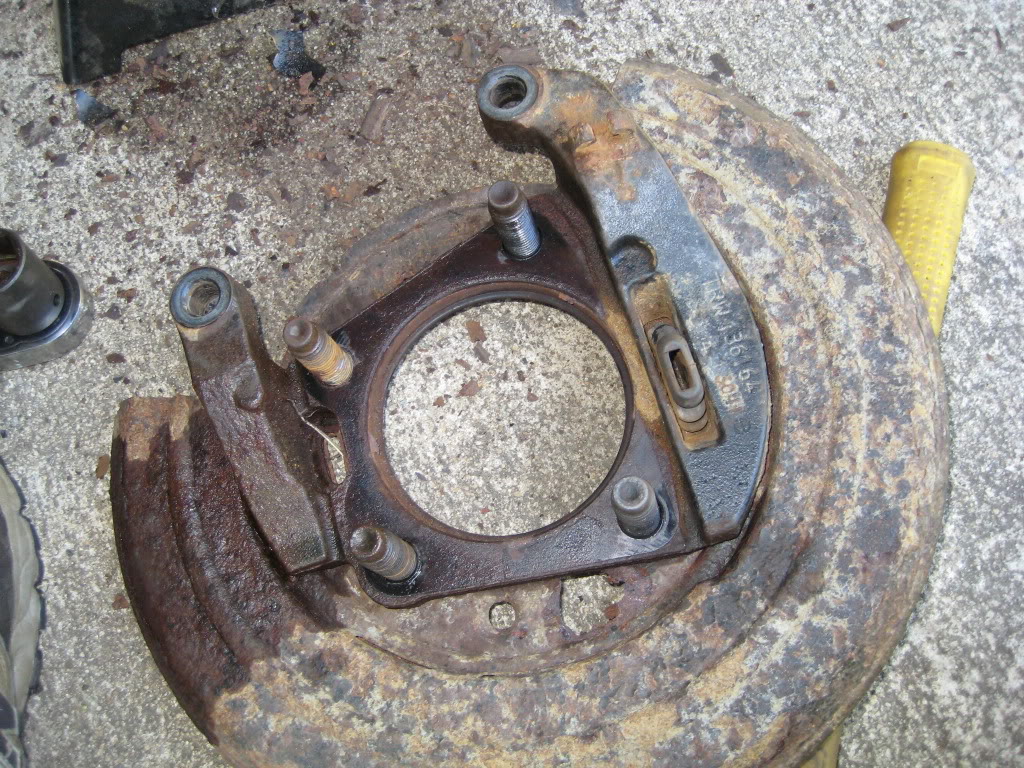
At this point just clean up all the parts and pieces. I chose to use a pneumatic scaler to remove all the rust i could. I then cleaned the parts with brake cleaner and painted them with black rattle-can paint. I also had to work on the lever thingy to loosen it up. It was completely rusted and didn't articulate at all. Beating it up with the scaler and hammer did the trick.
Lever thingy:
Paint:
Ok, finished installing the new backing plates and shoes today. Here is how i did it:
Step 1: Chock the wheels.
This is self explanatory, but make sure the parking brake is OFF.
Step 2: Lift the wheel and set the axle on a jack stand. (never work on the jack)
Step 3: Remove the wheel. 21mm socket
Step 4: Remove the brake caliper. 18mm socket
Either set it on something or use a ziptie or piece of wire to hang it from the leafspring. Do not let it dangle from the brake hose.
Step 5: Remove the rotor and set aside.
This might take some persuasion from a rubber mallet or dead blow hammer. If you use a steel hammer, make sure you protect the rotor with a piece of wood.
Step 6: Remove all 8 bolts holding the axle in. 18mm socket
Once the bolts are out, place a catch pan under the end of the axle because some oil will come out. Grab the plate at the end of the axle and pull the axle out. This might take a little effort to get past the o-ring, just be ready for it to let go.
Step 7: Remove the spindle nut using a spindle nut socket. The 4 teeth on this socket engage the 4 notches in the nut. NOTE: the drivers side screws on/off backwards.
Step 8: Using a 3-jaw puller, remove the hub. You will need a step plate, but since i didn't have one, i used the spindle socket by turning it around and placing it over the axle tube end. Be careful not to let the hub fall on the ground when it comes off. There is a set of bearings behind the spindle nut, don't drop those either as they will fall out of the hub if you turn it face down.
EDIT(3/1/2012): Inspect the hub seals and replace if they have been damaged. Some people have noted that they can tear while pulling off the hub.
This will expose the parking brake. I like to wrap the shiny part of the axle end in paper towels and tape it on to protect it and minimize cleanup later, especially if you have the kind of rust problem i have.
Step 9: Remove the parking brake shoes.
First remove the smaller-top spring. Then remove the bottom spring. Next remove the adjustment screw on the bottom... it just pulls away from the shoes when you pull them apart. Finally remove the left shoe by pulling it to the left (stretching the spring). Then work the right shoe free.
If you are just replacing shoes, then you can skip to the re-assembly section, otherwise continue.
Step 10: Remove the brake cable from the lever-thingy.
Step 11: Remove the backing plate. 24mm socket
Remove the 4 backing plate nuts. Some penitrating oil might help here. Tap on the bolts to break the backing plate assembly free of the axle. The bolts will stay stuck in the plate.
Step 12: Remove the bolts from the backing plate.
Use a hammer to tap the bolts free of the plate, this is relatively easy and shouldn't take much effort. Just be careful not to damage the threads on the bolts.
At this point just clean up all the parts and pieces. I chose to use a pneumatic scaler to remove all the rust i could. I then cleaned the parts with brake cleaner and painted them with black rattle-can paint. I also had to work on the lever thingy to loosen it up. It was completely rusted and didn't articulate at all. Beating it up with the scaler and hammer did the trick.
Lever thingy:
Paint:
#3
04-17-2011, 09:57 PM
Re-assembly is basically the same as the removal but in reverse.
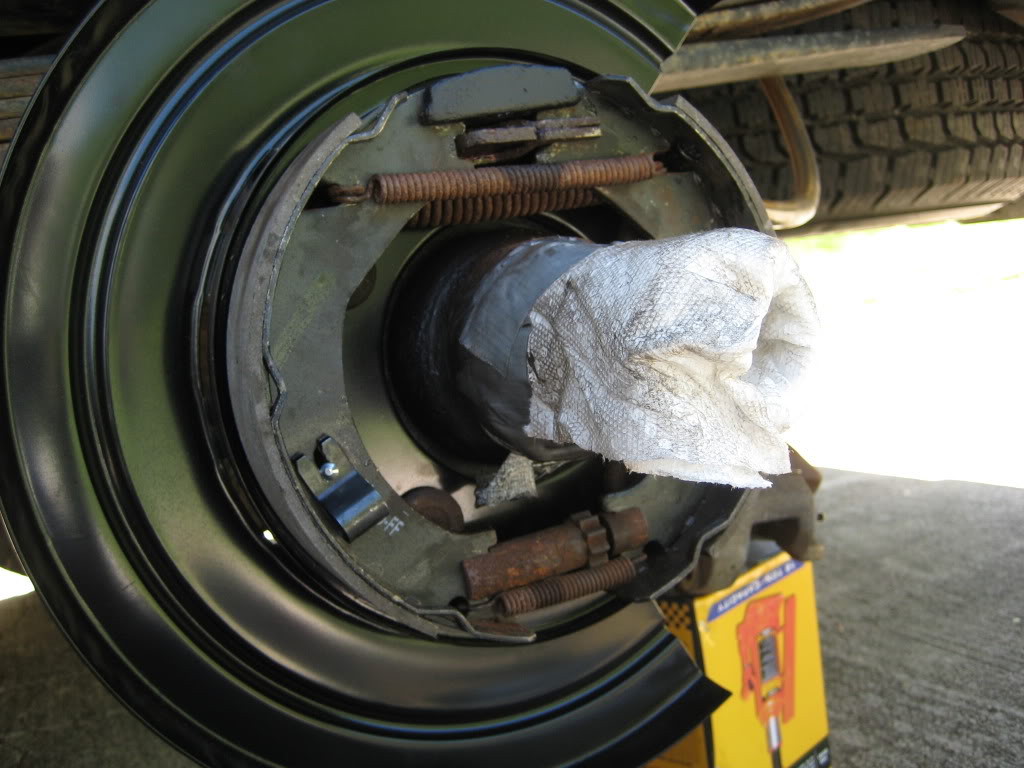
Step 1: Install the new rubber boot for the lever thingy and the adjustment hole cover in the new backing plate. Sandwich the new backing plate between the bolts and the heavy steel plate. place this assembly on the axle and tighten the bolts. It will help the bolts catch if you tap them in a bit with a hammer from the outside.
Things are starting to look better.
Step 2: Install the brake lever thingy into the rubber boot. Make sure it articulates freely, this is key to the parking brake operation. If there is any resistance or grinding, make sure you clean it up with some emery paper. I also worked some axle grease into it then wiped off the excess. I didn't get a good picture of this during re-assembly, but it goes in this way:

Step 3: Install the big spring into the upper-back side of both brake shoes. Put the right shoe in place first, then stretch the left shoe over the lever thingy. This might take some effort. Install the adjustment screw and the bottom spring. Install the pins and clips to hold the shoes in place. Finally, install the skinny top spring. Make sure you install it so the spring is up. Otherwise it will rub on the hub.
Step 4: Install the brake cable end back into the lever thingy.
Step 5: At this point you should roughly adjust the shoes to fit the rotor hat. It is much easier to do this now then to try to do it after everything is closed back up. If you don't have a parking break shoe gauge (i didn't) then I found it is easy enough to adjust the brake shoes until they just barely fit into the rotor hat. Keep sliding the rotor hat on then adjusting until the rotor just fits. Using this method, i didn't even have to re-adjust after my test drive.
Step 6: Remove the protective towel and tape and slide the hub assembly (with bearings) back over the axle end. Just in case you dropped the bearings, they go on so the wedge shape is pointing at the truck. Thread on the spindle nut and tighten.
------EDITED-------
If you are reusing bearings:
Tighten to 60 lbft then back off 7 notches (or clicks).
If you are using new bearings:
Tighten to 60 lbft then back off 5 notches (or clicks).
------EDITED------- (thanks 99f350sd)
Step 7: re-install the axle shaft:
I squirted a bunch of rear diff fluid in before i closed it up to give it some lubrication until some fluid gets a chance to flow in there.
Step 8: Re install the 8 axle bolts and tighten to 80 lbft
Step 9: Re install the rotor
Step 10: Re install the caliper
Step 11: Re install the wheel
Step 12: Take for a test drive and adjust parking brakes as needed.
Step 1: Install the new rubber boot for the lever thingy and the adjustment hole cover in the new backing plate. Sandwich the new backing plate between the bolts and the heavy steel plate. place this assembly on the axle and tighten the bolts. It will help the bolts catch if you tap them in a bit with a hammer from the outside.
Things are starting to look better.
Step 2: Install the brake lever thingy into the rubber boot. Make sure it articulates freely, this is key to the parking brake operation. If there is any resistance or grinding, make sure you clean it up with some emery paper. I also worked some axle grease into it then wiped off the excess. I didn't get a good picture of this during re-assembly, but it goes in this way:
Step 3: Install the big spring into the upper-back side of both brake shoes. Put the right shoe in place first, then stretch the left shoe over the lever thingy. This might take some effort. Install the adjustment screw and the bottom spring. Install the pins and clips to hold the shoes in place. Finally, install the skinny top spring. Make sure you install it so the spring is up. Otherwise it will rub on the hub.
Step 4: Install the brake cable end back into the lever thingy.
Step 5: At this point you should roughly adjust the shoes to fit the rotor hat. It is much easier to do this now then to try to do it after everything is closed back up. If you don't have a parking break shoe gauge (i didn't) then I found it is easy enough to adjust the brake shoes until they just barely fit into the rotor hat. Keep sliding the rotor hat on then adjusting until the rotor just fits. Using this method, i didn't even have to re-adjust after my test drive.
Step 6: Remove the protective towel and tape and slide the hub assembly (with bearings) back over the axle end. Just in case you dropped the bearings, they go on so the wedge shape is pointing at the truck. Thread on the spindle nut and tighten.
------EDITED-------
If you are reusing bearings:
Tighten to 60 lbft then back off 7 notches (or clicks).
If you are using new bearings:
Tighten to 60 lbft then back off 5 notches (or clicks).
------EDITED------- (thanks 99f350sd)
Step 7: re-install the axle shaft:
I squirted a bunch of rear diff fluid in before i closed it up to give it some lubrication until some fluid gets a chance to flow in there.
Step 8: Re install the 8 axle bolts and tighten to 80 lbft
Step 9: Re install the rotor
Step 10: Re install the caliper
Step 11: Re install the wheel
Step 12: Take for a test drive and adjust parking brakes as needed.

#5
04-17-2011, 10:28 PM
Postmaster

#6
04-17-2011, 10:31 PM
Freshman User
Join Date: Feb 2011
Location: Elgin, IL
Posts: 45
Likes: 0
Received 0 Likes
on
0 Posts
Excellent write-up and pictures. It's these type of things that give me the confidence to tackle larger projects for myself. The moment I read something that said "remove axle" I would have closed the book. Seeing your pictures with your 12-steps makes it seem less daunting. Thank you for sharing.
#7
04-18-2011, 01:12 AM

Elder User
Join Date: Oct 2007
Location: Montreal,Canada
Posts: 706
Likes: 0
Received 0 Likes
on
0 Posts
Trending Topics
#8
04-18-2011, 11:57 AM

Senior User
Join Date: Jan 2011
Location: SW Missouri
Posts: 178
Likes: 0
Received 0 Likes
on
0 Posts


#12
04-19-2011, 07:52 AM
#13
04-19-2011, 08:29 AM
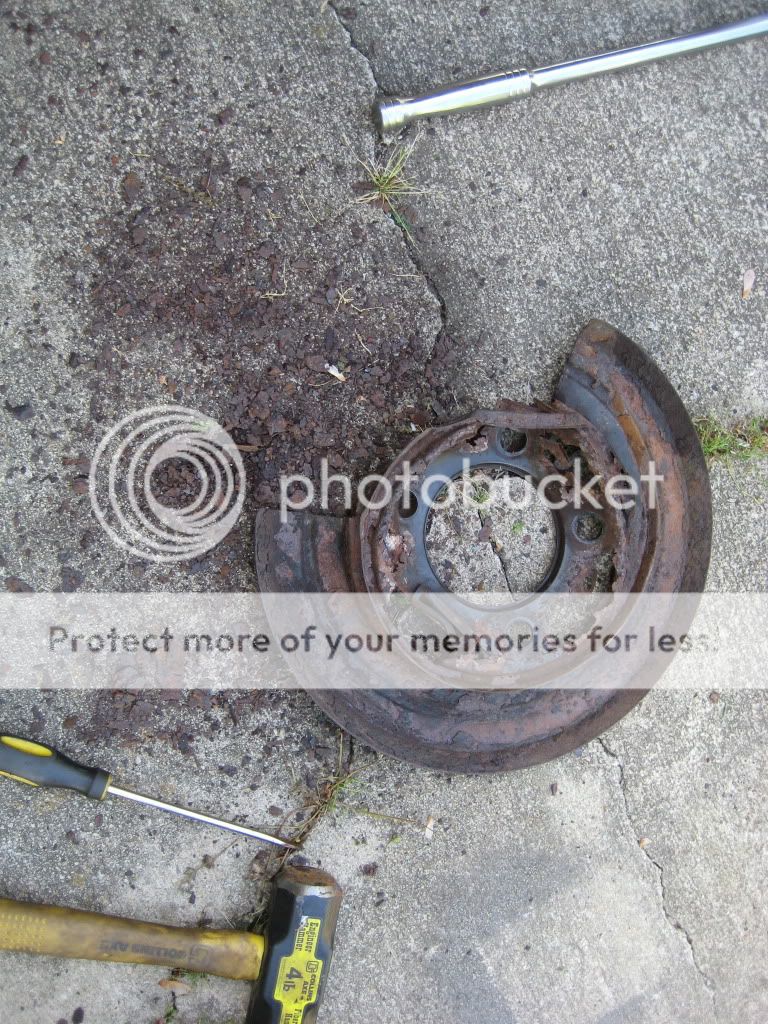
Yeah, this is why you shouldn't buy a used truck in MA. It was actually hard to peel the backing plate away from the thicker plate... they kept crumbling away as i pulled on them... You can see the giant pile of rust on my driveway.
#14
04-19-2011, 12:41 PM

Senior User
#15
05-01-2011, 07:17 AM

