Ford F-150: How to Replace Headlight Assembly
Whether you want to change the look of your headlights or simply need to swap out an old assembly for a new one, it's a fairly simple and straight forward task.
This article applies to the F-150 (2004-2014).
Replacing stock headlights with aftermarket units is a popular upgrade for F-150 owners and for good reason. Aftermarket lights almost always provide an easy and instant upgrade in the appearance of a truck, and depending on which lights you choose, they can be brighter and safer as well. Replacing headlights is an easy and quick modification that almost anyone can do with minimal skills and tools.

Materials Needed
- Phillips head screwdriver
- 10mm socket or wrench
Step 1 - Remove the headlight assembly
- Remove the pins and loosen the screw from the shield next to the headlight.
- Lift the shield back to gain access to the headlight.
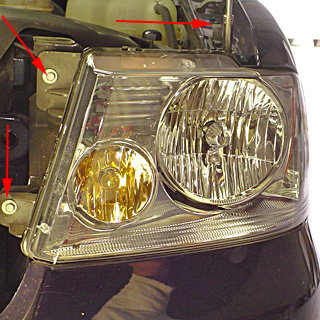
- Remove the two 10 mm screws holding the headlight assembly in place.
- Pull the clip on top of the headlight assembly up a little, and pull the assembly forward to remove the headlight.
- Twist and pull to remove signal light, headlight bulb, and side market light that are plugged in to the back of the assembly.
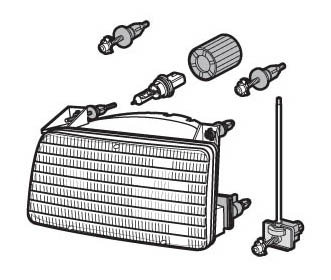
Figure 1. Headlight assembly diagram. 
Figure 2. Pull the headlight assembly out.
Step 2 - Install the new headlight assembly
- Insert and twist signal light, headlight bulb, and side market light to secure in new headlight assembly.
- Slide assembly into place and reinsert two 10 mm bolts.
- Replace plastic shield and tighten screws after pushing grommets down.
- Test headlights before heading out on the road.
Related Discussion
- Headlight Assembly Removal - Ford-Trucks.com