

J.Webster Designs Ultimate Family Hauler and Business Work Horse


Thread Starter
|
Cross-Country
Joined: Jun 2017
Posts: 72
Likes: 0
J.Webster Designs Ultimate Family Hauler and Business Work Horse Build Thread!
Hello everyone! Just wanted to introduce myself and announce that I have made the plunge into Excursion ownership!
I recently purchased a 2001 7.3L 2WD Excursion that has 200k on the clock. After wracking our brains about what to buy for our family needs, my wife and I finally remembered a conversation that we had while in high school. We would make holiday trips to Lake of the Ozarks with my family for boating trips. Back then, the Excursions were brand new and the people driving them to the lakes were towing very large powerboats (Obvious envy).
I told her: "One day, I am going to get an Excursion and build the ultimate family hauler out of it." As time went on, We got married and we forgot completely about the Excursion. We were looking at new super crew trucks to meet our current and future family needs. But no matter which truck we looked at, they always failed the needs in one form or another. So while I was on a cross country trip displaying one of my newest custom built motorcycles at shows, I saw an excursion cruising next to me on the highway and it all clicked... All the boxes were checked AND I could build it to meet our exact needs and wants!
2 weeks later, we bought our Excursion and haven't looked back since!


The last owner was lacking on maintenance and also made one modification to the truck that has to be fixed. So currently, I am working on catching up on maintenance, repairing neglected broken systems and starting to clean the truck back to my standards before starting the fun stuff.
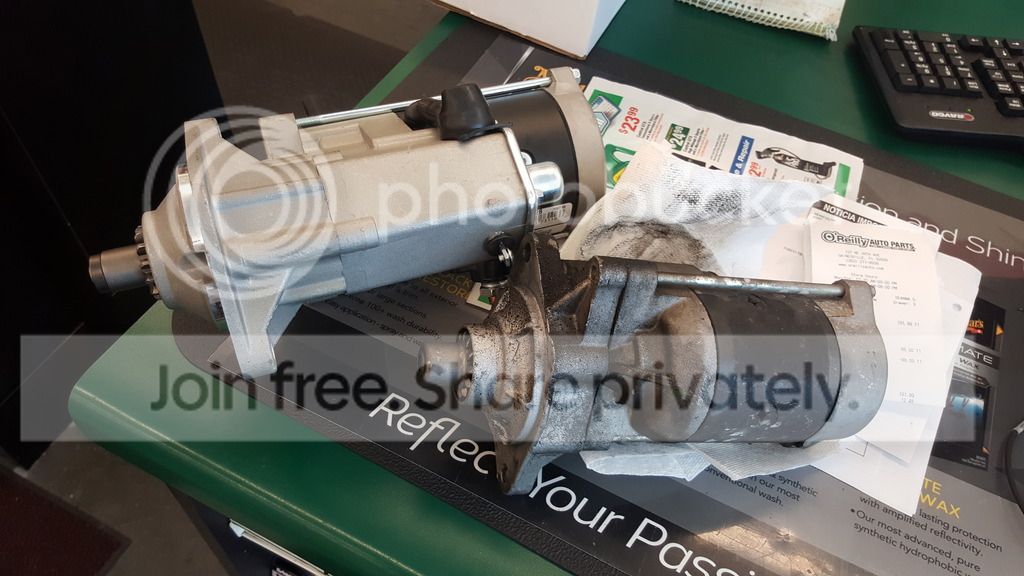
first thing that needed to be addressed was the starter. It took a dump the 1st day I got it home. So I replaced it with a Nippon Denso clone.
I also saw mention of the roof rack causing issues on these trucks. So naturally I climbed up to see what kind of mess I would have to deal with. Luckily, my rust is not as bad as some I have seen. I will be shaving the roof rack and the mounting nutserts in the roof skin all together to eliminate the future possibility of this happening again. As you can see, the roof paint is pretty well roached as well. So after I shave and smooth the roof skin, it will get a fresh coat of paint.

This is the most current position of the truck. I will try to keep this thread up to date as I go through the process of repairing and modifying our newest family member!
Cheers!
I recently purchased a 2001 7.3L 2WD Excursion that has 200k on the clock. After wracking our brains about what to buy for our family needs, my wife and I finally remembered a conversation that we had while in high school. We would make holiday trips to Lake of the Ozarks with my family for boating trips. Back then, the Excursions were brand new and the people driving them to the lakes were towing very large powerboats (Obvious envy).
I told her: "One day, I am going to get an Excursion and build the ultimate family hauler out of it." As time went on, We got married and we forgot completely about the Excursion. We were looking at new super crew trucks to meet our current and future family needs. But no matter which truck we looked at, they always failed the needs in one form or another. So while I was on a cross country trip displaying one of my newest custom built motorcycles at shows, I saw an excursion cruising next to me on the highway and it all clicked... All the boxes were checked AND I could build it to meet our exact needs and wants!
2 weeks later, we bought our Excursion and haven't looked back since!


The last owner was lacking on maintenance and also made one modification to the truck that has to be fixed. So currently, I am working on catching up on maintenance, repairing neglected broken systems and starting to clean the truck back to my standards before starting the fun stuff.
first thing that needed to be addressed was the starter. It took a dump the 1st day I got it home. So I replaced it with a Nippon Denso clone.

I also saw mention of the roof rack causing issues on these trucks. So naturally I climbed up to see what kind of mess I would have to deal with. Luckily, my rust is not as bad as some I have seen. I will be shaving the roof rack and the mounting nutserts in the roof skin all together to eliminate the future possibility of this happening again. As you can see, the roof paint is pretty well roached as well. So after I shave and smooth the roof skin, it will get a fresh coat of paint.

This is the most current position of the truck. I will try to keep this thread up to date as I go through the process of repairing and modifying our newest family member!
Cheers!
Thread Starter
|
Cross-Country
Joined: Jun 2017
Posts: 72
Likes: 0
So one of the original owners did a shoddy 2nd tank install at some point in time. In doing so, he cut a large hole through the skid plate and through the fuel tank itself. He also modified the fuel filler neck and welded hangars to the frame. The person that I bought the truck from was having all kinds of issues with this second tank, so they ripped it all out and installed some sort of plastic cover using self tapping screws and a BUNCH of RTV sealant. Check out the pictures below.
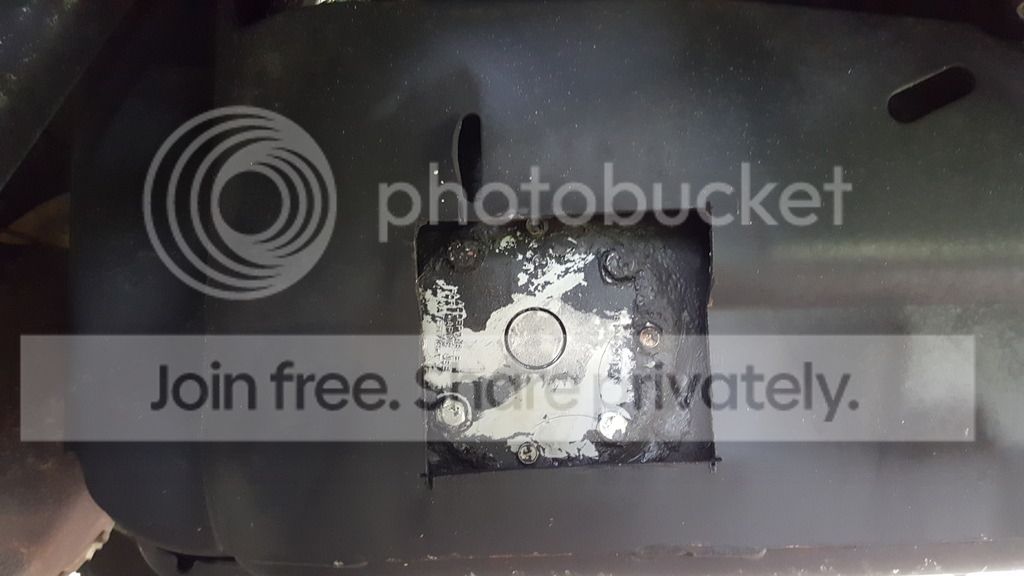


As you can see, that plastic plug that they screwed onto the fuel tank has developed multiple cracks and is starting to fail. I am glad that I caught this shoddy repair early before it failed on a trip someplace and let loose an entire tank worth of fuel.
I found a replacement fuel tank an hour from my house and quickly drove down and picked it up. The skid plate in my truck is in better condition than the replacement. So I will chop out a patch panel from the donor skid plate and weld up the original skid plate. I will also be chopping off all the hangars and installing a new fuel filler neck.

Since I will have the fuel tank out, I will do the "Hutch" and "Harpoon" mods to the new fuel tank before it goes back in the truck.
I first need to figure out how to thoroughly clean out the inside of this replacement fuel tank. Anyone have any recommendations or links they can point me to?
Also, Is there anything else I should do while I have the tank out?
Posting Guru
Joined: Sep 2015
Posts: 1,320
Likes: 9
From: Central Florida
[QUOTE=
Also, Is there anything else I should do while I have the tank out?[/QUOTE]
Check to make sure you have the updated hitch bolts, nows the time to change them.
As to cleaning the tank, once you drain it let it sit in the sun for 3-4 hours to evap the fumes, then get purple stuff and spray it in there and add some water and swish it around.
Rinse and drain and let it sit in the sun till dry.
Thats how I clean my tanks. If you were doing metal tanks, then you could weld.
Moderator


Joined: Jul 2010
Posts: 12,041
Likes: 1,536
From: Media PA

All years of the EX came with the exact same trailer hitch, however the earlier rigs came with smaller diameter bolts attaching them to the frame. These smaller bolts are why the earlier rigs are only rated to a 10,000 max trailer weight, the later EXs with the larger bolts are rated for 12,500 lbs. The only difference is the bolt size, the new larger bolts are available at the dealer.

Also two of the bolts have round heads to make it more difficult to remove the hitch as the hitch was required by the Feds as crash protection for the big station wagons. When the tank is out it is very easy to use a pipe wrench on those round headed bolts and then swap them out with hex heads that are much easier to deal with. If removing any of the hitch bolts be aware that the factory used blue thread locker on them so a small propane torch works well to soften that up.
Thread Starter
|
Cross-Country
Joined: Jun 2017
Posts: 72
Likes: 0
Romanova - They are load range E. I think they are just cheapo tires from Pep Boys. They were on the truck when I bought it. not a bad tire after driving on them. I doubt they will last long however.
Trending Topics
Thread Starter
|
Cross-Country
Joined: Jun 2017
Posts: 72
Likes: 0
WE3ZS - Roger that. I was wondering what the differences in ratings were. I will be ordering up the bolts that I need so that they are here and waiting to go in the truck when the new tank goes in! Cheers!


 Stewart should feel it's presents shortly and come chime in as well
Thread Starter
|
Cross-Country
Joined: Jun 2017
Posts: 72
Likes: 0
Apocalypse - haha. Totally didn't mean to snap the other trucks in that picture. It isn't a lightning. They didn't make them for the 2004-2008 body style. So I ordered a truck to be built that was as close as I could get. Regular cab, 6.5ft bed, flare side FX2 package with the 5.4L. I then lowered it with an Eibach lowering kit and will be adding a Whipple Supercharger to it. The other is my first truck. a 1979 Ford Bronco with a 400ci built motor. It will be getting a lot of attention at some point in the future.
Moderator
Joined: Jul 2010
Posts: 12,041
Likes: 1,536
From: Media PA
When the tank is out you will have access to that area of the frame and underbody that is normally blocked, so it would be good time to do some cleaning and preservation work while under there.
When I installed my new Torklift SuperHitch I cleaned, scuffed and painted the underbody with Chassis Saver silver aluminum first the top coated it with gloss black and shot the frame with rubberized undercoating.


When I installed my new Torklift SuperHitch I cleaned, scuffed and painted the underbody with Chassis Saver silver aluminum first the top coated it with gloss black and shot the frame with rubberized undercoating.
Thread Starter
|
Cross-Country
Joined: Jun 2017
Posts: 72
Likes: 0
WE3ZS - That was definitely on my list as I had the tank out. My truck does not have much surface rust on the underside of it. Primarily just dirt build up. I am thinking I will give it a good degreasing, scrubbing and washing then apply a good coat of Rustoleum semi-gloss over the frame and body panels. I have not had good experience with products like chassis saver or POR-15 sticking to non rusted metal. I am always open to critique in my processes as most of my experience is in fabrication and building custom motorcycles. So learning some stuff being a first time diesel owner. I used to work on hotrods and restoring old cars with my dad growing up. I also built the bronco back when I was in high school when I first bought it and learned some lessons on what lasts and what doesn't. rubberized undercoat didn't hold up on that truck over the years, so I wont be going that route.
Super Moderator

Joined: May 2004
Posts: 29,379
Likes: 116
From: Central Coast of CA

Stewart
Posting Guru
Joined: Sep 2015
Posts: 1,320
Likes: 9
From: Central Florida
Leesburg /Eustis